|
// Spirograph simulator for MPCNC used as plotter |
|
// Ed Nisley KE4ZNU – 2017-12-23 |
|
// Adapted for Guillioche plots with ball point pens – 2018-09-25 |
|
// 2019-06 Text on circular arcs |
|
// 2019-08 Coordinate pruning |
|
// 2019-09 Allow L > 1.0, proper scale to fit disk |
|
|
|
// Spirograph equations: |
|
// https://en.wikipedia.org/wiki/Spirograph |
|
// Loosely based on GCMC cycloids.gcmc demo: |
|
// https://gitlab.com/gcmc/gcmc/tree/master/example/cycloids.gcmc |
|
|
|
//—– |
|
// Library routines |
|
|
|
include("tracepath.inc.gcmc"); |
|
include("engrave.inc.gcmc"); |
|
|
|
//—– |
|
// Define useful constants |
|
|
|
SafeZ = 10.00mm; |
|
TravelZ = 1.00mm; |
|
|
|
AngleStep = 0.1deg; |
|
|
|
Snuggly = 0.2mm; // prune coordinates when closer |
|
|
|
TextFont = FONT_HSANS_1_RS; |
|
TextSize = [1.5mm,1.5mm]; |
|
|
|
//—– |
|
// Command line parameters |
|
|
|
// -D DiskType="string" |
|
|
|
if (!isdefined("DiskType")) { |
|
DiskType = "CD"; |
|
} |
|
|
|
if (DiskType != "CD" && // list all possible types |
|
DiskType != "3.5" && |
|
DiskType != "TrimCD" |
|
) { |
|
error("Unknown disk type: ",DiskType); |
|
} |
|
|
|
comment("Disk type: ",DiskType); // default is "CD" |
|
|
|
Margin = 1.5mm; // clamping margin around disk OD |
|
|
|
DiskDia = (DiskType == "3.5") ? 95.0mm : |
|
(DiskType == "TrimCD") ? 95.0mm : |
|
120.0mm; |
|
OuterDia = DiskDia – 2*Margin; |
|
OuterRad = OuterDia / 2; |
|
comment("Outer Diameter: ",OuterDia); |
|
comment(" Radius: ",OuterRad); |
|
|
|
InnerDia = (DiskType == "3.5") ? 33.0mm : |
|
(DiskType == "TrimCD") ? 38.0mm : |
|
38.0mm; |
|
InnerDia = InnerDia; |
|
InnerRad = InnerDia / 2; |
|
comment("Inner Diameter: ",InnerDia); |
|
comment(" Radius: ",InnerRad); |
|
|
|
MidDia = (InnerDia + OuterDia) / 2; |
|
MidRad = MidDia / 2; |
|
comment("Mid Diameter: ",MidDia); |
|
comment(" Radius: ",MidRad); |
|
|
|
LegendDia = (DiskType == "3.5") ? 31.0mm : |
|
(DiskType == "TrimCD") ? 31.0mm : |
|
30.0mm; |
|
LegendDia = LegendDia; |
|
LegenRad = LegendDia / 2; |
|
comment("Legend Diameter: ",LegendDia); |
|
comment(" Radius: ",LegenRad); |
|
|
|
// -D PRNG_Seed=integer non-zero random number seed |
|
|
|
if (isdefined("PRNG_Seed")) { // did we get a seed? |
|
if (!PRNG_Seed) { // .. it must not be zero |
|
PRNG_Seed = 347221084; |
|
} |
|
} |
|
else { // no incoming seed, so use a constant |
|
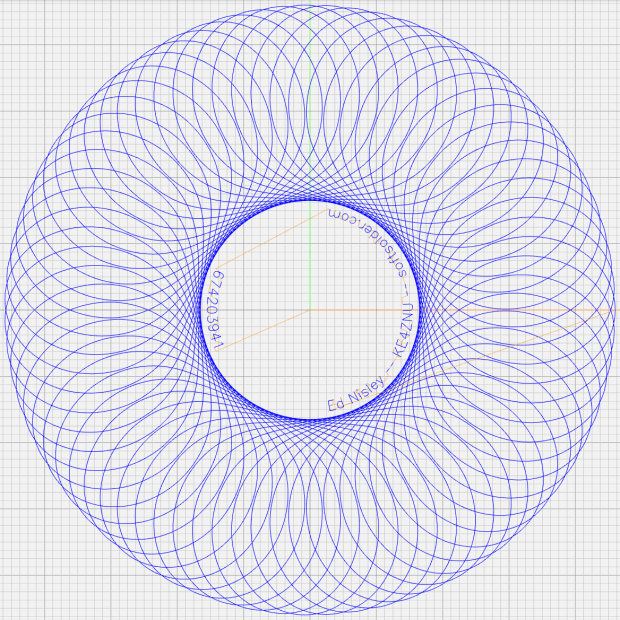
PRNG_Seed = 674203941; |
|
} |
|
comment("PRNG seed: ",PRNG_Seed); |
|
|
|
PRNG_State = PRNG_Seed; // set initial state |
|
|
|
// -D various other useful tidbits |
|
// add unit to speeds and depths: 2000mm / -3.00mm / etc |
|
|
|
if (!isdefined("PlotSpeed")) { |
|
PlotSpeed = 2400mm; |
|
} |
|
|
|
if (!isdefined("TextSpeed")) { |
|
TextSpeed = 2000mm; |
|
} |
|
|
|
// Force is proportional to depth, but you must know the coefficent! |
|
|
|
if (!isdefined("PlotZ")) { |
|
PlotZ = (DiskType == "3.5") ? -3.00 : -0.25mm; |
|
} |
|
|
|
if (!isdefined("Legend")) { |
|
Legend = "Ed Nisley – KE4ZNU – softsolder.com"; |
|
} |
|
|
|
|
|
|
|
//—– |
|
// Spirograph tooth counts mooched from: |
|
// http://nathanfriend.io/inspirograph/ |
|
// Stators includes both inside and outside counts, because we're not fussy |
|
|
|
// Stator with prime tooth count will always produce that number of lobes |
|
// Prime numbers: |
|
// https://en.wikipedia.org/wiki/Prime_number |
|
// Table of primes: |
|
// https://www.factmonster.com/math/numbers/prime-numbers-facts-examples-table-all-1000 |
|
|
|
// Must be sorted and should not exceed 127 teeth, which will make plenty of lobes |
|
|
|
Stators = [37,41,43,47,53,59,61,67,71,73,79,83,89,97,101,103,107,109,113,127]; |
|
|
|
// Rotor tooth count chosen randomly, these are for the old method |
|
|
|
Rotors = [24, 30, 32, 36, 40, 45, 48, 50, 52, 56, 60, 63, 64, 72, 75, 80, 84]; |
|
//Rotors = [5,7,11,13,17,19,23,31,37,41,47]; |
|
|
|
//—– |
|
// Greatest Common Divisor |
|
// https://en.wikipedia.org/wiki/Greatest_common_divisor#Using_Euclid's_algorithm |
|
// Inputs = integers without units |
|
|
|
// This is unused with prime rotor tooth counts left here for completeness |
|
|
|
function gcd(a,b) { |
|
if (!isnone(a) || isfloat(a) || !isnone(b) || isfloat(b)) { |
|
error("GCD params must be dimensionless integers. a: ",a," b: ",b); |
|
} |
|
|
|
local d = 0; // power-of-two counter |
|
|
|
while (!((a | b) & 1)) { // remove and tally common factors of two |
|
a >>= 1; |
|
b >>= 1; |
|
d++; |
|
} |
|
|
|
while (a != b) { |
|
if (!(a & 1)) {a >>= 1;} // discard non-common factor of 2 |
|
elif (!(b & 1)) {b >>= 1;} // … likewise |
|
elif (a > b) {a = (a – b) >> 1;} // gcd(a,b) also divides a-b |
|
else {b = (b – a) >> 1;} // … likewise |
|
} |
|
|
|
local GCD = a*(1 << d); // form gcd |
|
|
|
// message("GCD: ",GCD); |
|
return GCD; |
|
|
|
} |
|
|
|
//—– |
|
// Max and min functions |
|
|
|
function max(x,y) { |
|
return (x > y) ? x : y; |
|
} |
|
|
|
function min(x,y) { |
|
return (x < y) ? x : y; |
|
} |
|
|
|
//—– |
|
// Pseudo-random number generator |
|
// Based on xorshift: |
|
// https://en.wikipedia.org/wiki/Xorshift |
|
// http://www.jstatsoft.org/v08/i14/paper |
|
// Requires initial state from calling script |
|
// -D "PRNG_Seed=whatever" |
|
// Bash (et. al.) supplies nine reasonably random digits from $(date +%N) |
|
|
|
function XORshift() { |
|
|
|
local x = PRNG_State; // fetch current state |
|
|
|
x ^= x << 13; |
|
x ^= x >> 17; |
|
x ^= x << 5; |
|
|
|
PRNG_State = x; // save state for next invocation |
|
return x; |
|
|
|
} |
|
|
|
//—– |
|
// Bend text around an arc |
|
|
|
function ArcText(TextPath,Center,Radius,BaseAngle,Align) { |
|
|
|
PathLength = TextPath[-1].x; |
|
Circumf = 2*pi()*Radius; |
|
TextAngle = to_deg(360 * PathLength / Circumf); |
|
|
|
AlignAngle = BaseAngle + (Align == "Left" ? 0 : |
|
Align == "Center" ? -TextAngle / 2 : |
|
Align == "Right" ? -TextAngle : |
|
0); |
|
|
|
ArcPath = {}; |
|
|
|
foreach(TextPath; pt) { |
|
if (!isundef(pt.x) && !isundef(pt.y) && isundef(pt.z)) { // XY motion, no Z |
|
r = Radius – pt.y; |
|
a = 360deg * (pt.x / Circumf) + AlignAngle; |
|
ArcPath += {[r*cos(a) + Center.x, r*sin(a) + Center.y,-]}; |
|
} |
|
elif (isundef(pt.x) && isundef(pt.y) && !isundef(pt.z)) { // no XY, Z up/down |
|
ArcPath += {pt}; |
|
} |
|
else { |
|
error("Point is not pure XY or pure Z: " + to_string(pt)); |
|
} |
|
} |
|
|
|
return ArcPath; |
|
|
|
} |
|
|
|
|
|
|
|
//—– |
|
// Set up gearing |
|
|
|
s = (XORshift() & 0xffff) % count(Stators); |
|
StatorTeeth = Stators[s]; |
|
comment("Stator ",s,": ",StatorTeeth); |
|
|
|
// When Stator has prime teeth, any Rotor will have GCD = 1 |
|
|
|
if (1) { |
|
RotorTeeth = Stators[-1]; |
|
n = 0; |
|
while (RotorTeeth >= floor(0.95 * StatorTeeth) || RotorTeeth < 5) { |
|
RotorTeeth = (XORshift() & 0x007f); // this is why Stator can't have more than 127 teeth |
|
n++; |
|
} |
|
comment("Rotor: ",RotorTeeth," in ",n," iterations"); |
|
} |
|
else { |
|
r = (XORshift() & 0xffff) % count(Rotors); |
|
RotorTeeth = Rotors[r]; |
|
comment("Rotor ",r,": ",RotorTeeth); |
|
} |
|
|
|
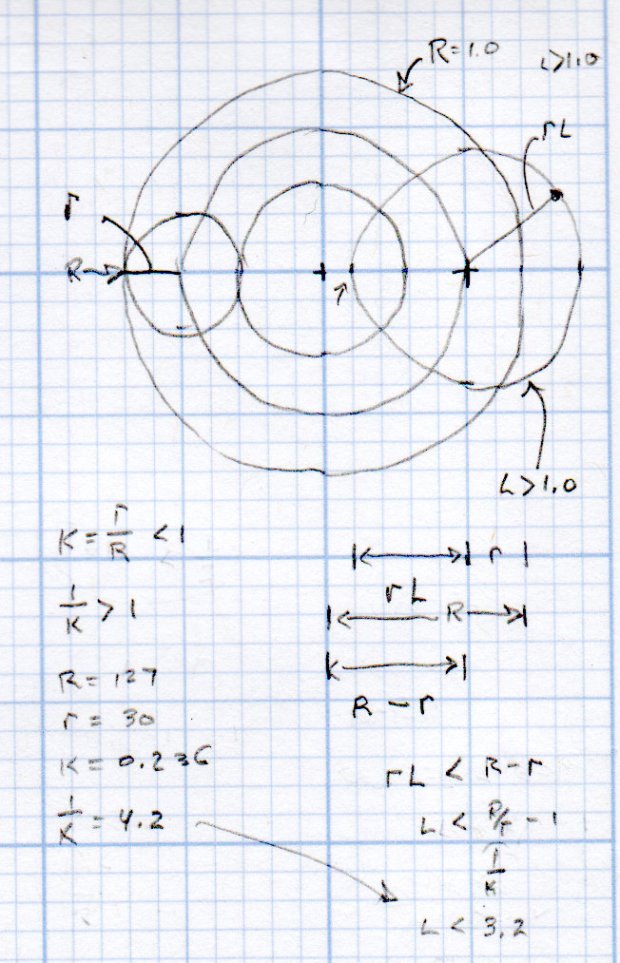
K = to_float(RotorTeeth) / to_float(StatorTeeth); // find normalized rotor dia |
|
comment("Dia ratio K: ",K," 1/K: ",1.0/K); |
|
|
|
GCD = gcd(StatorTeeth,RotorTeeth); // reduce teeth to ratio of least integers |
|
comment("GCD: ",GCD); |
|
|
|
Lobes = StatorTeeth / GCD; // compute useful values |
|
comment("Lobes: ", Lobes); |
|
|
|
Turns = RotorTeeth / GCD; |
|
comment("Turns: ", Turns); |
|
|
|
// Find normalized pen offset to never cross Stator center |
|
|
|
if (1) { |
|
n = 0; |
|
do { |
|
L = (to_float((XORshift() & 0x1f) + 1) / 32.0) * (1.0/K – 1.0); // allow L > 1.0 |
|
// comment(" test L: ",L); |
|
n++; |
|
} while (L >= (1.0/K – 1.0) || L < 0.01); |
|
} |
|
else { |
|
n = 0; |
|
do { |
|
L = to_float((XORshift() & 0x1f) + 1) / 32.0; // force L < 1.0 |
|
n++; |
|
} while (L >= (1.0/K – 1.0) || L < 0.01); |
|
} |
|
|
|
comment("Offset L: ", L," in ",n," iterations"); |
|
|
|
//—– |
|
// Crank out a list of points in normalized coordinates |
|
|
|
Path = {}; |
|
|
|
for (a = 0.0deg ; a <= Turns*360deg ; a += AngleStep) { |
|
x = (1 – K)*cos(a) + L*K*cos(a*(1 – K)/K); |
|
y = (1 – K)*sin(a) – L*K*sin(a*(1 – K)/K); |
|
Path += {[x,y]}; |
|
} |
|
|
|
//—– |
|
// Calculate normalized limits for band traced by pen in rotor at offset L |
|
// L was chosen to produce a band around the rotor center point |
|
|
|
RotorMin = 1.0 – 2*K; |
|
comment("Rotor Min: ",RotorMin); |
|
|
|
BandCtr = 1.0 – K; // band center radius |
|
BandMin = BandCtr – L*K; // … min radius |
|
BandMax = BandCtr + L*K; // … max radius |
|
|
|
BandAmpl = BandMax – BandCtr; |
|
|
|
comment("Band Min: ",BandMin," Ctr: ",BandCtr," Max: ",BandMax); |
|
|
|
//—– |
|
// Scale normalized band to fill physical limits centered at mid-disk radius |
|
|
|
FillPath = {}; |
|
|
|
foreach (Path; pt) { |
|
|
|
a = atan_xy(pt); // recover angle to point |
|
r = length(pt); // … radius to point |
|
|
|
br = (r – BandCtr) / BandAmpl; // remove center bias, rescale to 1.0 amplitude |
|
dr = br * (OuterRad – MidRad); // rescale to fill disk |
|
pr = dr + MidRad; // set at disk centerline |
|
|
|
x = pr * cos(a); // find new XY coords |
|
y = pr * sin(a); |
|
|
|
FillPath += {[x,y]}; |
|
} |
|
|
|
comment("Path has ",count(FillPath)," points"); |
|
|
|
//—– |
|
// Prune too-snuggly physical coordinates |
|
|
|
PointList = {FillPath[0]}; // must include first point |
|
|
|
lp = FillPath[0]; |
|
n = 0; |
|
|
|
foreach (FillPath; pt) { |
|
if (length(pt – lp) <= Snuggly) { // discard too-snuggly point |
|
n++; |
|
} |
|
else { |
|
PointList += {pt}; // otherwise, add it to output |
|
lp = pt; |
|
} |
|
} |
|
|
|
PointList += {FillPath[-1]}; // ensure closure at last point |
|
|
|
comment("Pruned ",n," points, ",count(PointList)," remaining"); |
|
|
|
//—– |
|
// Convert coordinate list to G-Code |
|
|
|
comment("Pattern begins"); |
|
|
|
feedrate(PlotSpeed); |
|
|
|
goto([-,-,SafeZ]); |
|
goto([0,0,-]); |
|
goto([-,-,TravelZ]); |
|
|
|
tracepath(PointList, PlotZ); |
|
|
|
//—– |
|
// Draw the legend |
|
|
|
comment("Legend begins"); |
|
|
|
if (Legend) { |
|
tp = scale(typeset(Legend,TextFont),TextSize); |
|
tpa = ArcText(tp,[0mm,0mm],LegenRad,0deg,"Center"); |
|
feedrate(TextSpeed); |
|
engrave(tpa,TravelZ,PlotZ); |
|
} |
|
|
|
tp = scale(typeset(to_string(PRNG_Seed),TextFont),TextSize); |
|
tpa = ArcText(tp,[0mm,0mm],LegenRad,180deg,"Center"); |
|
feedrate(TextSpeed); |
|
engrave(tpa,TravelZ,PlotZ); |
|
|
|
goto([-,-,SafeZ]); // done, so get out of the way |
|
goto([0,0,-]); |
|
|
|
comment("Disk ends"); |