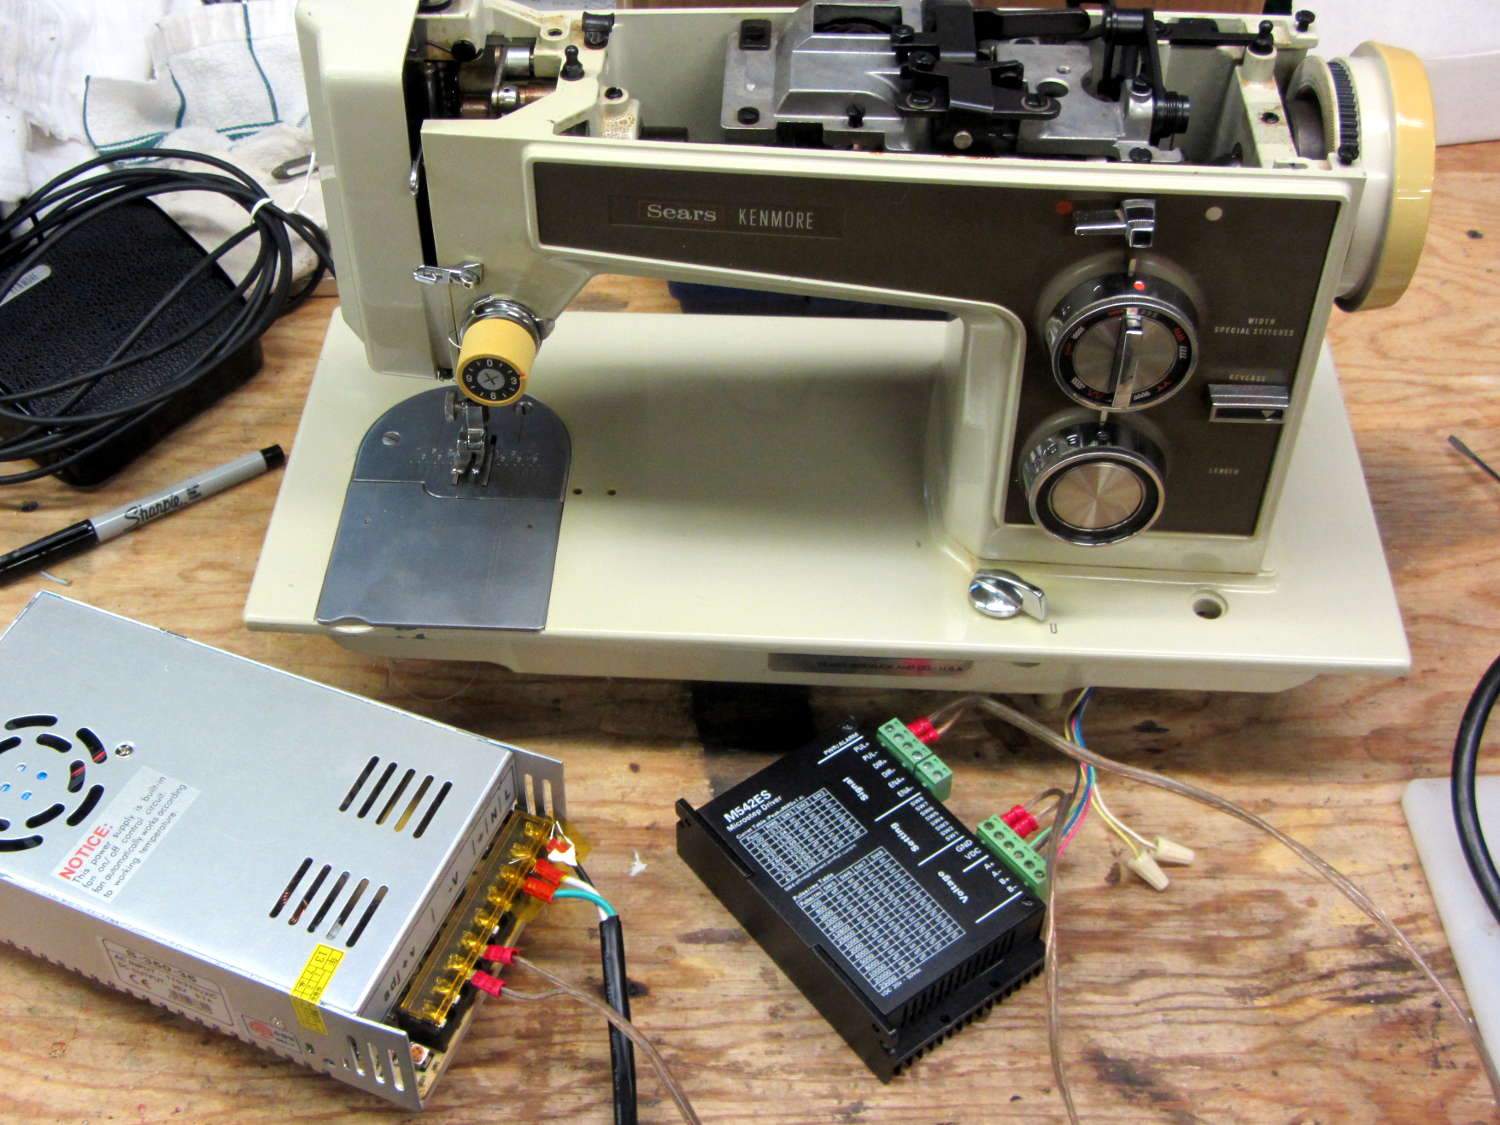
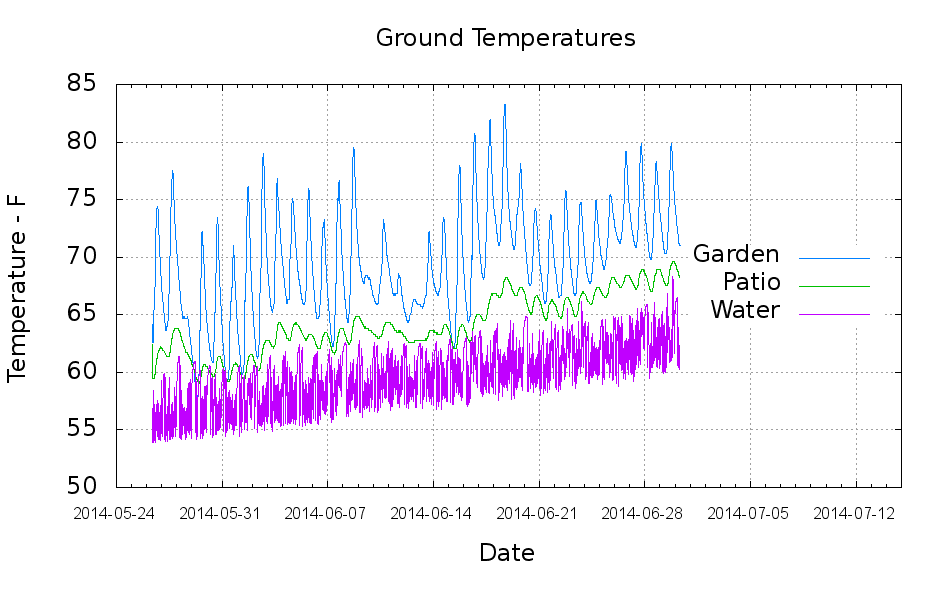
The Smell of Molten Projects in the Morning

Ed Nisley's Blog: Shop notes, electronics, firmware, machinery, 3D printing, laser cuttery, and curiosities. Contents: 100% human thinking, 0% AI slop.

Category: Science

If you measure something often enough, it becomes science

  • Kenmore 158: Stepper Motor Max Speeds

    Having a NEMA 23 stepper fit almost exactly into the spot vacated by the sewing machine’s AC motor was too good to pass up:

    Kenmore 158 - NEMA 23 stepper - on adapter
    Kenmore 158 – NEMA 23 stepper – on adapter

    So I wired a power supply to an M542 stepper driver brick, connected the pulse output of a function generator to the brick’s STEP inputs, swapped motor leads until it turned the proper direction (CCW as seen from the shaft end), and turned the function generator knob:

    Kenmore 158 - NEMA 23 stepper test
    Kenmore 158 – NEMA 23 stepper test

    The object was to find the step frequency where the motor stalls, for various winding currents and supply voltages. The motor won’t have enough torque to actually stitch anything near the dropout speed, but this will give an indication of what’s possible.

    With a 24 V DC supply and 1/8 microstepping (40 k step/s = 1470 RPM):

    • 1.00 A = 11 k step/s
    • 1.91 A = 44 k/s
    • 2.37 A = 66 k/s
    • 3.31 A = 15 k/s

    With a 36 V DC supply and 1/8 microstepping:

    • 1.91 A = 70 k/s
    • 3.31 A = 90 k/s

    With a 36 V DC supply and 1/4 microstepping (40 k step/s = 2900 RPM):

    • 1.91 A = 34 k/s
    • 2.37 A = 47 k/s
    • 2.84 A = 47 k/s
    • 3.31 A = 48 k/s

    The motor runs faster with a higher voltage supply, which is no surprise: V = L di/dt. A higher voltage across the winding drives a faster current change, so each step can be faster.

    The top speed is about 3500 RPM; just under that speed, the motor stalls at the slightest touch. That’s less than half the AC motor’s top speed under a similarly light load and the AC motor still has plenty of torque to spare.

    90 k step/s at 1/8 microstepping = 11 k full step/s = crazy fast. Crosscheck: 48 k step/s at 1/4 microstepping = 12 k full step/s. The usual dropout speed for NEMA 23 steppers seems to be well under 10 k full step/s, but I don’t have a datasheet for these motors and, in any event, the sewing machine shaft provides enough momentum to keep the motor cruising along.

    One thing I didn’t expect: the stepper excites howling mechanical resonances throughout its entire speed range, because the adapter plate mounts firmly to the cast aluminum frame with absolutely no damping anywhere. Mary ventured into the Basement Laboratory to find out what I was doing, having heard the howls upstairs across the house.

    She can also hear near-ultrasonic stepper current chopper subharmonics that lie far above my audible range, so even if the stepper could handle the speed and I could damp the mechanics, it’s a non-starter for this task.

    Given that the AC motor runs on DC, perhaps a brute-force MOSFET “resistive” control would suffice as a replacement for the carbon disk rheostat in the foot pedal. It’d take some serious heatsinking, but 100 V (or less?) at something under 1 A and intermittent duty doesn’t pose much of a problem for even cheap surplus MOSFETs these days.

    That would avoid all the electrical and acoustic noise associated with PWM speed control, which counts as a major win in this situation. Wrapping a speed control feedback loop around the motor should stiffen up its low end torque.

  • Monthly Science: Springtime Ground Temperatures

    The last month’s ground temperatures:

    Temperatures - Garden Patio Water
    Temperatures – Garden Patio Water

    The “Garden” trace comes from a waterproof Hobo datalogger buried a few inches underground, beneath a thick layer of chipped leaf mulch. The “Patio” trace comes from the center of the cramped space below the concrete patio, buried flush with the bare dirt floor. The “Water” trace is the temperature at the incoming water pipe from the town water main, which passes 150 feet under the front yard.

    Calculated eyeballometrically, the temperature rose 7 °F in about a month.

    The datalogger in the garden came from the “cold cellar” veggie storage buckets, so I don’t have a year-long record. On the other paw, it looks like the patio temperature will be a pretty good proxy for the minimum garden temperature.

    I hand-cleaned the Hobo CSV files and fed the results into a Gnuplot script that’s replete with the cruft of ages:

    #!/bin/sh
    #-- overhead
    export GDFONTPATH="/usr/share/fonts/truetype/"
    ofile=Temperatures.png
    echo Output file: ${ofile}
    #-- do it
    gnuplot << EOF
    #set term x11
    set term png font "arialbd.ttf" 18 size 950,600
    set output "${ofile}"
    set title "Ground Temperatures"
    set key noautotitles right center
    unset mouse
    set bmargin 4
    set grid xtics ytics
    set timefmt "%m/%d/%Y %H:%M:%S"
    set xdata time
    set xlabel "Date"
    set format x "%Y-%m-%d"
    set xrange [:"07/15/2014"]
    set xtics font "arial,12"
    #set mxtics 2
    #set logscale y
    #set ytics nomirror autofreq
    set ylabel "Temperature - F"
    #set format y "%4.0f"
    #set yrange [30:90]
    #set mytics 2
    #set y2label "right side variable"
    #set y2tics nomirror autofreq 2
    #set format y2 "%3.0f"
    #set y2range [0:200]
    #set y2tics 32
    #set rmargin 9
    set datafile separator ","
    #set label 1 "Garden"     at "05/31/2014",25 left font "arialbd,10" tc lt 3
    #set arrow from 2.100,110 to 2.105,103 lt 1 lw 2 lc 0
    plot	\
        "Garden.csv" using 2:3 with lines lt 3 lw 1 title "Garden",\
        "Patio.csv"  using 2:3 with lines lt 2 lw 1 title "Patio",\
        "Water.csv"  using 2:5 with lines lt 4 lw 1 title "Water",\
    
    EOF
    
  • Silicone Caulk + Desiccant = Win!

    After doing the second batch of quilting pin caps, I dropped the newly opened silicone caulk tube into a jar with some desiccant, which worked wonderfully well. Unlike the usual situation where the caulk under the cap hardens into a plug after a few weeks, the tube emerged in perfect condition. In fact, even the caulk in the middle of the conical nozzle was in good shape, with just a small cured plug on either end; it had been sitting inside a cloth wrap with no sealing at all.

    Here’s what it looked like after finishing the last of the most recent caps:

    Silicone caulk tube with silica gel
    Silicone caulk tube with silica gel

    The indicator card says the humidity remains under 10%, low enough to keep the caulk happy and uncured. Well worth the nuisance of having a big jar on the top shelf instead of a little tube next to the epoxy.

    Although I thought the desiccant was silica gel, it’s most likely one of the clay or calcium desiccants.

  • Kenmore 158: AC Motor Running on DC!

    The sewing machine had a three-contact plug / terminal block that joins all the wiring:

    Kenmore 158 - terminal block
    Kenmore 158 – terminal block

    For completeness, the matching socket (not shown) joins two cords:

    • AC line cord (two wire, not polarized, no ground)
    • Foot pedal

    Extract the motor wiring from that block and connect it to a 50 V / 3 A bench supply, with the positive lead to the marked wire conductor:

    Kenmore 158 AC motor - DC power
    Kenmore 158 AC motor – DC power

    Cranking the voltage upward from zero:

    Kenmore Model 158 AC Motor on DC - RPM vs V
    Kenmore Model 158 AC Motor on DC – RPM vs V

    So that’s about 200 RPM/V, offset by 2800 RPM. Totally unloaded, of course.

    The original data:

    DC V DC A RPM Notes
    15 0.29 690 Barely turning
    20 0.28 1380 Finger-stoppable
    25 0.29 2350
    30 0.29 3450
    35 0.30 4450
    40 0.29 5740
    45 0.29 6780 Still finger-holdable at start
    50 0.29 8000

    I can hold the shaft stopped between my fingers up through 45 V, with 0.54 A locked-rotor current at 25 V. The motor doesn’t have a lot of torque, although it’s operating at less than half the normal RMS voltage.

    I should take those numbers with the motor driving the sewing machine to get an idea of the actual current under a more-or-less normal load.

    Reversing the power supply leads shows that the motor rotates only counterclockwise, which is exactly what you’d expect: both polarities of the normal AC sine wave must turn the motor in the same direction.

  • Makergear M2: Heating Times

    With the platform and extruder starting at the 19.5 °C = 67 °F Basement Laboratory ambient …

    The extruder takes 1 minute to reach 175 °C, overshoots to about 180 °C, crosses 175 °C going downward at 1:30, then gets up to 174 °C again at 3:15. I ran a PID tuning session quite a while ago with inconclusive results. Reducing the initial overshoot would probably increase the time-to-get-ready, with no net improvement.

    The platform, which isn’t the stock Makergear hardware, requires 3:30 to reach 69 °C, just under the 70 °C target, at which point it’s ready to start. There’s no insulation under the PCB-trace heater, but some previous tinkering implies that running bare doesn’t make much difference, particularly with a fan blowing on the top surface of the glass.

    M2 - Improved HBP - bottom view
    M2 – Improved HBP – bottom view

    The modified platform runs from a 40 V supply with an initial power of 250-ish W at ambient. A quick measurement at 75 °C during a print:

    • 40 V @ 5.8 A = 230 W peak
    • 10 s on / 30 s off = 25% duty cycle
    • 230 W × 0.25 = 58 W average

    Remember that’s with an outboard SSR to unload the RAMBo’s MOSFET.

    By and large, the M2 is ready to print in under 5 minutes from a standing start, which is just about enough time to spritz hair spray on the platform, load the G-Code into Pronterface, and so forth and so on.

  • Monthly Science: Basement Safe Drying

    Back in early May, I swapped in a new bag of silica gel, which (as always) immediately punched the humidity down to the Hobo datalogger’s 15%RH minimum reading:

    Basement Safe - 2014-05-26
    Basement Safe – 2014-05-26

    A closer look at the very beginning of that data shows the humidity dropping for an hour after the door closes:

    Basement Safe - 2014-05-09 Detail
    Basement Safe – 2014-05-09 Detail

    The logger is on the bottom of the safe, with the desiccant bag on the shelf above it, and there’s no mechanical air circulation: it’s all done by air currents, driven by whatever drives them. I have no idea what that bump in the middle means.

  • Dell Dimension 2300: Capacitor Plague

    While scrubbing a hard drive and decommissioning an old Dell Dimension 2300, I spotted a failed capacitor:

    Dell 2300 failed capacitors - 1
    Dell 2300 failed capacitors – 1

    And another:

    Dell 2300 failed capacitors - 2
    Dell 2300 failed capacitors – 2

    The board sported many of those little caps, well over half showing signs of distress.

    A progression of victims, from I’m-not-dead-yet to phew:

    Dell 2300 failed capacitors - grouped
    Dell 2300 failed capacitors – grouped

    According to its Service Tag, this Dimension 2300 came off the line in late November 2002. All of the other caps on the board seemed OK, so apparently the plague affected just this lot of Hermei 470 µF 6.3 V capacitors.

    Or, hey, they’re not supposed to last a dozen years and this is perfectly normal …