OK, I’ll admit we weren’t on our bikes:

The next week, however, we were, and we leaned our bikes against the wall, because:
- Long-wheelbase recumbents don’t fit into that kind of rack anyway
- Even if they did, they’d block the entire sidewalk
The Smell of Molten Projects in the Morning
Ed Nisley's Blog: Shop notes, electronics, firmware, machinery, 3D printing, laser cuttery, and curiosities. Contents: 100% human thinking, 0% AI slop.
Cruisin’ the streets
OK, I’ll admit we weren’t on our bikes:
The next week, however, we were, and we leaned our bikes against the wall, because:
It’s the start of a new riding season and we’re returning from a concert at Vassar. I’m cranking 20+ mph, pushed by a gusty tailwind.
T minus 7 seconds:

The white car approaches the intersection a bit faster than usual, which leads me to expect a New York State Rolling Stop-and-Go right turn directly in front of me.
T minus 5 seconds:

The white car slows enough that I now expect a stop with the front end well onto the shoulder. A quick check in the mirror shows no traffic behind me: I can take the lane if needed. This intersection always has a large gravel patch spanning the shoulder, so I must move closer to the fog line anyway.
T minus 2 seconds:
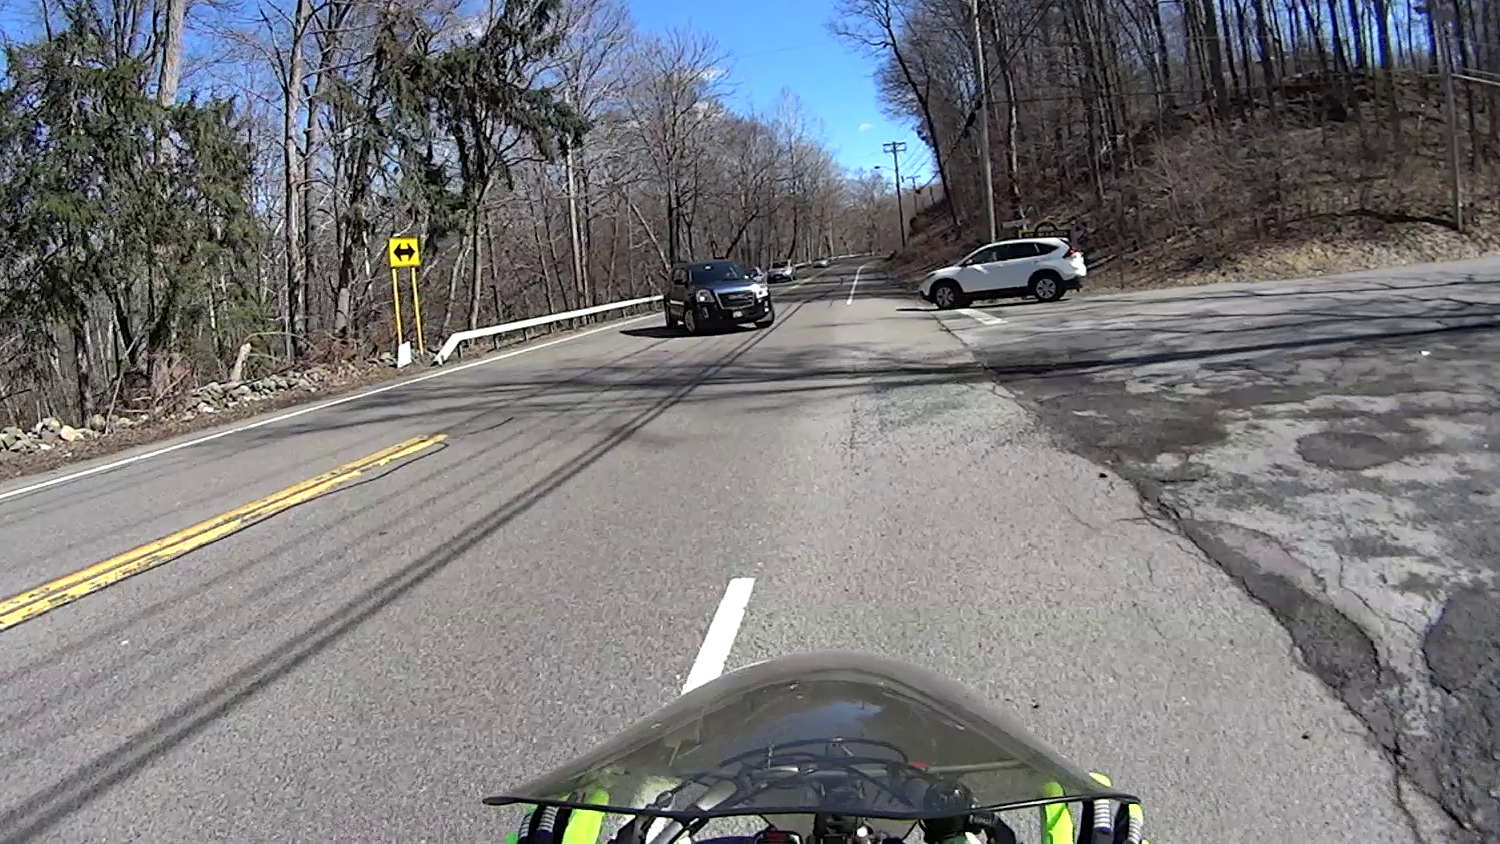
The white car comes to a full stop, not too far onto the shoulder, and my fingers come off the brakes. I gotta work on that fingers-up position, though.
… Whoops, a classic left cross from the black SUV!
T minus 1 second:

I’m now braking hard, barely to the left of the gravel patch.
T zero:

Well, that was close.
Somewhat to my surprise, the white car hasn’t crept any further onto the shoulder.
The SUV driver gives me a cheery wave, as if to thank me for not scratching the doors. I never make hand gestures, but I did tell him he does nice work.
It’s hard to not see a faired long-wheelbase recumbent, head-on in bright sunlight, not to mention that I’m wearing my new Sugoi Zap Bike Jacket in Super Nova retroreflective lime green with retroreflective lime green utility gloves.
I. Am. Visible. In. Any. Light. Dammit.
It is, apparently, easy to mis-judge a bike’s speed, although driver-ed courses used to recommend that you err on the side of not trying to beat an oncoming vehicle. Perhaps that recommendation has become inoperative?
The corresponding maneuver by a car passing you is known as a right hook.
Memo to Self: Always look at the license plate to give the camera a straight-on picture.
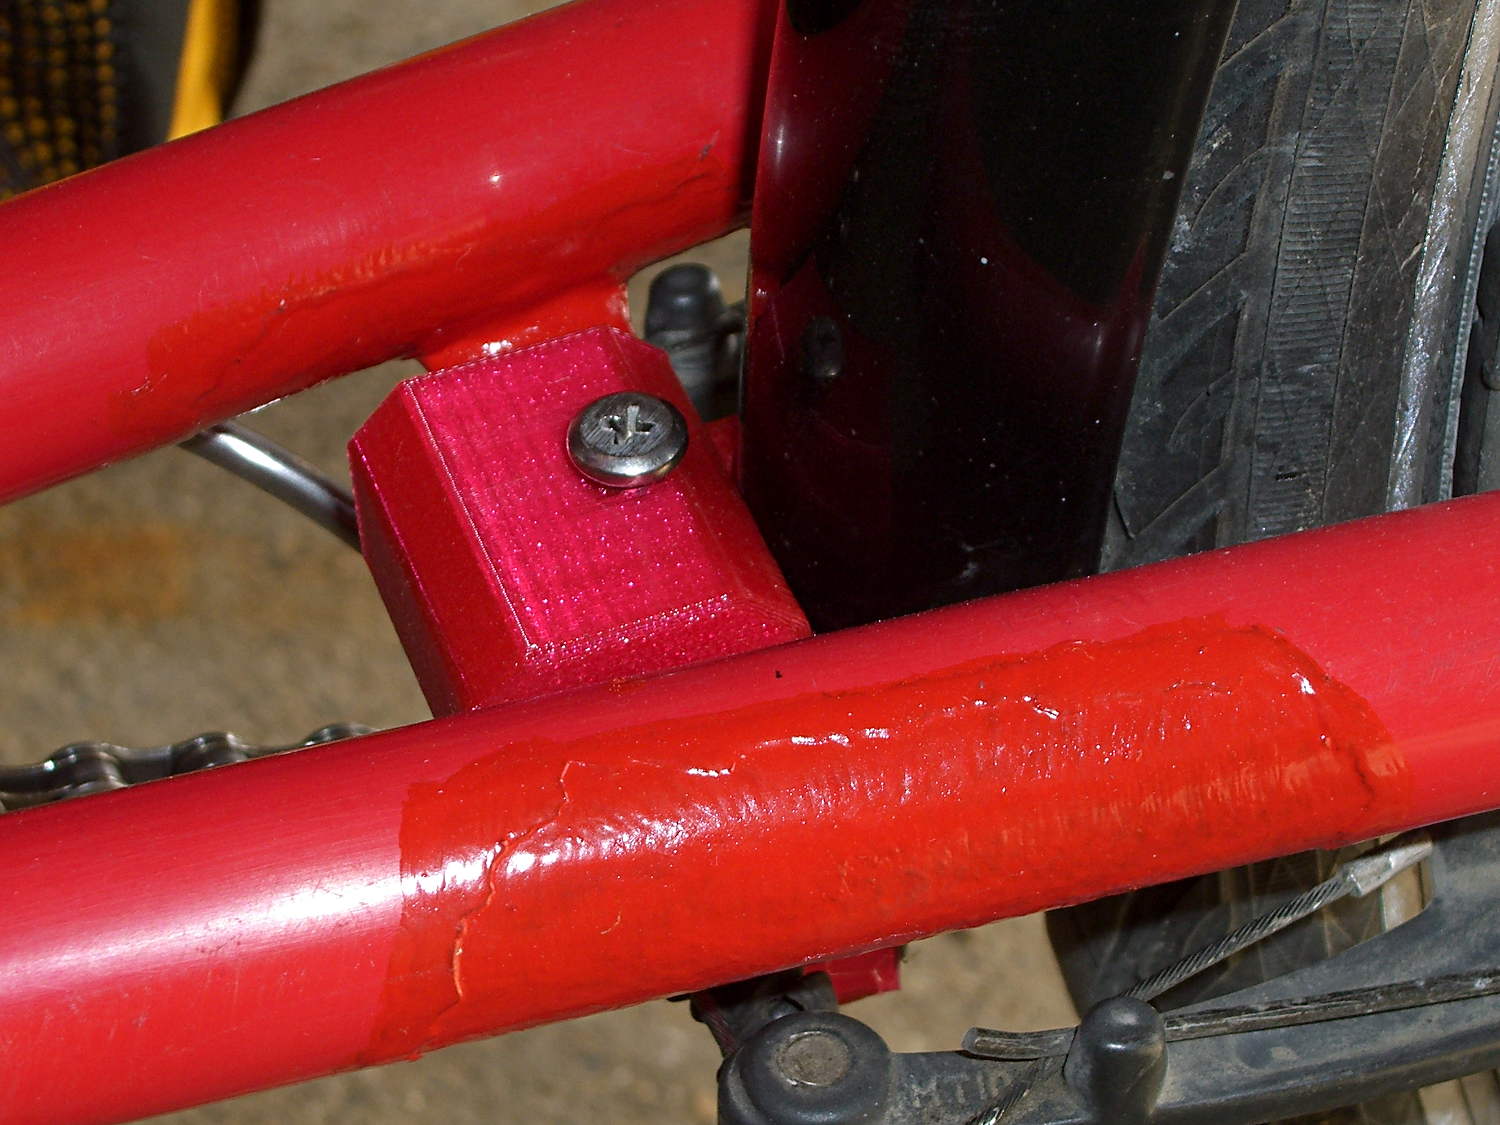
I’d originally secured the rear fender to the steel strap connecting the chainstays on Mary’s Tour Easy with a cable tie: small, simple, light weight, reliable. Unfortunately, that put the end of the fender just slightly lower than the strap and, I fear, sprayed water all over the strap, where it worked its way through a paint flaw and rusted the steel under the paint. A simple metal clip would chew its way through the pain[t] on the strap, so, seeing as how we’re living in the future…
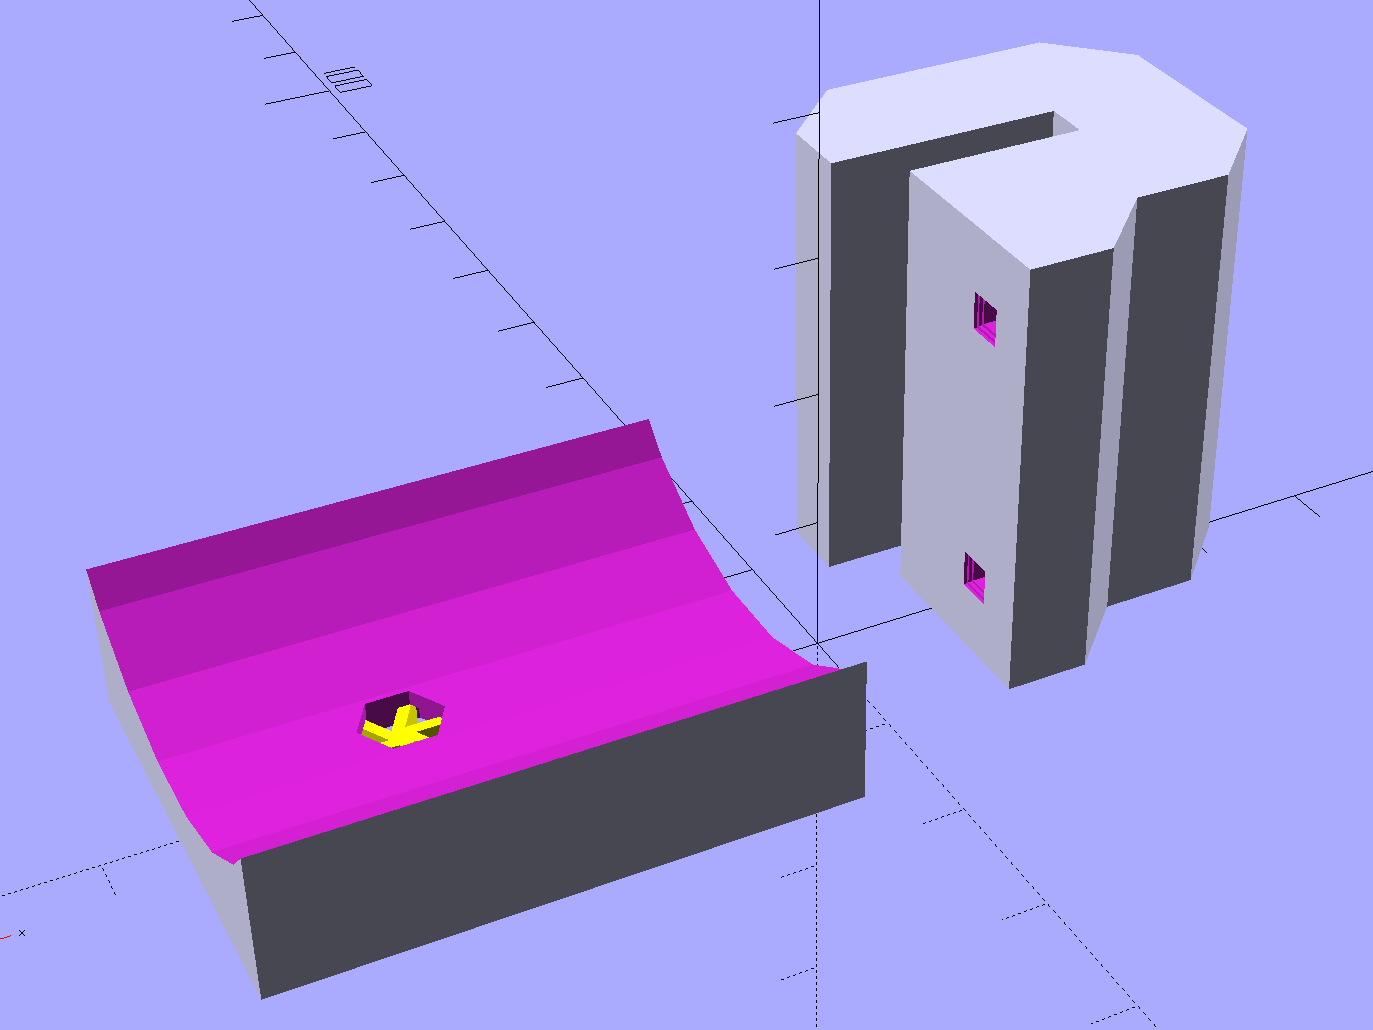
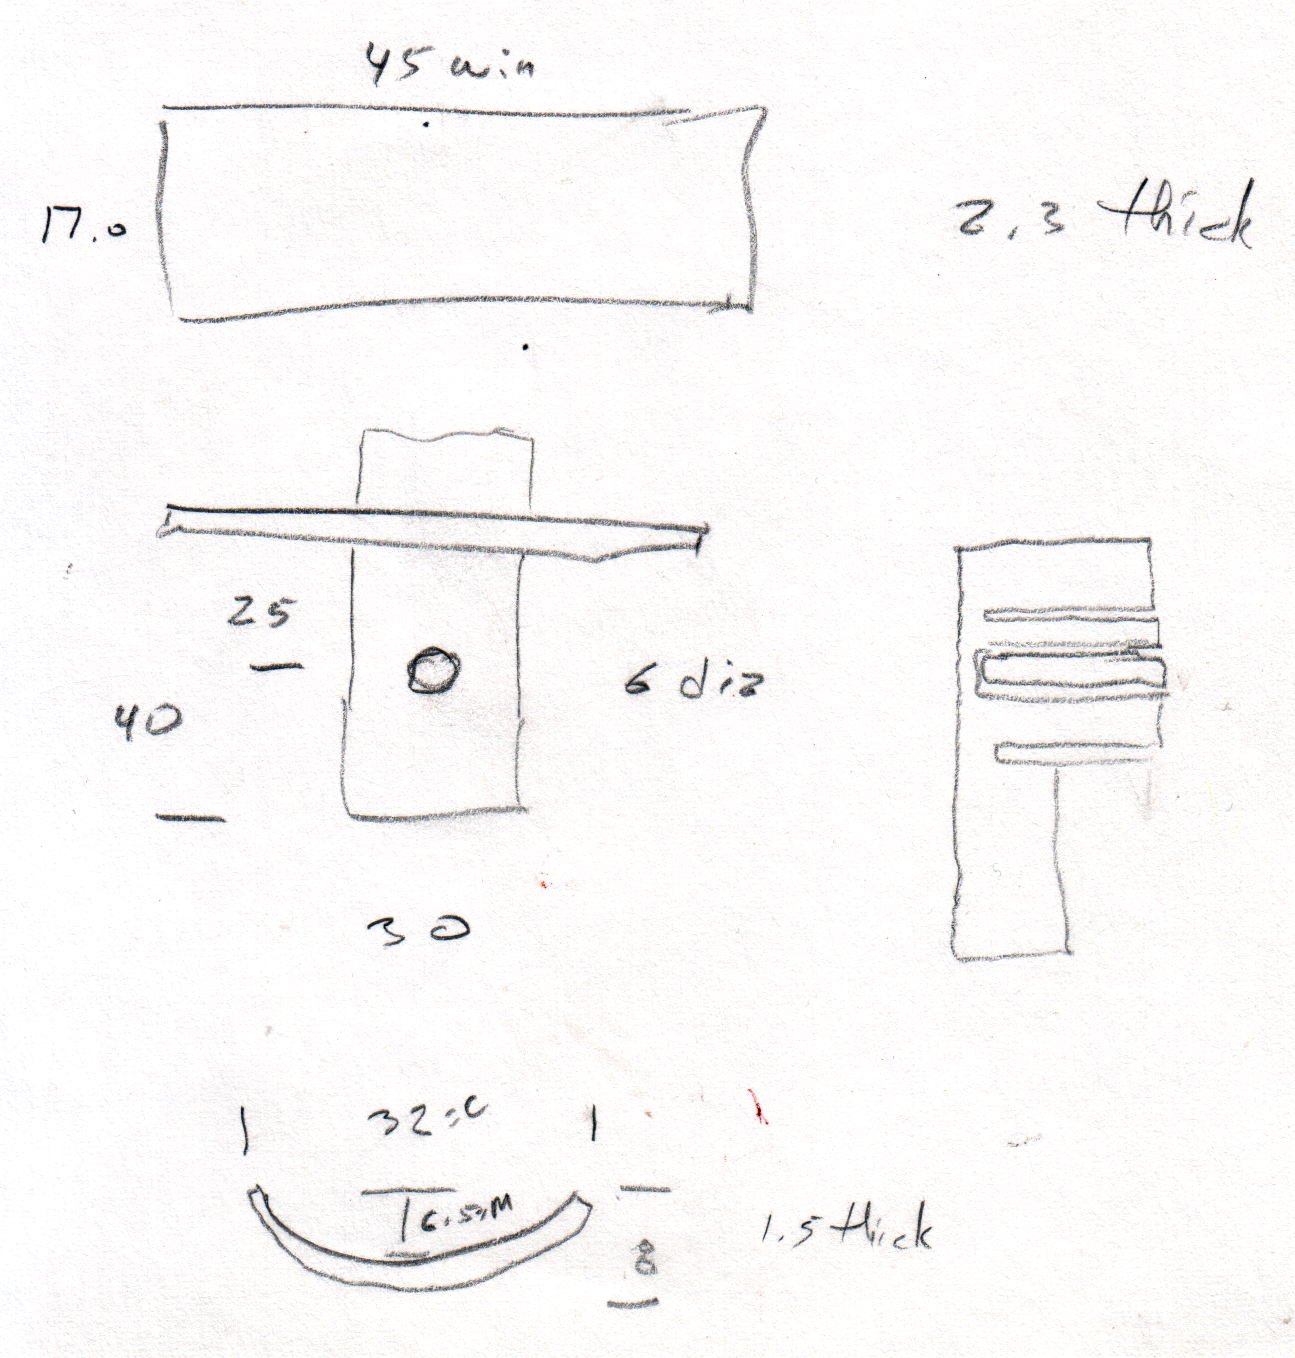
The C-shaped block on the top grips the steel cross-strap, the trough fits the fender’s curve, the little spider supports the inside of the nut recess, and a pair of alignment pin holes (one visible) help during gluing:

Although it’s tempting to 3D print both parts as a single unit, laying them out like this aligns the threads for best strength in each piece:
Pressing the bracket on the glass slab (flat side up, nubblies on the bottom) with the clamps in place finished the job. The slightly crushed support spider from the nut recess sits in the foreground:

Magenta PETG matches the red Tour Easy paint surprisingly well:
From below, you can see why the top block can’t extend all the way to the bottom of the fender mount:
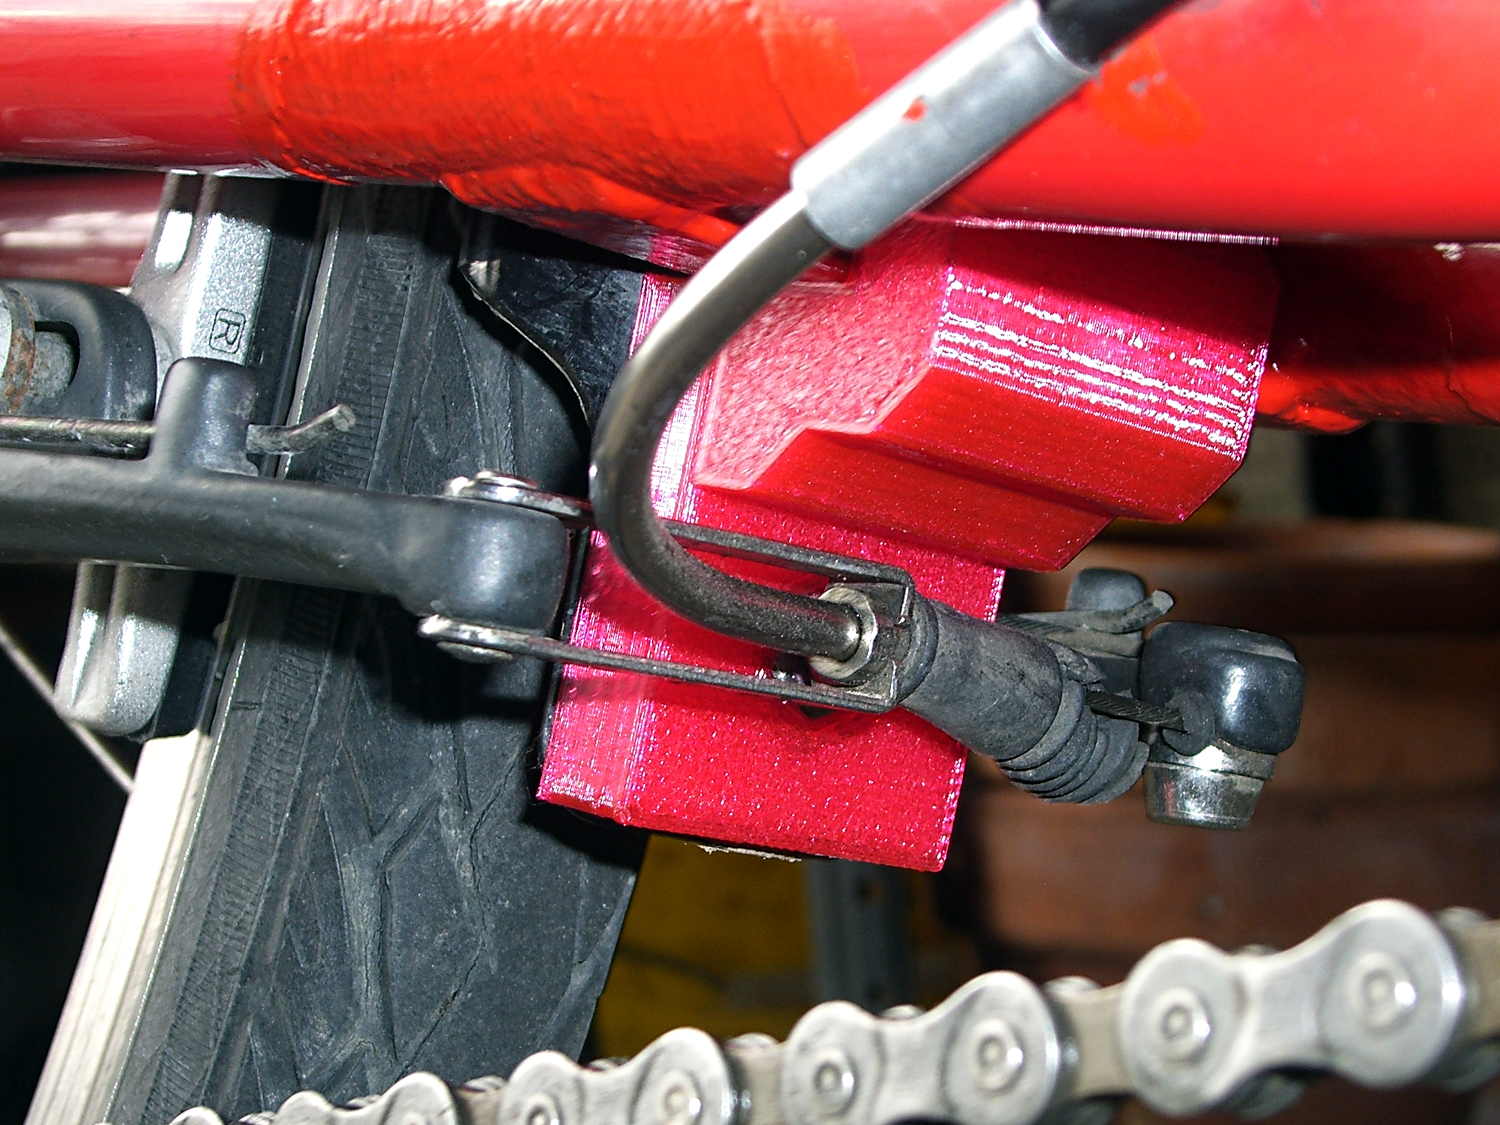
That rubber boot needs replacing in the worst possible way, but I didn’t have anything suitable on hand and wouldn’t dismount that cable even if I had; cables never go back on properly.
Alas, because the brakes weren’t mounted when I did the measurements, I had to build one to find out why a long block wouldn’t work:

The screw atop the block (on the left in that picture) presses a small plastic slug against the steel strap, in the hopes it won’t chew through the paint quite as rapidly. The screws & nuts are stainless, so at least they’ll survive for a while.
The curve in the trough comes from the chord equation applied to these crude measurements:
Fortunately, it’s tucked into a spot where nobody ever looks…
The OpenSCAD source code:
// Tour Easy rear fender bracket
// Ed Nisley KE4ZNU March 2015

Layout = "Build";		// Build Show TabHolder Block

//- Extrusion parameters must match reality!

ThreadThick = 0.25;
ThreadWidth = 0.40;

HoleWindage = 0.2;

Protrusion = 0.1;			// make holes end cleanly

inch = 25.4;

function IntegerMultiple(Size,Unit) = Unit * ceil(Size / Unit);

//----------------------
// Dimensions

PlateWidth = 45;		// Tour Easy frame plate
PlateDepth = 17;
PlateThick = 3.3;		//  ... allow for a bit of crud

TabWidth = 32;			// fender tab
TabLength = 40;
TabThick = 1.5;
TabDepth = 8;

ChordM = TabDepth - TabThick;	// find fender tab's radius of curvature
ChordC = TabWidth;

TabRadius = ((ChordM * ChordM) + (ChordC * ChordC)/4) / (2 * ChordM);
echo(str("Fender radius: ", TabRadius));

FenderOffset = -25.0;		// from bottom of frame plate

ScrewClear = 5.0;			// close enough to 10-32
ScrewTap = ScrewClear - 1.0;

NutThick = 3.1;				// 10-32 nut
NutOD = 9.5;				//  ... across flats

Chamfer = 5.0;					// edge chamfer

BlockSlab = 10.0;
BlockWidth = TabWidth;
BlockDepth = PlateDepth + BlockSlab;
BlockHeight = TabLength + PlateThick + BlockSlab;

BlockOutline = [
	[TabDepth/2,0],
	[TabDepth/2,TabLength],
	[PlateDepth,TabLength],
	[PlateDepth,TabLength + PlateThick],
	[0,TabLength + PlateThick],
	[0,BlockHeight - Chamfer],
	[Chamfer,BlockHeight],
	[BlockDepth - Chamfer,BlockHeight],
	[BlockDepth,BlockHeight - Chamfer],
	[BlockDepth,TabLength - BlockSlab + Chamfer],
	[BlockDepth - Chamfer,TabLength - BlockSlab],
	[BlockSlab + Chamfer,TabLength - BlockSlab],
	[BlockSlab,TabLength - BlockSlab - Chamfer],
//	[BlockSlab,Chamfer],								// full-length tab (TrimBlock = false)
//	[BlockSlab - Chamfer,0],							//   ""
	[TabDepth/2,TabLength - BlockSlab - Chamfer]		// trim lower tab (TrimBlock = true)
	];

TrimBlock = true;

BuildGap = 5.0;

//----------------------
// Useful routines

module PolyCyl(Dia,Height,ForceSides=0) {			// based on nophead's polyholes

  Sides = (ForceSides != 0) ? ForceSides : (ceil(Dia) + 2);

  FixDia = Dia / cos(180/Sides);

  cylinder(r=(FixDia + HoleWindage)/2,
           h=Height,
	   $fn=Sides);
}

//- Locating pin hole with glue recess
//  Default length is two pin diameters on each side of the split

PinOD = 1.75;
PinOC = TabLength / 2;

module LocatingPin(Dia=PinOD,Len=0.0) {

	PinLen = (Len != 0.0) ? Len : (4*Dia);

	translate([0,0,-ThreadThick])
		PolyCyl((Dia + 2*ThreadWidth),2*ThreadThick,4);

	translate([0,0,-2*ThreadThick])
		PolyCyl((Dia + 1*ThreadWidth),4*ThreadThick,4);

	translate([0,0,-(Len/2 + ThreadThick)])
		PolyCyl(Dia,(Len + 2*ThreadThick),4);

}

module LocatingPins(Length) {
	for (i=[-1,1])
	translate([i*PinOC/2,0,0])
		rotate(180/4)
		LocatingPin(Len=Length);
}

//----------------------
// Pieces

module TabHolder() {

	difference() {
		translate([-TabWidth/2,-TabLength,0])
			cube([TabWidth,TabLength,2*TabDepth],center=false);

		translate([0,-TabLength/4,0])
			LocatingPins(5.0);

if (!TrimBlock)
		translate([0,-3*TabLength/4,0])
			LocatingPins(5.0);

		translate([0,FenderOffset,-Protrusion])
			rotate(180/6)
				PolyCyl(ScrewClear,3*TabDepth,6);

if (TrimBlock)
		translate([0,FenderOffset,-Protrusion])
			rotate(180/6)
				PolyCyl(NutOD,NutThick + Protrusion,6);

		translate([0,TabLength,TabRadius + TabDepth/2])
			rotate([90,0,0])
				rotate(180/(6*4))
					cylinder(r=TabRadius,h=3*TabLength,$fn=6*4);
	}

if (TrimBlock)
	color("Yellow")
	translate([0,FenderOffset,0])
		for (Seg=[0:5]) {
			rotate(30 + 360*Seg/6)
			cube([NutOD/2,
				2*ThreadWidth,
				(NutThick - ThreadThick)],center=false);
		}

}

module Block() {

	difference() {
		linear_extrude(height=BlockWidth,convexity=3)
			polygon(points=BlockOutline);

if (!TrimBlock)
		translate([TabDepth/2,TabLength/4,BlockWidth/2])
			rotate([0,90,0])
				LocatingPins(5.0);

		translate([TabDepth/2,3*TabLength/4,BlockWidth/2])
			rotate([0,90,0])
				LocatingPins(5.0);

		translate([-BlockDepth,TabLength + FenderOffset,BlockWidth/2])
			rotate([0,90,0])
				rotate(180/6)
					PolyCyl(ScrewClear,3*BlockDepth,6);

		translate([PlateDepth/2,BlockHeight - BlockSlab - Protrusion,BlockWidth/2])
			rotate([-90,0,0])
					PolyCyl(ScrewTap,2*BlockSlab,6);

if (!TrimBlock)
		translate([(BlockSlab - NutThick),(TabLength + FenderOffset),BlockWidth/2])
			rotate([0,90,0])
				rotate(180/6)
					PolyCyl(NutOD,NutThick + Protrusion,6);

	}

}

//----------------------
// Build it

if (Layout == "TabHolder")
	TabHolder();

if (Layout == "Block")
	Block();

if (Layout == "Show") {
	translate([0,BlockWidth/2,0])
		rotate([90,0,0]) {
			color("Magenta")
				Block();
			color("Orange")
				translate([0,TabLength,TabWidth/2])
					rotate([0,-90,0])
						TabHolder();
		}
}

if (Layout == "Build") {

	translate([-BuildGap,0,0])
		rotate(-90)
			TabHolder();

	translate([BuildGap,TrimBlock ? -BlockHeight/1.5 : -BlockHeight/3,0])
		Block();
}
While replacing the well-worn sprocket / chain / chainrings on Mary’s bike, I finally got around to repairing some damaged paint tucked in an inconvenient spot…
Over the years, a flaw in the paint underneath the strap connecting the chainstays on Mary’s Tour Easy let in enough moisture to dislodge the paint over a considerable area. I chipped off the loose paint and used Evapo-Rust to convert the oxide to phosphate; there’s not much damage to the steel parts, despite what it may look like in the pictures.
A top view from the right rear, minus the wheel & fender, looking toward the left chainstay:
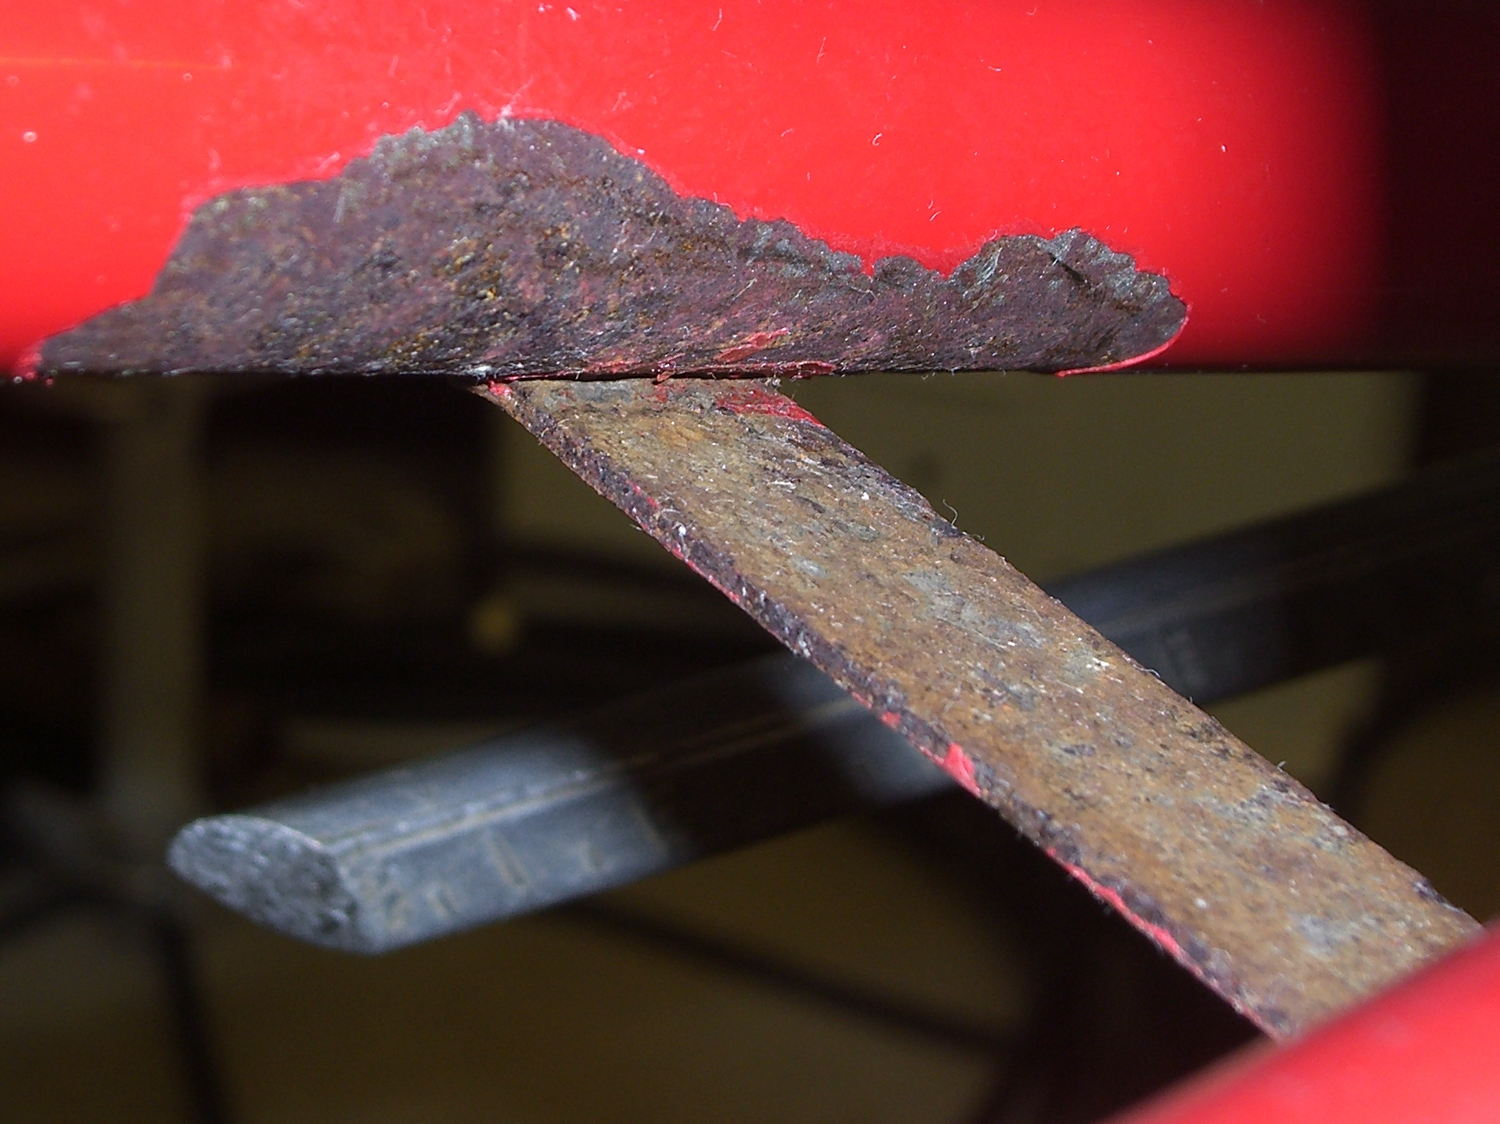
Two epoxy fillets in the concave sections where the strap meets the chainstays should eliminate problems in those sections forever more:

Some rusty-metal primer and a few coats of red paint conceal most of the ugliness:

It’ll never be mistaken for showroom quality, but our bikes are tools, not art objects.
The obviously 3D printed red block in the middle of the strap holds the fender in place, about which more tomorrow…
There’s a fundamental error in my writeup about setting the APRS Smart Beaconing parameters for the bike trackers: I blundered the units of Turn Slope.
Rich Painter recently explained how that works:
I ran across your blog on Smart Beaconing and saw something that needed correction.
You state the Turn Slope is in units Degrees / MPH
This is incorrect. Although the term Turn Slope is not a real slope (such as rise/run classically) that is what the originators used albeit incorrectly. They do however correctly attribute the units to MPH * Degrees (a product and hence not really a slope).
In their formula they calculate a turn threshold as:
turn_threshold = min_turn_angle + turn_slope / speedLooking at the units we see:
= Degrees + (MPH * Degrees) / MPHwhich yields
= Degrees + DegreesWhich makes sense. It is too bad that the originators used the wrong term of Turn Slope which confuses most people. A better term would have been Turn Product.
In looking back over that post, I have no idea where or how I got the wrong units, other than by the plain reading of the “variable name”.
As he explained in a followup note:
As for units… I was introduced to making unit balance way back in 1967-1968 science class in HS by a really fine science teacher. It has served me all my life and I’m thankful for that training.
I have ever since told that teacher so!
A while back, our Larval Engineer rammed an engineering physics class head-on and sent me a meme image, observing that I’d trained her well: if the units don’t work out, then you’re doing it wrong.
Yes, yes, I do care about the units:

Seeing this early one wintry morning made me wonder if somebody had ridden away on our bikes in the dead of night:
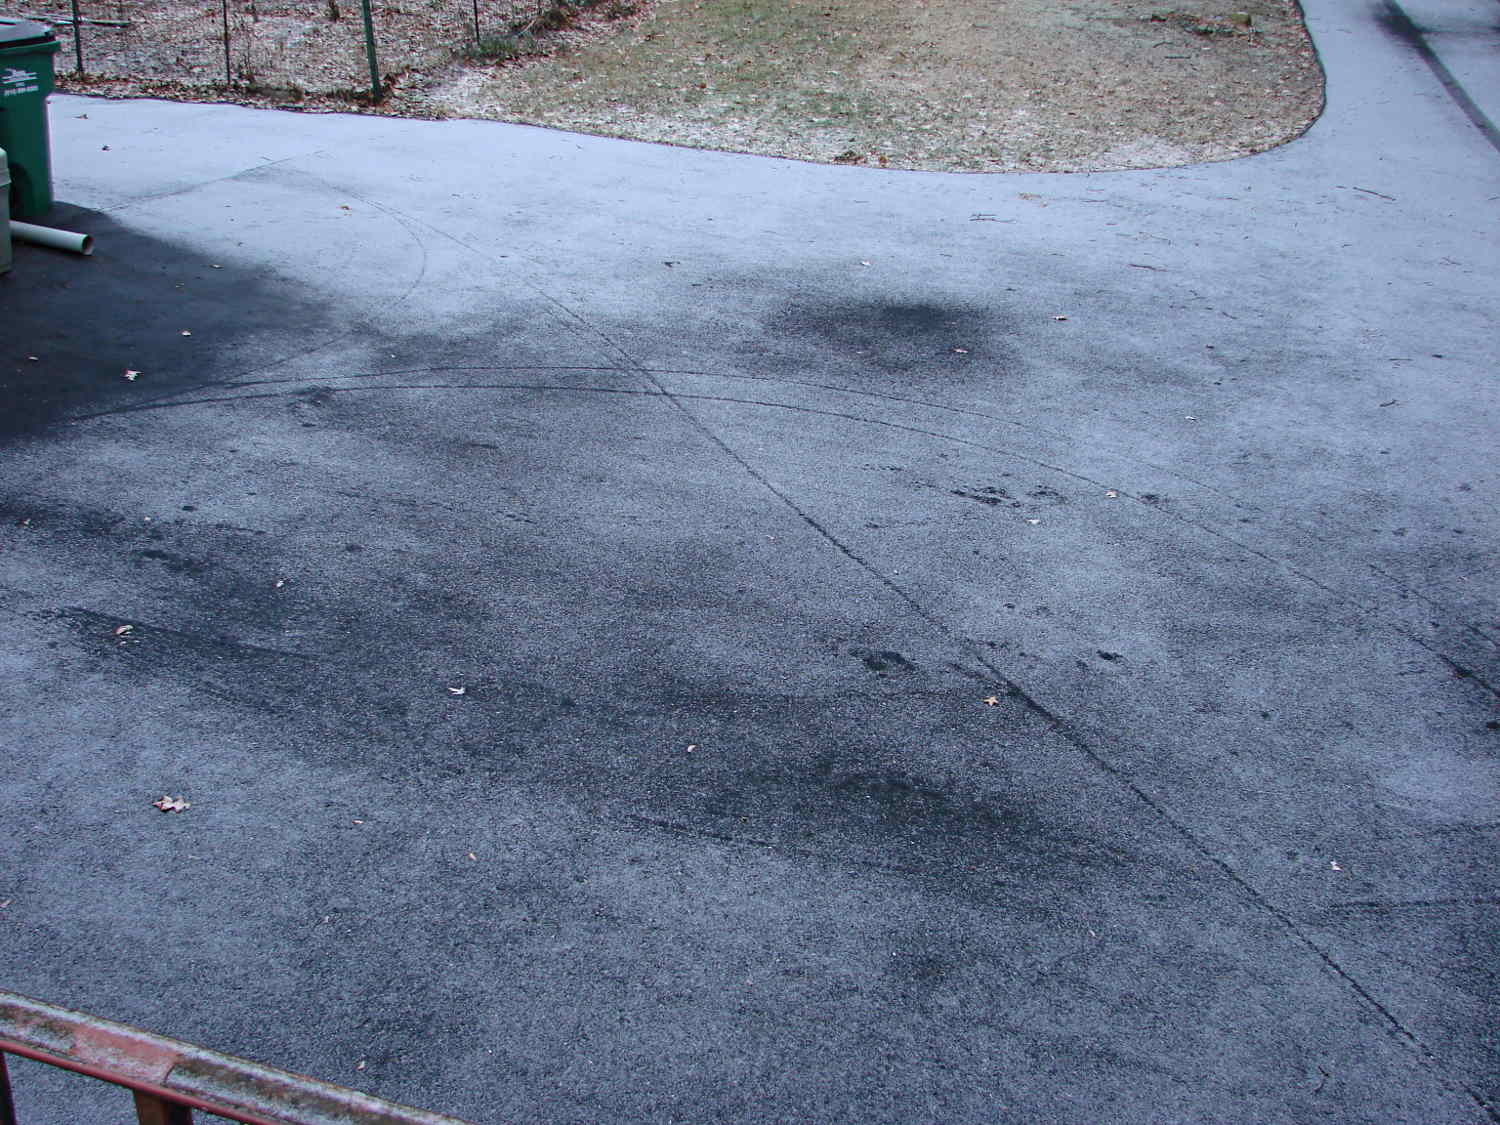
A closer look, as seen from the garage door:
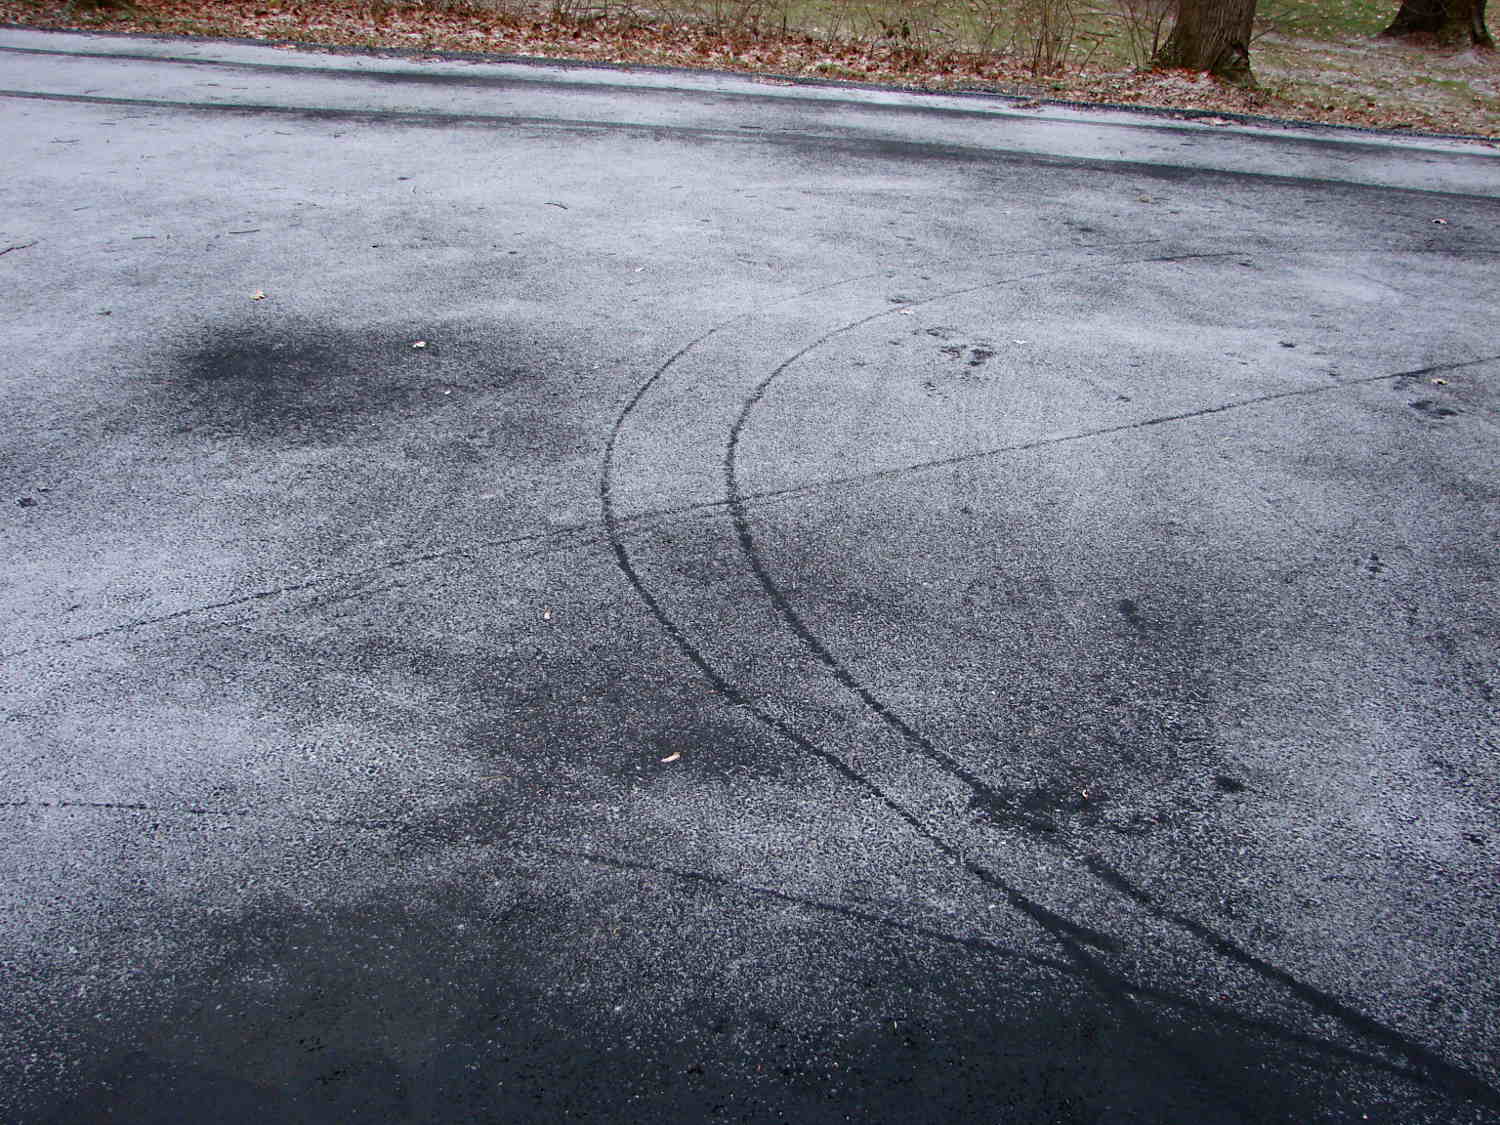
We’d gone for a ride two days earlier and, apparently, our tires deposited enough salt dust (?) on the driveway as we rolled them out of the garage to melt the light snowfall. I’m not sure I can believe that, as those same tires left no trace of our return from that same trip, when I’d expect them to carry more dust.
If it’s a thermal effect, it was produced by one brief contact with tires kept in an unheated garage and rolled over an asphalt driveway, after exposure to ambient conditions for two days.
Truly a puzzlement…
The Thanksgiving Snowfall didn’t amount to much, but it did bring down a bunch of branches across the area. A few days later, as we rode along the DCRT on an errand, we admired the freshly sawed fallen trees and piles of brush by the side of the trail: evidently, a DC DPW crew had just cleared the trail.
Then we encountered this at Mile Marker 7.0:

As nearly as we can tell, that tree fell minutes before we arrived; the trunk snapped about five feet off the ground. There were bike tire tracks on the (wet!) trail directly below the trunk, but none stopped on one side and resumed on the other, so we were the first bikes on the scene.
We portaged the bikes, continued the mission, and called it in when we got to an information sign with the DPW contact number.
Timing is everything!
