Ed Nisley's Blog: Shop notes, electronics, firmware, machinery, 3D printing, laser cuttery, and curiosities. Contents: 100% human thinking, 0% AI slop.
As expected, that repair didn’t last very long at all; one hinge fractured along the same line as before. This time, however, we had a visit already in-plan, so I brought along my solvents and clamps.
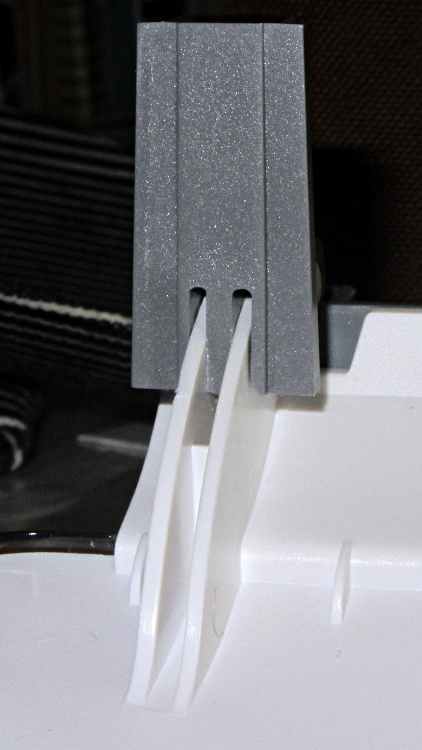
Perhaps you wondered how I could have been so remiss as to not brace those thin white flanges. One picture of the unbroken hinge in the “lid down” position is worth a thousand words:
HP 3970 Scanjet – intact hinge
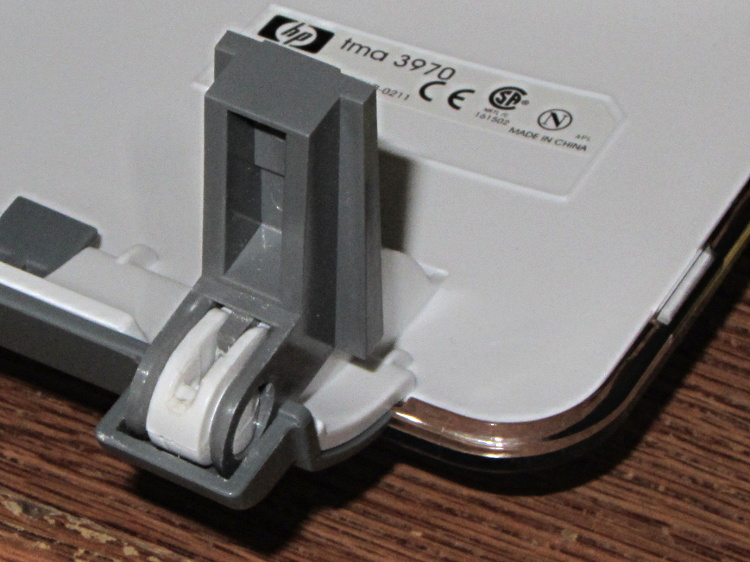
Need more? Here’s another thousand words from the other side:
HP 3970 Scanjet – intact hinge pivot
As the lid opens, the gray tab pivots toward the edge of the lid until it’s nearly parallel, at which point all of the force tries to yank those two flanges apart and then crack the tiny solid part at the pivot pin.
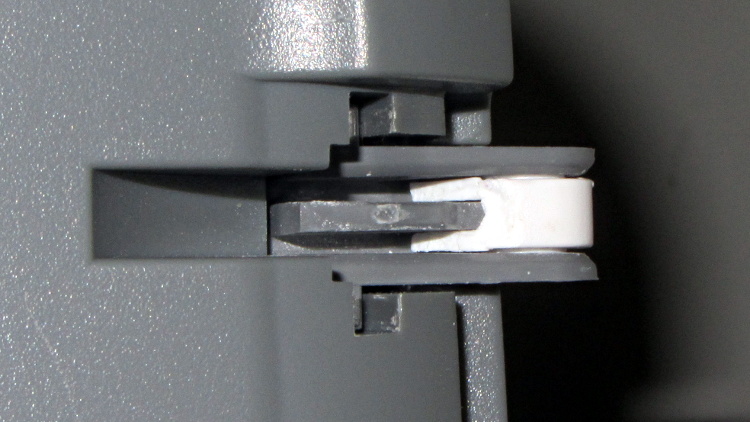
Eventually, it succeeds. This is a view of the scanner base with the gray tab inserted in its slot, with the broken hinge in the “lid up” position:
HP 3970 Scanjet – broken hinge pivot
Clever design, no?
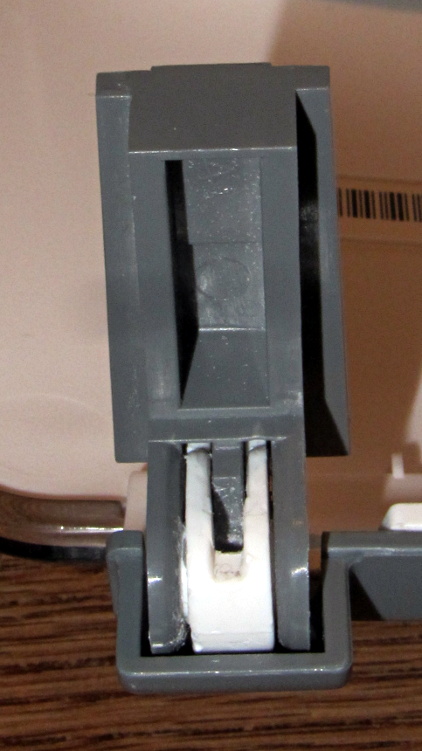
I was unable to extract the broken fragment from the gray tab (actually, unwilling to apply more force, as I cracked part of the gray ring around the hinge pin), so this became an in situ repair. Once again, I applied solvent glue and squished the pieces together:
HP 3970 Scanjet – glued hinge
And clamped it while we ate lunch:
HP 3970 Scanjet – hinge clamping
The brass rod applies the clamping force to the fractured part of the hinge through the pivot point. This isn’t the most stable clamp arrangement you’ve ever seen, but it worked well enough.
I pushed the scanner back half a foot, so the lid now clunks against the wall just before the hinges reach their limit. Maybe they’ll survive until the next visit…
I planned to use an old Dell Inspiron 531S AMD desktop for the LinuxCNC installation, but it turned out to have terrible interrupt latency, despite fiddling with all the available BIOS settings and video drivers. Mostly, it ran fine, but would occasionally burp up a millisecond-long latency spike for no apparent reason. So it’s now on the harvest / recycle heap.
A new-to-me off-lease Dell Optiplex 760 Core 2 Duo in the SDT (Small Desktop Tower) configuration has similar latency numbers:
Optiplex 760 latency – isolcpu 1
What’s important here is that the latency remains rock-solid stable at those numbers. Contrary to my experience with the D520 and D525 Atoms, isolating one CPU for the real-time tasks didn’t make any noticeable difference, but it’s running that way because the overall performance isn’t a problem.
Latency around 20 μs is near the upper limit for successful software step generation at any reasonable pace; the LinuxCNC description has more details. In round numbers, running the M2 at 500 mm/s needs a 40 kHz step rate in 1/16 microstep mode = a 25 μs period, which means 20 μs of jitter wouldn’t work well at all. Which is why I’m using Mesa FPGA card to get hardware step generation: it makes such problems Go Away.
The Optiplex arrived with Windows Vista Business preinstalled; it dates back to mid-2009. I used System Rescue CD to shrink the Windows partition, added a few more, then installed LinuxCNC direct from the CD image (based on Ubuntu 10.04 LTS) and Xubuntu 13.04. The latter serves as a general-purpose installation for times when I don’t need LinuxCNC, because 10.04 is pretty much obsolete for anything other than real-time control.
Digression 1: Yes, 10.04 LTS. TheRTAI project hasn’t released the patches that will slip the real-time kernel under the stock 3.x Linux kernel: LinuxCNC remains stuck at 10.04 LTS. Those changes have been coming Real Soon Now for quite a while; as with most Open Source projects, they could use more manpower and money. This isn’t a problem, as LinuxCNC is used for motion control, not a general-purpose operating system.
The SDT case has room for two PCI cards and one PCI-E video card, so I installed the dual-head video card that couldn’t handle the U2711 monitor’s dual-DVI connection (although I’m using only DVI Output 1) and a Mesa 5i25. The middle “card” is actually a tiny PCB connected to a ribbon cable that brings out a second serial port (remember serial ports?) and what could be either or both of a PS2 keyboard or mouse connection (remember PS/2?).
Optiplex 760 SDT – dual DVI – serial – 5i25
The back panel has a parallel printer port (which may come in handy for something) and a serial port, although you’re expected to have USB mice and keyboards these days. The front panel even has a floppy drive…
Digression 2: LinuxCNC does not require a parallel printer port; this seems to be a common misconception among folks who don’t actually know how it works. The Mesa 5i25 FPGA card with a 7i76 step-direction daughter board provides high-resolution timing for five axes, rotary encoder inputs, a bunch of buffered digital I/O bits, a watchdog timer, plus various other useful odds and ends, all behind handy screw terminals.
The Optiplex 760 has on-board VGA-class video that would also work fine, but the monitor I’m using has its VGA input connected to the box driving the Sherline mill and an unused DVI input. Having that dual-DVI monitor card lying around, I figured I could attach the same monitor to both systems and just poke the monitor’s input section button; I’ve found KVM switches unreliable in this application.
The usual setup preps the system for public-key SSH on a nonstandard port, sets up the NFS mounts, and tweaks this-and-that: it’s running just fine.
Digression 3: SSH kvetches when you swap server boxes at the same IP address, as well it should. If you’re foolish enough to have two separate Linux installs on the same box with the same IP, SSH reminds you every time you boot the other distro…
Mary’s folks enjoy the daily crossword, but they wanted a slightly larger edition… and, after a bit of procrastination, I conjured up an automated way to make it happen, so her father need not do this manually with The GIMP and Xsane.
The scanner, an old HP Scanjet 3970, dropped off the Windows driver list after Vista, so it now runs only with Linux.
Doing the scan is straightforward, as it’s the default scanner:
The X and Y coordinates set the scan dimensions in millimeters, which should be as small as possible consistent with scanning the whole crossword.
The driver produces output image files in PNM format, which isn’t particularly common these days, or TIFF. ImageMagick knows what to do with both of them; I picked PNM.
Unfortunately, for some unknown reason, the SANE driver produces a severely low-contrast image:
HP3900 Grayscale Scan
ImageMagick can produce a histogram:
convert scan.pnm histogram:hist.png
Which shows the problem:
HP3900 Grayscale Histogram
That’s using the grayscale emulation mode: the driver does a Color scan and converts to Gray mode for the output image. It seems having the driver do the conversion produces better results than scanning directly in Color and then applying ImageMagick, but it’s not my scanner and I don’t have a lot of experience with it.
This being Linux, the best way to print something is with either Postscript or PDF. I used PDF, because then we can look at the results with Reader, a more familiar program than, say, Evince:
Which centers the crossword on the page over a white background with enough margin to keep the printer happy:
Crossword – full page
That PDF goes to the default printer queue, where it’s turned into Postscript and comes out exactly like it should:
lp page.pdf
I gimmicked the default printer instance to use only black ink by creating a separate CUPS printer with the appropriate defaults. Other programs pay no attention to that setting and the printer uses colored inks. There is no explanation I can find for any of this; Linux / CUPS printing is basically a black box operation.
In theory, you could print the composited image file as a PNG or some such, but I cannot make it come out the right size in the right place.
You could do all of that in one line, with one huge ImageMagick invocation kicking off the scan and firing the result to the printer, but leaving some intermediate results lying along the trail isn’t necessarily a Bad Thing. I should probably use random temporary file names, though, in the interest of not polluting the namespace.
All this happened remotely, with me signed on through SSH: hooray for the command line. Had to use SCP a few times to fetch those intermediate files to puzzle over the results, too.
Turns out that there’s no difference between the Mac and PC versions of the Logitech Dual Action Gamepad:
Logitech Dual Action Gamepads – Mac vs PC
I picked up a Mac version cheap from the usual eBay seller and discovered that LinuxCNC / HAL was perfectly happy. That wasn’t too surprising; they have the same model and part numbers. Most likely, the only difference was the CD and maybe the Quick Start Guide that I didn’t get in the opened retail box…
So now I have either a hot backup for the Joggy Thing or one for a different box.
Most likely, it was cheap because nobody wants a blue-and-black peripheral next to their shiny white Mac…
Because it seems there’s no good support for separate X sessions with dual monitors these days, the landscape and portrait monitors on my desk represent viewports into a larger pixel array within a single X session. As a consequence, it’s entirely possible to slide windows across the gutter between the two displays (generally producing an essentially unusable result), but one cannot flip through workspaces on only one monitor.
Worse, some programs seem to have trouble remembering that they were last seen on the portrait monitor, so I must rearrange the windows at the start of every session. First world problem, yeah, but still annoying.
I’d previously used devilspie to force windows to their proper places across monitors, sessions, and workspaces, but its s-expression syntax was impenetrable and I eventually gave up using it.
A fork (or continuation or something) called devilspie2 uses lua scripts that I can both read and write. It’s an Ubuntu package and easy to set up.
A typical script in ~/.config/devilspie2 looks like this:
if (get_application_name()=="Firefox") then
   set_window_geometry(0,0,1300,1200);
   maximize_vertically();
end
Putting Adobe Reader on the portrait monitor looks about the same:
if (get_application_name()=="acroread") then
   unmaximize();
   set_window_geometry(2561,0,1000,100);
   maximize();
end
Set /usr/bin/devilspie2 as an auto-started program and it Just Works…
The problem was to get both a landscape and a portrait monitor working. The complexity came from the landscape monitor, a 2560×1440 Dell U2711, which requires either a Dual-Link DVI or HDMI input to reach full resolution. The portrait monitor, an old 1608×1050 Dell 2005FPW, uses Single-Link DVI.
The previous attempt with an nVidia GT430 card failed: both DVI outputs were Single-Link, despite their connector’s appearance. It had worked OK with the previous landscape monitor, a 1600×1200 Dell 2001FP.
So I picked up a low-end nVidia GT610 card that advertised both Dual-Link DVI and HDMI. I plugged the DVI cable into the U2711 and it lit up at full resolution, then I plugged the HDMI into the 2005FPW and it lit right up. By some miracle that didn’t involve tweaking an xorg.conf file, the 2005FPW immediately displayed the pixels lying to the right of the U2711, exactly as I wanted; all I had to do was rotate the image using xrandr.
Not only that, but the version of xsetwacom in Xubuntu 12.10 once again respects the MapToOutput "HEAD-0" option that restricts the stylus to the U2711 monitor. That means I can’t put the GIMP toolbars and suchlike on the portrait monitor, but the U2711 has enough dots to render that moot.
Although the Dell doc strongly suggests that the on-board VGA and Displayport outputs don’t work with a PCI-E video card plugged in, xrandr reports:
Screen 0: minimum 8 x 8, current 3610 x 1680, maximum 16384 x 16384
DVI-I-0 disconnected (normal left inverted right x axis y axis)
VGA-0 disconnected (normal left inverted right x axis y axis)
DVI-I-1 connected 2560x1440+0+0 (normal left inverted right x axis y axis) 597mm x 336mm
   2560x1440      60.0*+
   1920x1200      59.9
   1680x1050      60.0
   1600x1200      60.0
   1280x1024      75.0     60.0
   1280x800       59.8
   1152x864       75.0
   1024x768       75.0     60.0
   800x600        75.0     60.3
   640x480        75.0     59.9
HDMI-0 connected 1050x1680+2560+0 left (normal left inverted right x axis y axis) 434mm x 270mm
   1680x1050      59.9*+
   1280x1024      75.0     60.0
   1152x864       75.0
   1024x768       75.0     60.0
   800x600        75.0     60.3
   640x480        75.0     59.9
I’m not going to connect the DVI-I-0 and VGA-0 outputs; my physical desk has no room for more pixels…
The ~/.xprofile file now looks like:
setxkbmap -option terminate:ctrl_alt_bksp
xrandr --output HDMI-0 --rotate left
xrandr --dpi 100x100
xsetwacom --verbose set "Wacom Graphire3 6x8 stylus" MapToOutput "HEAD-0"
xsetwacom --verbose set "Wacom Graphire3 6x8 eraser" MapToOutput "HEAD-0"