The Smell of Molten Projects in the Morning

Ed Nisley's Blog: Shop notes, electronics, firmware, machinery, 3D printing, laser cuttery, and curiosities. Contents: 100% human thinking, 0% AI slop.

Category: PC Tweakage

Remembering which tweaks worked

  • Linux Mint Login: HTML vs. GDM

    Linux Mint uses an HTM-based login screen that displays an assortment of lush images. That would be fine, except that on the Lenovo Q150, the rendering engine (or whatever you call it) drives one core at full throttle whenever the login screen is up. That turns out to be all the time when I’m signed in through ssh and, for that box, the HTML engine is just a sucking chest wound.

    To fix that:

    System → Login → Theme tab

    Mint Linux - Login Theme Selection
    Mint Linux – Login Theme Selection

    Then pick any theme using GDM rather than HTML; they’re marked to the right of the theme name.

    Being that type of guy, I picked SimpleGreeter, which presents a dead-centered field in a blank screen:

    Mint Linux - SimpleGreeter Login
    Mint Linux – SimpleGreeter Login

    Set it to auto-select the previous user (in the Options tab) and you’re good to go.

    Burns zero CPU and works for me, anyhow.

  • Lenovo Q150: Setup for HP 7475A Plotter Demo

    Starting with a blank 120 GB SSD, I had to disable the “Plug-n-Play OS” BIOS option to get the Lenovo Q150 to boot from a System Rescue CD USB stick. While the hood was up, I told the BIOS to ignore keyboard errors so it can boot headless.

    Partitioning:

    • 50 GB ext4 partition for Mint
    • 8 GB swap
    • The remainder unallocated

    Booting & installing Mint Linux 17.2 XFCE from another USB stick went smoothly, after which it inhaled the usual gazillion updates. Rather than wait for the auto-updater to wake up and smell the repositories, I generally get it done thusly:

    sudo apt-get update
    sudo apt-get upgrade
    apt-get dist-upgrade
    apt-get autoremove
    

    Add my user to the dialout group, so I have access to the USB serial converter on /dev/ttyUSB0 that will drive the plotter.

    Configure a static IP address that appears in the appropriate /etc/hosts files.

    Install some useful packages:

    • nfs-common
    • openssh-server
    • htop and iotop

    Set up ssh for public key authentication, rather than passwords, on an unusual port, so everything else can happen from the Comfy Chair upstairs.

    Install packages that Chiplotle will need:

    • build-essential
    • python-setuptools
    • python-dev
    • python-numpy
    • python-serial
    • hp2xx

    I think some of those would be auto-installed as dependencies by the next step, but now I can remember what they are for the next time around this action loop:

    sudo easy_install -U chiplotle
    ... blank line to show underscore above ...
    

    Plug the old hard drive into a USB-SATA adapter to copy:

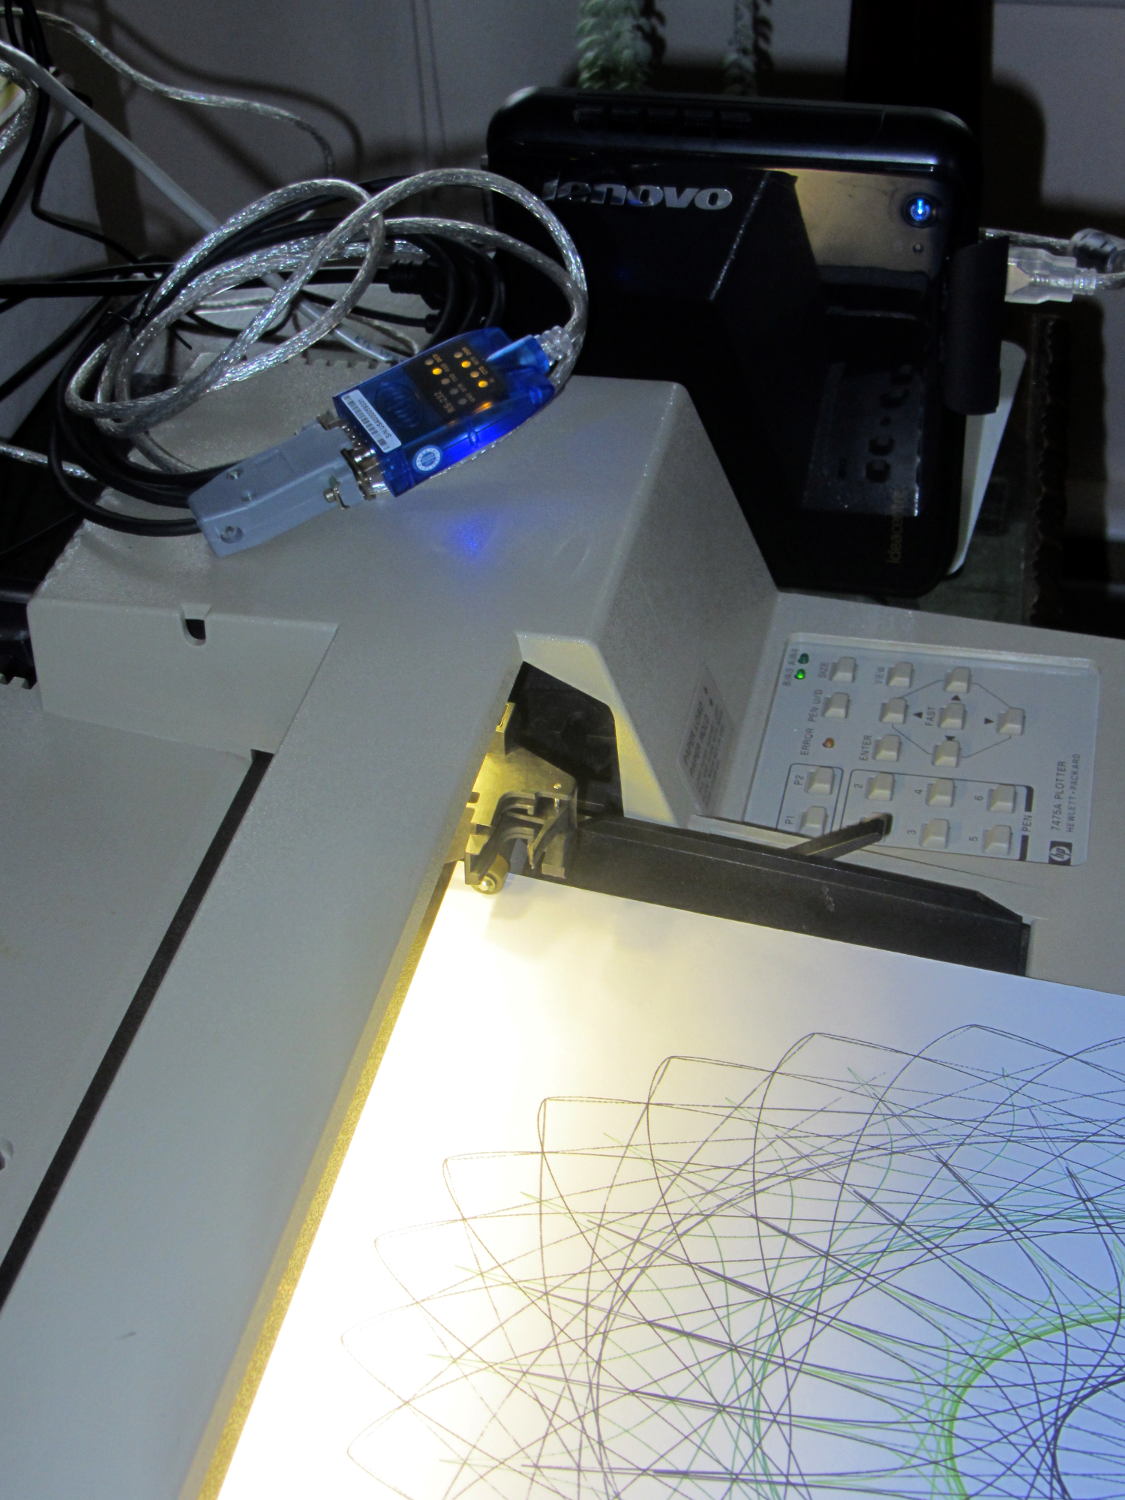
    Then chuck up some paper and pens to let it grind out art:

    HP 7475A - demo plot
    HP 7475A – demo plot

    It’s good clean fun…

  • Lenovo Q150: Opening the Case For an SSD

    A pre-Christmas sale brought a cheap SSD that rendered my oath not to install one in the Lenovo Q150 inoperative, so I had to figure out how to open the case. Removing the visible screws didn’t release the cover, but some exploratory prying eventually popped the internal snap latches. Knowing the latch & screw locations will simplify harvesting the SSD when that time comes…

    Front (with USB & SPDIF jacks):

    Lenovo Q150 - case latches - front
    Lenovo Q150 – case latches – front

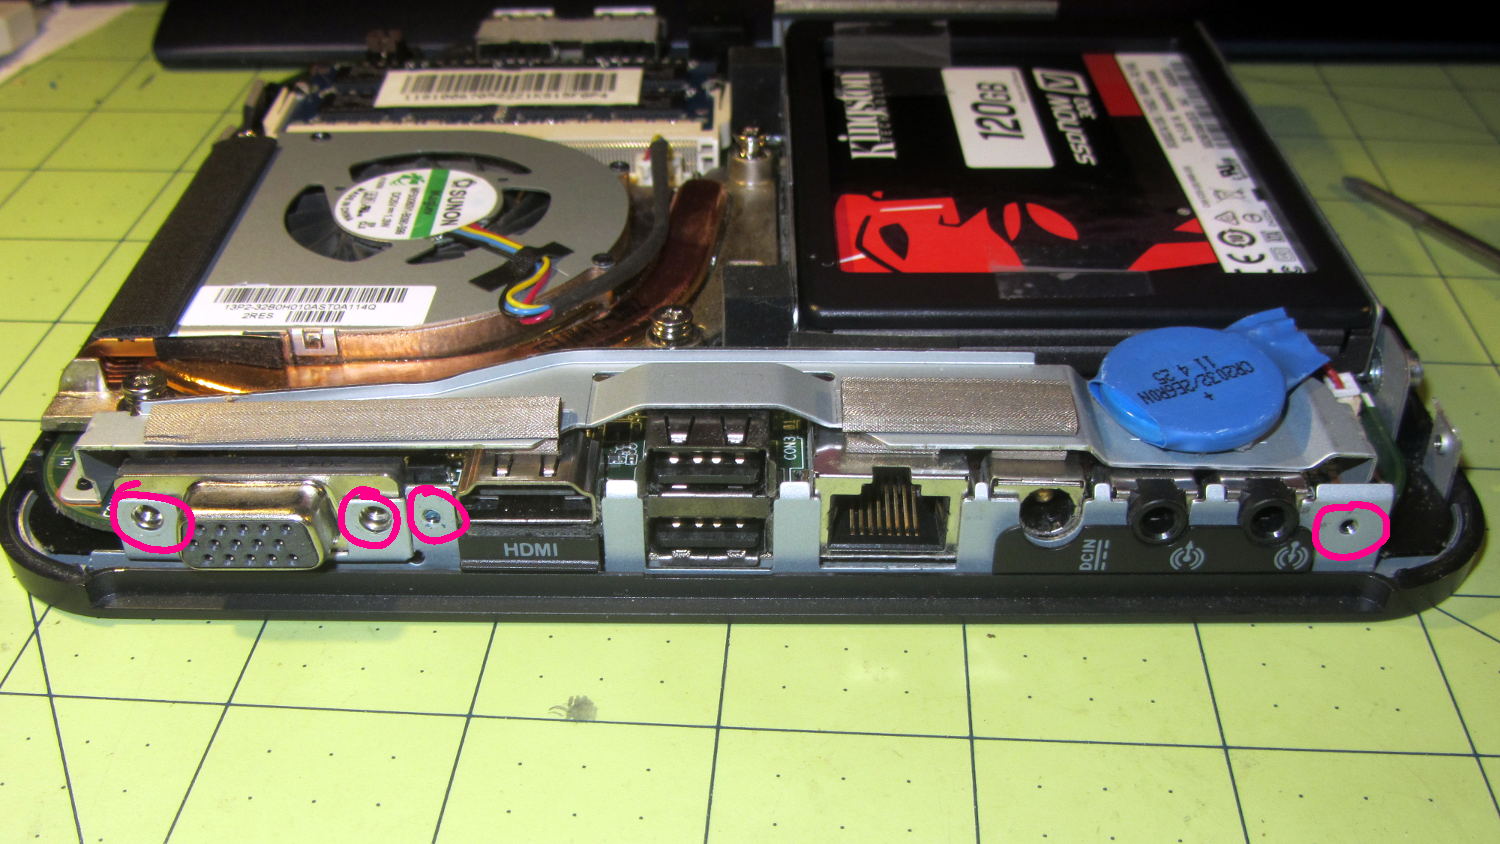
    Rear (with all the other jacks):

    Lenovo Q150 - case screws - rear
    Lenovo Q150 – case screws – rear

    Top (with the heatsink outlet):

    Lenovo Q150 - case latches - top
    Lenovo Q150 – case latches – top

    Bottom (with the mounting boss):

    Lenovo Q150 - case latch screws - bottom
    Lenovo Q150 – case latch screws – bottom

    With the cover off, the inside looks like this:

    Lenovo Q150 - interior overview
    Lenovo Q150 – interior overview

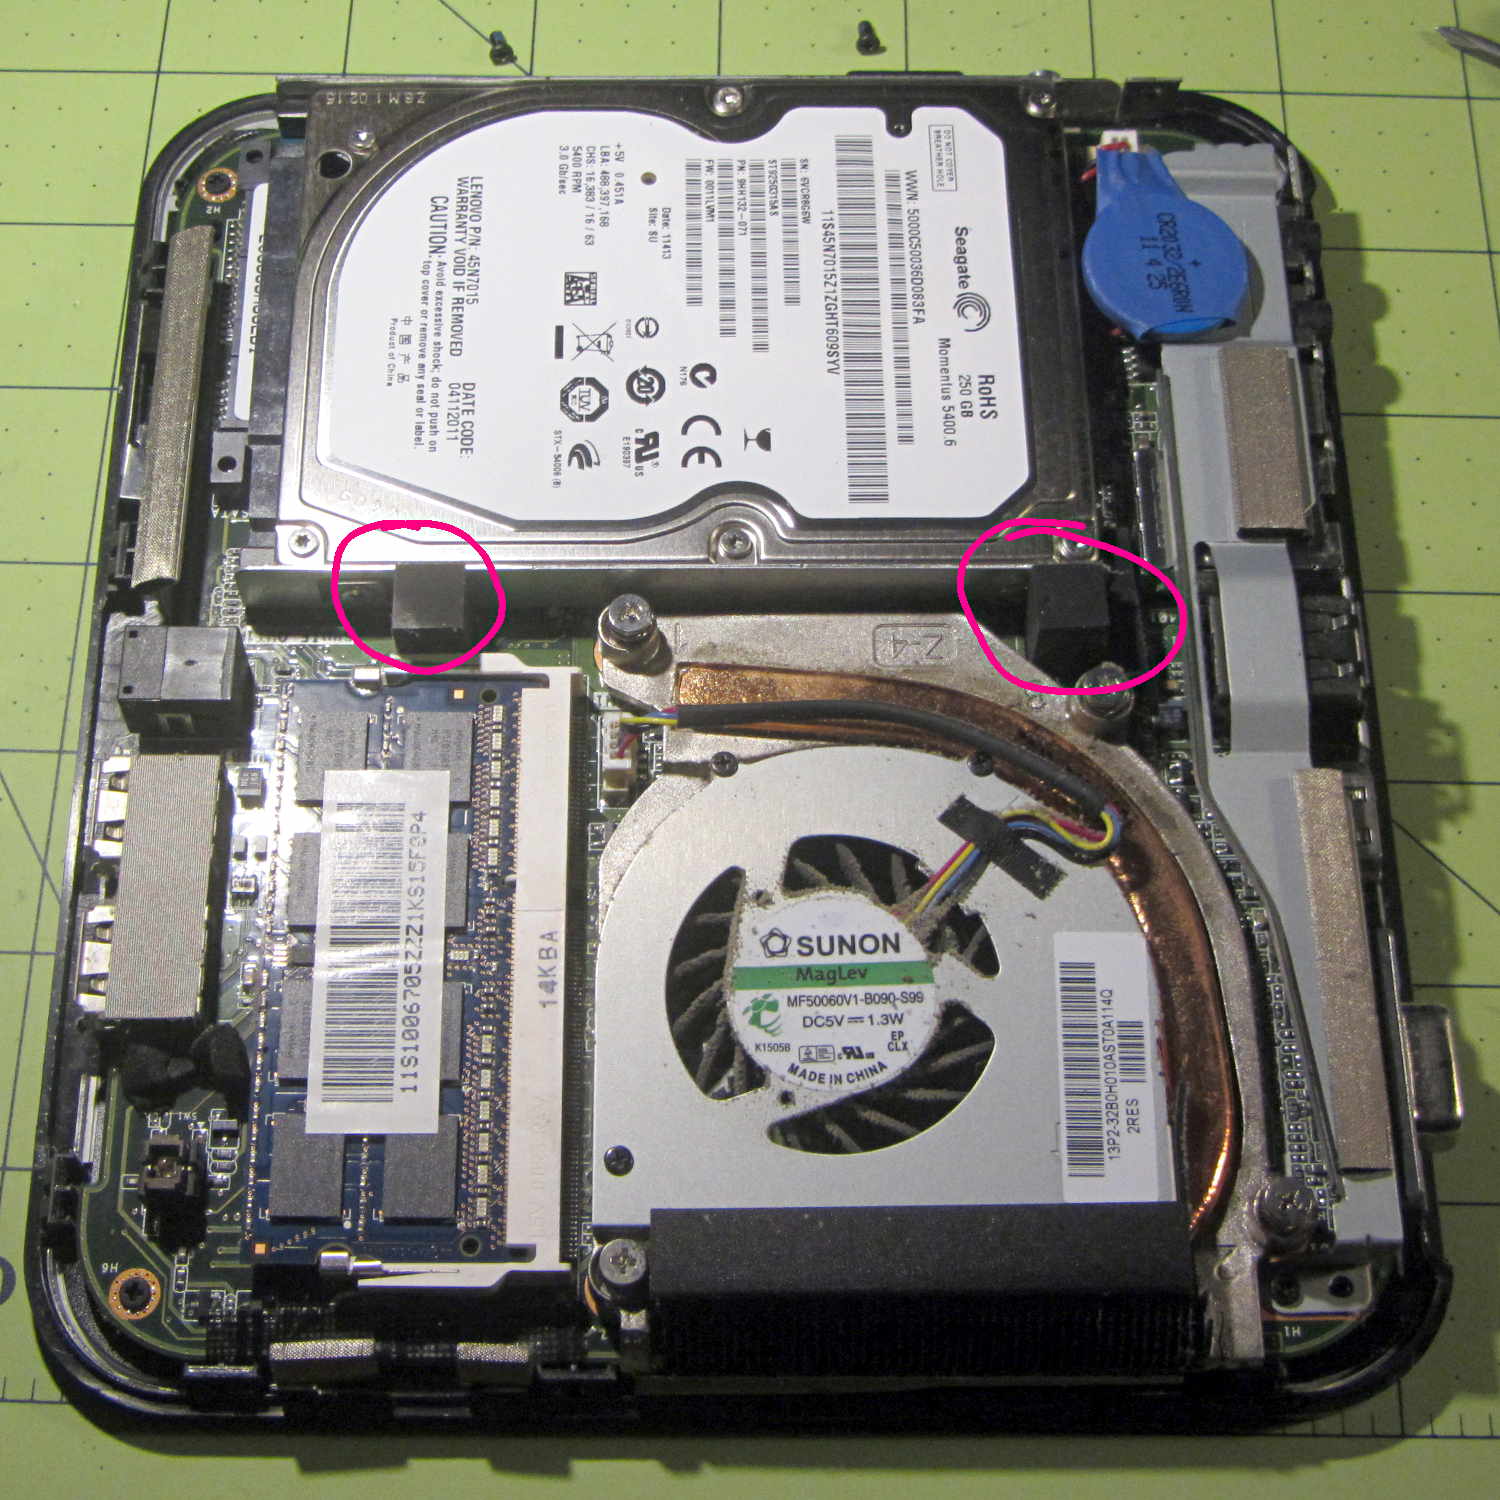
    The two rubber blocks glued to the hard drive bracket (carrier / sled / whatever) conceal the screws holding that side to the chassis. However, removing the blocks and the screws didn’t release the bracket, because it had what looked like a black adhesive layer below the screw flanges:

    Lenovo Q150 - hidden drive bracket screw
    Lenovo Q150 – hidden drive bracket screw

    Gentle prying from the edge of the bracket eventually released it, showing that the black plastic was just an insulating layer. Below that, two thin foam strips had firmly affixed themselves to the PCB, despite not having any adhesive on that side:

    Lenovo Q150 - drive bracket - foam strips
    Lenovo Q150 – drive bracket – foam strips

    With the bracket on the bench, installing the SSD went exactly as you’d expect and reinstalling the cover was, quite literally, a snap.

  • Forcing UDEV to Not Rename Network Adapters

    I use System Rescue CD to repartition / backup / restore hard drive partitions, but a not-very-recent change to udev caused the familiar eth0 name to come up as something like enp0s26u1u2 on the Lenovo Q150. Which would be OK, but feeding either that or eth0 into net-setup causes it to fall over dead.

    Avoiding that mess requires an incantation in the kernel boot parameters: select a main boot option, hit Tab, type net.ifnames=0 (with a leading space), and whack Enter to boot. Then good old eth0 appears where it should and everything works.

    It’s annoying, but not quite enough to create a specialized SysRescCD image with that incantation preloaded.

  • Lenovo Q150 Restoration Utility

    The general idea was to put the old Lenovo Q150 to work as a dedicated Superformula generator attached to the HP 7475A plotter: connect the serial cable, fire ’em up, and It Just Works. As part of the first pass, I installed Mint Linux atop an old Ubuntu install, got Python & Chiplotle set up, and That Just Works:

    Lenovo Q150 with HP 7475A
    Lenovo Q150 with HP 7475A

    However, the Q150 sports a dual-core Intel Atom, underpowered even back in the day, that hasn’t gotten any peppier over the years. The Lenovo-installed Windows 7 pushed the CPU hard enough to require full-throttle fan whine, even at idle, and mysterious issues with memory usage (something involving a memory leak in svchost.exe or perhaps over-aggressive Windows Update prefetching) reduced performance to a crawl as the system paged its brains out to the 5400 RPM laptop-style drive (*). As part of this adventure, I figured I’d boot the Lenovo restore partition and burn Win 7 back to bedrock before installing Mint.

    Turns out that the Lenovo restore utility doesn’t work when the drive has an unusual partition structure; it tells you to repartition the drive and try again. So I blew away the Ubuntu installation’s extended partition (containing swap, main, and spare partitions), then rebooted, only to discover that, of course, the missing partitions contain Grub’s later stages. Having previously wasted far too much time trying to resuscitate various half-dead Grubs, I created a fourth partition, installed Mint Linux (ignoring its strenuous objections about not having a swap partition) to refresh Grub, booted the Lenovo restore utility, and ended up at a raw Windows terminal emulator box atop a picture of some weird tropical greenery. Apparently the restore utility depends on something that got blown away during all the flailing around.

    So, just for completeness, I shrank Mint a bit, added a swap partition, and got the results shown above. One core runs at 100%, probably dribbling bytes to the USB-to-serial adapter, but the thing runs much cooler. In this context, it should be noted, a 110 °F surface and 140 °F exhaust temperature counts as “cool”; the fan isn’t at full throttle, but it’s surprisingly noisy for a computer billed as a multimedia streaming device.

    I actually have a complete backup of the original contents of all three partitions, so I could whack it back to mid-2011. Modulo, of course, resetting the actual partition sizes and positions and suchlike, which I’m sure will be vital to having the restore utility do its thing. Maybe that’s worthwhile just to remind me why it’s such a terrible idea.

    (*) Blowing $50 on an SSD is so not happening, OK?


  • Fixing the Sudo Timeout

    So I can find it again, the way to change the sudo timeout for a particular user (that would be me) involves adding a line to the /etc/sudoers file using sudo visudo, thusly:

    Defaults:       ed timestamp_timeout=90
    # blank line to make the underscore visible

    Note the colon! Should you add the timeout to the global Defaults env_reset line, then everybody gets a monster timeout, which may not be what you want.

    You can change the default editor (nano in Ubuntu) thusly:

    sudo update-alternatives --config editor

    Or, in Arch / Manjaro, add a stanza:

    Defaults	editor=/usr/bin/nano

    Because my vi hand is weak:

    • :wq to save & exit
    • :q! to bail out
    • i and a at cursor, I and A in line
    • o and O at line
    • ␛ back to command mode

    That’s all I need to insert the proper stanza & move on.

  • Time Warner RoadRunner vs. SSH: Help Wanted

    So Time Warner updated the infrastructure upstream of Mary’s folks and installed a new cable modem / router, which killed my remote access using ssh (with RSA keys, passphrases, nonstandard ports, fixed internal IP addresses, port forwarding, port triggers, and all the Right Stuff). I just spent a harried pair of days trying and failing to figure out how to make this work again.

    My laptop can ssh into my file server from our house network, both wired and wireless. Ditto when it’s on the Squidwrench Operating Table. Ditto from the low-quality Hampton Inn WiFi near her folks. Plunked on their desk and jacked into their router, however, that outbound ssh times out somewhere between their bits and my basement.

    I dinked with the TW Surfboard modem / router, added the appropriate port forwarding & triggers, dialed back the firewall intensity, and ssh flat out doesn’t work in either direction from any PC (all running various Linus flavors). No diagnostics, no logs, nothing that I could find.

    From the outside (our house or the Hampton), there’s no response from the PCs inside (on their desk). I’m not trying a loopback from inside to inside, which I know doesn’t work with consumer-grade routers. I’d planned to ssh from there to my basement file server, then ssh back to verify that the connections worked, but the outbound connection doesn’t work.

    Probably unrelated, but equally frustrating: trying to configure Thunderbird’s outbound SMTP with their email server flat-out doesn’t work. Either the username / password isn’t valid (it is), various combination of ports / security / encryption (including the ones in the TW FAQs) don’t survive the configuration test, or a seemingly valid configuration doesn’t actually transmit email. Incoming email works only in IMAP mode, not POP3.

    I finally set up outbound TW email to bankshot through his Gmail account, which will probably have unforeseen side effects.

    The usual Google searches were unavailing, other than several notes suggesting that if you have any other choice of ISP or email provider than TW, do that. But it’s not like they have any choice; Verizon provides 1 Mb/s (!) DSL in that area and satellite Internet isn’t going to happen in an apartment.

    Obviously, I’m doing several things wrong, but I have no idea what else to try. I’ve set up email and remote access often enough to get a whole bunch of things right, but that sure didn’t help with TW.

    Any suggestions?