The Smell of Molten Projects in the Morning

Ed Nisley's Blog: Shop notes, electronics, firmware, machinery, 3D printing, laser cuttery, and curiosities. Contents: 100% human thinking, 0% AI slop.

Category: Machine Shop

Mechanical widgetry

  • Lip Balm Holder

    A bit of tinkering with the OpenSCAD code that produced the DeoxIT bottle holder delivered a place for the cylindrical objects we use just before cycling:

    Lip Balm Holder
    Lip Balm Holder

    The tubes are 1.5 diameters tall, minus a skosh, so the cylinders stand neatly inside and don’t want to fall over. I added about 1 mm clearance and you could taper the cylinder openings for E-Z insertion, although we can eke out a miserable existence with this thing as-is.

    It works exactly as you’d expect:

    Lip Balm Holder - in action
    Lip Balm Holder – in action

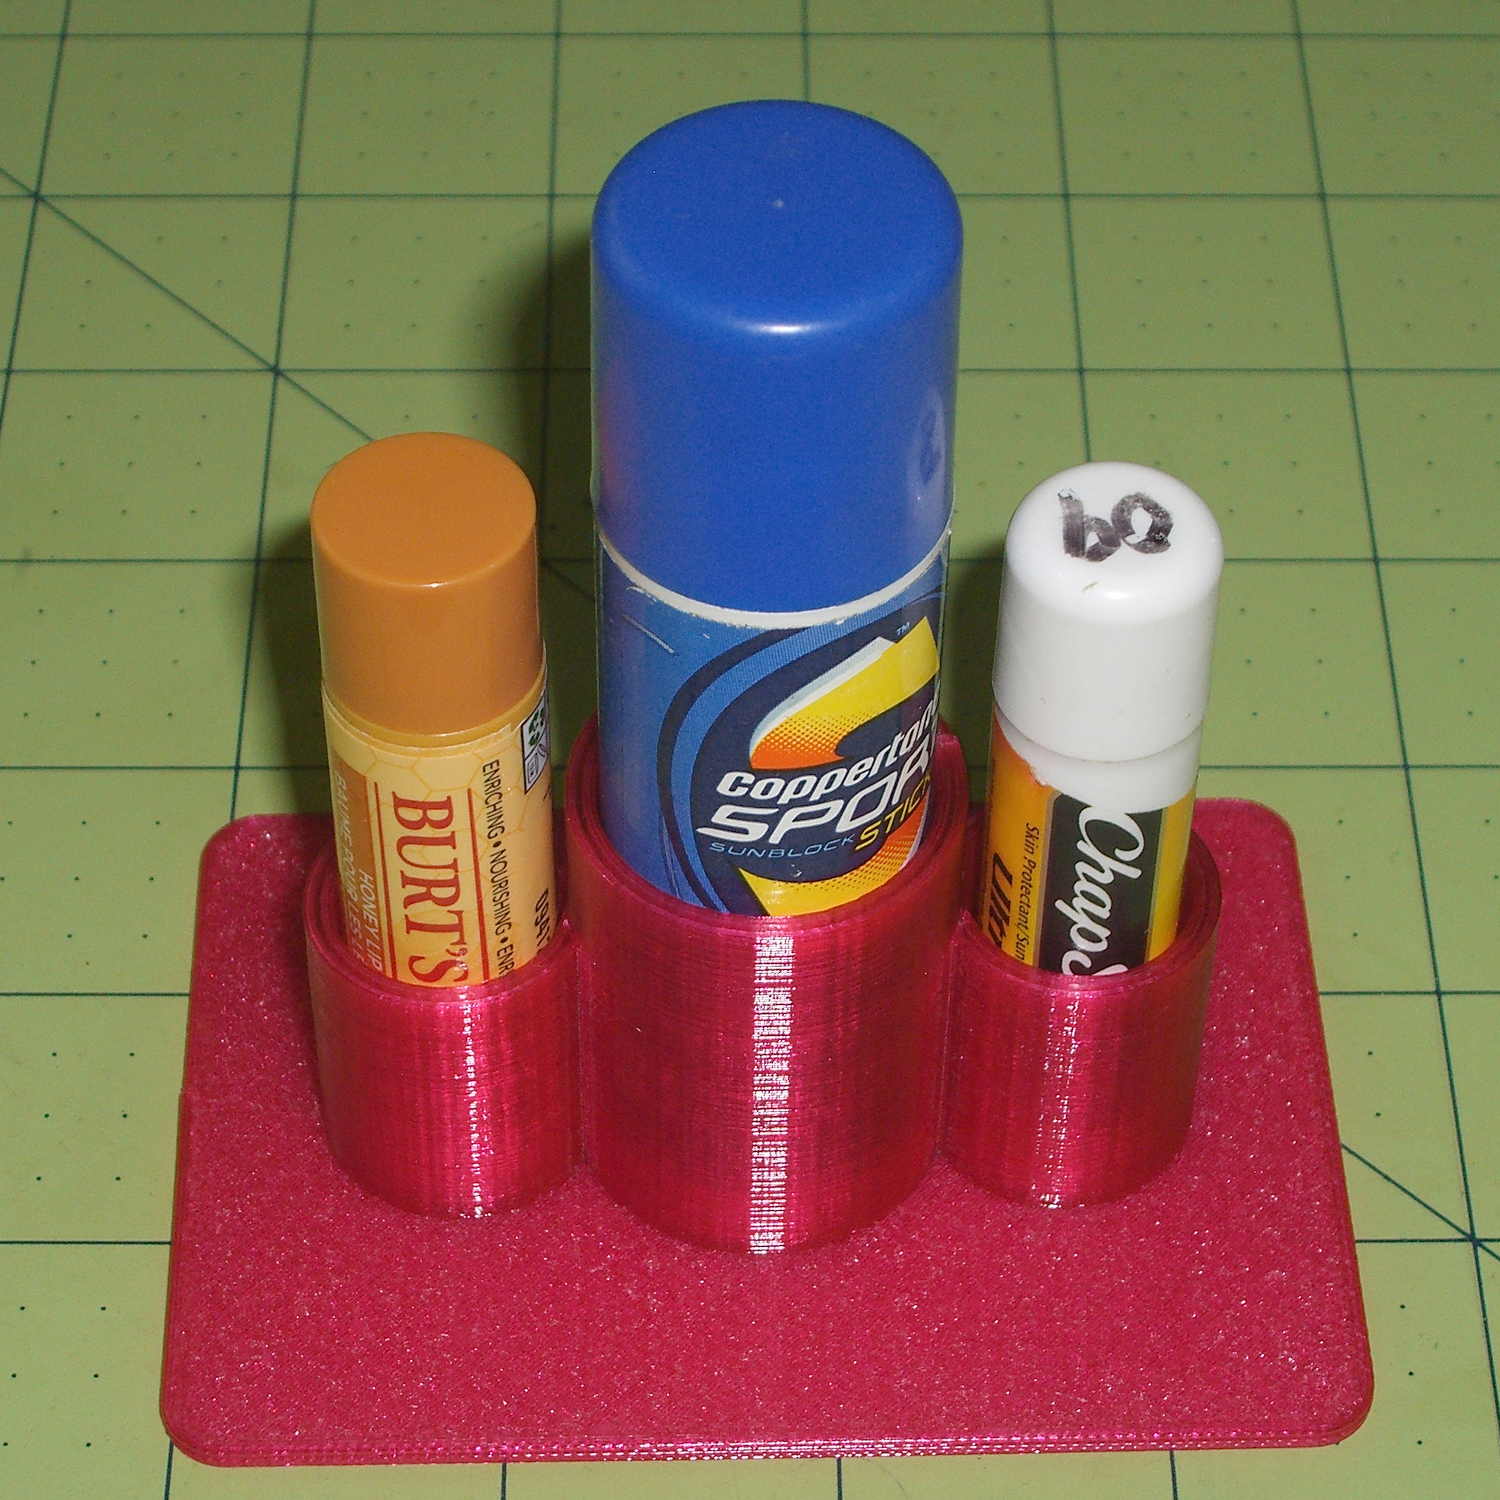
    That big stick in the middle is actually skin sunscreen, not lip balm; let’s not get all pedantic. The intent is to keep those cylinders from rolling off the shelf and falling into awkward locations, which this will do.

    The OpenSCAD source code is strictly from empirical:

    // Lip Balm Tube Holder
    // Ed Nisley KE4ZNU - July 2015
    
    //- Extrusion parameters - must match reality!
    
    ThreadThick = 0.25;
    ThreadWidth = 0.40;
    
    function IntegerMultiple(Size,Unit) = Unit * ceil(Size / Unit);
    
    Protrusion = 0.1;
    
    HoleWindage = 0.2;
    
    //------
    // Dimensions
    
    Tubes = [18,26];			// tube diameters plus clearance
    
    WallThick = 2.0;
    
    Plate = [1.5*(Tubes[1] + 2*Tubes[0]),2.5*Tubes[1],IntegerMultiple(2.0,ThreadThick)];
    PlateRound = 5.0;
    
    NumSides = 8*4;
    
    //- Build it
    
    	hull() {
    		for (i=[-1,1], j=[-1,1]) {
    			translate([i*(Plate[0]/2 - PlateRound),j*(Plate[1]/2 - PlateRound),0])
    				cylinder(r=PlateRound,h=Plate[2],$fn=NumSides);
    		}
    	}
    
    	translate([0,0,Plate[2]/2])
    		rotate(180/NumSides)
    			difference() {
    				cylinder(d=(Tubes[1] + 2*WallThick),h=1.5*Tubes[1],$fn=NumSides);
    				cylinder(d=Tubes[1],h=1.5*Tubes[1] + Protrusion,$fn=NumSides);
    			}
    
    	for (i=[-1,1])
    		translate([i*((Tubes[1] + Tubes[0])/2 + 1.0*WallThick),0,Plate[2]/2])
    			rotate(180/NumSides)
    				difference() {
    					cylinder(d=(Tubes[0] + 2*WallThick),h=1.5*Tubes[0],$fn=NumSides);
    					cylinder(d=Tubes[0],h=1.5*Tubes[0] + Protrusion,$fn=NumSides);
    			}
    
  • HP 7475A Plotter: Ceramic-Tip Pen Refill

    The ceramic-tip green pen I’ve been using finally ran dry and, having nothing to lose, I tried refilling it.

    Grabbing the metal ferrule in the drill press chuck provided enough traction to twist / pull it off, revealing the pen nib assembly inside:

    HP 7475A Ceramic-tip pen - ferrule
    HP 7475A Ceramic-tip pen – ferrule

    A pin vise provided enough traction to remove the nib, which had the expected fiber cylinder extending into the ink reservoir:

    HP 7475A Ceramic-tip pen - disassembly
    HP 7475A Ceramic-tip pen – disassembly

    I injected 0.5 ml of yellow ink from my lifetime supply of bulk inkjet ink (*), then tried to inject 0.5 ml of cyan, which promptly overflowed. In retrospect, allowing a few minutes for the new ink to seep into whatever’s inside the reservoir would be prudent.

    After wiping the mess off the pen and reassembling it in reverse order, it works just like new:

    HP 7475A Ceramic-tip pen - C-Y refill
    HP 7475A Ceramic-tip pen – C-Y refill

    During the course of the first plot, the trace went from green to deep blue-green to a different green, which suggests the yellow ink took a while to make its presence known. No problem; whatever comes out of that tip is all good with me.

    The stain around the rim of the pen body above the flange suggests a cap that might come off with sufficient persuasion. If it’s firmly fused to the flange, which would make perfect sense, injecting ink through a small hole drilled in the end might produce better results than ripping the nib out yet again.

    (*) This leftover came from the never-sufficiently-to-be-damned HP2000C inkjet printer. ‘Nuff said.

  • HP 7475A Plotter: Superformula Demo

    Setting n2=n3=1.5 generates smoothly rounded shapes, rather than the spiky ones produced by n2=n3=1.0, so I combined the two into a single demo routine:

    HP 7475A - SuperFormula patterns
    HP 7475A – SuperFormula patterns

    A closer look shows all the curves meet at the points, of which there are 37:

    HP 7475A - SuperFormula patterns - detail
    HP 7475A – SuperFormula patterns – detail

    The spikes suffer from limited resolution: each curve has 10 k points, but if the extreme end of a spike lies between two points, then it gets blunted on the page. Doubling the number of points would help, although I think this has already gone well beyond the, ah, point of diminishing returns.

    I used the three remaining “disposable” liquid ink pens for the spiked curves; the black pen was beyond repair. They produce gorgeous lines, although the magenta ink seems a bit thinned out by the water I used to rinse the remains of the last refill out of the spiral vent channel.

    I modified the Chiplotle supershape() function to default to my choices for point_count and travel, then copied the superformula() function and changed it to return polar coordinates, because I’ll eventually try scaling the linear value as a function of the total angle, which is much easier in polar coordinates.

    The demo code produces the patterns in the picture by iterating over interesting values of n1 and n2=n3, stepping through the pen carousel for each pattern. As before, m should be prime/10 to produce a prime number of spikes / bumps. You could add more iteration values, but six of ’em seem entirely sufficient.

    A real demo should include a large collection of known-good parameter sets, from which it can pick six sets to make a plot. A legend documenting the parameters for each pattern, plus the date & time, would bolster the geek cred.

    The Python source code with the modified Chiplotle routines:

    from chiplotle import *
    from math import *
    
    def superformula_polar(a, b, m, n1, n2, n3, phi):
       ''' Computes the position of the point on a
       superformula curve.
       Superformula has first been proposed by Johan Gielis
       and is a generalization of superellipse.
       see: http://en.wikipedia.org/wiki/Superformula
       Tweaked to return polar coordinates
       '''
    
       t1 = cos(m * phi / 4.0) / a
       t1 = abs(t1)
       t1 = pow(t1, n2)
    
       t2 = sin(m * phi / 4.0) / b
       t2 = abs(t2)
       t2 = pow(t2, n3)
    
       t3 = -1 / float(n1)
       r = pow(t1 + t2, t3)
       if abs(r) == 0:
          return (0,0)
       else:
     #     return (r * cos(phi), r * sin(phi))
         return (r,phi)
    
    def supershape(width, height, m, n1, n2, n3,
       point_count=10*1000, percentage=1.0, a=1.0, b=1.0, travel=None):
       '''Supershape, generated using the superformula first proposed
       by Johan Gielis.
    
       - `points_count` is the total number of points to compute.
       - `travel` is the length of the outline drawn in radians.
          3.1416 * 2 is a complete cycle.
       '''
       travel = travel or (10*2*pi)
    
       ## compute points...
       phis = [i * travel / point_count
          for i in range(1 + int(point_count * percentage))]
       points = [superformula_polar(a, b, m, n1, n2, n3, x) for x in phis]
    
       ## scale and transpose...
       path = [ ]
       for r, a in points:
          x = width * r * cos(a)
          y = height * r * sin(a)
          path.append(Coordinate(x, y))
    
       return Path(path)
    
    ## RUN DEMO CODE
    
    if __name__ == '__main__':
       paperx = 8000
       papery = 5000
       if  not False:
         plt=instantiate_plotters()[0]
         plt.set_origin_center()
         plt.write(hpgl.VS(10))
         pen = 1
         for m in [3.7]:
            for n1 in [0.20, 0.60, 0.8]:
              for n2 in [1.0, 1.5]:
                  n3 = n2
                  e = supershape(paperx, papery, m, n1, n2, n3)
                  plt.select_pen(pen)
                  if pen < 6:
                     pen += 1
                  else:
                     pen = 1
                  plt.write(e)
         plt.select_pen(0)
       else:
         e = supershape(paperx, papery, 1.9, 0.8, 3, 3)
         io.view(e)
    
  • HP 7475A Plotter: Exploring SuperFormula Parameters

    Although the Superformula can produce a bewildering variety of patterns, I wanted to build an automated demo that plotted interesting sets of similar results. Herewith, some notes after an evening of fiddling around with the machinery.

    Starting with the original Chiplotle formula, tweaked for B size paper:

    ss=geometry.shapes.supershape(8000,5000,5.3,0.4,1,1,point_count=1+10*1000,travel=10.001*2*math.pi)

    The first two parameters set the more-or-less maximum X and Y values in plotter units; the plot is centered at zero and will extend that far in both the positive and negative directions. For US paper:

    • A = Letter = 11 x 8½ inch → 4900 x 3900
    • B = 17 x 11 inch → 8000 x 5000

    The point_count parameter defines the number of points to be plotted for the entire figure. They’re uniformly distributed in angle, not in distance, so some parts of the figure will plot very densely and others sparsely, but the plotter will connect all of the points with straight lines and it’ll look reasonably OK. For the figures below, 10*1000 works well.

    The travel value defines the number of full cycles that the figure will make, in units of 2π. Ten cycles seems about right.

    The four parameters in between those are the m, n1, n2, and n3 values plugged directly into the basic Superformula. The latter two are exponents of the trig terms; 1.0 seems less bizarre than anything else.

    Sooo, that leaves only two knobs…

    With travel set for 10 full cycles, m works best when set to a value that’s equal to prime/10, which produces prime points around the figure. Thus, if you want 11 points, use m=1.1 and for 51 points, use m=5.1. Some non-prime numbers produce useful patterns (as below), others collapse into just a few points.

    The n1 parameter is an overall exponent for the whole formula in the form -1/n1. Increasing values, from 0.1 to about 2.0, expand the innermost points of the pattern outward and turn the figure into more of a ring and less of a lattice.

    So, for example, with m=3.1, setting n1= 0.15, 0.30, 0.60 produces this pattern with 31 points:

    HP 7475A - Superformula - m 3.1 vary n1
    HP 7475A – Superformula – m 3.1 vary n1

    Varying both at once, thusly:
    (m,n1) = (1.9,0.20)=green (3.7,0.30)=red (4.9,0.40)=blue
    produces this pattern:

    HP 7475A - Superformula - m 1.9 3.7 4.9 n1 0.2 0.3 0.4
    HP 7475A – Superformula – m 1.9 3.7 4.9 n1 0.2 0.3 0.4

    Yeah, 49 isn’t a prime number. It’s interesting, though.

    Note that n1 doesn’t set the absolute location of the innermost points; you must see how it interacts with m before leaping to any conclusions.

    It’s still not much in the way of Art, but it does keep the plotter chugging along for quite a while and that’s the whole point. I must yank the functions out of the Chiplotle library, set my default values, add one point to automagically close the last vertex, and maybe convert them to polar coordinates to adjust the magnitude as a function of angle.

    Yes, that poor green ceramic-tip pen is running out of ink after all these decades.

  • Monthly Science: Basement Humidity Step Changes

    Can you tell when our dehumidifier failed?

    Basement Temp Humidity - 2015-05 to 2015-07
    Basement Temp Humidity – 2015-05 to 2015-07

    The step change in Week 22 shows when the replacement took over. After some poking around, Amazon Prime FTW.

    The square-ish pulse starting in Week 26 marks a change from 55% RH to 60%RH and back again, to see how the front panel meter compares with the low end lab-grade hygrometer in the other side of the basement near the Hobo datalogger on the water inlet; they’re all off by a bit, but well within their expected tolerances. The 5% RH height of the step suggests a good match between their incremental calibrations.

    It seems dehumidifiers last a few years, no matter which Brand Name you’ve decided to trust, so there’s not much point in developing a deep emotional attachment.

    For the record, the old dehumidifier sported a GE label:

    GE Dehumidifier label
    GE Dehumidifier label

    The new one says Frigidaire on the front, but the label says Electrolux:

    Fridgidaire - Electrolux Dehumidifier label
    Fridgidaire – Electrolux Dehumidifier label

    As it turns out, Electrolux bought Frigidaire a while ago, then absorbed GE’s appliances in 2014, so they’re all one big happy family now.

    The various names notwithstanding, a recall notice suggests Gree Electric actually makes all the dehumidifiers badged with Brand Names you might think represent something significant.

  • Folding Saw Rework

    Mary found a folding saw buried under a compost heap at Vassar Farms, where it had evidently been for quite a while. It cleaned up surprisingly well:

    Folding saw - pivot shim
    Folding saw – pivot shim

    I made a crude brass shim to stabilize the crude blade in its crudely bent metal frame; the ugly hole came from freehand punching with the rebuilt leather punch tool. Probably spent as much time doing that as they did on the whole rest of the saw: it’s not a high-quality tool.

    It could be an older version of the Harbor Freight Folding Saw, minus a fancy plastic-encased joint screw. I added a dot of Loctite to discourage this one from leaping to its doom.

    As with the other pruning saws in my collection, that blade scares me just looking at it. I managed to avoid slicing myself open, although I did stab a finger with a sharp brass sliver…

  • Silhouette Glasses: Temple Re-repair

    This was not the failure mode I expected:

    Silhouette temple - failed repair
    Silhouette temple – failed repair

    As failures go, that one’s survivable; slightly larger epoxy dots should do the trick:

    Silhouette temple - re-repair
    Silhouette temple – re-repair

    The other temple worked loose inside the brass tube and rotated freely, so I yanked it out, bashed the tip slightly flatter, and epoxied it back in place, along with overcoating the epoxy dots on the lens to forestall another failure.

    This has obviously blown right by the point of absurdity, but …