The groundhog responsible for trimming the lawn greenery in our area has discovered the long-disused driveway salt barrel:

There’s always another appointment on the calendar, though:

A busy critter with no time to waste!
The Smell of Molten Projects in the Morning
Ed Nisley's Blog: Shop notes, electronics, firmware, machinery, 3D printing, laser cuttery, and curiosities. Contents: 100% human thinking, 0% AI slop.
Things around the home & hearth

The groundhog responsible for trimming the lawn greenery in our area has discovered the long-disused driveway salt barrel:
There’s always another appointment on the calendar, though:
A busy critter with no time to waste!

After four years, I finally had occasion to use the blue label cartridge, only to have the tape refuse to feed. The mess on the tongue sticking out shows the result after I forcibly pulled the tape from the cartridge:

The proximate cause was a fold in the imaging tape takeup path causing the driven spool to stop turning:

Some delicate unspooling, unfolding, and respooling put things back in order.
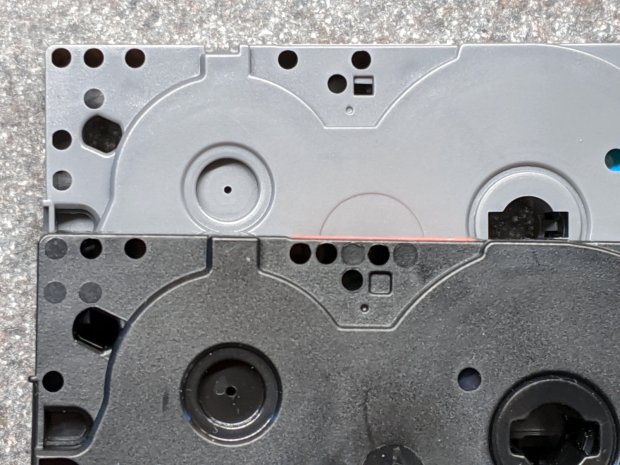
However, with the cartridge opened on the desk, it became obvious this was the cheapnified version:

Compare with a genuine Brother cartridge:

In the genuine cartridge, the base tape (with the sticky side and the colored side) feeds from the lower right directly into the assembly pressure roller. The transparent cover tape feeds from the spool in the lower left, up around the imaging tape supply spool, has the image fused to it, and is then pressed against the base tape on the assembly roller.
Update: Per david’s comment, the cartridges are even more complex than I thought! The printer has sense pins matching a group of cartridge holes to determine (at least) the tape size & orientation. See the pix added below.
Despite using the same cartridge body, the cheapnified tape path is entirely different. The base tape now feeds from the spool in the lower right through what should be the cover tape supply reel, around the imaging film supply spool, has the image fused directly to it, then passes out through the assembly pressure roller.
The cover tape is completely missing!
It turns out the cheapnified cartridges don’t bother with lamination. Instead, the printhead presses the imaging film against the top of the base tape, leaving the black image exposed to the elements. The assembly roller does nothing, apart from pulling the base tape through the cartridge.
Now that I know what to look for, the visible difference is the orientation of the base tape. A cartridge with the correct innards feeds the base tape with the colored side + image facing away from the long side of the cartridge. A cheapnified cartridge has the color + image facing the long side, with the major benefit of making the advertising look more appealing:

A genuine Brother cartridge would print the image on the bottom of the tape in that picture, so you’d see the blank side of the tape in that picture.
The “Amazon Marketplace” being what it is, I assume any pictures will not, in general, have much in common with what you actually receive, but at least I now know which ones to reject out of hand.
Update: The PT-1090 label printer has cartridge sensing pins:

And the cartridges have corresponding holes, although the printer doesn’t sense all of them:
Despite that, cheapnified cartridges are still cheapnified.
I learn something new every day around here! Thanks!
This also appeared while clearing the forsythia:
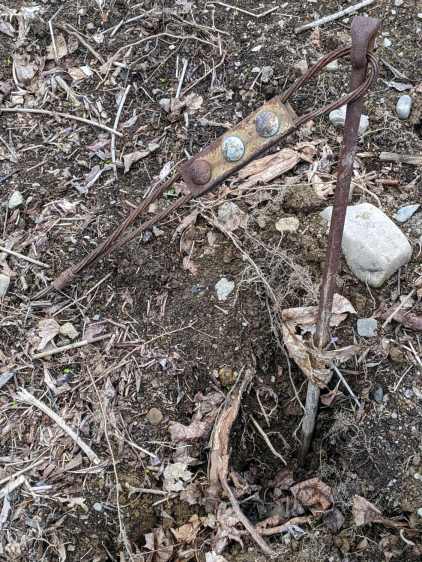
It’s the guy line anchor for the fallen utility pole, abandoned in place when the crew installed the new pole.
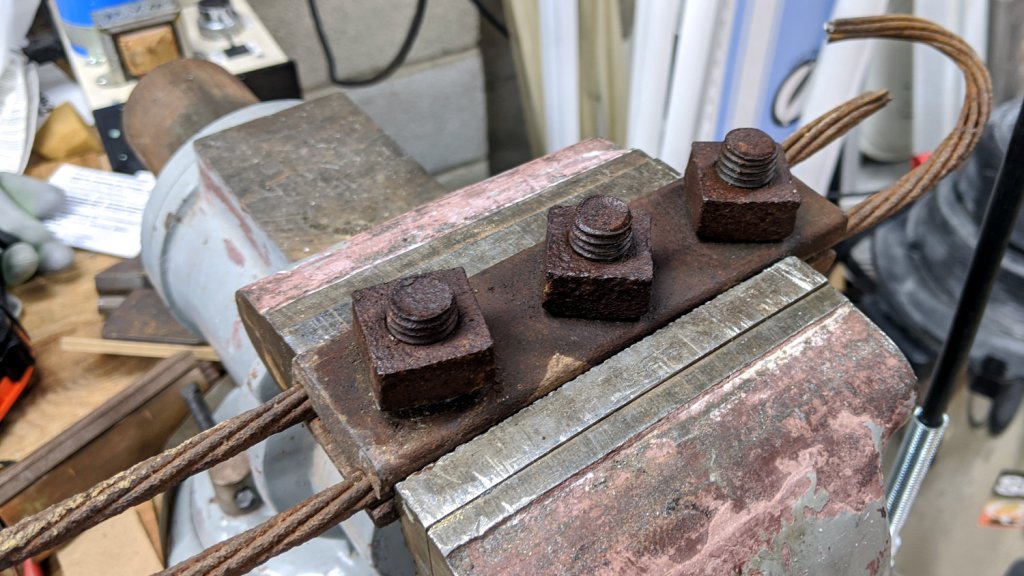
The rod turned freely in its underground anchor, but the nut is apparently frozen to the rod. I deployed the bolt cutter on the cable and hauled the carcass into the Basement Shop:

Steeping the nuts with Kroil for a few hours relaxed them enough to submit to gentle suasion, whereupon the cable sproinged as the last nut released the clamping force:
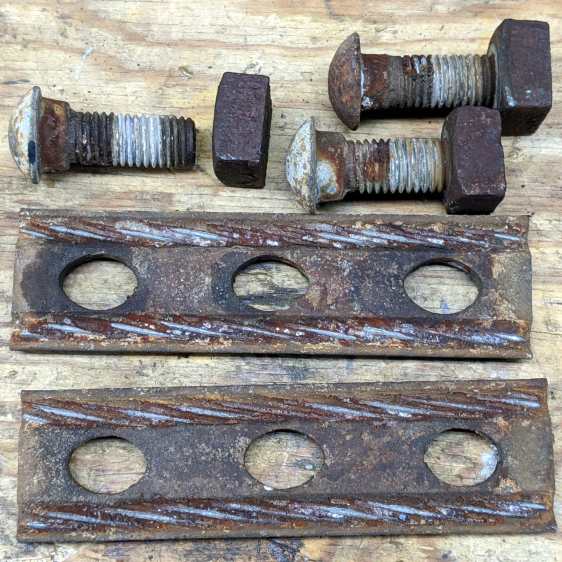
As far as I can tell, the clamp hardware dates back to the pole’s original installation in 1940 and is in fine, if not pristine, shape.
The bolt shanks have an oval section matching the holes in the plate, so the bolts don’t turn and the crew needs only one wrench. They don’t make ’em like they used to!
I have no idea what I’ll do with these things, but they’re entirely too nice for the steel recycling bucket.

Our morning task on clear days has been clearing a forsythia overgrowth along the north lot line; the branches tip-root as our neighbor’s bushes creep southward toward the sunlight. The process involves ramming a six-foot octagonal high-carbon / tempered / tougher than nails / rings like a bell steel bar (measuring a generous 1-1/8 across the flats) deep into the dirt under the plant, kicking a 4×4 inch block against the bar, pushing downward with all my weight to pry the plant upward until something deep underground rips, then repeating from all directions until enough big roots break and the mass tears out:

Then it’s on to the next plant.
The turmoil exposed a run of black PVC pipe along the lot line, although one end seemed firmly anchored. More excavation revealed a giant grape vine root growing around the pipe:
I had to sever the pipe with an axe on both sides to free the root:
The pipe originally carried water from the Mighty Wappinger Creek along the east lot line, 500 feet away and 70-ish feet down, presumably to water the previous owner’s plants. As far as I’m concerned, the remains of that pump will remain on the bottomlands forevermore, but at least we’ve cleared the remains of the plumbing.
Mornings like that make writing CNC code look downright attractive, but I’m developing the cutest little biceps …
This happens occasionally:

Repairing it with a length of 20 mil = 0.5 mm music wire didn’t take long:

What did take a while was removing one of the screws, turning off another millimeter of thread, and sticking it back in again. The new wire is slightly thinner, stacks up just slightly less under the screw head (maybe I used two turns instead of three?), and let the thread stick into the Delrin bushing I put inside the aluminum roller.
Imagine the middle screw with a slightly longer smooth end and you’ve got the idea:
That was easy …
It’s worth noting the JB Weld epoxy coating remains in as-applied condition after well over a year.

This appeared while we uprooted a row of forsythia along the north border:
Although FOD has killed a good share of my lawn mowers and blades over the decades, this happened long before my administration and I can’t take credit for the precision targeting.
As other folks have discovered, it’s straightforward to convert soft, soothing baby wipes into toxic sanitizing wipes by pouring harsh chemicals down the hatch:
Ending up with the proper dilution, though, requires knowing how much liquid the wipes already have, so you can account for it in whatever recipe you’re following.
Stand back, I’m going to use arithmetic!
Gut a new package of wipes: 552 g total weight, with 80 wet wipes weighing 536 g, so the packaging amounts to 15.5 g and each wet wipe weighs 6.7 g.
Hang five wipes in the breeze for a few hours to find they weigh 9.2 g. They’re still slippery, because of all the aloe & Vitamin E & whatever else Amazon specifies for the mix, but they’re dry. One dry wipe weighs 1.8 g, so all 80 weigh 150 g.
The block o’ wet wipes holds 536 – 150 = 390 g = 390 ml of water.
Should you want a 70% (by volume) isopropyl alcohol solution, pour 0.7/0.3 × 390 ml = 910 ml of 99% alcohol into the package and let it settle for a while. Each wipe will emerge dripping wet, but that’s not entirely a Bad Thing. Perhaps it’d be a good idea to start by letting the block dry out for a while, re-weigh, then calculate the alcohol dose from the reduced amount of water.
Bleach dilutions for sanitation seem wildly varied, but the jug of 8.25% sodium hypochlorite on the shelf says 1/2 cup to a gallon, a 1:32 volume ratio. Starting with 390 ml of water-like substance in the package, pour 12 ml of bleach into the hatch, let things settle, then squish it around for good measure.
None of the dosages seem particularly critical, given the slapdash way everybody applies wipes.
You should, of course, conspicuously mark the packages, so as not to apply toxic wipes to sensitive parts of you or your baby …
