Ed Nisley's Blog: Shop notes, electronics, firmware, machinery, 3D printing, laser cuttery, and curiosities. Contents: 100% human thinking, 0% AI slop.
After getting two feet of snow over the course of a few days, the snowbank at the end of the driveway absorbed the mailbox:
End of Driveway Snowbank
I try to gnaw a path closer to the mailbox for the USPS delivery truck, but it was pretty much a losing battle against the DOT snowplows.
Later that day, we carved the top off the banks on both sides to improve the sightlines along the road. After a week, we were once again comfortable making a left turn…
For perspective, after the 2011 Snowtober event, the DOT crew parked the shredder in front of the same bushes you can see in the top picture:
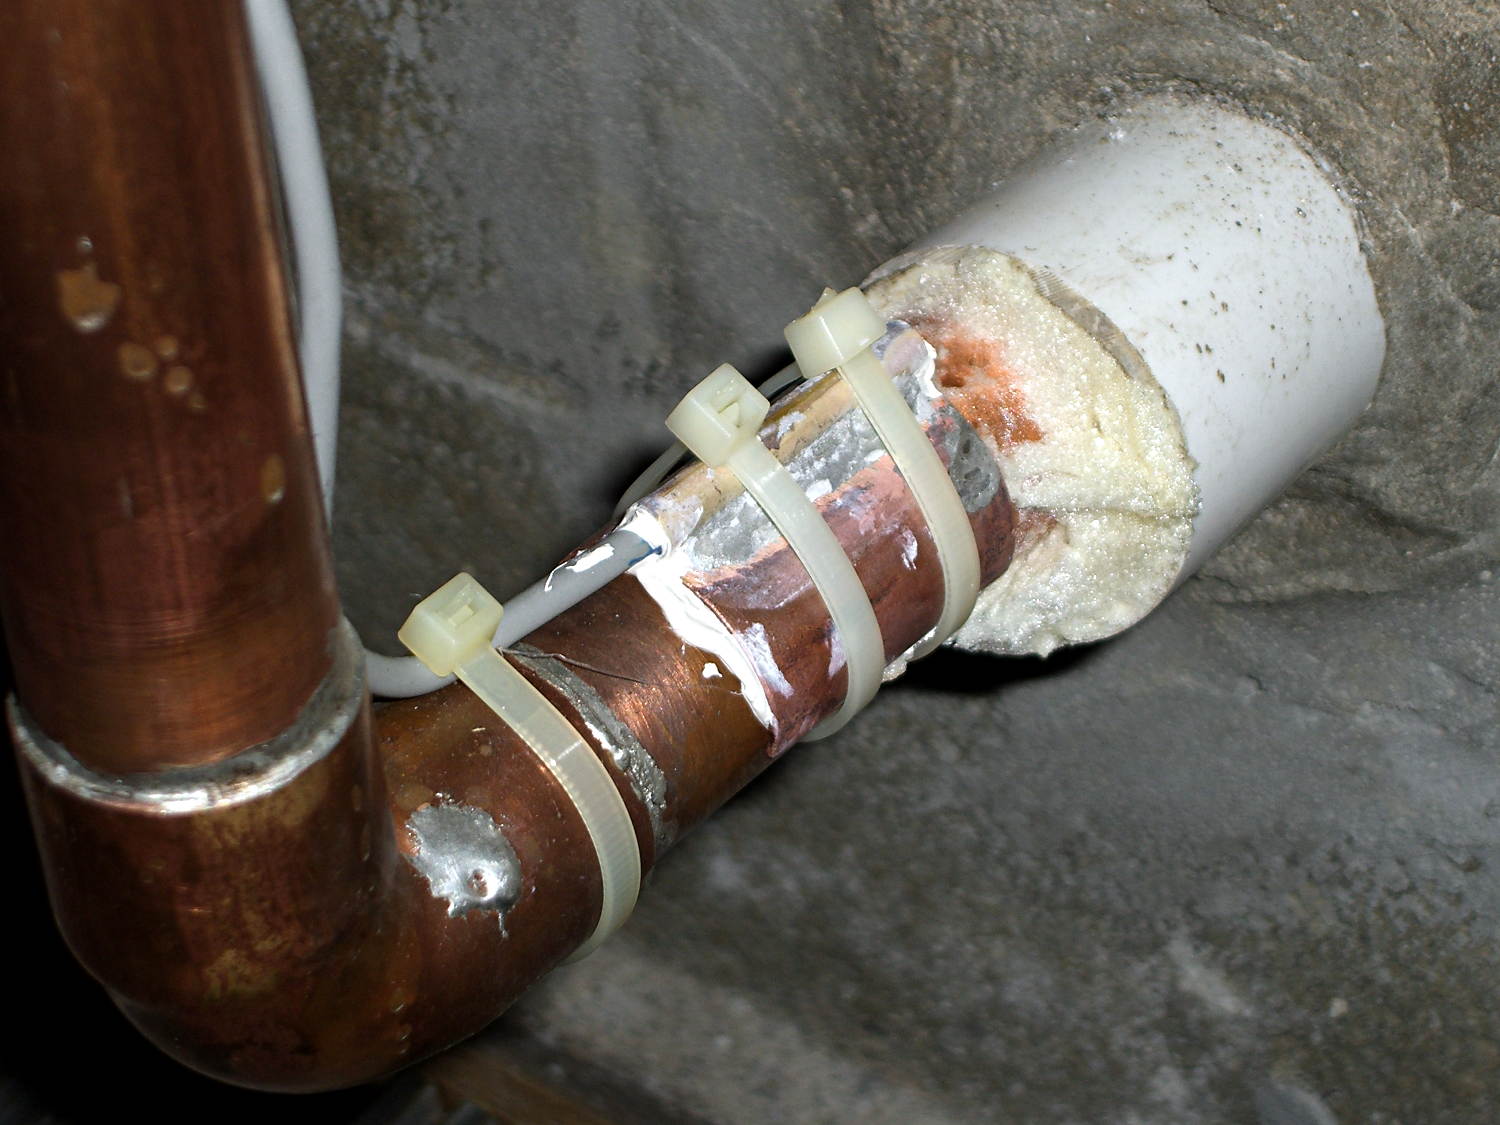
Back in 2006, I clamped a Hobo temperature sensor onto the pipe that delivers town water from the main, under 150 feet of front yard, and into our basement:
Town Water Inlet – temperature sensor mounting
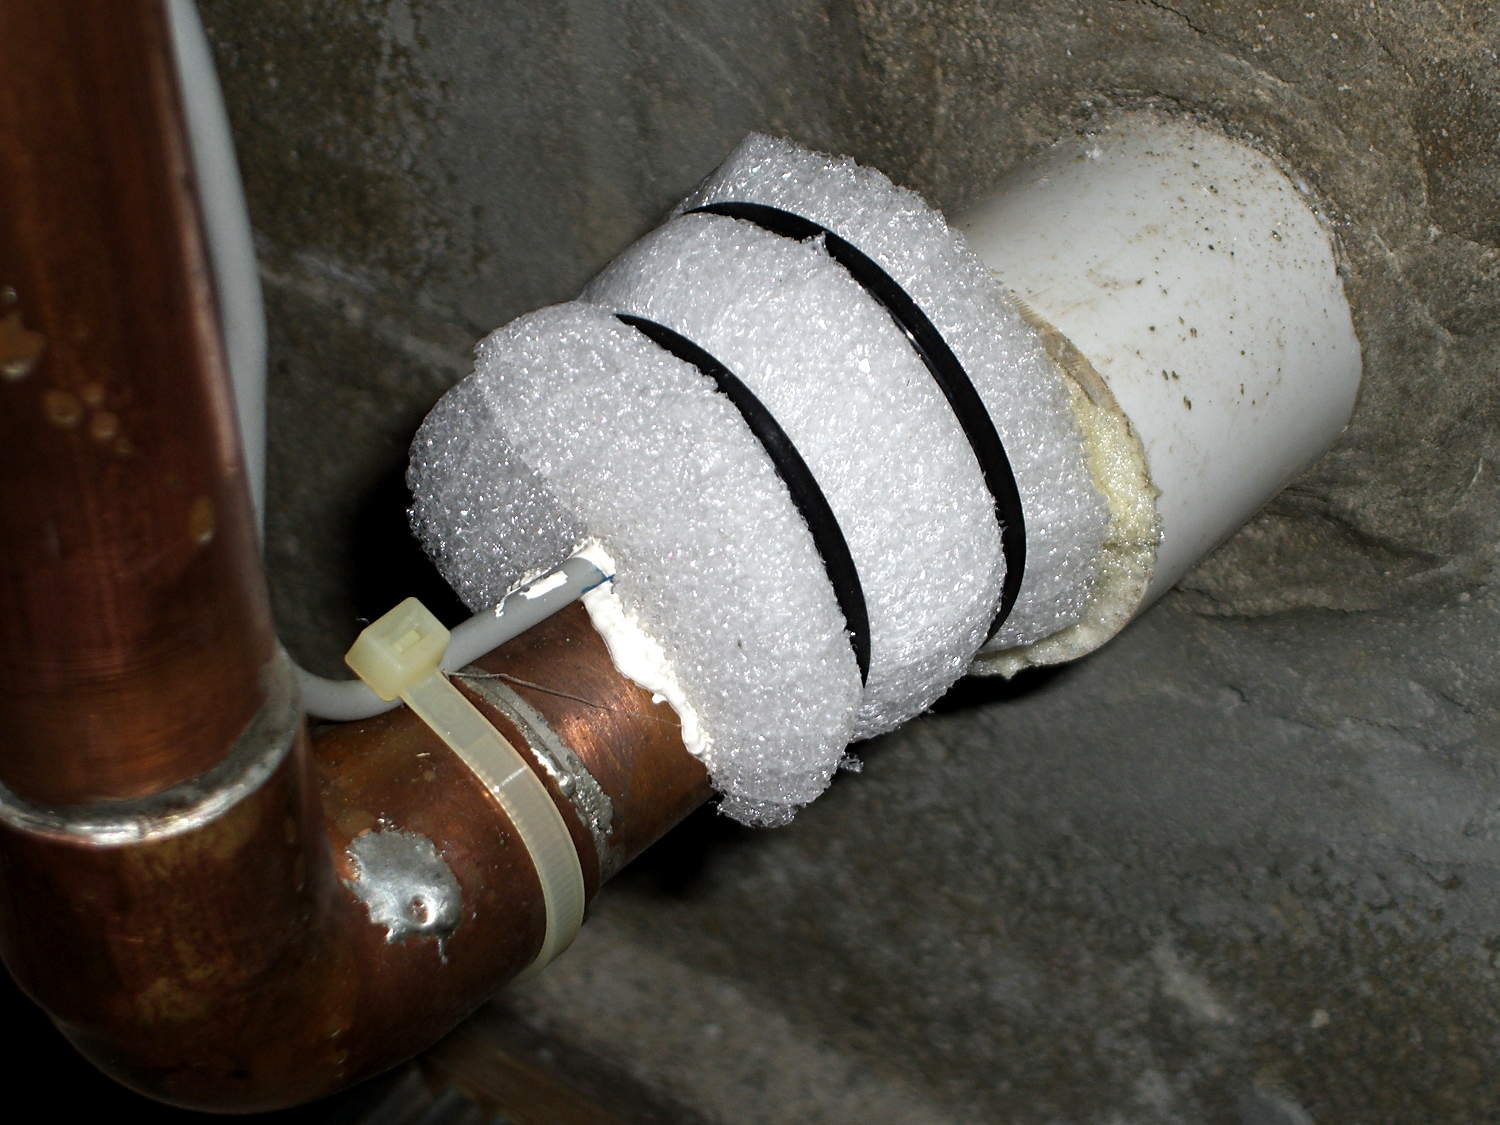
Wrapping a chunk of closed-cell foam insulation around it made me feel better, but probably doesn’t affect the results very much at all:
Town Water Inlet – temperature sensor insulation
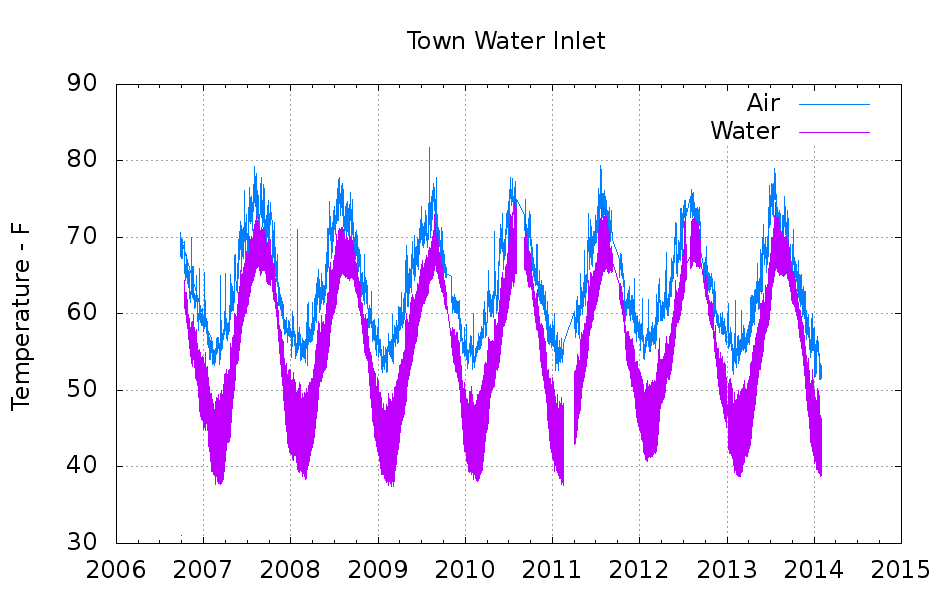
I assume the temperature of the pipe at that location will match the water temperature pretty closely, at least while some water flows into the house, and the water temperature will match the ground temperature four feet under the front yard.
Under those assumptions, the bottom trace shows the pipe temperature and the top trace shows the air temperature on the shelf a few feet above the pipe:
Town Water Inlet
The gap in early 2011 documents an embarrassing bit of forgetfulness. All in all, you’re looking at about 750,000 logged records; if you observe something long enough, it turns into science.
Cleaning up the date and time columns in the data files required a few hours of heads-down sed experimentation:
Convert quoted headers to comments → s/^\"/#&/
Convert non-data records to comments → s/^.*Logged/#&/
Convert two-digit years to four-digit years and enforce trailing blank → s_/\([01][0-9]\)[ ,]_/20\1 _
Enforce blank after four-digit years → s_/\(20[0-9]\{2\}\),_/\1 _
Remove blank after time-of-day value → s_\(:[0-9]\{2\}\) _\1_
Being reminded that sed will accept (nearly) any delimiter character came in handy!
The temperature spikes happen when I bring the Hobo datalogger upstairs to read it out. The plotting routine discards the junk readings caused by unplugging the remote sensor; anything below 30 °F or above 100 °F counts as spurious. The gnuplot idiom uses the ternary operator with the Not-a-Number value:
plot "filename" using 2:((\$3 > 30) && (\$3 < 100) ? \$3 : NaN) with ...</code>
The backslashes escape gnuplot’s variable markers, which would otherwise get eaten by Bash.
The Bash / gnuplot script that produces the plot:
#!/bin/sh
#-- overhead
export GDFONTPATH="/usr/share/fonts/truetype/"
base="${1%.*}"
echo Base name: ${base}
tfile1=$(tempfile)
ofile=${base}.png
echo Input file: $1
echo Temporary files: ${tfile1}
echo Output file: ${ofile}
#-- prepare csv Hobo logger file
sed 's/^\"/#&/ ; s/^.*Logged/#&/ ; s_/\([01][0-9]\)[ ,]_/20\1 _ ; s_/\(20[0-9]\{2\}\),_/\1 _ ; s_\(:[0-9]\{2\}\) _\1_' "$1" > ${tfile1}
#-- do it
gnuplot << EOF
set term png font "arialbd.ttf" 18 size 950,600
set output "${ofile}"
set title "${base}"
set key noautotitles
unset mouse
set grid xtics ytics
set timefmt "%m/%d/%Y %H:%M:%S"
set xdata time
#set xlabel "Week of Year"
set format x "%Y"
set ylabel "Temperature - F"
set yrange [30:90]
set datafile separator ","
plot	\
    "${tfile1}" using 2:((\$3 > 30) && (\$3 < 100) ? \$3 : NaN) with lines lt 3 title "Air", \
    "${tfile1}" using 2:((\$5 > 30) && (\$5 < 100) ? \$5 : NaN) with lines lt 4 title "Water"
EOF
No snagging on a bulky quilt shoved through the machine
Not completely butt-ugly
Reasonably durable
I picked up reels of cool-white and warm-white waterproof LED strips (12 V, 3528-size chips, 5 m, 600 LED, 25 mm segments) from the usual eBay supplier, who promptly charged for both and shipped only the warm-white reel. Cool-white LEDs will be a better color match to daylight from the window and the little Ottlite she uses for detail work, but I ran some prototypes while we wait for the replacement.
The Chinese New Year really comes in handy as an excuse for screwing things up and not responding for a week or two. ‘Nuff said.
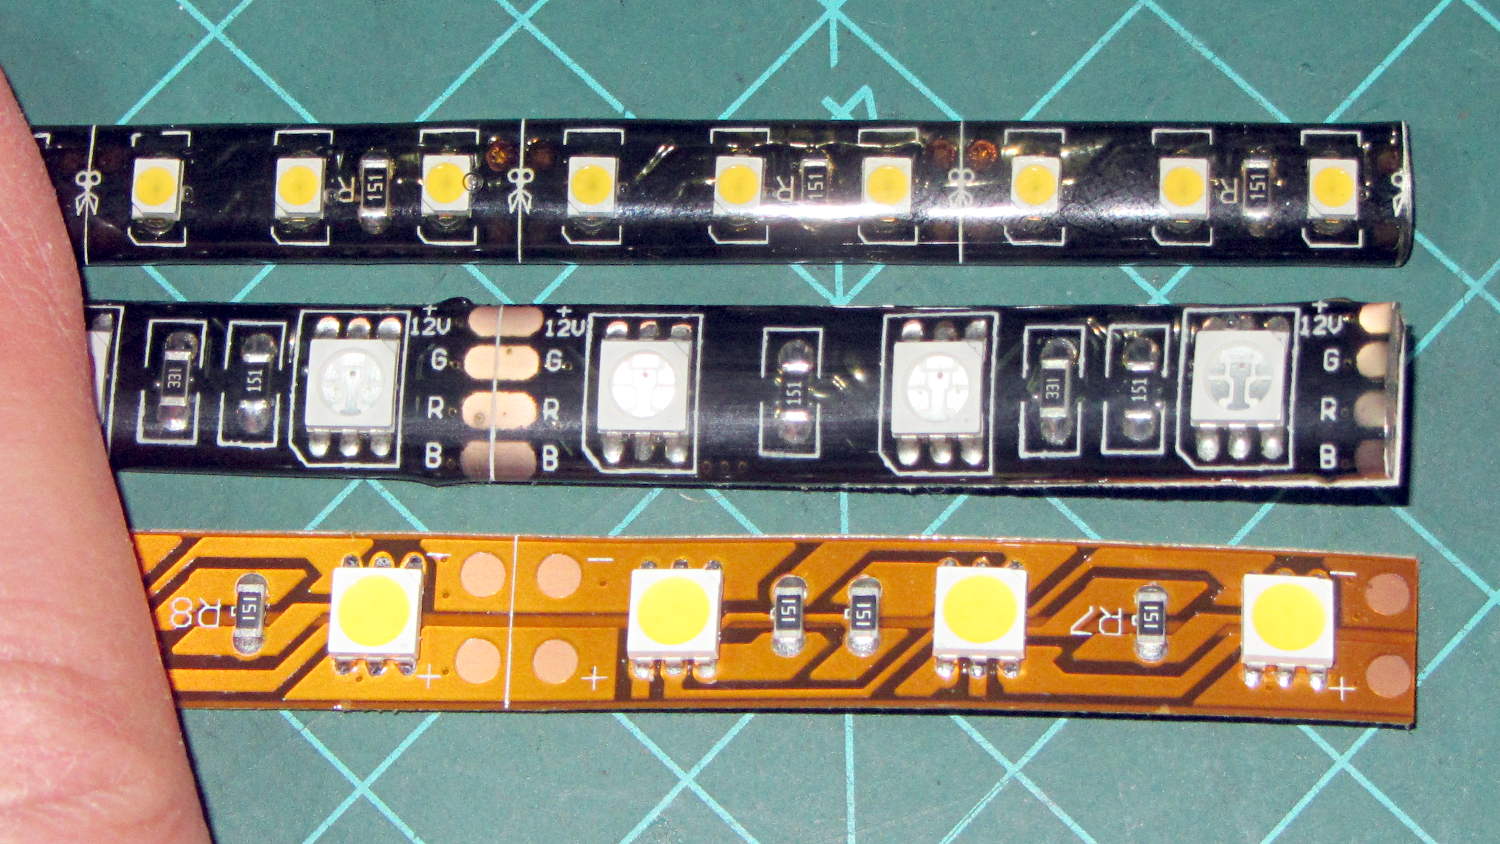
They’re similar to the RGB LEDs from a while ago, with even gummier “waterproof” encapsulation. I got double-density 600 LED strips to put more light emitters across the arm:
Various LED strip lights
The smaller 3528 SMD LEDs (vs. 5050 chips in the others) allow a narrower strip and the double-density layout means each three-LED segment is half as long long. The as-measured dimensions work out to:
25.0 mm segment length
8.2 mm strip width
2.5 mm thickness
The sealant thickness varies considerably, so I’d allow 3.0 mm for that in case it mattered. It slobbers over the edge of the strip here and there; allowing at least 9.0 mm would be wise.
The SMD resistor in each segment is 150 Ω. A 5 segment length drew 85 mA @ 12 V = 17 mA/segment. Boosting the voltage to 12.8 V got the current to the expected 100 mA = 20 mA/segment.
The LEDs are noticeably less bright than the 5050 LEDs, even at 20 mA/segment, but I think they’ll suffice for the task.
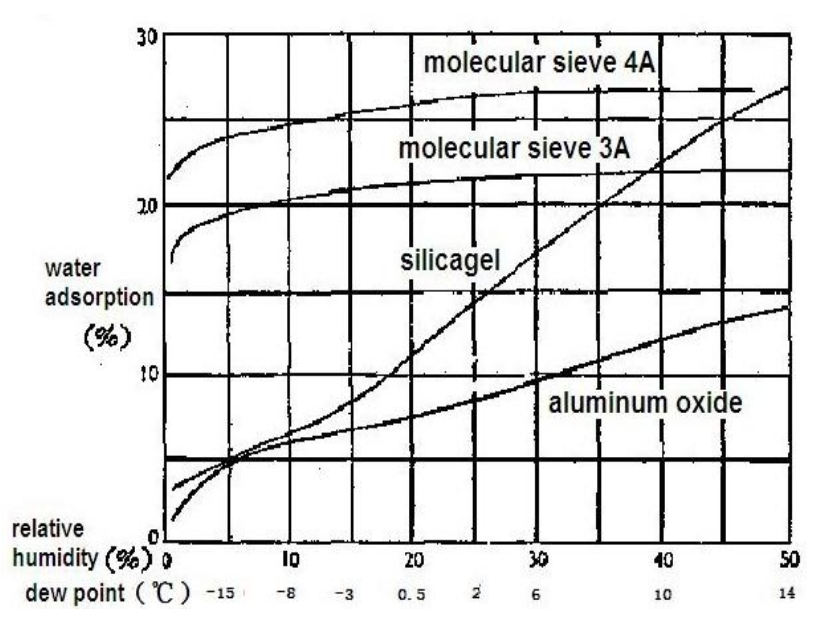
This chart, shamelessly ripped from the Interwebs because the links keep rotting out, may prove useful in the future:
Desiccant absorption vs humidity
In round numbers: between 10% and 40%RH, silica gel equilibrates at 1.8%RH for each percent of weight gain. If you toss 100 g of dry silica gel into a container with some filament, when it weighs 120 g (20% weight gain) the air inside the container will be at about 36%RH.
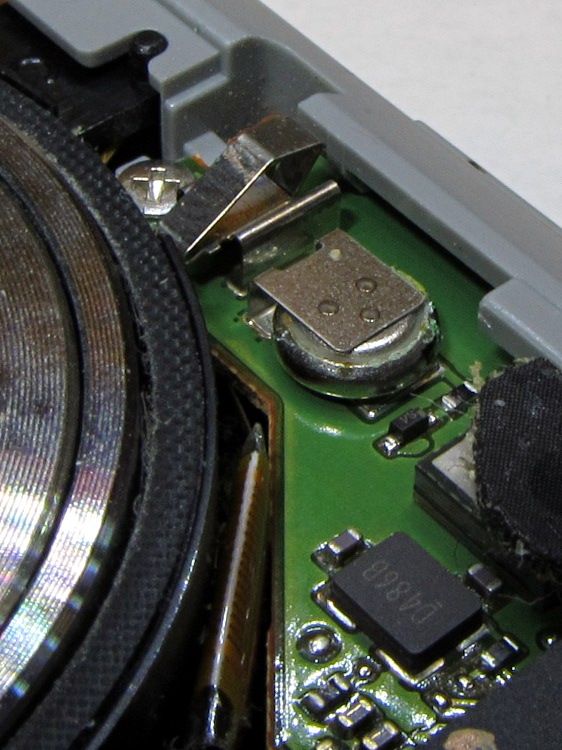
Removing the camera’s front cover (stick the screws to a length of masking tape!) reveals the backup battery hasn’t magically healed itself:
Casio EX-Z850 backup battery – corrosion
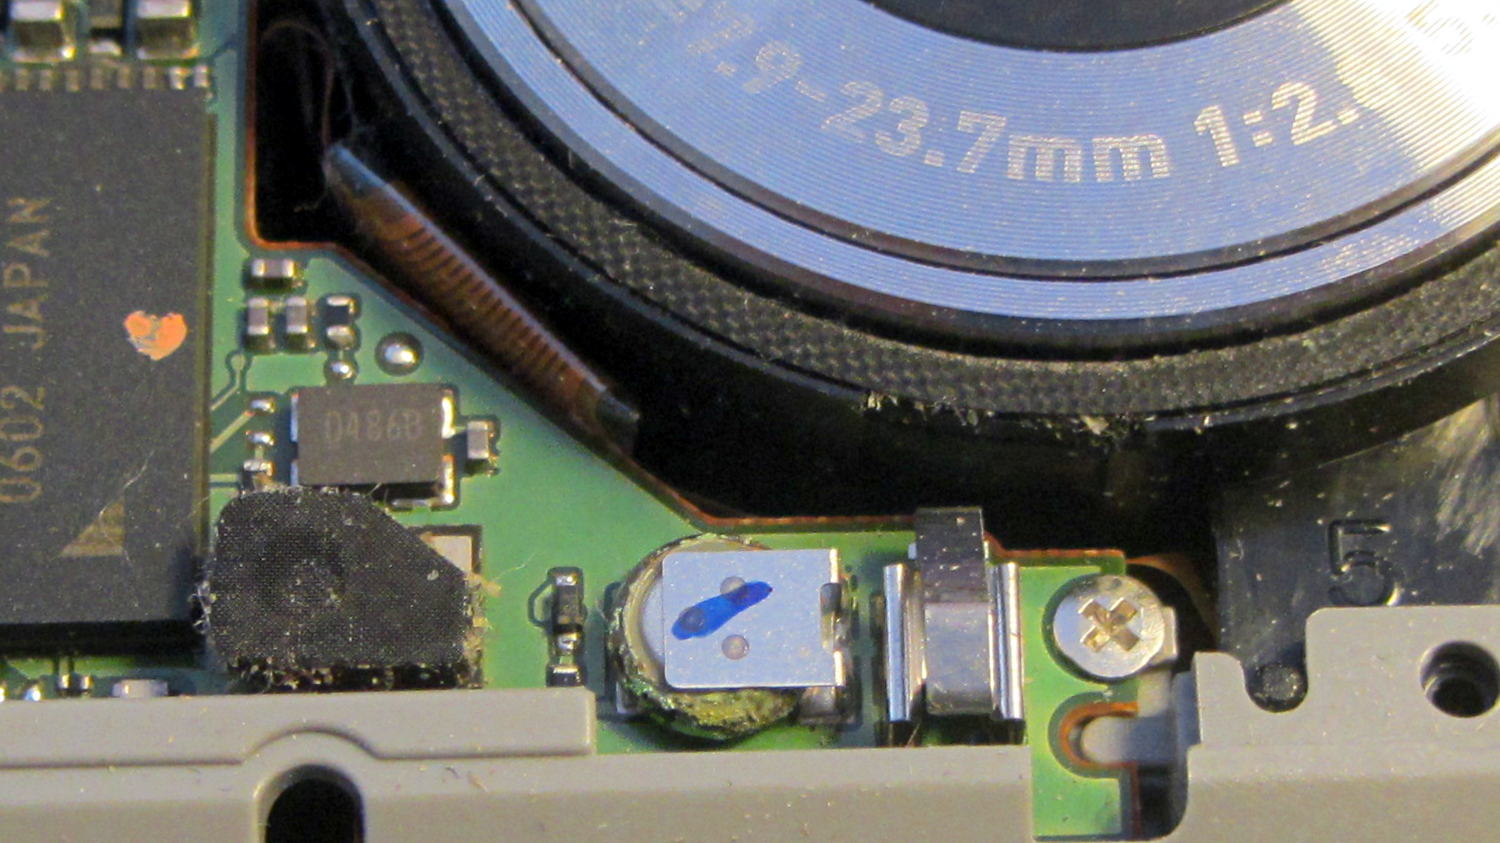
The main battery applies 3.2 V with the top terminal negative; it’s marked to help me remember that fact.
I snipped both legs of the top contact bracket, which promptly fell off, and then pushed the battery off its bottom contact. The condition of those two pads suggests a pair of cold solder joints (clicky for more dots):
Casio EX-Z850 backup battery – contact pads
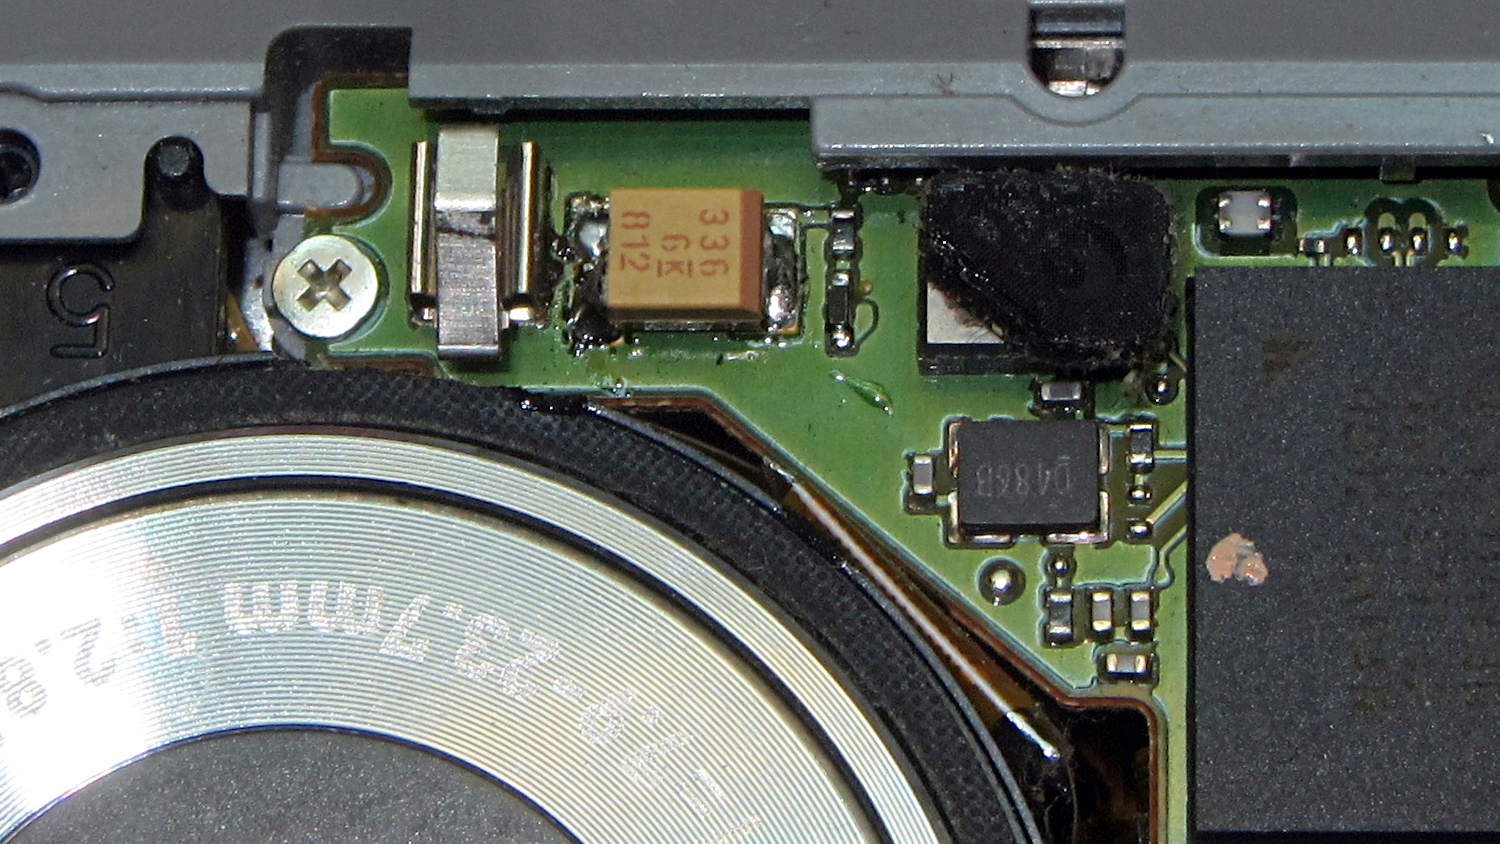
I wanted to replace it with a polyacene supercap, but there’s just not enough room in there. The biggest cap that fit was a 33 μF 16 V SMD electrolytic cap, so I soldered one in place:
I had to flip the camera around to get the soldering iron in between the cap and what looks to be an intrusion monitoring switch just to its left. No lie, that shiny metal thing seems to be a tab that presses against the front cover; it could be a static discharge / grounding point, but the base looks more complex than that.
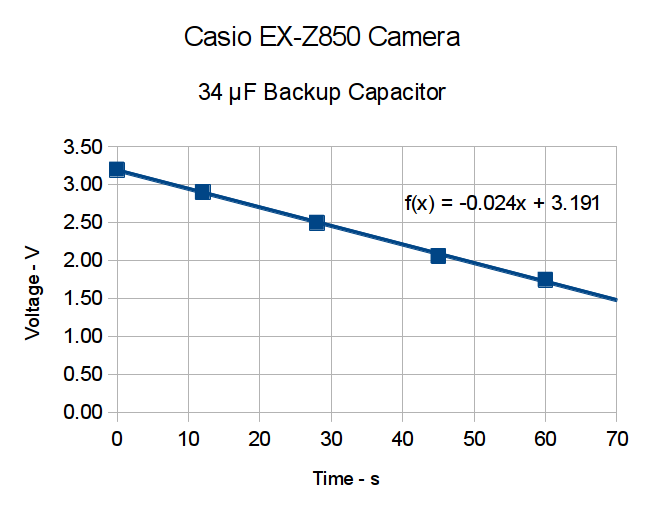
Now, a capacitor isn’t a battery, but memory backup doesn’t require much of a battery, either. I guesstimated the memory (or whatever) would draw a few microamps, at most, giving me a few seconds, at least, to swap batteries. A quick measurement shows that I’ll have plenty of time:
Casio EX-X850 backup capacitor – voltage vs time
The camera started up fine after that adventure, so the memory stays valid with the backup voltage down around 1 V.
The cap measured 34 μF, so a voltage decline of 24 mV/s works out to:
IC = C (dV/dT) = 34 μF x 24 mV/s = 820 nA
So, at least at room temperature, the memory draws less than a microamp.
I love it when a plan comes together!
With any luck, that capacitor should outlast the rest of the camera. It’ll definitely outlast a lithium battery, even if I could find one to fit in that spot.
I did those measurements by sampling the capacitor, rather than holding the meter probes in place, because the300 nA of current drawn by a 10 MΩ input resistance would cause a pretty large measurement error…
Come to find out that Makerbot changed the spacing between the Y-axis rod and the idler bolt, so it doesn’t fit the TOM286. I could fire up the Token Windows Box, install Sketchup, modify the model, rebuild and clean up the STL, and try again, but it’s easier to just give up. The TOM286 has worked fine so far, so maybe this isn’t really needed.
My trusty Radio Shack Sound Level Meter recently began misbehaving: switching to the most sensitive two ranges (-60 and -70 dB) caused it to turn off. Finessing the switch got it back in operation, so I completed the mission (a string quartet in Vassar’s Skinner Recital Hall topped out around 90 dB) and laid it out for repair:
Radio Shack Sound Level Meter – PCB solder side
After cleaning the already pristine gold-plated (!) contact pads and putting it back together, the switch failed the same way.
A bit more poking & prodding revealed that slightly loosening the upper case screw (in the boss just left of the switch pads) made it work perfectly.
Ah-ha!
Come to find out that the rear case presses on the PCB to hold it in place, which moves it slightly toward the front of the case. The switch rotor, being firmly attached to the stem in the middle of the pads, doesn’t move, which suggested that the bifurcated spring contacts on the rotor had take a bit of a set.
Un-bending them very, very gently to add a millimeter of springiness solved the problem.
A piano solo topped out in the high 80s…
Update: Another meter owner shows how to cure the problem, rather than treat the symptom:
I found your older note about the switch problem on the digital R.S. SLM to be helpful, in that mine had a similar problem, but only on the 60 dB scale, not both the 60 and 70 dB scales. Your diagnosis about the back putting pressure on the board seems to be right on. However, for me, re-bending the switch contacts didn’t help.
What did fix it was filing ~2mm off the back case boss around the upper screw hole. That was the source of the pressure on the board. 1 mm didn’t quite fix it, but 2mm off did.