Ed Nisley's Blog: Shop notes, electronics, firmware, machinery, 3D printing, laser cuttery, and curiosities. Contents: 100% human thinking, 0% AI slop.
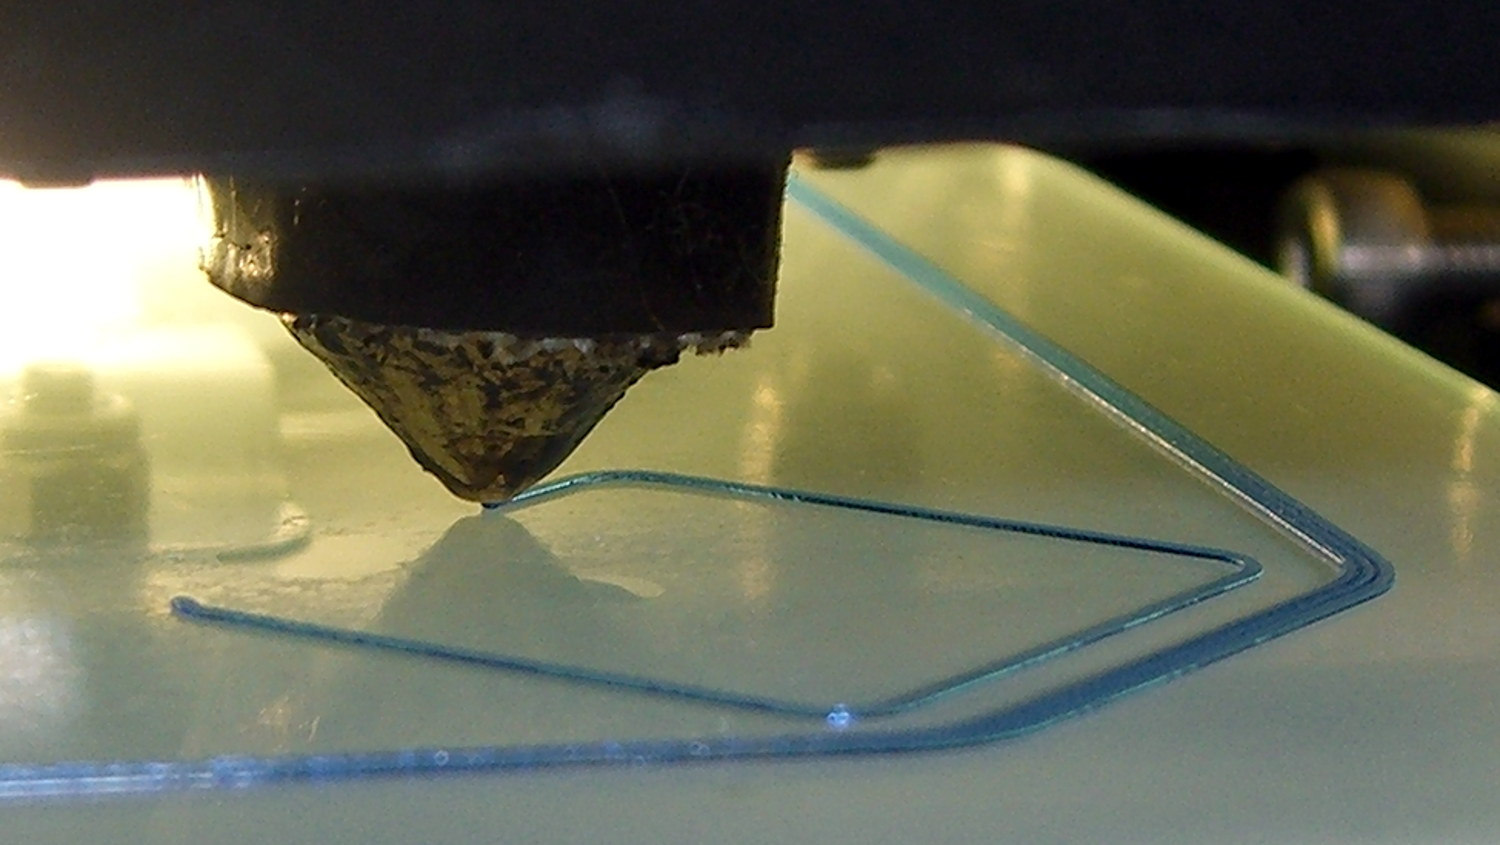
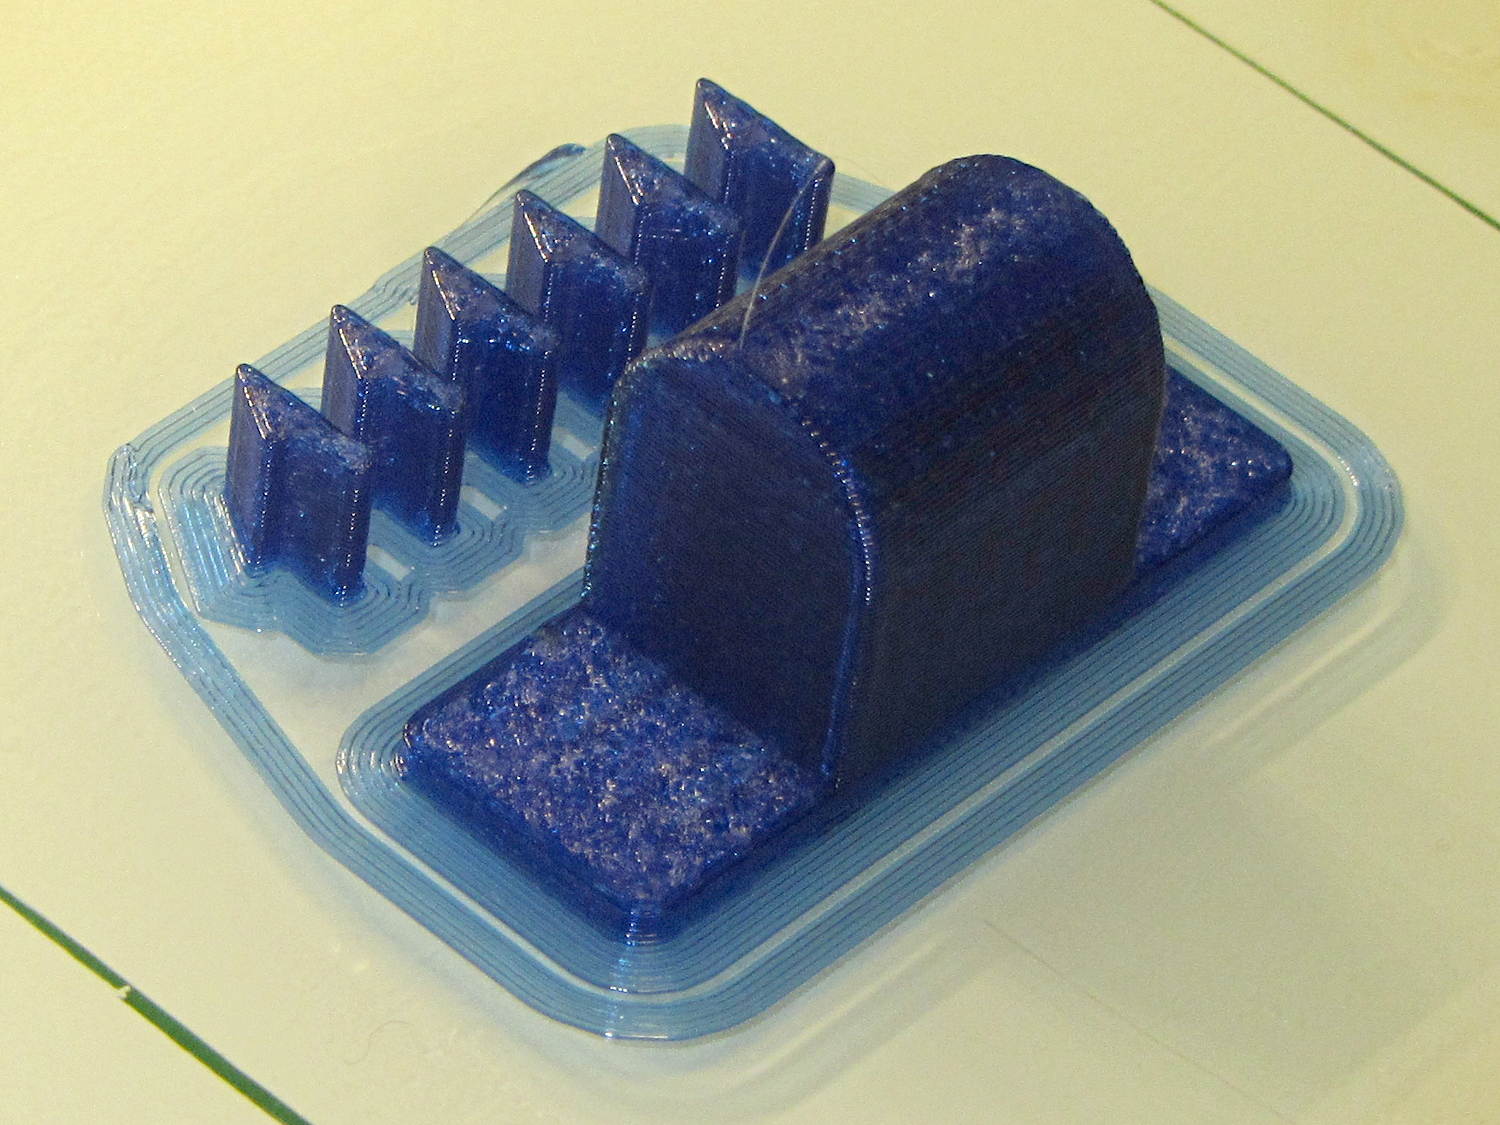
Here’s what the 0.35 mm diameter nozzle of my Makergear M2 looks like when printing a 0.40×0.25 mm thread on borosilicate glass with a coating of hairspray:
M2 V4 nozzle – thinwall box first layer
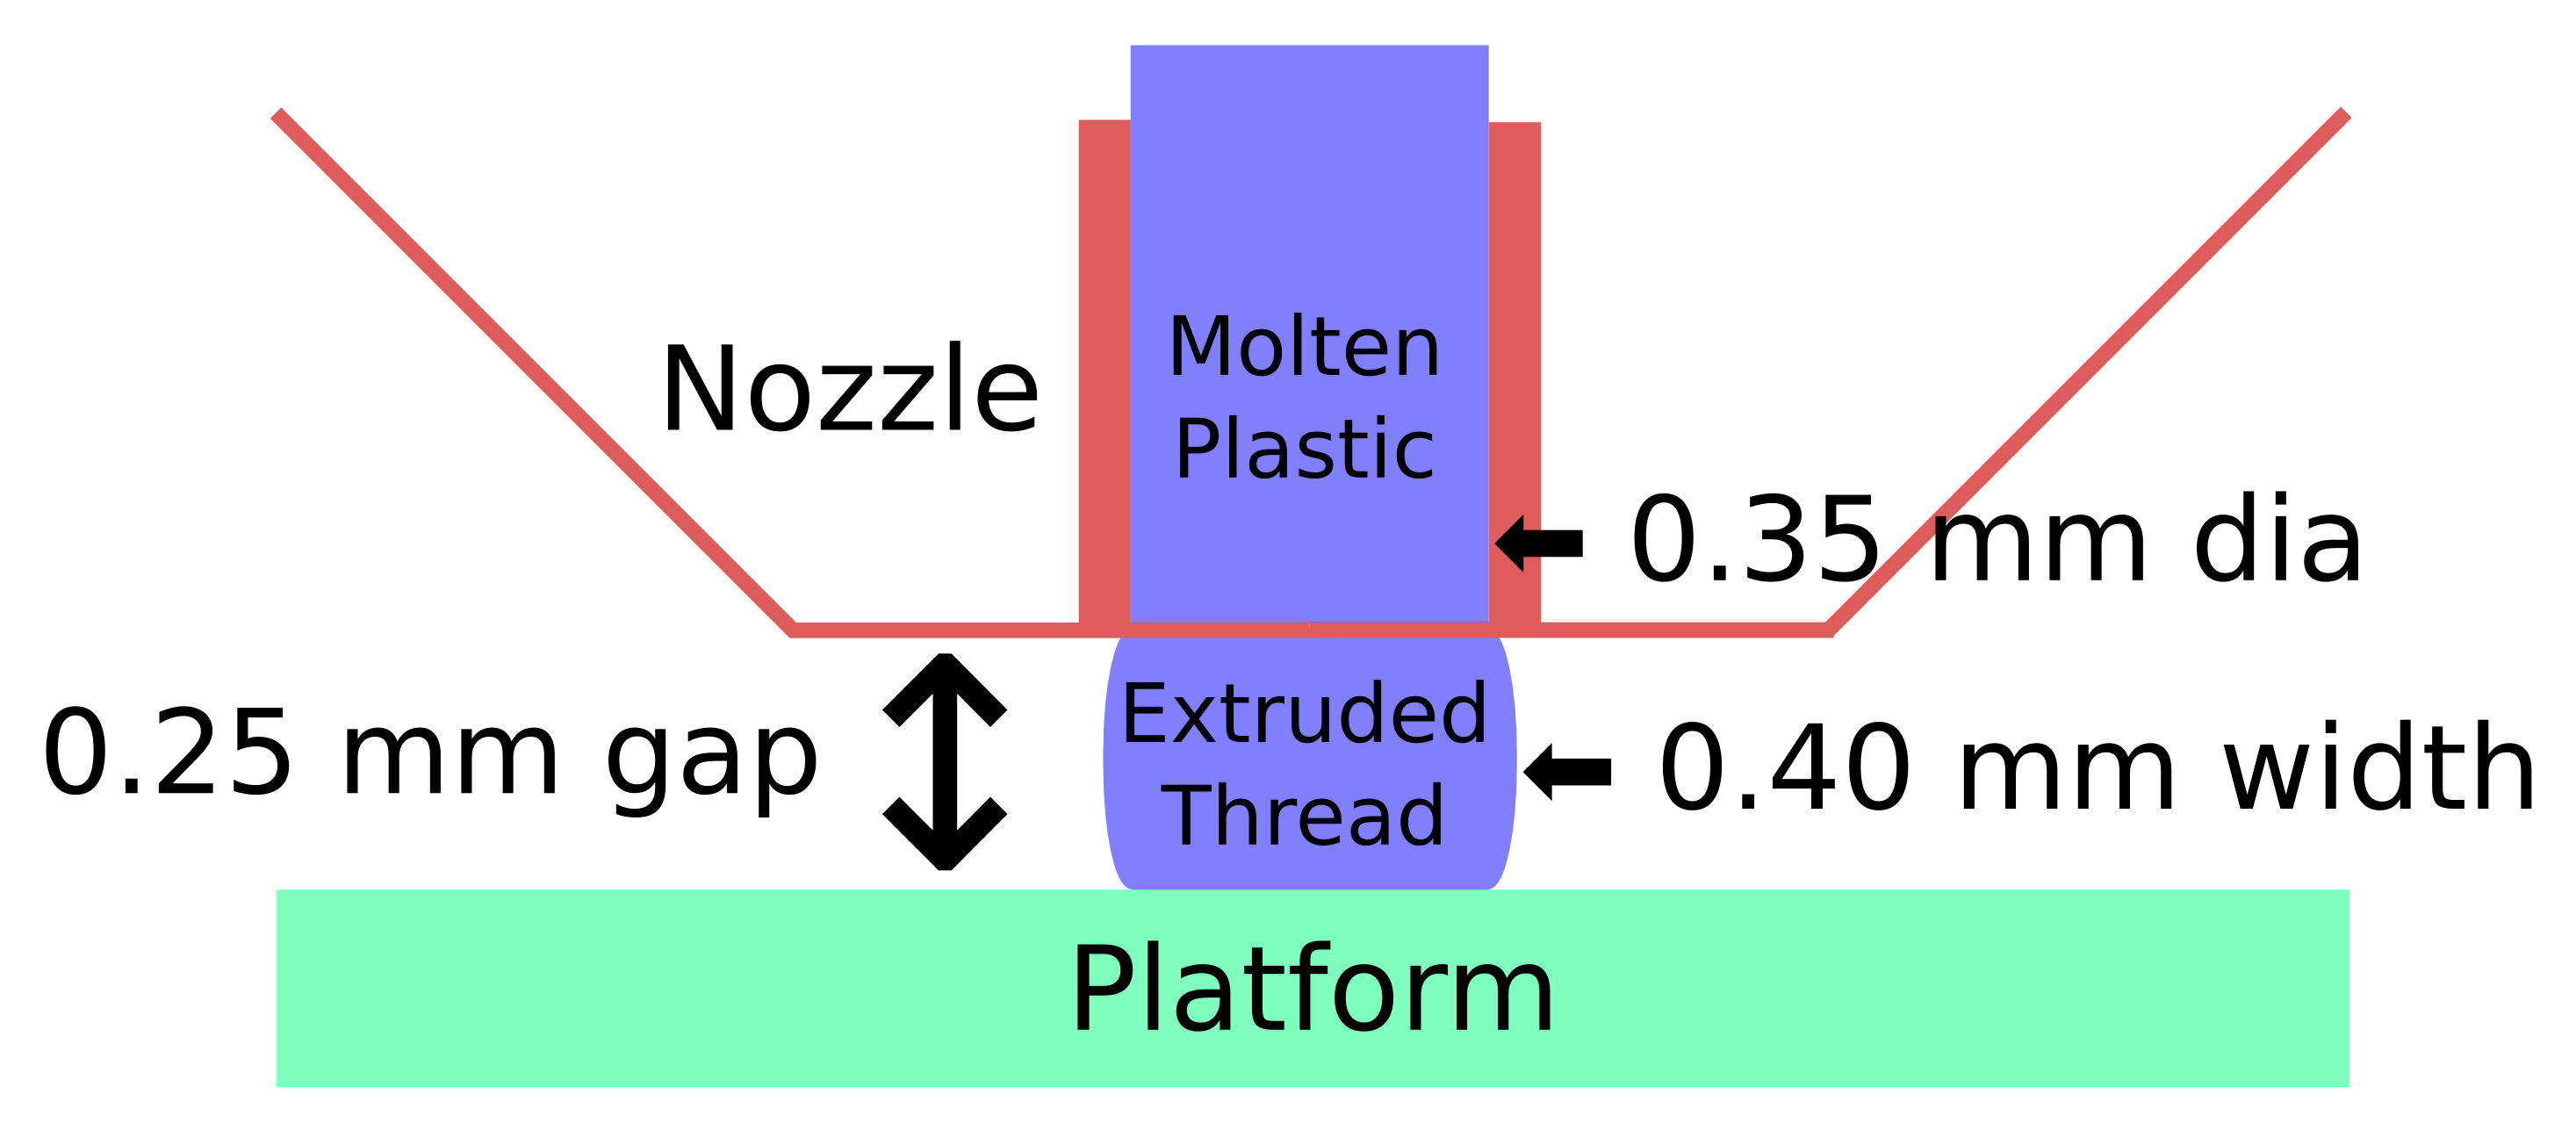
The dimensions:
Extrusion Dimensions
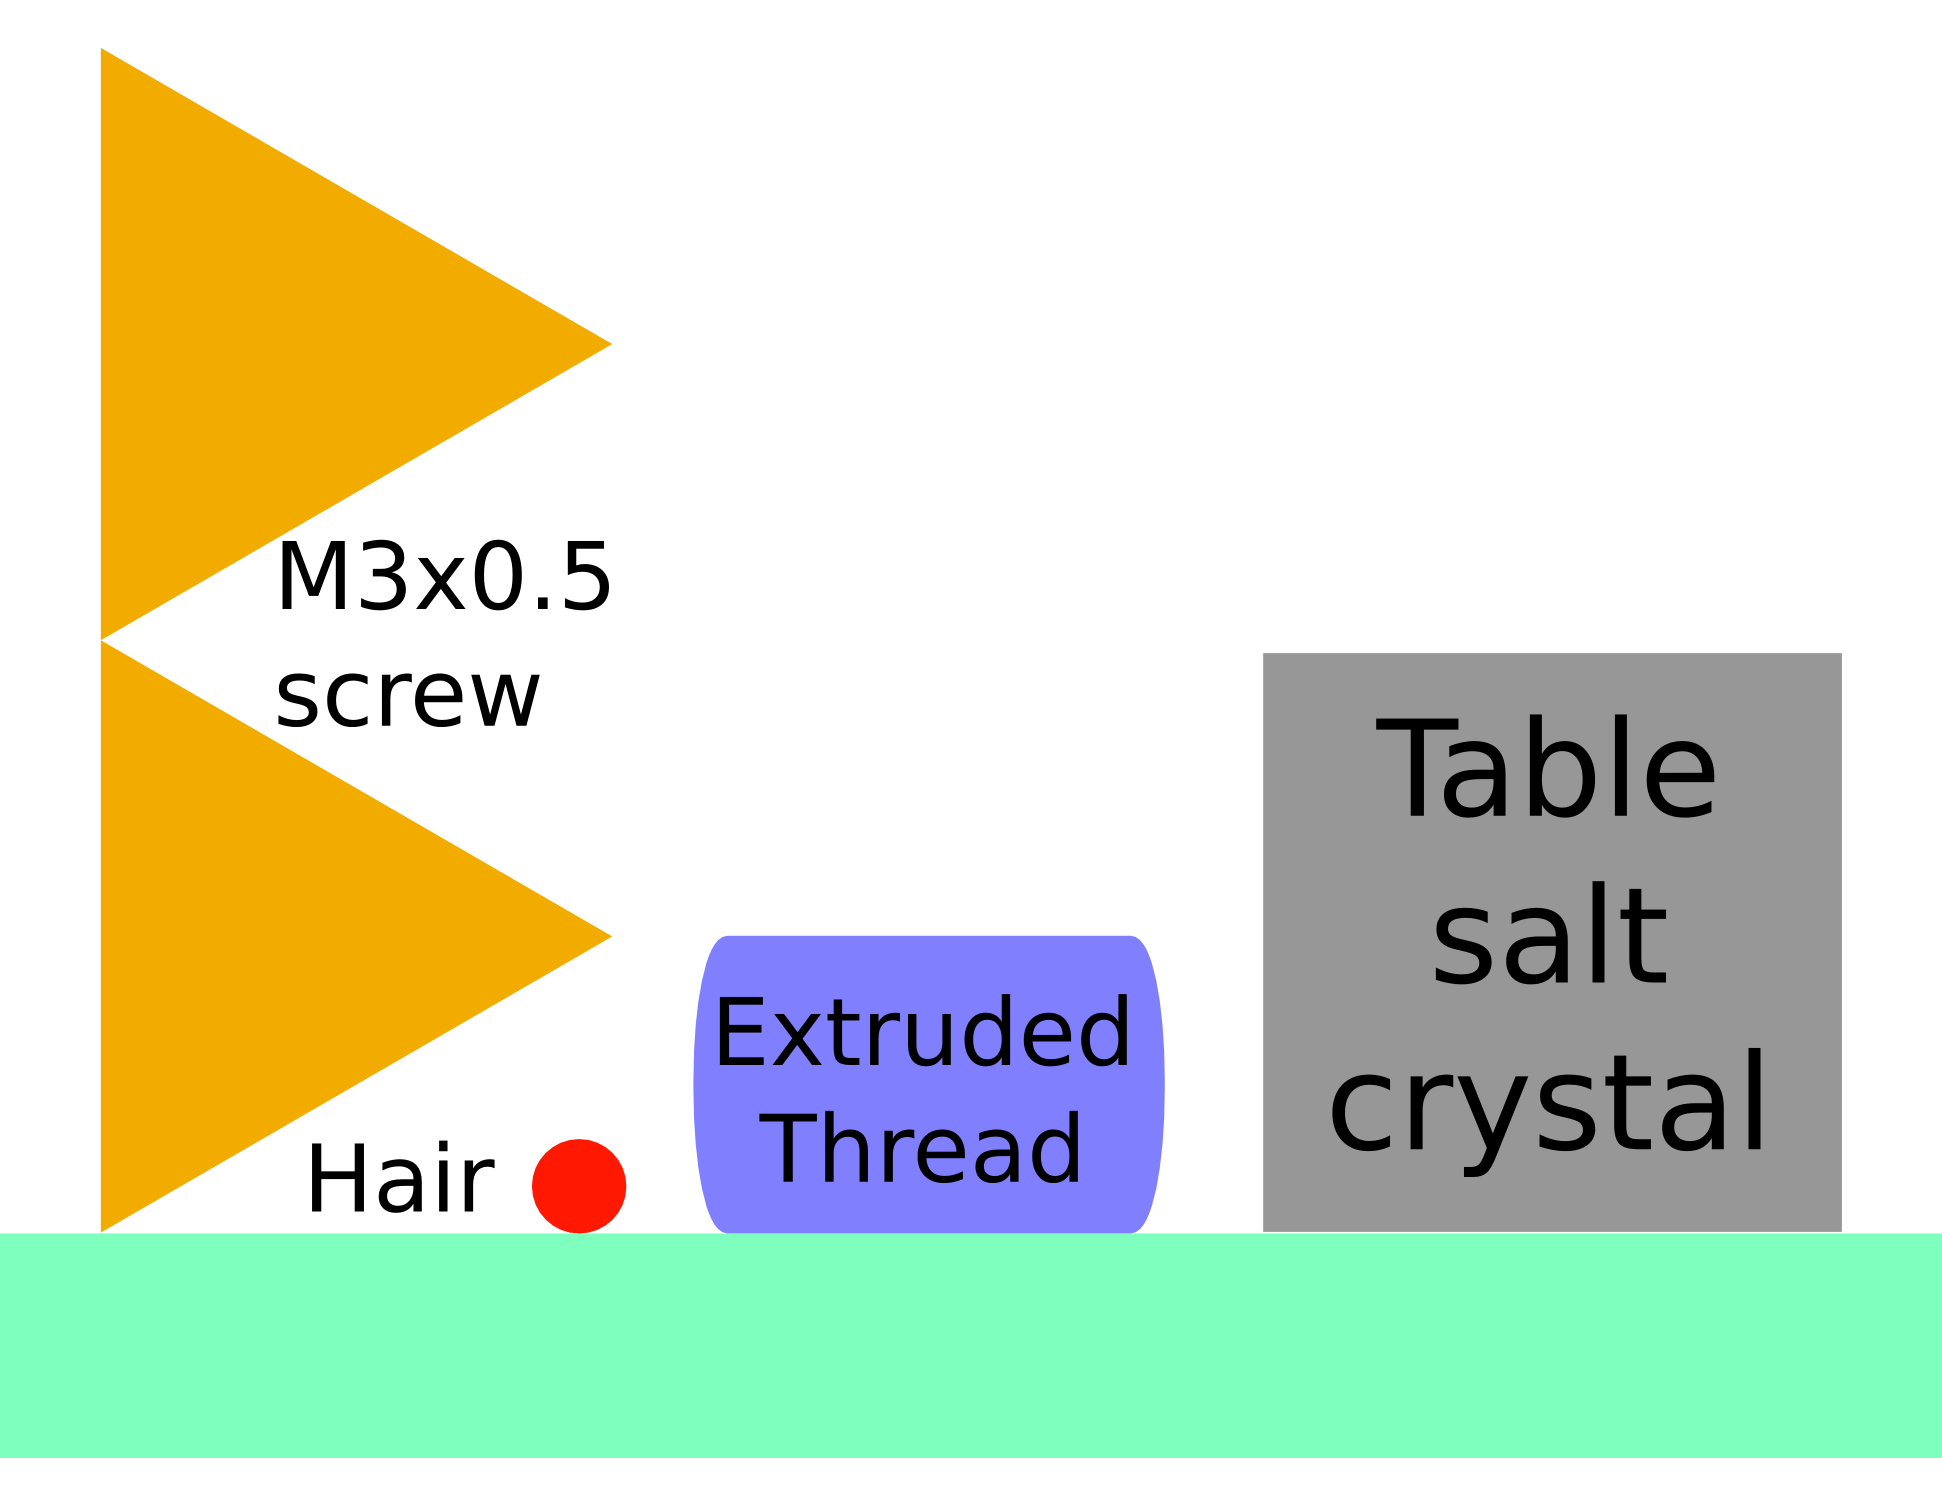
Some common household objects at the same scale:
Objects vs Thread Comparison
The accuracy required is literally hair-fine: being off by the diameter of the hair on your head can wreck the first layer of the printed object.
One turn of the M3 screws supporting the M2 platform move the mounting point by twice the thread thickness. Their positions on the platform amplify the motion by about a factor of two, so if you’re tweaking the screws by more than 1/6 turn at a time, you’re overdoing it.
For first-layer nozzle-to-platform distance adjustment:
If it increases by 0.25 mm, the plastic won’t touch the platform
If it decreases by 0.25 mm, the plastic won’t come out of the nozzle
For platform alignment:
If your printer can’t maintain the proper gap to within ±0.10 mm across the entire platform, it won’t produce accurate results
Works for me, anyhow. All I do is slice whatever object I’ve just designed, turn the M2 on, and print it. No muss, no fuss, no wasted motion: It Just Works.
The sketches come from my Digital Machinist column (DM 10.4). They’ve been covering a bunch of 3D printing topics, so if you’re interested in that kind of stuff…
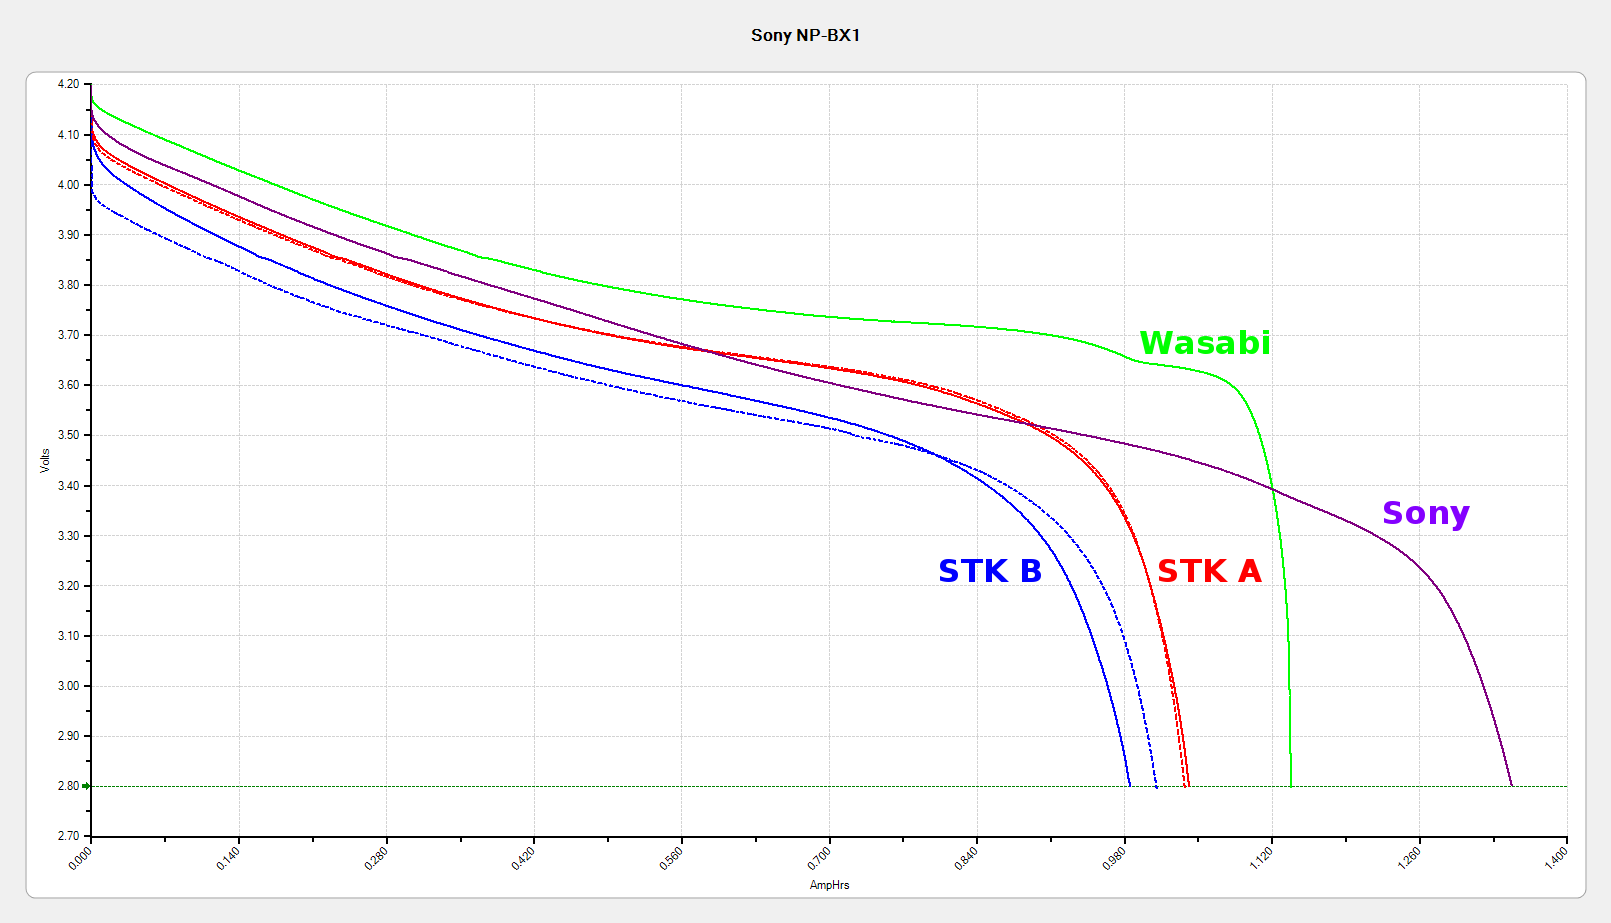
One might reasonably conclude all six came from the same factory; the STK B battery looks like a dud. The two replacement batteries from STK performed slightly better than the first pair.
The Wasabi and SterlingTEK batteries all carry a 1600 mA·h rating that’s far in excess of their actual 1000-ish mA·h performance. If they were advertised as 1.0 A·h batteries, they’d meet their specifications (for small values of “meet”), but nobody would buy a second-tier battery with less capacity than the Sony OEM battery’s 1.24 A·h.
If you rummage around in previous posts, I did verify that battery capacity does increase with decreasing test current, but definitely not by the 60% needed to reach 1600 mA·h.
Because most devices these days operate at constant power from a boost supply, presenting the results against a watt·hour scale would make sense:
They should survive for hour-long rides with the GPS tracker turned off, which is about as much as I want to ride at once. I’ll eventually autopsy the STK B battery, which won’t last all that long.
Credit where credit is due: after I sent the first test results to STK, they sent a pair of replacement batteries and, based on the second test results, refunded the entire purchase price. I’m reluctant to give a five-star rating for customer service, because shipping mis-advertised products should carry a zero-star rating.
Sony NP-BX1 – Wasabi AB CDE FG – when new – 2015-11-03
The red traces are the original units (AB, January 2014), the blue traces are the next three batteries (CDE, October 2014), the purple traces are the new pair (FG, October 2015), and the green trace is the OEM Sony battery, all tested when more-or-less new.
So, about the same as before, not as good as the first pair.
That may show a year on the warehouse shelf doesn’t affect lithium batteries very much, because the date codes atop the batteries, labeled in order of arrival:
AB = BMK20
CDE = BNI18
FG = BNI13
Assuming my interpretation of the date codes is correct, the last two digits indicate the day of manufacture: the most recent two batteries (F and G, arrived a few days ago) are five days older than the previous three (C, D, and E, arrived Oct 2014); all five were manufactured in September 2014, a bit over a year ago. The first two were built in November 2013.
Huh…
The problem with lithium batteries is that no two devices use the same battery, even when the batteries are functionally identical, so distributors must stock an acre of separate items, each of which move pathetically few units. Perhaps the top ten items make up for the rest?
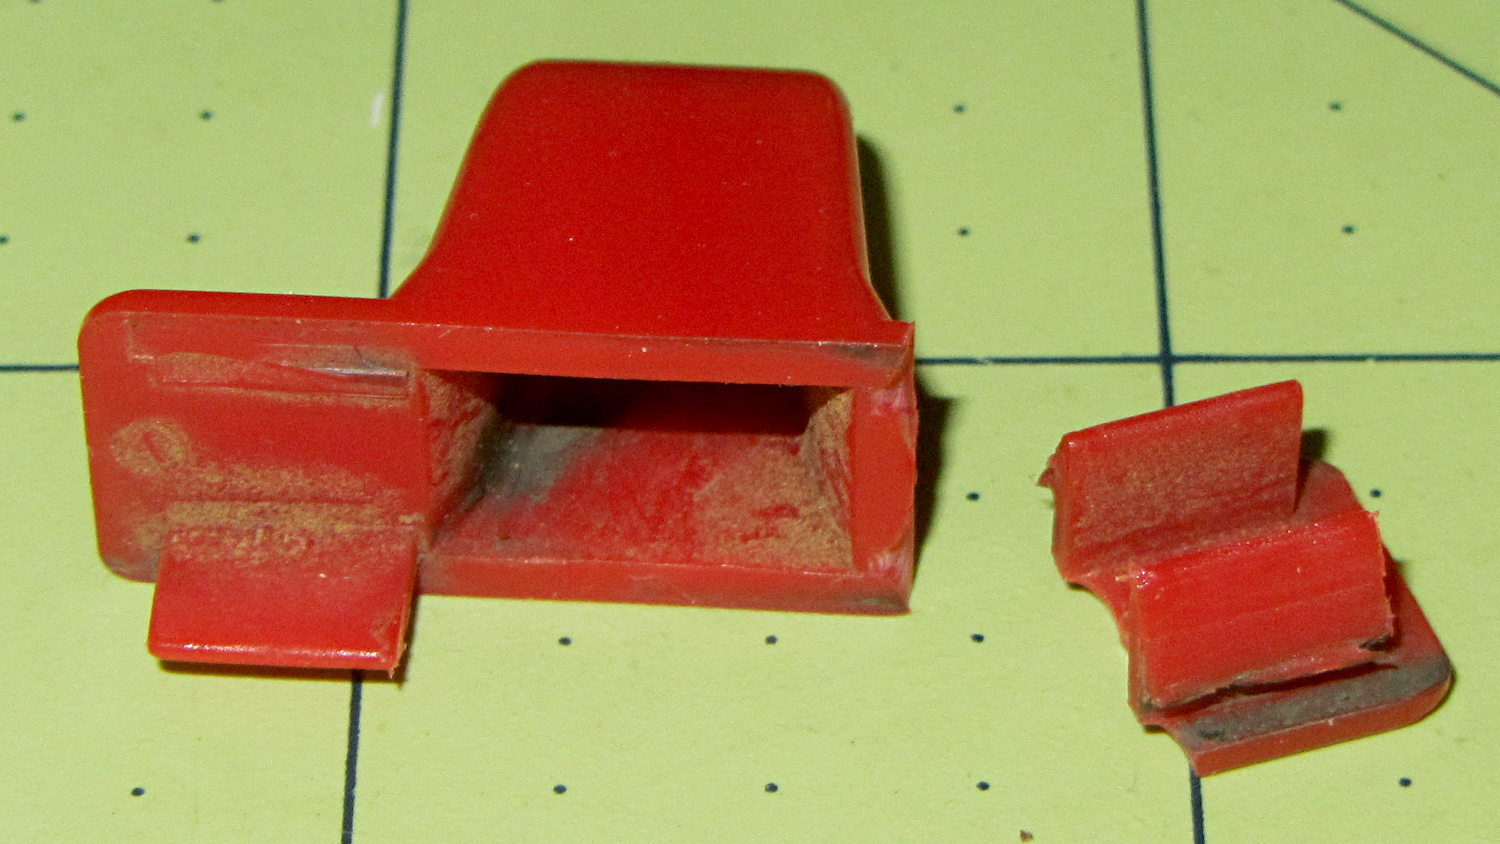
The upper-left tab broke off this “knob” shortly after we got the leaf shredder:
Throttle knob – broken original
But it worked well enough that, following my usual course of action, I could ignore the problem. Until a few days ago, that is, when the remaining tab on that end pulled out of the slot on the engine and the whole affair bent into uselessness.
It’s a $10 item from eBay (with free shipping), $8 from Amazon ($4, not eligible for Prime, so plus $4 shipping), out of stock at my usual online small engine source, and not worth biking a few dozen miles here & there to see if anybody has one. I know better than to look for repair parts at Lowe’s / Home Depot. It’s Tecumseh Part 36638, which may come in handy some day.
So, we begin…
It’s one of those pesky injection-molded miracle plastic doodads that can’t be printed in one piece, so I designed the tabs as separate parts and glued them in place. The solid model shows the intended assembly, with a bit of clearance around the tabs for tolerance and glue slop:
Tecumseh Throttle Knob – solid model – show view
External clearances aren’t an issue, so I made the base plate longer, wider, and thicker, which gave the tabs something to grab onto. The half-round knob is bigger, more angular, and uglier than the OEM knob, because I had trouble holding onto the original while wearing work gloves.
Printing a few extra tabs allows the inevitable finger fumble:
Throttle knob – on platform
The tabs stand on edge to properly orient the printed threads around the perimeter: a great force will try to rip that triangular feature right off the tab, so wrapping the thread as shown maximizes the strength. Laying them flat on their backs would put the force in shear, exactly parallel to thread-to-thread bonds; I wouldn’t bet on the strength of those layers.
The brim provides enough platform footprint around the tabs to keep them upright, but obviously isn’t needed around the knob. Although you could wrap a modifier mesh around one or the other, trimming the brim off the knob with a precision scissors seemed more straightforward.
Slobbering generous drops of of IPS #4 solvent adhesive into the slots and over the tabs softened the PETG enough that I could ram the tabs into place, using a big pliers to overcome their feeble resistance:
Throttle knob – glued latches
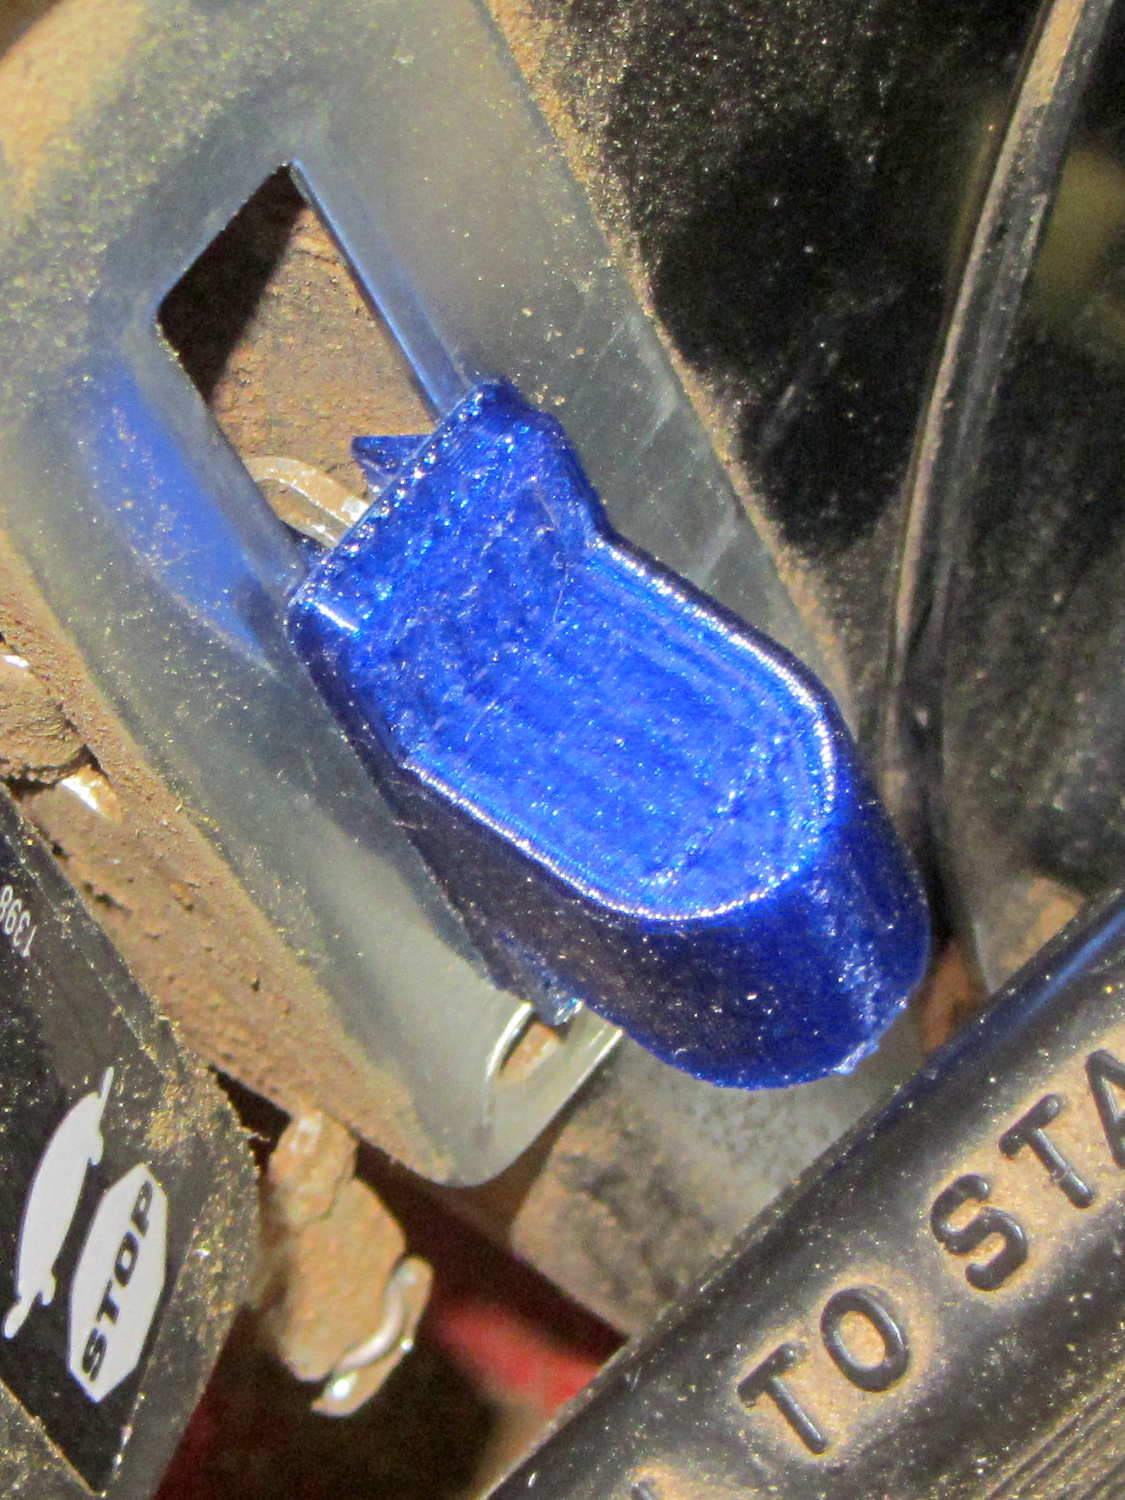
With the plastic still dazed from the fumes, I force-fit the knob into the slot on the engine:
Throttle knob – installed
The tabs eased back into position and seem to be holding the knob in place. Worst case: make a new knob, butter up the tabs with slow epoxy, ram knob into slot, then poke a screwdriver inside to realign the tabs against the slot edges.
The solvent had a few cloudy days to evaporate before the next shredding session, whereupon the throttle once again worked exactly the way it should.
The OpenSCAD source code:
// Tecumseh 36638 Throttle Knob
// Ed Nisley KE4ZNU November 2015

Layout = "Build";					// Build Show Tab Base

//- Extrusion parameters must match reality!

ThreadThick = 0.25;
ThreadWidth = 0.40;

HoleWindage = 0.2;

Protrusion = 0.1;			// make holes end cleanly

inch = 25.4;

function IntegerMultiple(Size,Unit) = Unit * ceil(Size / Unit);

//----------------------
// Dimensions

BaseSize = [40,14,3.0];							// overall base plate outside engine controller slot

Knob = [18,BaseSize[1],17];

TabSize = [7.5,1.6,6.0];						// ovarall length, minimum width, overall height
TabSocket = [8.0,2.0,BaseSize[2] - 2*ThreadThick];				// recess in base plate for tab

TabOuterSpace = 30.0;							// end-to-end length over tabs - sets travel distance
SlotWidth = 7.75;								// engine controller slot width
SlotThick = 1.5;								// engine controller slot thickness

TabShape = [
	[0,0],
	[BaseSize[2] + TabSize[2],0],
	[BaseSize[2] + TabSize[2],ThreadWidth],
	[BaseSize[2] + SlotThick,2*TabSize[1]],
	[BaseSize[2] + SlotThick,TabSize[1]],
	[0,TabSize[1]]
];

CapBaseOpening = [11,7.5,15];			// opening in base plate, Z = clearance from controller plate

//----------------------
// Useful routines

module PolyCyl(Dia,Height,ForceSides=0) {			// based on nophead's polyholes

  Sides = (ForceSides != 0) ? ForceSides : (ceil(Dia) + 2);

  FixDia = Dia / cos(180/Sides);

  cylinder(r=(FixDia + HoleWindage)/2,
		h=Height,
	$fn=Sides);
}

//----------------------
// Pieces

module Tab() {

	linear_extrude(height=TabSize[0]) {
		polygon(points=TabShape);
	}
}


module Base() {

	CornerRad = BaseSize[1]/8;

	difference() {
		union() {
			linear_extrude(height=BaseSize[2])
				hull()
					for (i=[-1,1], j=[-1,1])
						translate([i*(BaseSize[0]/2- CornerRad),j*(BaseSize[1]/2 - CornerRad)])
							circle(r=CornerRad,$fn=4*4);
			translate([Knob[0]/2,0,BaseSize[2] - Protrusion])
				rotate([0,-90,0])
					linear_extrude(height=Knob[0])
						hull() {
							translate([Knob[2] - Knob[1]/2,0])
								circle(d=Knob[1],$fn=8*4);
							translate([0,-Knob[1]/2,0])
								square([Protrusion,Knob[1]]);
						}
		}

		translate([-CapBaseOpening[0]/2,-CapBaseOpening[1]/2,-Protrusion])
			cube(CapBaseOpening + [0,0,-CapBaseOpening[1]/2 + Protrusion],center=false);

		translate([0,0,CapBaseOpening[2] - CapBaseOpening[1]/2])
			rotate([0,90,0]) rotate(180/8)
				cylinder(d=CapBaseOpening[1]/cos(180/8),h=CapBaseOpening[0],center=true,$fn=8);

		for (i=[-1,1], j=[-1,1])
			translate([i*(TabOuterSpace/2 - TabSocket[0]/2),j*(SlotWidth/2 - TabSocket[1]/2),TabSocket[2]/2 - Protrusion])
				cube(TabSocket + [0,0,Protrusion],center=true);
	}
}


//----------------------
// Build it

if (Layout == "Base")
	Base();

if (Layout == "Tab")
	Tab();

if (Layout == "Show") {
	Base();

		for (i=[-1,1], j=[-1,1])
			translate([i*(TabOuterSpace/2 - TabSocket[0]/2),j*(SlotWidth/2 - TabSocket[1]/2),0])
				translate([j < 0 ? TabSize[0]/2 : -TabSize[0]/2,j < 0 ? TabSize[1]/2 : -TabSize[1]/2,BaseSize[2] - 2*ThreadThick])
					rotate([0,90,j < 0 ? -180 : 0])
					Tab();
}

if (Layout == "Build") {
	Base();

	for (i=[0:5])					// build a few spares
		translate([-7*TabSocket[1] + i*3*TabSocket[1],BaseSize[1],0])
			rotate(90)
				Tab();
}
The original doodle showing the OEM knob dimensions and some failed attempts at fancy features:
Yeah, I’m sure that’s not what it means, but, still…
I don’t understand how the total cost of a nontrivial something shipped halfway around the planet can be less than the price I’d pay to return it. I’m certain it involves massive subsidies and mysterious cash flows that never break the surface of the eBay “Buy It Now!” pond.
Because the first pair of Wasabi NP-BX1 batteries for the Sony HDR-AS30V camera faded to the point where they weren’t useful for a typical bike ride, I bought a pair of SterlingTEK (a.k.a. STK) NP-BX1 batteries that, like the Wasabi batteries, claimed to have a 1600 mA·h capacity. These are “second tier” batteries, not the cheap eBay crap I’ve already dismissed, and run a bit under $10 apiece.
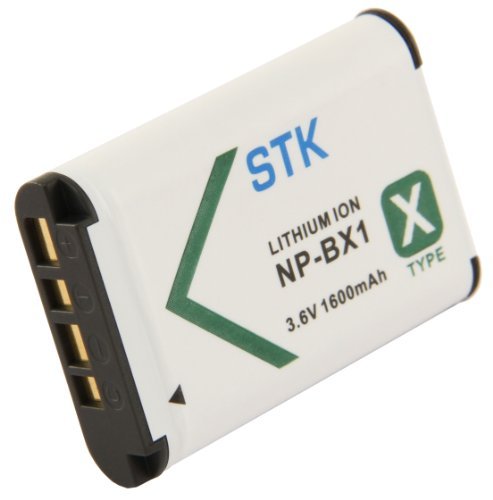
Here’s the picture from their product description:
SterlingTEK – STK NP-BX1 battery – as advertised
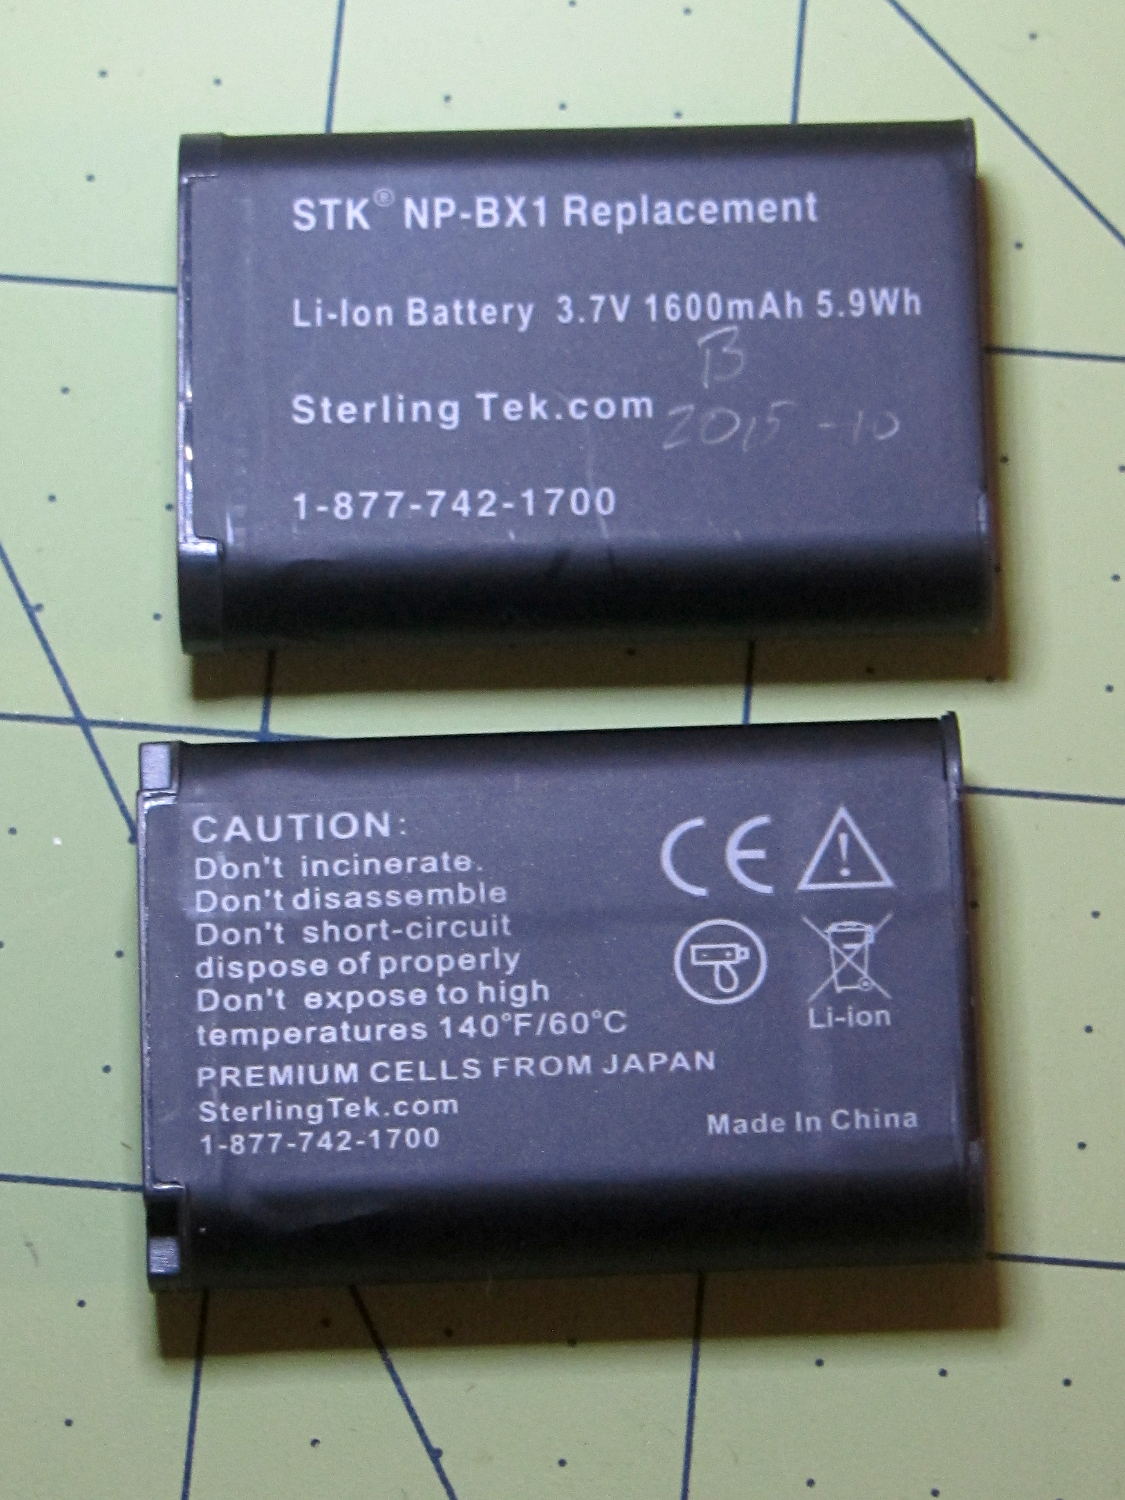
Here’s what arrived:
STK NP-BX1 batteries
Huh.
That’s a red flag, right there. It’s remarkably tempting to ship a good product for a while, then swap in much cheaper junk that can ride on the good reviews. Not saying that’s what happened, but it’s a possibility.
Here’s how they performed:
Sony NP-BX1 – Sony Wasabi STK – as received
The red and blue curves show that the STK batteries produced less than 1000 mA·h in their first two charges, with the blue battery (I labeled it B) showing considerable variation that suggests it’ll suffer early failure. The green curve shows one of those Wasabi batteries and the purple curve is the OEM Sony battery, both in as-received condition.
SterlingTEK will send two more batteries, in the belief that I received two sub-standard samples. We shall see…