The Smell of Molten Projects in the Morning

Ed Nisley's Blog: Shop notes, electronics, firmware, machinery, 3D printing, laser cuttery, and curiosities. Contents: 100% human thinking, 0% AI slop.

Author: Ed

  • Fordham FG-801 Function Generator Power Switch

    The power switch in my trusty Fordham FG-801 Function Generator failed with an accumulation of oxidation / crud on the contacts. That’s fix-able, but the switch contained not one, but two powerful springs, and puked its guts all over the floor around the Squidwrench Operating Table. Even with (a preponderance of) the parts in hand, I couldn’t figure out how to reassemble the thing; the only way out was to replace the switch.

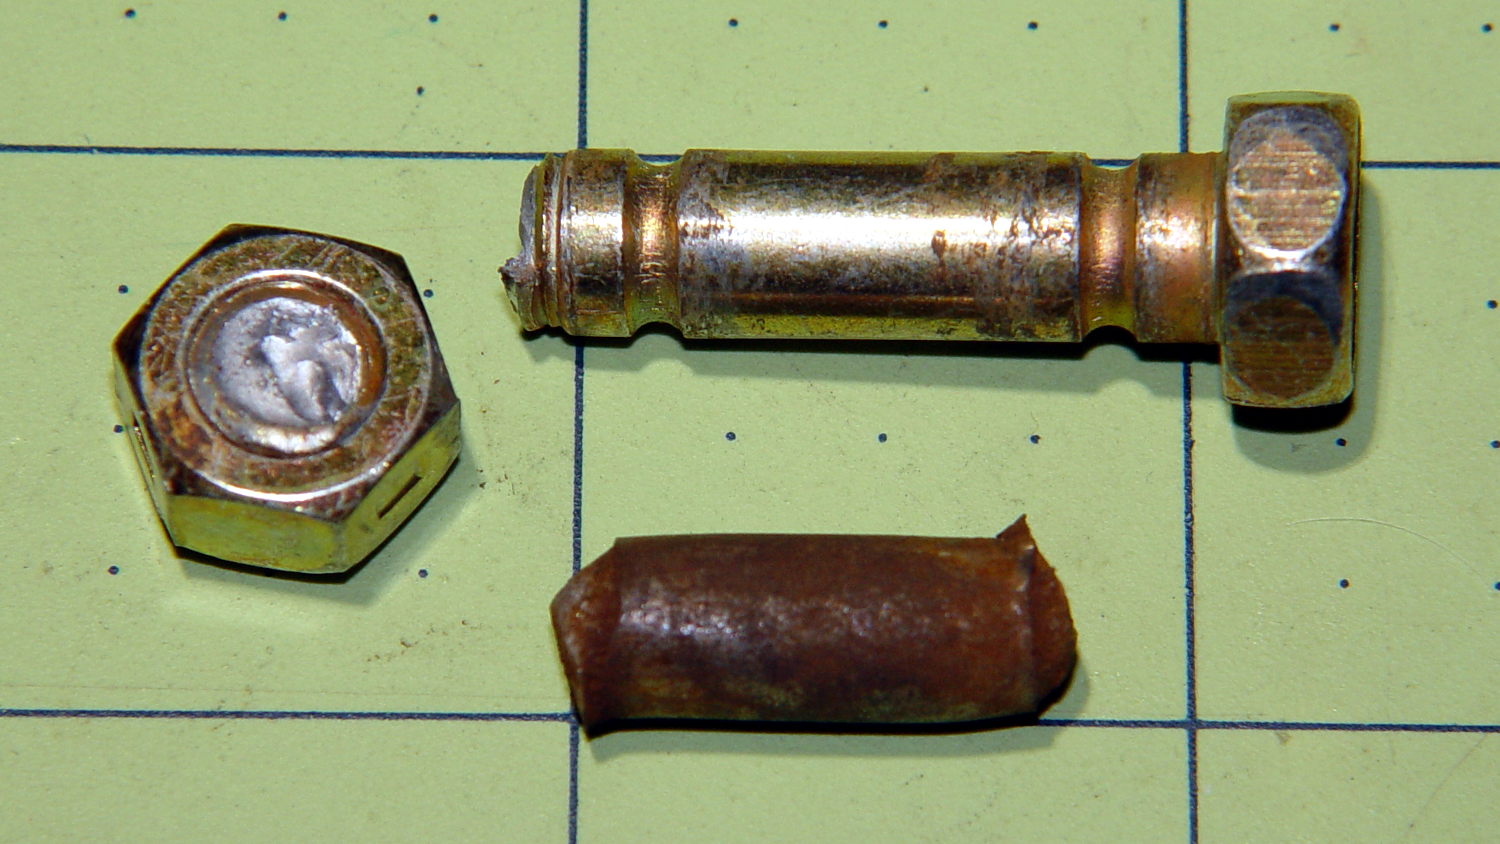
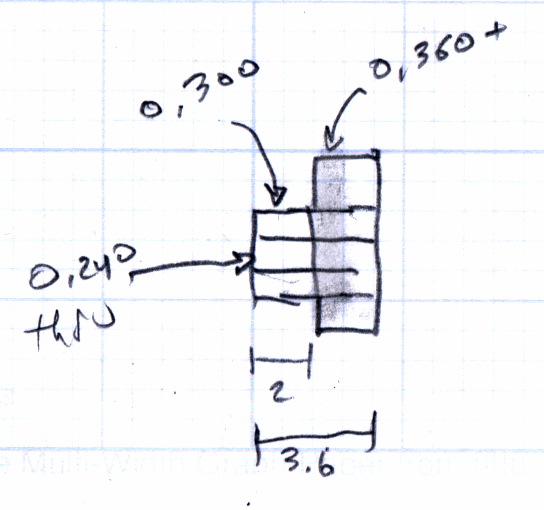
    The OEM switch had a 0.360+ inch diameter pushbutton that fit into a ⅜ inch hole and, alas, my remaining stock of line-voltage switches had toggle levers and used ¼ inch holes. So I converted a bit of aluminum rod into a suitable bushing:

    Fordham FG-801 Fn Gen - new switch hardware
    Fordham FG-801 Fn Gen – new switch hardware

    The lock washer in the middle started with a much wider tab that I filed down into a tooth for the dent from a #2 center drill. Protip: center drills don’t walk off like twist drills, even when you hand-hold the front panel at the drill press with all the electronics dangling below.

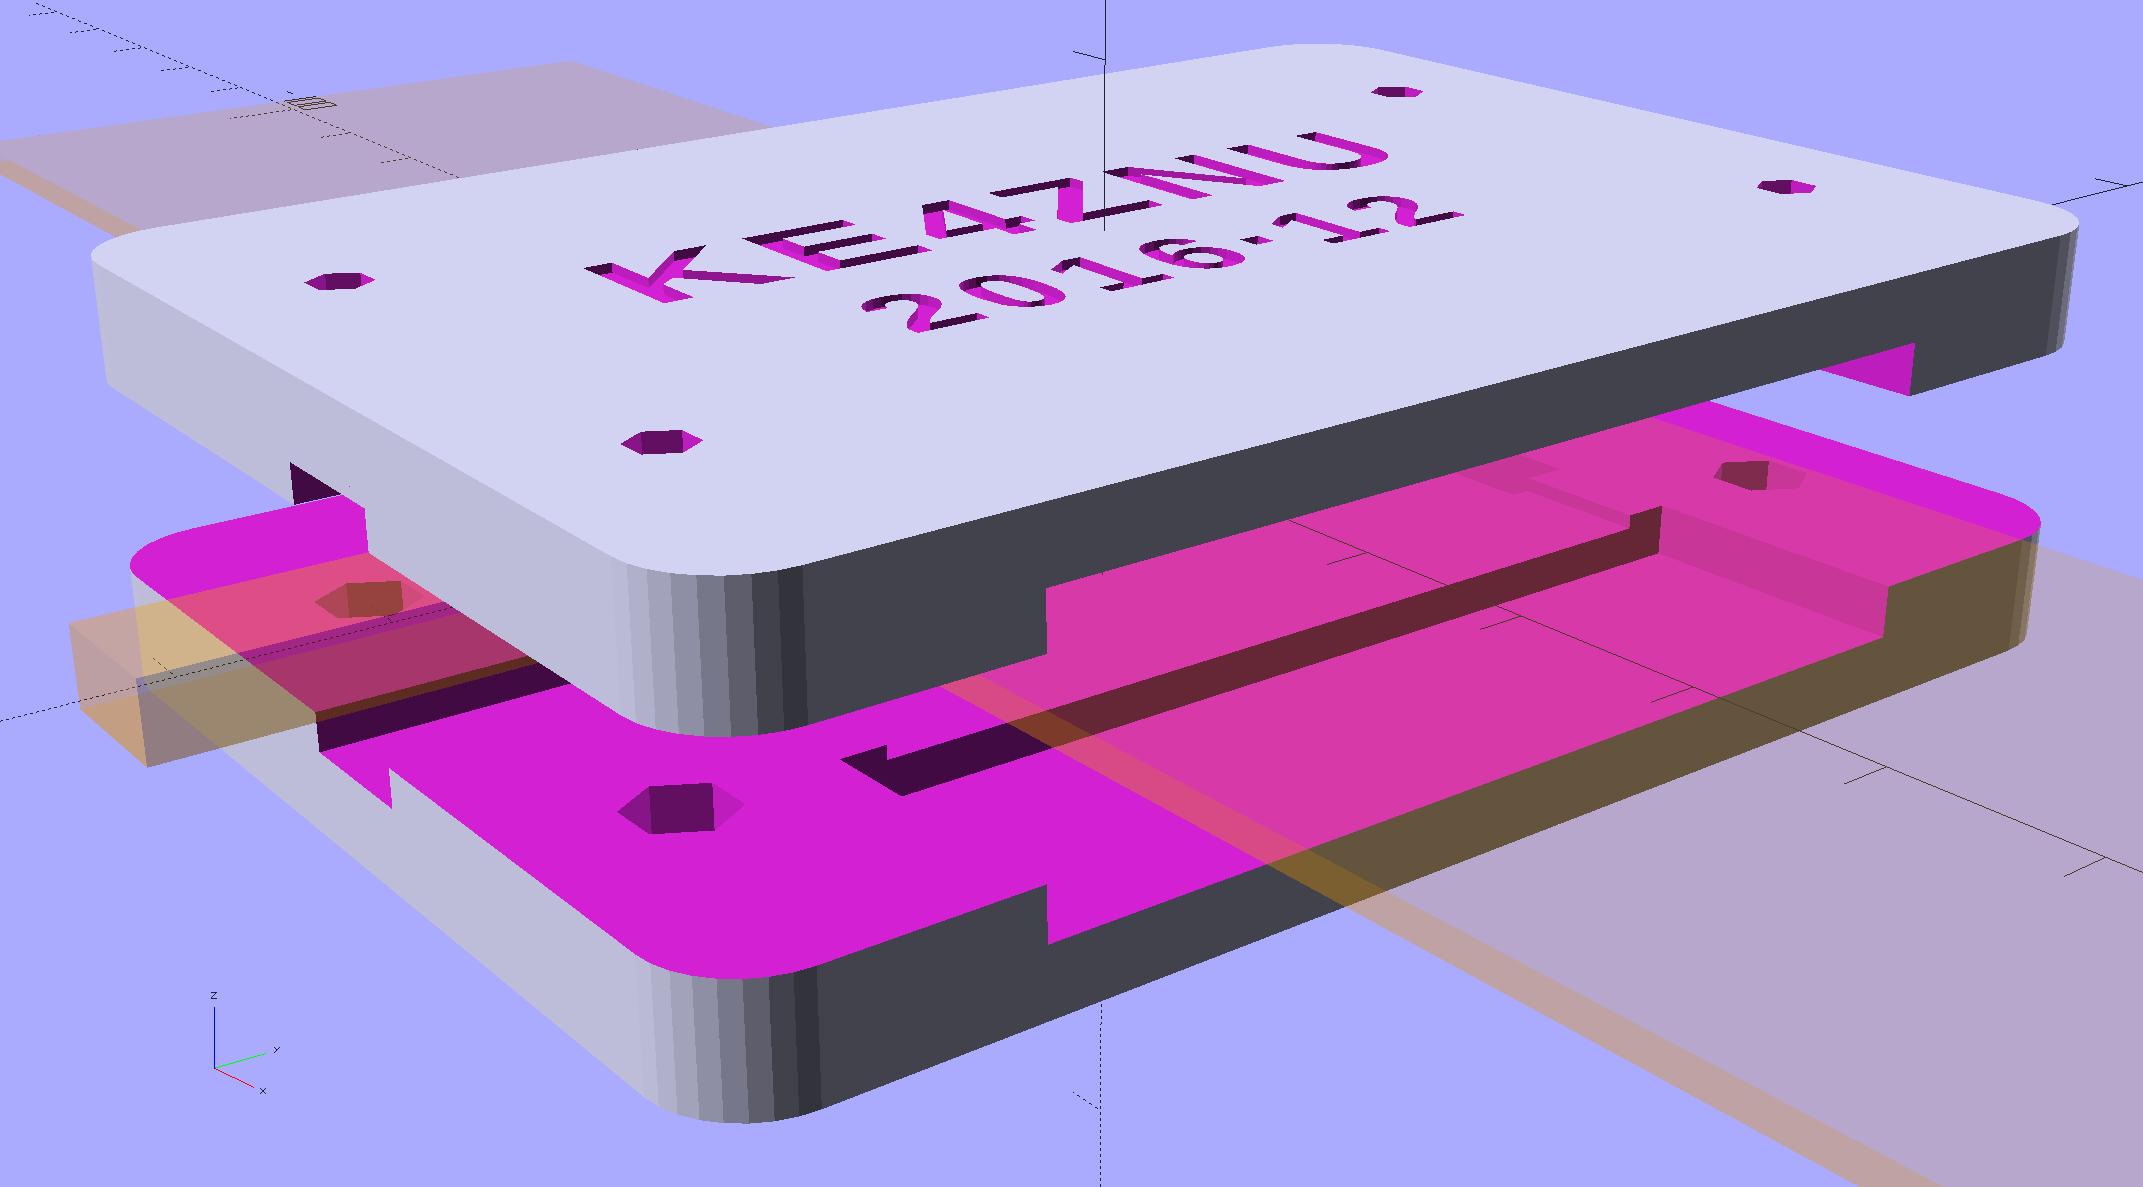
    The bushing dimension doodle:

    Fordham FG-801 Function Generator - Replacement Switch Bushing
    Fordham FG-801 Function Generator – Replacement Switch Bushing

    The internal wiring routes the 120 VAC line conductor to the switch, then to the fuse, then to the transformer. I don’t know whether it’s better to have an unfused switch or an unswitched fuse (surely there’s a UL spec for that), but I didn’t change anything. The new switch, being slightly smaller and mounting directly on the panel, required a new wire (the blue one) from the fuse:

    Fordham FG-801 Fn Gen - power switch - installed
    Fordham FG-801 Fn Gen – power switch – installed

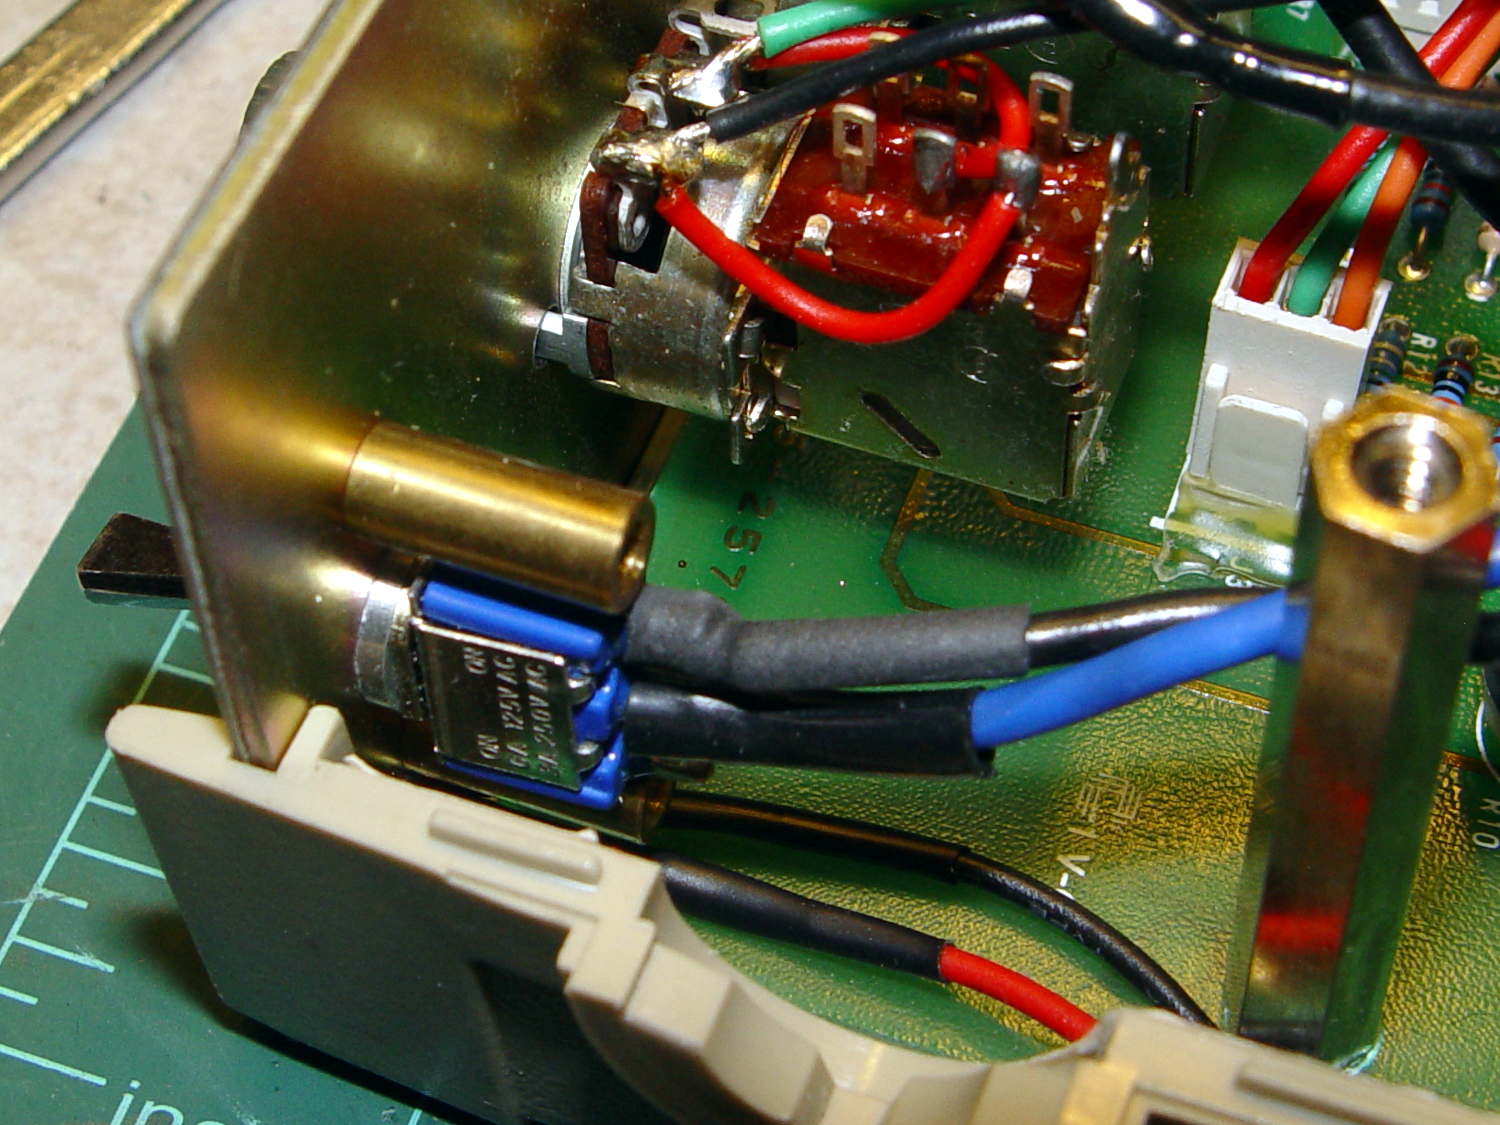
    The OEM switch mounted on two round brass standoffs and, wonder to tell, the new switch fit between them!

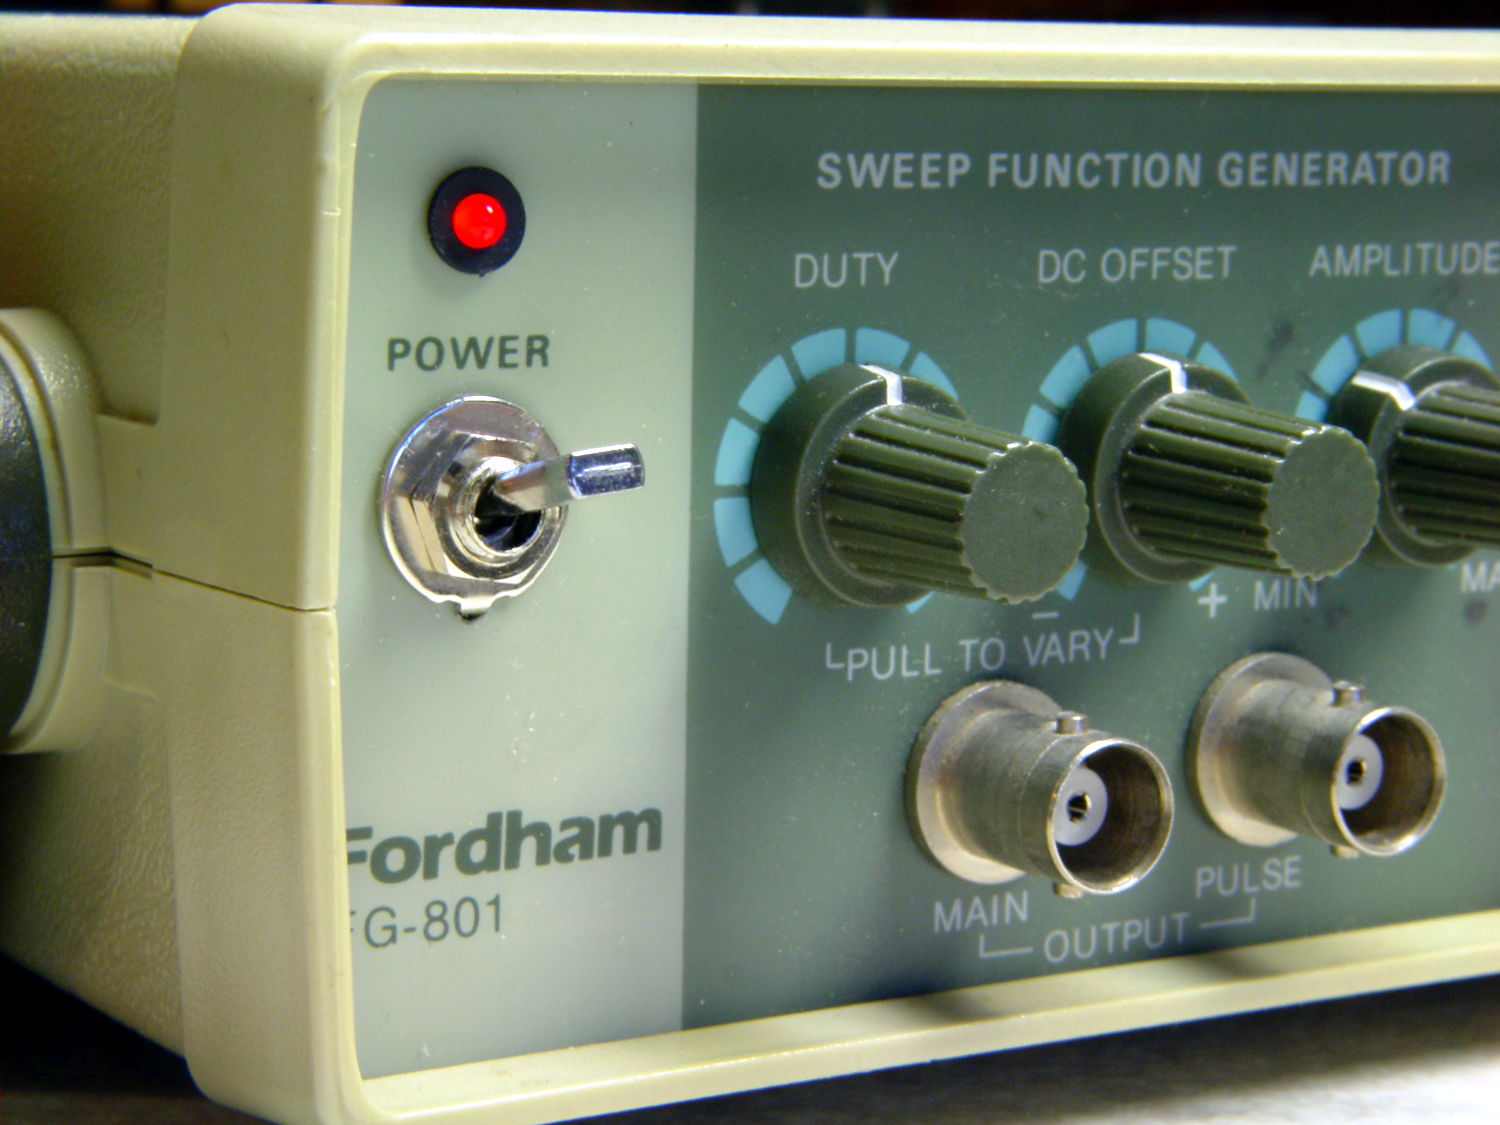
    From the front, the new switch looks like it grew there:

    Fordham FG-801 Fn Gen - switch in action
    Fordham FG-801 Fn Gen – switch in action

    The PCB mounts to the top of the case with one screw and four hexagonal brass standoffs. The standoffs have 6-32 tapped holes on one end and a 6-32 stud on the other; one of those stud had broken off. A 6-32 stainless steel screw secured in a clearance hole with a dab of epoxy solved that problem:

    Fordham FG-801 Fn Gen - standoff stud
    Fordham FG-801 Fn Gen – standoff stud

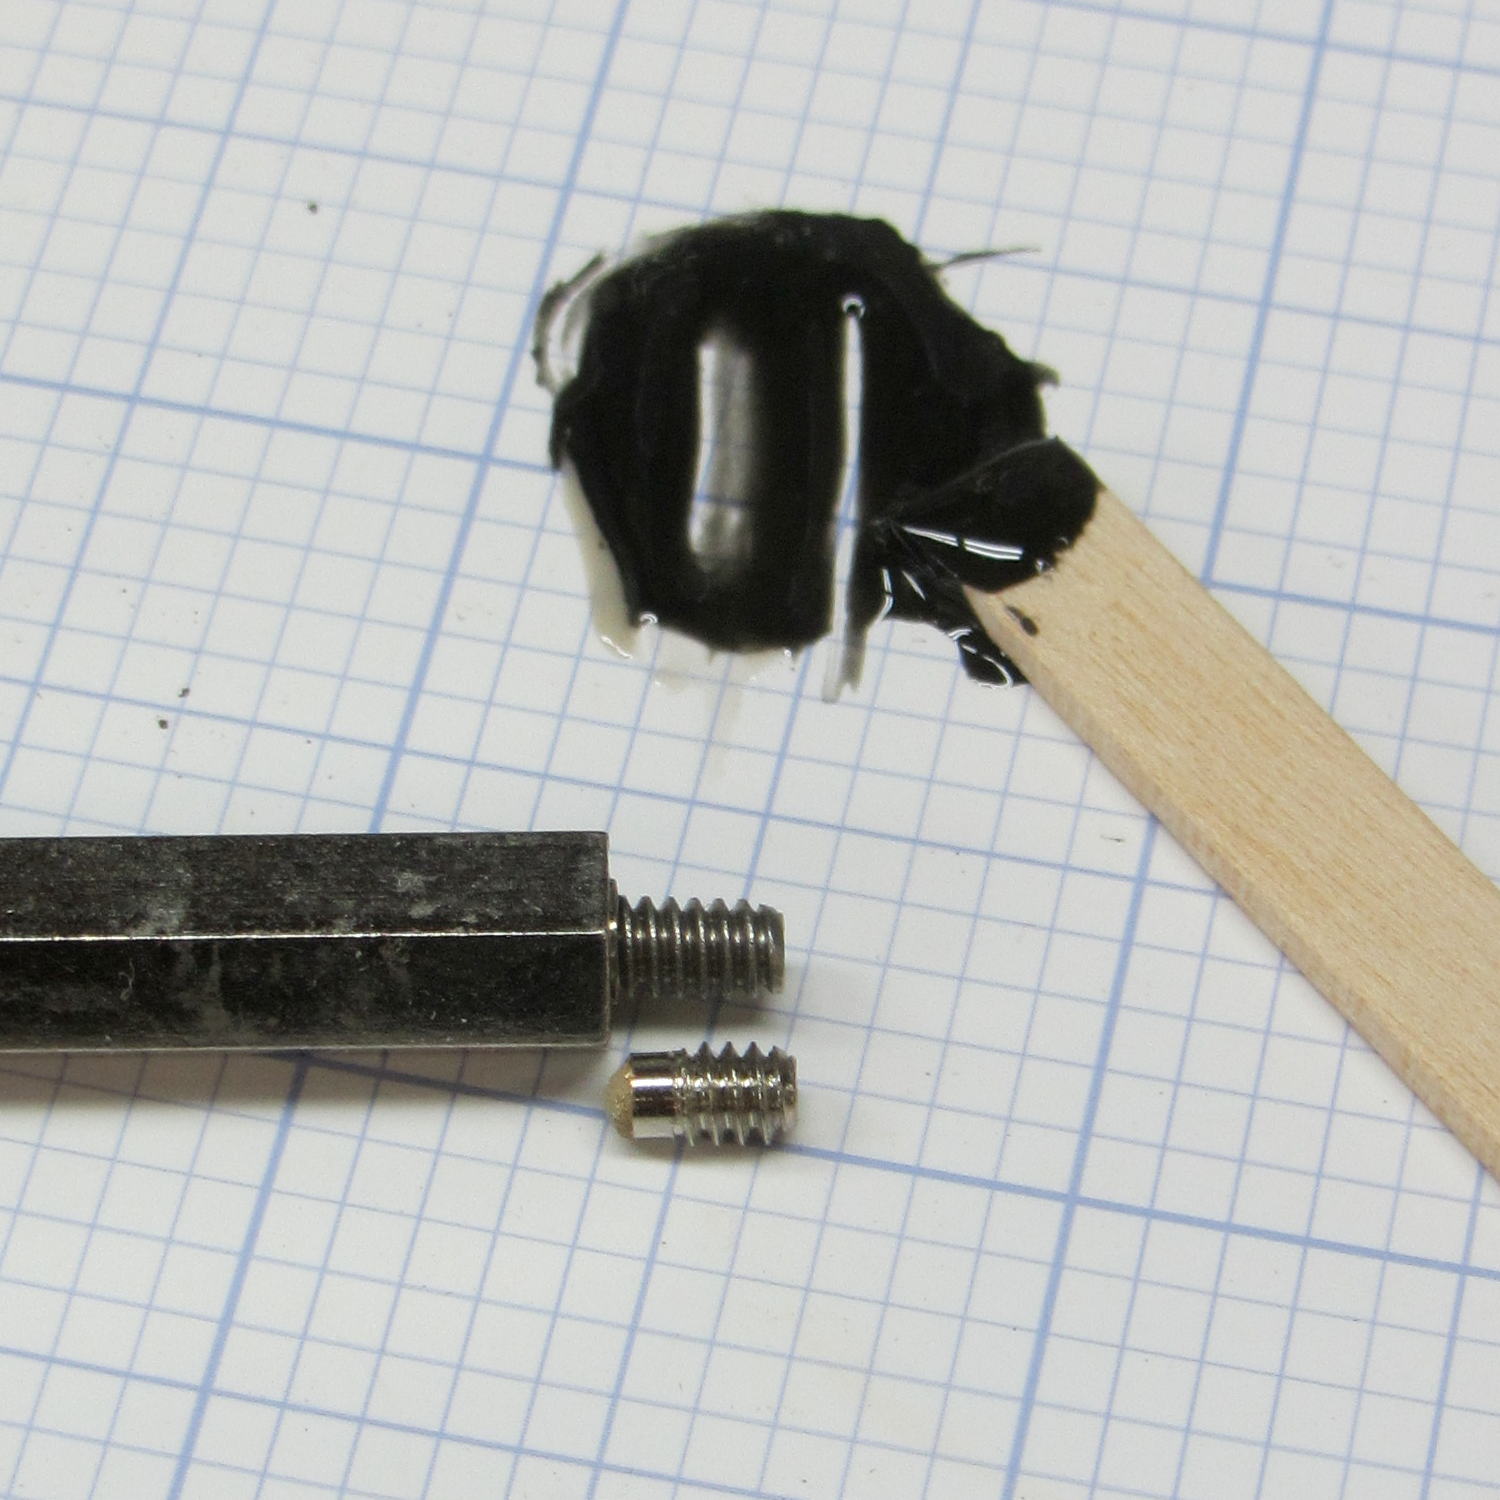
    I stood it vertically and tweaked the screw to be perpendicular while the epoxy cured.

    Memo to Self: The next time around, put a nut on the stud to make sure the answer comes out right. I didn’t do this time to avoid epoxying the nut to the standoff.

    Done!

  • Loop Antenna Splice Reinforcement

    Those solder joints and finicky little wires seem much too fragile on their own:

    LF Loop Antenna - complete joint
    LF Loop Antenna – complete joint

    This should help:

    Loop Antenna Splice - assembled
    Loop Antenna Splice – assembled

    Foam blocks hold the ribbon cable in place and provide a bit of strain relief around the hard plastic edge:

    Loop Antenna Splice - hardware
    Loop Antenna Splice – hardware

    The brass inserts in the bottom block (on the left) got epoxied in place, because they must provide quite a bit of force to clamp the foam. Their larger knurled end sits flush with the outside surface and the smaller end has one thread thickness of clearance below the inner surface.

    A last look at the wiring:

    Loop Antenna Splice - wiring
    Loop Antenna Splice – wiring

    I think the preamp must sit at some distance from the antenna to prevent feedback, but that remains to be seen.

    The M2’s nozzle accumulated a huge blob of PETG that turned into a giant smear:

    Loop Antenna Splice - PETG booger
    Loop Antenna Splice – PETG booger

    Fortunately, it’s on the inside where nobody will ever see it. If you know where to look, it’s barely visible from the outside.

    The solid model shows off the structure a bit better:

    Loop Antenna Splice - show view
    Loop Antenna Splice – show view

    The inside view:

    Loop Antenna Splice - bottom
    Loop Antenna Splice – bottom

    The OpenSCAD source code as a GitHub Gist:

    // Ribbon cable loop antenna splice
    // Ed Nisley KE4ZNU December 2016
    Layout = "Text";
    //- Extrusion parameters must match reality!
    ThreadThick = 0.25;
    ThreadWidth = 0.40;
    HoleWindage = 0.2;
    Protrusion = 0.1; // make holes end cleanly
    inch = 25.4;
    function IntegerMultiple(Size,Unit) = Unit * ceil(Size / Unit);
    //———-
    // Dimensions
    Cable = [200,48.0,1.5]; // X = longer than anything else
    Splice = [15.0,53.0,5.0]; // epoxy blob around joints
    Foam = [15.0,Splice[1],2.0];
    CornerRadius = 5.0;
    ID = 0;
    OD = 1;
    LENGTH = 2;
    Insert = [3.9,4.6 – 0.1,5.8]; // 4-40 knurled brass insert
    Screw = [2.7,5.5,2.0]; // OD = head LENGTH = head thickness
    Washer = [3.0,8.0,0.8];
    BlockOA = [60.0, // convenient length
    Splice[1] + 4*Washer[OD], // clearance around washer on top
    2*(Insert[LENGTH] + 2*ThreadThick)]; // insert sets both thicknesses
    NumScrews = 2; // screws along each side of cable
    ScrewOC = [BlockOA[0] / NumScrews,
    BlockOA[1] – 2*Washer[OD],
    2*BlockOA[2] // ensure complete holes
    ];
    TextThick = 3*ThreadThick; // depth of text into surface
    TextFit = HoleWindage/2; // clearance around text polygons
    //———————-
    // Useful routines
    module PolyCyl(Dia,Height,ForceSides=0) { // based on nophead's polyholes
    Sides = (ForceSides != 0) ? ForceSides : (ceil(Dia) + 2);
    FixDia = Dia / cos(180/Sides);
    cylinder(d=(FixDia + HoleWindage),h=Height,$fn=Sides);
    }
    //—–
    // Blocky model of cable + splice + wire tap for subtraction
    module Antenna() {
    union() {
    cube(Cable,center=true);
    cube(Splice,center=true);
    for (i=[-1,1])
    translate([0,-Splice[1]/2,0])
    cube([Splice[0]/2,Splice[1],2*Foam[2]],center=true);
    }
    }
    // Outside shape of splice Block, less screw clearance
    module SpliceBlock() {
    difference() {
    hull()
    for (i=[-1,1], j=[-1,1])
    translate([i*(BlockOA[0]/2 – CornerRadius),j*(BlockOA[1]/2 – CornerRadius),-BlockOA[2]/2])
    cylinder(r=CornerRadius,h=BlockOA[2],$fn=4*8);
    for (i = [0:NumScrews – 1], j=[-1,1])
    translate([-BlockOA[0]/2 + ScrewOC[0]/2 + i*ScrewOC[0],j*ScrewOC[1]/2,-(BlockOA[2]/2 + Protrusion)])
    PolyCyl(Screw[ID],BlockOA[2] + 2*Protrusion,6);
    }
    }
    // Splice block less cable
    module ShapedBlock() {
    difference() {
    SpliceBlock();
    Antenna();
    }
    }
    // Bottom
    module BottomPlate() {
    difference() {
    ShapedBlock();
    translate([0,0,BlockOA[2]/2])
    cube(BlockOA + 2*[Protrusion,Protrusion,0],center=true);
    Antenna(Splice);
    for (i = [0:NumScrews – 1], j=[-1,1])
    translate([-BlockOA[0]/2 + ScrewOC[0]/2 + i*ScrewOC[0],j*ScrewOC[1]/2,-(BlockOA[2]/2 + Protrusion)])
    PolyCyl(Insert[OD],2*Insert[LENGTH],6);
    for (i=[-1,1])
    translate([i*((BlockOA[0] – Foam[0] + Protrusion)/2),0,(BlockOA[2]/2 – Cable[2]/2 – Foam[2])])
    cube([Foam[0] + Protrusion,Foam[1],BlockOA[2]],center=true);
    }
    }
    // Top
    module TopPlate() {
    difference() {
    ShapedBlock();
    translate([0,0,-BlockOA[2]/2])
    cube(BlockOA + 2*[Protrusion,Protrusion,0],center=true);
    Antenna(Splice);
    for (i=[-1,1])
    translate([i*((BlockOA[0] – Foam[0] + Protrusion)/2),0,-(BlockOA[2]/2 – Cable[2]/2 – Foam[2])])
    cube([Foam[0] + Protrusion,Foam[1],BlockOA[2]],center=true);
    rotate(90) {
    translate([0,6,BlockOA[2]/2 – TextThick])
    TextHack("KE4ZNU",8,0.0,1.15,TextThick + Protrusion);
    translate([0,-6,BlockOA[2]/2 – TextThick])
    TextHack("2016·12",6,0.0,1.20,TextThick + Protrusion);
    }
    }
    }
    module TextHack(Text="sample",Size=10,Offset=0.0,Space=1.0,Thick=ThreadThick) {
    linear_extrude(height=Thick,convexity=10)
    offset(r=Offset)
    text(Text,font=":bold",size=Size,spacing=Space,halign="center",valign="center");
    }
    //———-
    // Build them
    if (Layout == "Antenna")
    Antenna();
    if (Layout == "SpliceBlock")
    SpliceBlock();
    if (Layout == "ShapedBlock")
    ShapedBlock();
    if (Layout == "Bottom")
    BottomPlate();
    if (Layout == "Top")
    TopPlate();
    if (Layout == "Text") {
    translate([0,6,0])
    TextHack("KE4ZNU",8,-TextFit,1.15,TextThick);
    translate([0,-6,0])
    TextHack("2016·12",6,-TextFit,1.20,TextThick);
    }
    if (Layout == "Show") {
    translate([0,0,5])
    TopPlate();
    translate([0,0,-5])
    BottomPlate();
    color("Orange",0.2)
    Antenna();
    }
    if (Layout == "Build") {
    translate([0,-0.6*BlockOA[1],BlockOA[2]/2])
    rotate([180,0,0])
    TopPlate();
    translate([0,0.6*BlockOA[1],BlockOA[2]/2])
    BottomPlate();
    }
  • Maxell CR2032 Lithium Cell: Early Failure

    The Hobo datalogger buried in the dirt under the patio kvetched about a low battery, which produced this surprising result:

    Maxell CR2032 cell - early failure
    Maxell CR2032 cell – early failure

    Cells from the same lot have been doing just fine in the other dataloggers, so I hope this is a one-off weak cell and not the harbinger of another run of dead cells.

  • Red Oaks Mill Dam: Icy Water

    Two recent walks showed the wintry side of the Mighty Wappinger Creek at Red Oaks Mill:

    Red Oaks Mill Dam 2016-12-11
    Red Oaks Mill Dam 2016-12-11

    Plants growing on mid-stream rocks accumulate ice during a cold snap:

    Red Oaks Mill Dam 2016-12-11 - ice on rocks 2
    Red Oaks Mill Dam 2016-12-11 – ice on rocks 2

    Even bare rocks sprout rims:

    Red Oaks Mill Dam 2016-12-11 - ice on rocks 1
    Red Oaks Mill Dam 2016-12-11 – ice on rocks 1

    A week later, half a foot of snow added highlights:

    Red Oaks Mill Dam 2016-12-18
    Red Oaks Mill Dam 2016-12-18

    Warmer air over the snow and ice filled the valley with low-lying fog:

    Red Oaks Mill Dam 2016-12-18 - upstream fog
    Red Oaks Mill Dam 2016-12-18 – upstream fog

    Although it’s not quite as pastoral, a touch of pictorial graffiti recently appeared under the bridge carrying Rt 376 over the creek:

    Red Oaks Mill Dam 2016-12-18 - graffiti
    Red Oaks Mill Dam 2016-12-18 – graffiti

    The “No war just smoke” tag suggests someone with a fundamental misunderstanding of life, somewhat along the lines of those absurd “Coexist” bumper stickers.

    Anyhow, a happy holiday to one & all…

  • Snowthrower Shear Bolts

    The snowthrower (I’ve always called it a snowblower, but that’s just me) ate a ski pole (*), handle-tether-end first, and the right-side shear bolt worked perfectly when the right-hand auger slammed to a stop. A bit of drift punch rapping extracted the sorry lump at the bottom:

    Sheared MTD Snowthrower Bolts
    Sheared MTD Snowthrower Bolts

    The missing nut and bolt head may eventually surface, but I’m not losing any sleep over them.

    I popped a replacement shear bolt from the heap (thank you, Aitch!) and thought the nut went on rather stiffly. The nuts have a crimp in the middle to make them vibration-proof, but this one seemed stiffer than usual and, lo and behold, the bolt snapped just before I thought the nut had gotten far enough.

    The nut on the second replacement shear bolt required much less torque, didn’t (let me) snap the bolt, and I finished the mission. That’s the third or fourth shear bolt I’ve used since getting the thrower in 2007, so there’s a package of six in transit.

    Part Number 710-0809A, 5/16-18 x 1.5 inch.

    (*) One of Mary’s gardening cronies works for a sporting goods store, has access to an unlimited supply of slightly bent ski poles, and shares the bounty for use as garden stakes.

  • Raspberry Pi: Forcing VNC Display Resolution

    You can use VNC with a headless Raspberry Pi, but, absent a display with which to negotiate the screen resolution, X defaults something uselessly small: 720×480. To force a more reasonable resolution, edit /boot/config.txt and set the framebuffer size:

    framebuffer_width=1920
    framebuffer_height=1280
    

    You can use a nonstandard resolutions, as with the 1920×1280 that fits neatly on my 2560×1440 landscape monitor, but getting too weird will surely bring its own reward. When you plug in a display, X will ought to negotiate as usual for the highest resolution the display can handle.

    The System Configuration dialog has a “Resolution” button offering standard resolutions:

    RPi display resolution configuration
    RPi display resolution configuration

    The shiny RPi Pixel UI bakes the RealVNC server directly into whatever handles the startup process these days, rendering all previous recommendations about forcing VNC resolutions inoperative. I found the trick of editing the config file on StackExchange after the usual flailing around.

    Memo to Self: Remmina (the VNC client I use in XFCE on my desktop PC) doesn’t respond well to having the VNC server shut down while it’s connected. Fire up a command prompt, enter this:

    sleep 10 ; sudo reboot
    

    Then, quick like a bunny, disconnect the VNC session.

  • Blog Backup

    Recent news about Dropbox removing its Public folder feature reminded me to do my every-other-month blog backup. Wordpress provides a method to “export” the blog’s text and metadata in their XML-ish format, so you can (presumably) import your blog into another WordPress instance on the server of your choice. However, the XML file (actually, ten of ’em, all tucked into a paltry 8 MB ZIP file) does not include the media files referenced in the posts, which makes sense.

    Now, being that type of guy, I have the original media files (mostly pictures) tucked away in a wide variety of directories on the file server. The problem is that there’s no easy way to match the original file to the WordPress instance; I do not want to produce a table by hand.

    Fortunately, the entry for each blog post labels the URL of each media file with a distinct XML tag:

    		<wp:attachment_url>https://softsolder.com/wp-content/uploads/2008/12/cimg2785-blender-bearings.jpg</wp:attachment_url>
    

    Note the two leading tabs: it’s prettyprinted XML. (Also, should you see escaped characters instead of < and >, then WordPress has chewed on the source code again.)

    While I could gimmick up a script (likely in Python) to process those files, this is simple enough to succumb to a Bash-style BFH:

    grep attachment_url *xml > attach.txt
    sed 's/^.*http/http/' attach.txt | sed 's/&lt;\/wp.*//' > download.txt
    wget --no-verbose --wait=5 --random-wait --force-directories --directory-prefix=/where/I/put/WordPress/Backups/Media/ -i download.txt
    

    That fetches 6747 media files = 1.3 GB, tucks them into directories corresponding to their WordPress layout, and maintains their original file dates. I rate-limited the download to an average of 5 s/file in the hope of not being banned as a pest, so the whole backup takes the better part of ten hours.

    So I wind up blowing an extra gig of disk space on a neatly arranged set of media files that can (presumably) be readily restored to another WordPress instance, should the occasion arise.

    Memo to Self: investigate applying the -r option to the base URL, with the -N option to make it incremental, for future updates.