The Smell of Molten Projects in the Morning

Ed Nisley's Blog: Shop notes, electronics, firmware, machinery, 3D printing, laser cuttery, and curiosities. Contents: 100% human thinking, 0% AI slop.

Author: Ed

  • Squidwrench Electronics Workshop Session 6: Capacitors

    Capacitors as charge-storage devices with An introduction to Function Generators & Oscilloscopes

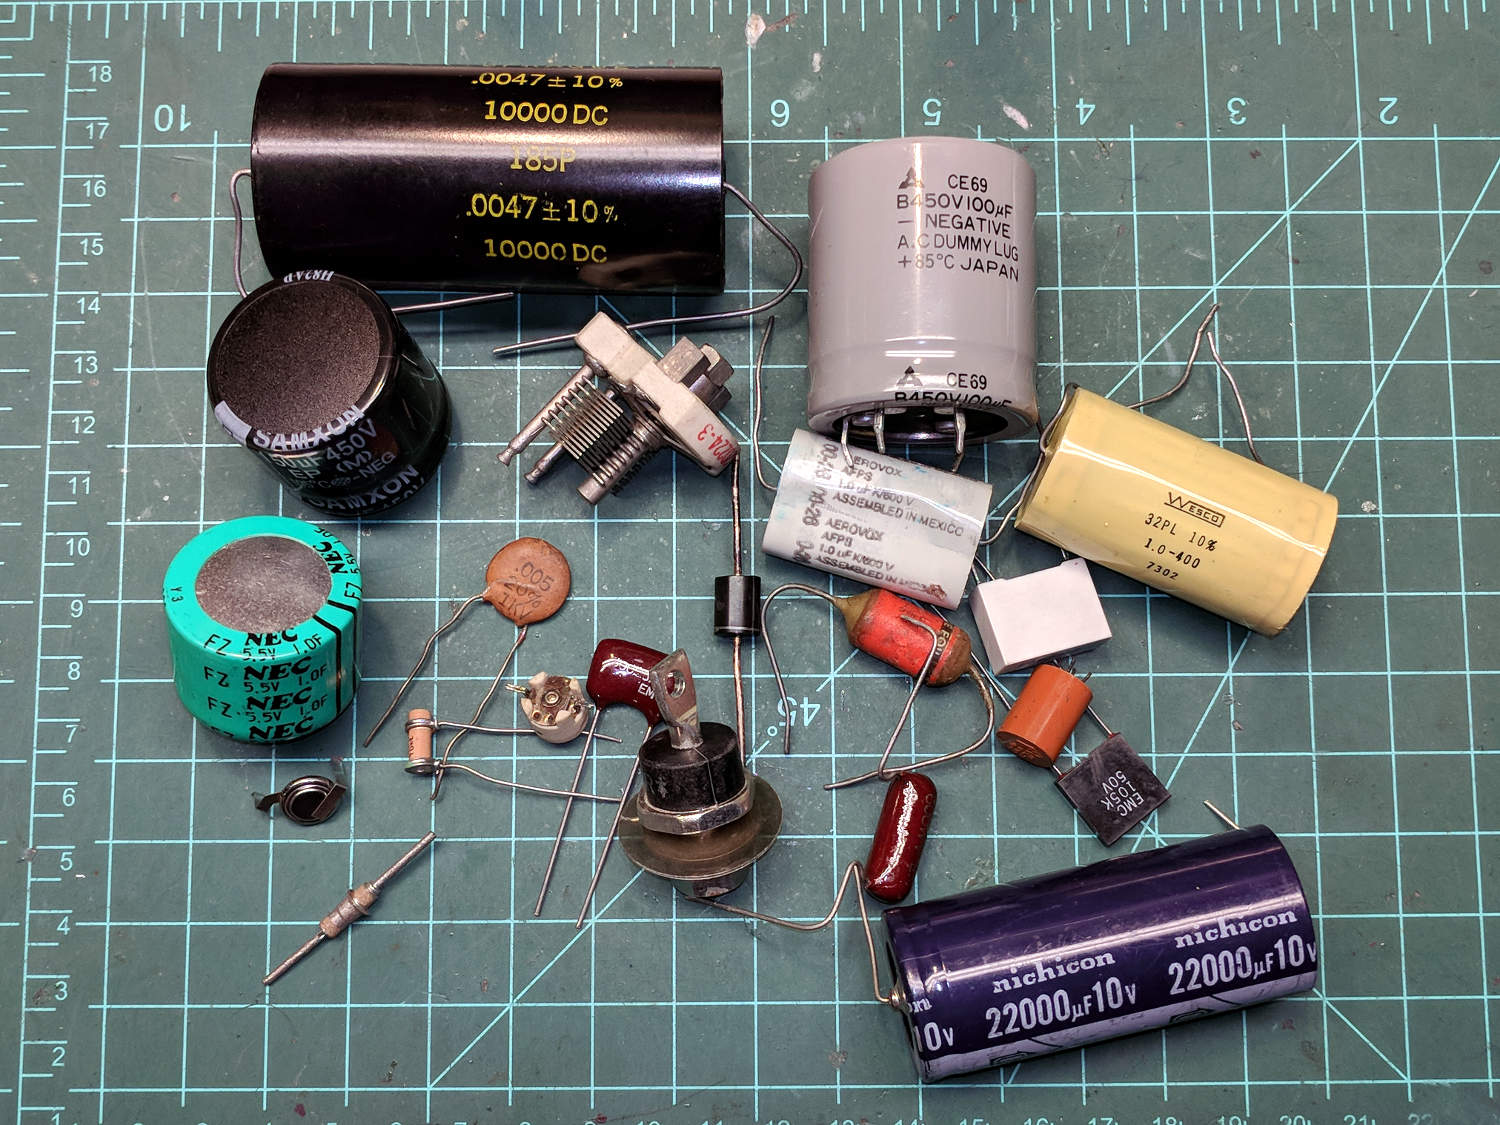
    Capacitor show-and-tell

    Capacitor show-n-tell
    Capacitor show-n-tell

    Things to remember

    • The green one over on the left is the 1 farad cap my EE prof said I’d never see: “It would be as big as a house”
    • The small disk in front of it is a 600 mF (milli, not micro) polyacene “battery” rated at 3.3 V
    • Air-variable and wax-dielectric caps = ghosts from the past
    • Reverse-biased diodes act as capacitors, due to charge separation
    • Silver-mica caps are pretty things to behold
    • Voltage rating vs size vs dielectric, a cap charged to 10 kV will get your attention

    Warmup exercise: Measure the caps with a variety of meters, noting they do not reach 1 farad. General patter, Q&A, introducing equations as needed.

    I will resolutely squash all discussion of capacitors as analog / small signal circuit elements.

    Cap construction

    • C = εA/d with ε = dielectric permittivity = ε0 × εR
    • ε0 = vacuum permittivity = 8.84 × 10⁻¹² F/m
    • εR = relative permittivity, air = 1.0006
    • dielectrics: wax vs paper vs plastics vs whatever
    • ignoring dissipation factor for now
    • caution on dielectric absorption
    • electrolytic caps vs capacitor plague
    • brave / daring / foolish: aluminum foil with chair mat dielectric (εR ≈ 3)

    Useful equations

    • C = Q/V and (nonlinearly) C = Δq/ΔV
    • thus Q = C × V, Δq = C × Δv = Δc × V
    • by definition, i = Δq/Δt, so i = C × Δv/Δt
    • “displacement current” vs “actual current”
    • stored energy = 1/2 × C × V²

    Quick demo

    • charge 1 F cap to 3.7 V at 20 mA from constant current power supply
    • estimate charge time
    • plot V vs T
    • disconnect power supply, connect white LED, observe light output for the next few hours

    Capacitor applications in charge-storage mode

    • Constant current → voltage ramp (scope horizontal)
    • Large cap = no-corrosion (kinda sorta) small-ish battery
    • Change plate d → microphone (need V)
    • Trapped charge in dielectric → Electret mic (no V, but need amp)
    • Change C (varactor) → parametric low noise amplifier (narrowband)

    Parallel caps

    • C = C1 + C2
    • expanded plate area “A”
    • capacitor paradox vs reality: never switch paralleled caps!

    Series caps

    • 1/C = 1/C1 + 1/C2
    • increased separation “d”, sorta kinda
    • floating voltage on center plates = Bad Idea

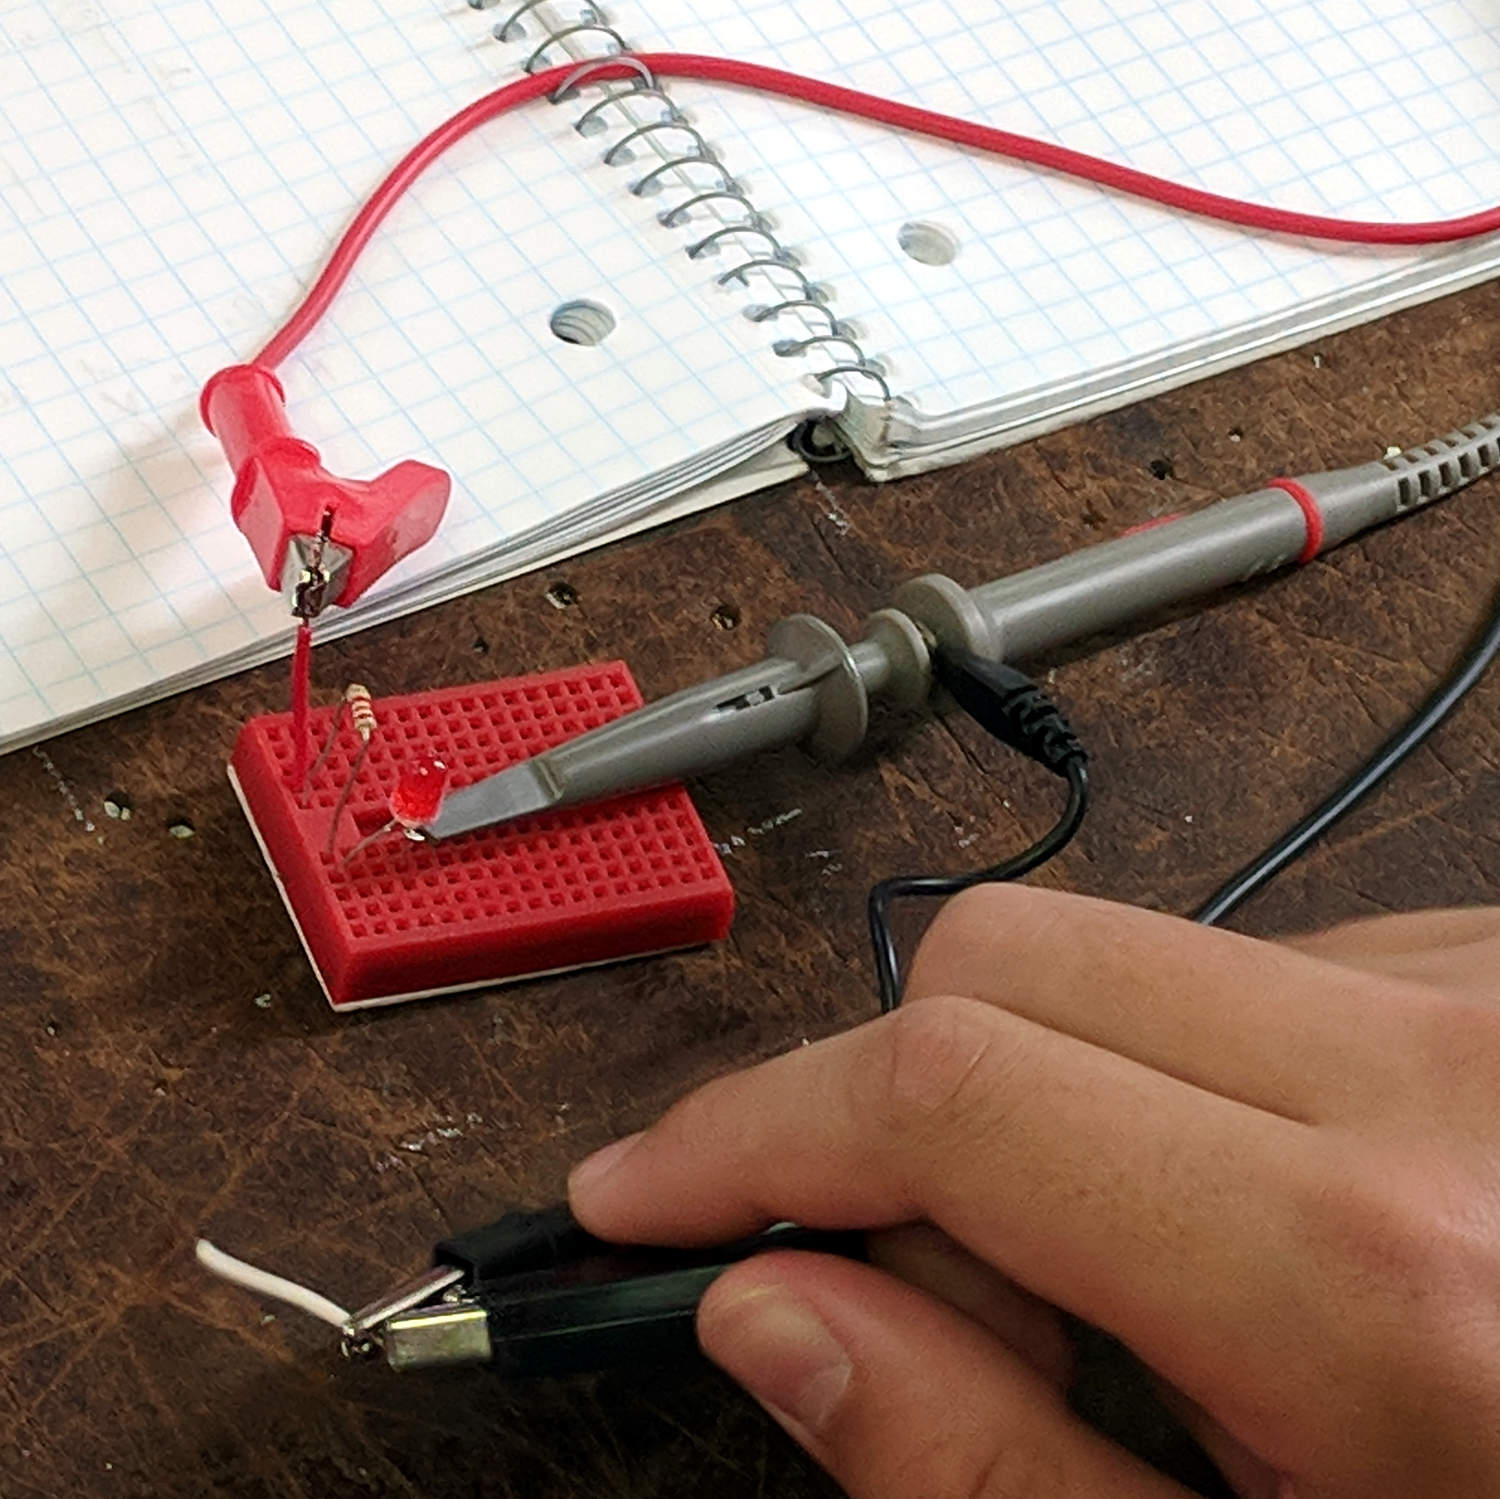
    Now for some hands-on lab action

    Connect function generator to resistor voltage divider

    Resistor voltage divider - oscilloscope connections
    Resistor voltage divider – oscilloscope connections
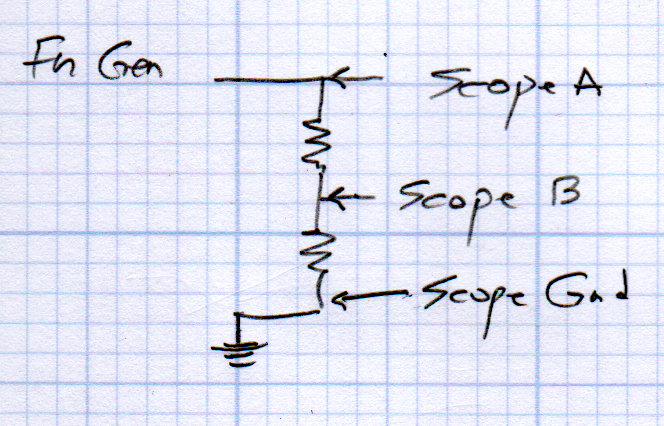
    • calculate total resistance and series current
    • calculate expected voltages from current
    • show input & output waveforms on scope
    • overview of oscilloscope controls / operations

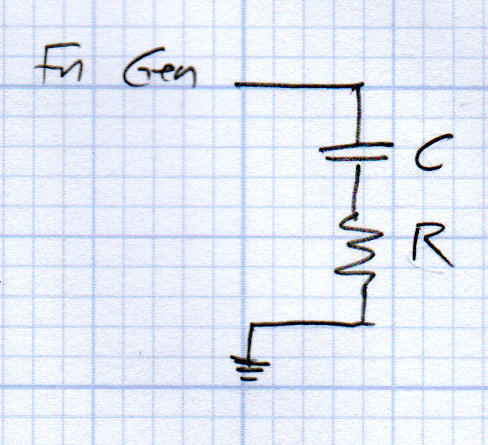
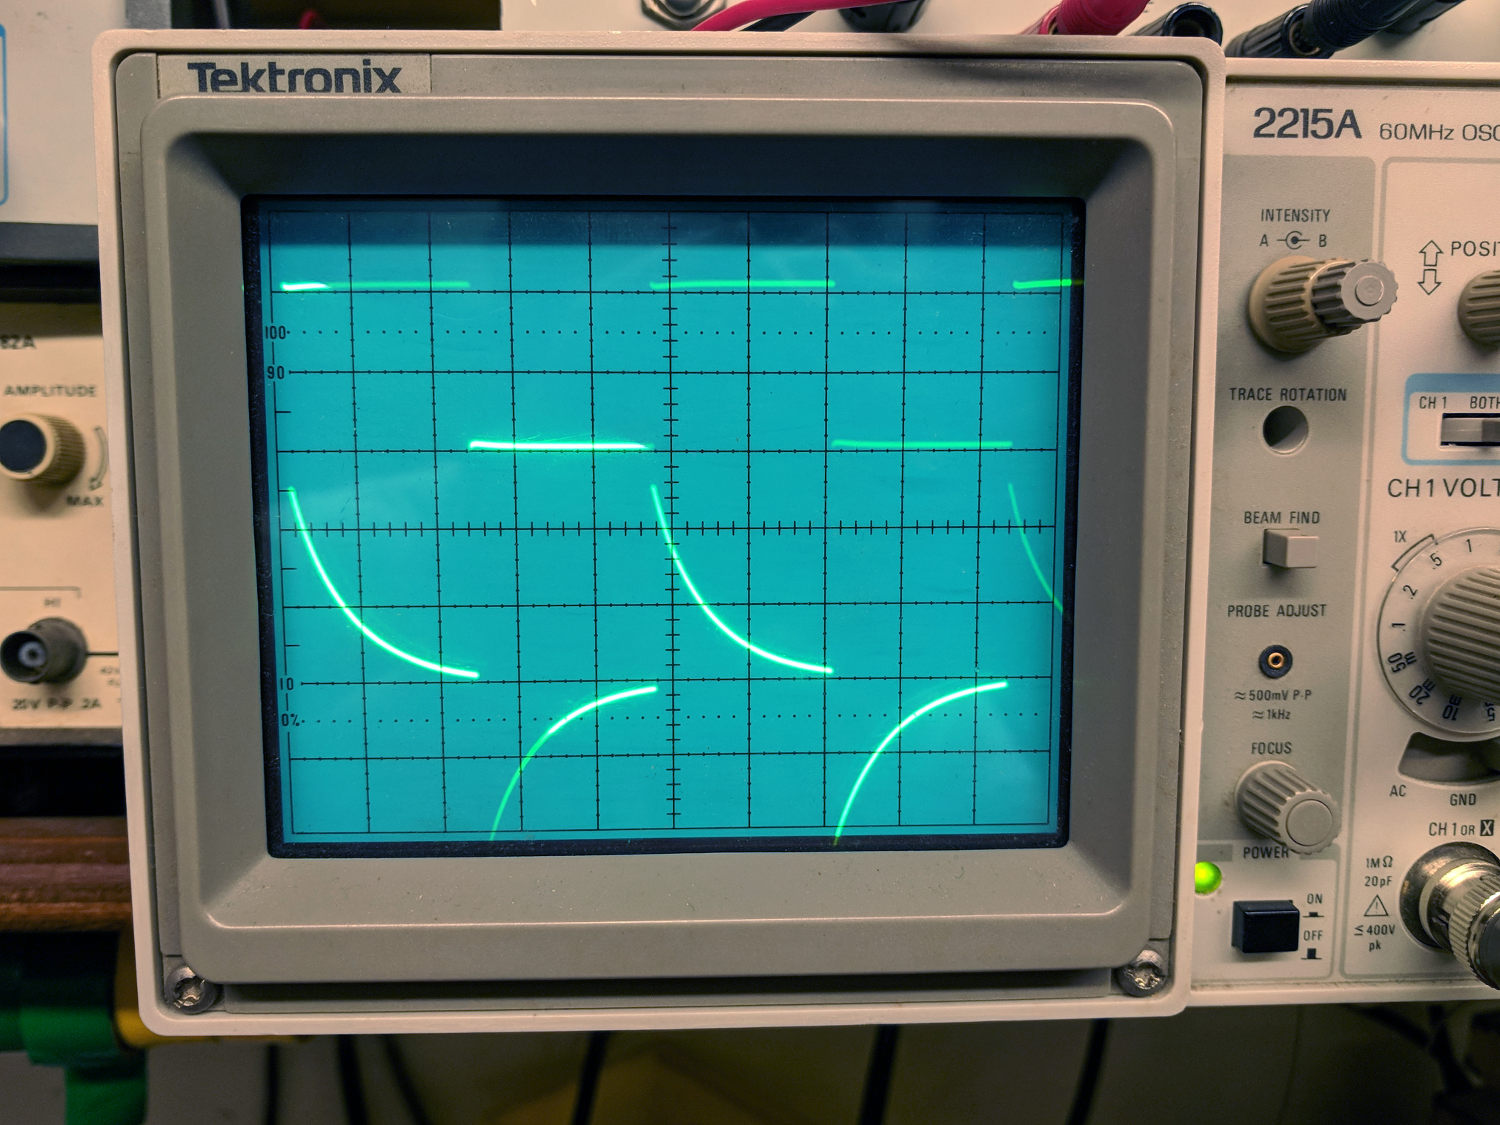
    Replace lower R with C, then measure V across cap

    RC Circuit - integrator
    RC Circuit – integrator
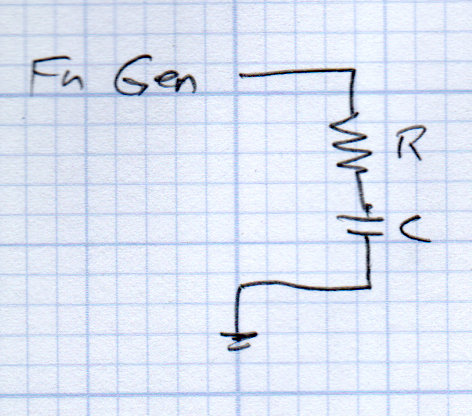
    • series circuit: fn gen → R → C (C to common)
    • scope exponential waveform across C
    • not constant current → not linear voltage ramp
    • except near start, where it’s pretty close
    • e^-t/τ and (1 – exp(-t/τ))
    • time constant τ = RC (megohm × microfarad = ohm × farad = second)
    • show 3τ = 5% and 5τ < 1%
    • integration (for t << τ)
    Tek 2215A oscilloscope - cap as integrator
    Tek 2215A oscilloscope – cap as integrator

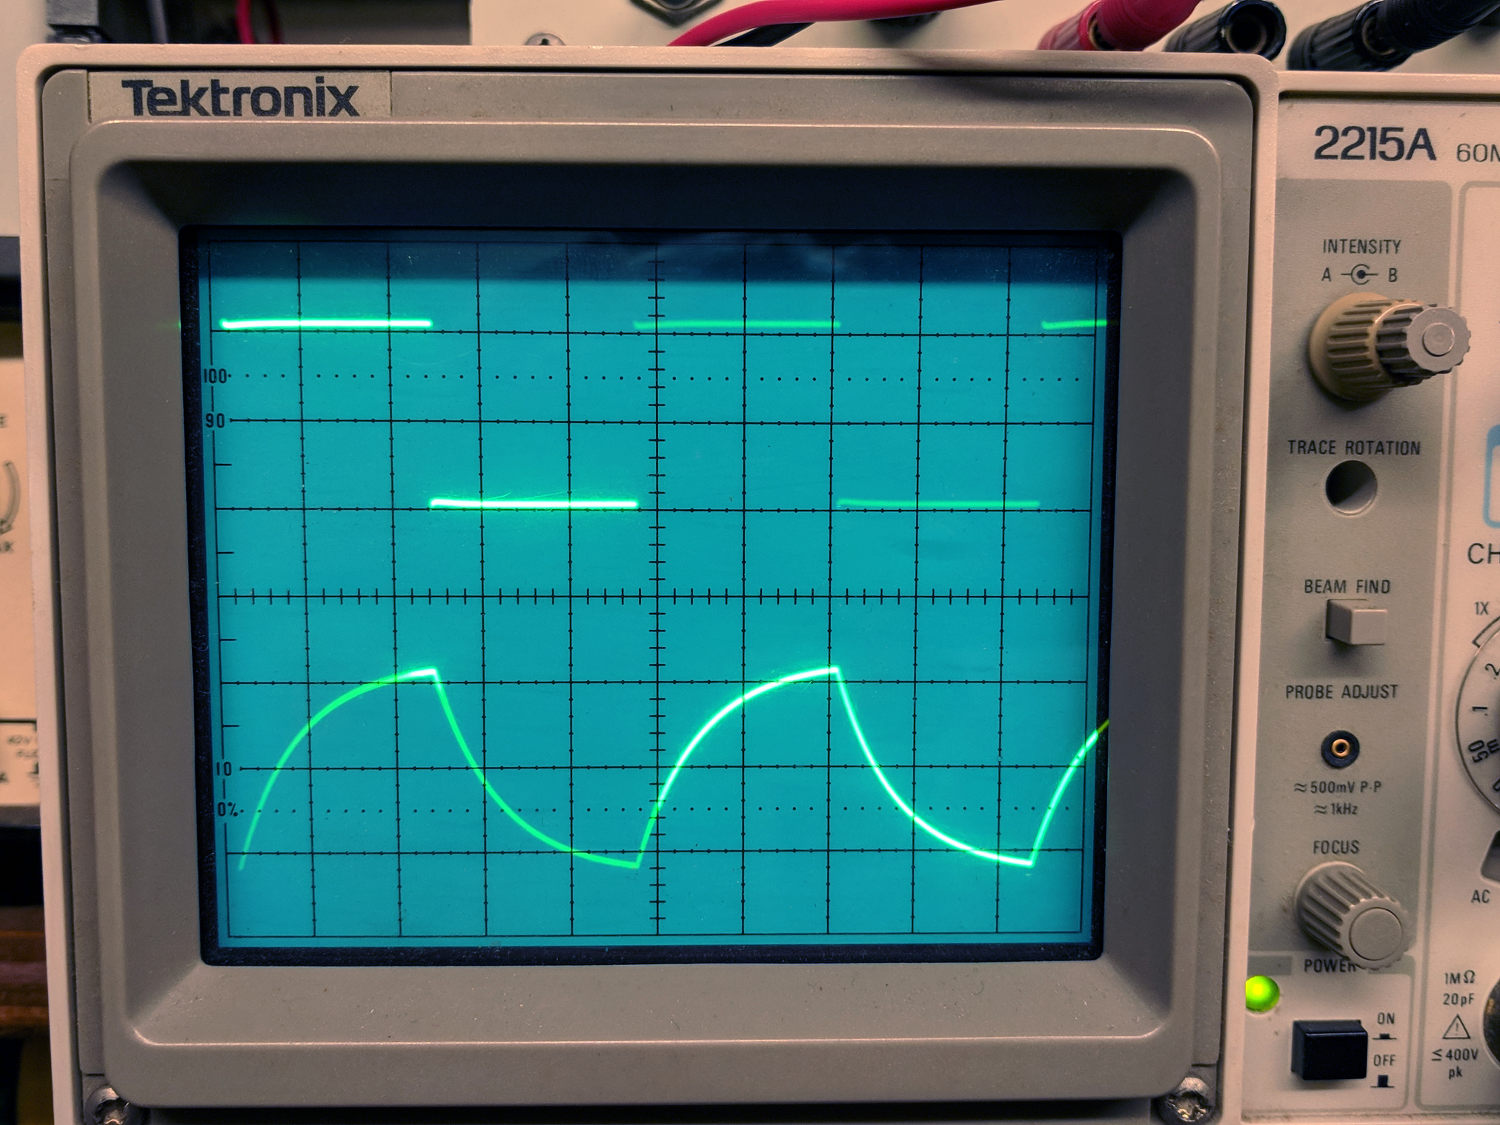
    Flip R and C, measure V across resistor

    RC Circuit - differentiator
    RC Circuit – differentiator
    • series circuit: fn gen → C → R (R to common)
    • scope exponential waveform across R  ∝ current through cap (!)
    • same time constant as above
    • differentiation (for t << τ)
    Tek 2215A oscilloscope - cap as differentiator
    Tek 2215A oscilloscope – cap as differentiator

    If time permits, set up a transistor switch

    NPN switch - Cap charge-discharge
    NPN switch – Cap charge-discharge
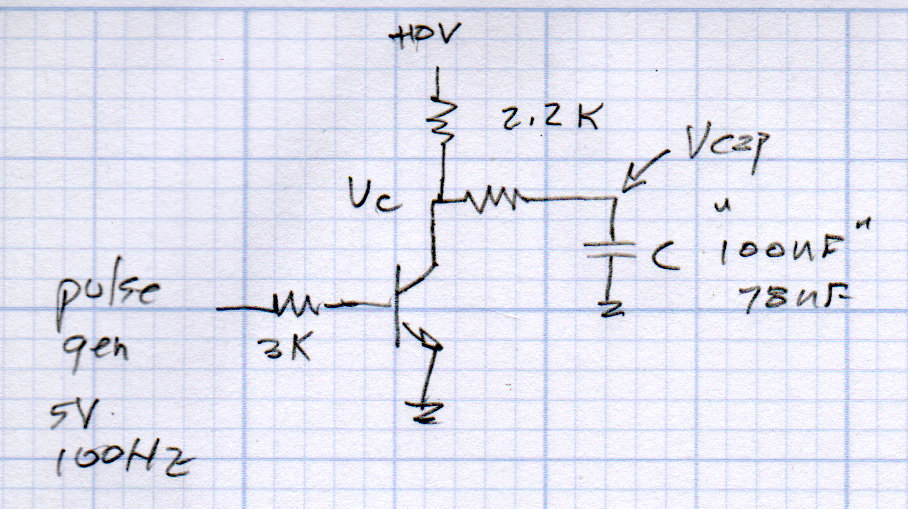
    • display voltage across cap
    • measure time constants
    • calculate actual capacitance

    Other topics to explore

    • measure 1 F cap time constant, being careful about resistor power
    • different function generator waveforms vs RC circuits
    • scope triggering
    • analog vs digital scope vs frequency

    All of which should keep us busy for the better part of a day …

  • Driving While Shouting

    We generally don’t get hassled during our bike rides, perhaps because we ride like narrow vehicles and don’t pull stupid bicyclist tricks. The few folks who do hassle us seem to be twenty-something males, an endangered species of its own.

    A shout of “Assholes!”

    This slideshow requires JavaScript.

    Unusually, there was no nearby traffic, so it’s not a case of mistaken identity.

    Protip: Don’t do something in your employer’s vehicle that your employer may regret.

    A shout of “Fuck you!”

    This slideshow requires JavaScript.

    Protip: Your car has a license plate. JCX-1393, matching my high-res version against the audio track; I shout the license plate and identifying information while I can see it.

    Yes, I was young once … and stupid.

    One hopes they outgrow it, too.

  • MPCNC: Jogging Keypad for bCNC

    The bCNC G-Code sender sends jogging commands to GRBL from an ordinary numeric keypad:

    MPCNC - Jogging keypad
    MPCNC – Jogging keypad

    Unlike the keypads on my streaming radio players, this one requires no configuration at all, because bCNC regards it as just another keyboard input. The catch: you must select any screen element other than a text entry field to have bCNC recognize the keystrokes as “not text”.

    You would get the same results from the numeric keys on the right side of a full-size / 104-key plank. I’m using a small “tenkeyless” keyboard, which means I can put the keypad wherever it’s easiest to reach while tweaking the MPCNC.

    The ÷10 and ×10 keys along the top row alter the step size by factors of ten, which is pretty much what you need: jog to within a big step of the target, drop to the next lower decade, jog a few more times, maybe drop another decade, jog once, and you’re as close as you need to be with an MPCNC. The -1 and +1 keys aren’t as useful, at least to me: changing from 5 mm to 4 mm or 6 mm doesn’t make much difference.

    Jogging to align the spindle (well, a pen or drag knife) with a target using the video camera works really well:

    bCNC - Video align
    bCNC – Video align

    GRBL and bCNC don’t do smooth jogging and the discrete steps aren’t as nifty as the Joggy Thing with LinuxCNC, but it gets the job done.

  • Squidwrench Electronics Workshop: Session 5 Whiteboards

    Whiteboards from the SqWr Electronics Session 5, covering transistors as switches …

    Reviewing I vs V plots, starting with a resistor and then a transistor as a current amplifier:

    SqWr Electronics 5 - whiteboard 1
    SqWr Electronics 5 – whiteboard 1

    Reminder of why you can’t run a transistor at its maximum voltage and current at the same time:

    SqWr Electronics 5 - whiteboard 2
    SqWr Electronics 5 – whiteboard 2

    A resistor load line, with power calculation at the switch on and off coordinates:

    SqWr Electronics 5 - whiteboard 3
    SqWr Electronics 5 – whiteboard 3

    Detail of the power calculations, along with a diagram of the current and voltage when you actually switch the poor thing:

    SqWr Electronics 5 - whiteboard 3 detail
    SqWr Electronics 5 – whiteboard 3 detail

    Oversimplification: most of the power happens in the middle, but as long as the switching frequency isn’t too high, it’s all good.

    Schematic of the simplest possible switched LED circuit, along with a familiar mechanical switch equivalent:

    SqWr Electronics 5 - whiteboard 4
    SqWr Electronics 5 – whiteboard 4

    We started with the “mechanical switch” to verify the connections:

    SqWr Session 5 - Switched LED breadboard
    SqWr Session 5 – Switched LED breadboard

    Building the circuitry wasn’t too difficult, but covering the function generator and oscilloscope hookup took far more time than I expected.

    My old analog Tek 2215 scope was a crowd-pleaser; there’s something visceral about watching a live CRT display you just don’t get from the annotated display on an LCD panel.

    I’d planned to introduce capacitors, but just the cap show-n-tell went well into overtime. We’ll get into those in Session 6, plus exploring RC circuitry with function generators and oscilloscopes.

  • Raspberry Pi vs. MicroSD-as-Disk Memory

    The MPCNC has bCNC running on a Raspberry Pi, with a Samsung EVO MicroSD card serving as the “hard drive”:

    Sandisk Extreme Plus vs. Samsung EVO MicroSD cards
    Sandisk Extreme Plus vs. Samsung EVO MicroSD cards

    The picture also shows a defunct Sandisk Extreme Plus killed by continuous video recording in my Fly6 bike camera. I later replaced the EVO with a video-rated Samsung card which has been running fine ever since, albeit with the occasional crash-and-reformat expected with “action” cameras.

    With that as background, a different Samsung EVO card from the same batch has been running the MPCNC’s Raspberry Pi for about a year. Over the course of a few days last week, the RPi went from an occasional stall to a complete lockup, although waiting for minutes to hours would sometimes resolve the problem. As I’ve learned by now, it’s not a software crash, it’s the controller inside the card suffering from write amplification while trying to move data from failing sectors.

    Applying f3write to the card shows the problem:

    MPCNC MicroSD - f3write slowdown
    MPCNC MicroSD – f3write slowdown

    The write speed started out absurdly high as the card’s write cache fills, then slowed to to the flash memory’s ability to absorb data, and eventually ran out of steam during the last few files.

    But, as you might not expect, f3read reported the data was fine:

    sudo f3read /mnt/part
    F3 read 7.0
    Copyright (C) 2010 Digirati Internet LTDA.
    This is free software; see the source for copying conditions.
    
                      SECTORS      ok/corrupted/changed/overwritten
    Validating file 1.h2w ... 2097152/        0/      0/      0
    Validating file 2.h2w ... 2097152/        0/      0/      0
    Validating file 3.h2w ... 2097152/        0/      0/      0
    Validating file 4.h2w ... 2097152/        0/      0/      0
    Validating file 5.h2w ... 2097152/        0/      0/      0
    Validating file 6.h2w ... 2097152/        0/      0/      0
    Validating file 7.h2w ... 2097152/        0/      0/      0
    Validating file 8.h2w ... 2097152/        0/      0/      0
    Validating file 9.h2w ... 2097152/        0/      0/      0
    Validating file 10.h2w ... 2097152/        0/      0/      0
    Validating file 11.h2w ... 2097152/        0/      0/      0
    Validating file 12.h2w ... 2097152/        0/      0/      0
    Validating file 13.h2w ... 2097152/        0/      0/      0
    Validating file 14.h2w ... 2097152/        0/      0/      0
    Validating file 15.h2w ... 2097152/        0/      0/      0
    Validating file 16.h2w ... 2097152/        0/      0/      0
    Validating file 17.h2w ... 2097152/        0/      0/      0
    Validating file 18.h2w ... 2097152/        0/      0/      0
    Validating file 19.h2w ... 2097152/        0/      0/      0
    Validating file 20.h2w ... 2097152/        0/      0/      0
    Validating file 21.h2w ... 1322894/        0/      0/      0
    
      Data OK: 20.63 GB (43265934 sectors)
    Data LOST: 0.00 Byte (0 sectors)
    	       Corrupted: 0.00 Byte (0 sectors)
    	Slightly changed: 0.00 Byte (0 sectors)
    	     Overwritten: 0.00 Byte (0 sectors)
    Average reading speed: 43.04 MB/s
    

    Obviously, the card’s read speed isn’t affected by the write problems.

    Assuming the actual data & programs on the card were still good, I slurped the partitions:

    sudo partimage save /dev/sdf1 mpcnc_boot.gz
    sudo partimage save /dev/sdf2 mpcnc_partition.gz
    

    And wrote them back:

    sudo partimage restmbr  mpcnc_boot.gz.000 
    sudo partimage restore /dev/sdf1 mpcnc_boot.gz.000 
    sudo partimage restore /dev/sdf2 mpcnc_partition.gz.000
    

    Unshown: a finger fumble requiring MBR restoration.

    Having forced the card controller to reallocate all the failed sectors, the card works now fine and runs at full speed again. This won’t last long, but it’ll be interesting to see how it plays out.

    While I was at it, I wrote the partitions to a new-ish / unused Samsung EVO Plus card, now tucked under the MPCNC’s monitor in case of emergency.

    An old SFF Optiplex with an SSD may be a better fallback.

  • Monthly Image: All Of My Paperwork Was Up To Par

    Although you’ll read cogent advice to Never Talk To Police, somehow I knew this would involve a conversation long before I went around the curve:

    Maloney Rd Incident 1 - 2018-02-27
    Maloney Rd Incident 1 – 2018-02-27

    And it did:

    Maloney Rd Incident 2 - 2018-02-27
    Maloney Rd Incident 2 – 2018-02-27

    Evidently, someone just discovered a body floating in a bend of the small creek off to the left.

    My helmet camera prompted some attention, although nothing of interest was visible from the road. A few days later, whoever owned the property bulldozed a substantial berm along the far shoulder to prevent random strangers from just driving in and doing whatever. A week or so later, a call from another police agency had me explaining I don’t have video records of the creek or of any activity, suspicious or otherwise.

    Another traffic stop concerned a specific vehicle allegedly involved in an attempt to pick up abduct a girl from a school bus stop:

    Traffic Stop - Jackson Drive - 2018-09-22
    Traffic Stop – Jackson Drive – 2018-09-22

    In both cases, all my paperwork was up to par and I just rolled on through; it doesn’t always work that way.

  • Dutch Reach

    I carry a garish scar under my right arm from my collision with a frameless driver door window while commuting from classes at Lehigh U, back in the day, so I’m as bike-aware as any driver you’ll ever meet. After reading several articles describing the Dutch Reach, I put a reminder on the Forester’s driver door handle:

    Dutch Reach reminder
    Dutch Reach reminder

    The bright yellow block reminds me to peer into the mirror (*) before yanking the handle, regardless of which hand I’m using. Haven’t had any close calls yet, but practice makes perfect.

    If you don’t have a label maker, you can hang a tag on the handle.

    It’s surprisingly hard to retrain a habit, though …

    (*) Update: Yes, I should look over my shoulder, too. At least now I’m aware of the situation and don’t just open the door without thinking. One step at a time.