Ed Nisley's Blog: Shop notes, electronics, firmware, machinery, 3D printing, laser cuttery, and curiosities. Contents: 100% human thinking, 0% AI slop.
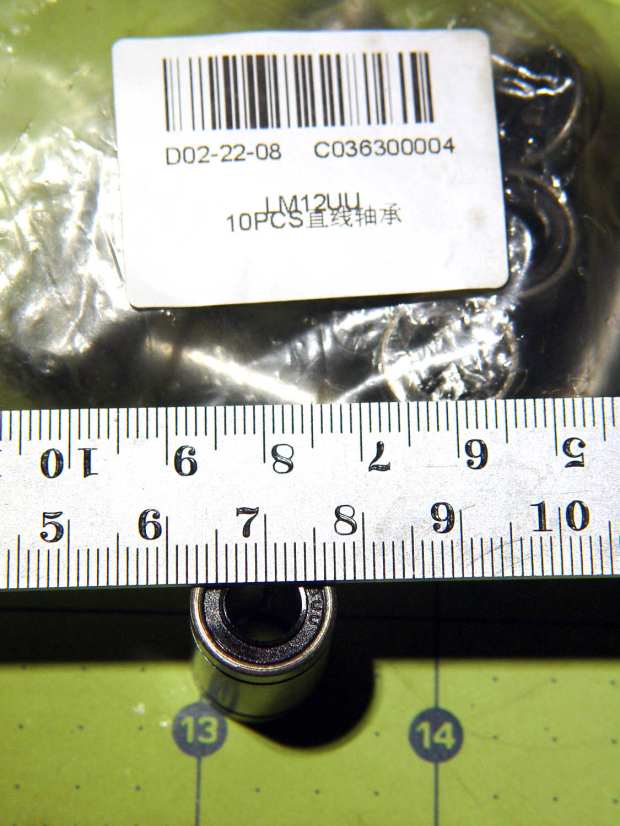
So I bought some LM12UU linear bearings from a nominally US-based eBay seller and received a suitably marked bag:
eBay – LM8UU bearings in LM12UU bag
They looked a bit on the skinny side:
eBay – LM8UU bearing
It seems somebody in the supply chain wasn’t paying attention, which isn’t surprising given the its ability to deliver ten hunks of reasonably precise machining to my mailbox for a buck-and-a-half apiece.
As it happens, I already have far too many LM8UU bearings and, after some unavailing back-and-forth with the seller, eBay customer service determined neither of us was “at fault” and refunded the whole order.
Being in no particular hurry, I ordered the next lot from halfway around the planet. Apparently, I’m now known throughout the land:
eBay – drop-ship addressing
Another label atop that one sported my actual address, with a matching Orange Connex tracking number barcode. Turns out OC is a “a joint venture between a leader in Chinese private equity investment, CITI CPE, and the a [sic] pioneer of global e-commerce platform, ebay”.
AFAICT, containers of “direct from China” packages arrive in the belly of a cargo airplane, get a sticker with their final destination, and enter the US postal system. It’s not clear buying from a “US seller” changes anything, as many of those packages come from addresses matching a building next to an airport.
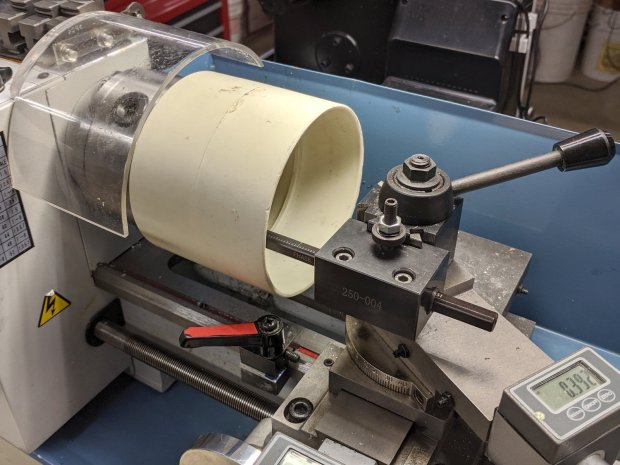
This came about while tinkering up a shade for a repurposed LED downlight:
PVC fitting – boring setup
It’s a 4 inch DWV pipe coupling I bored out to fit the LED housing, which was ever so slightly larger than the pipe OD.
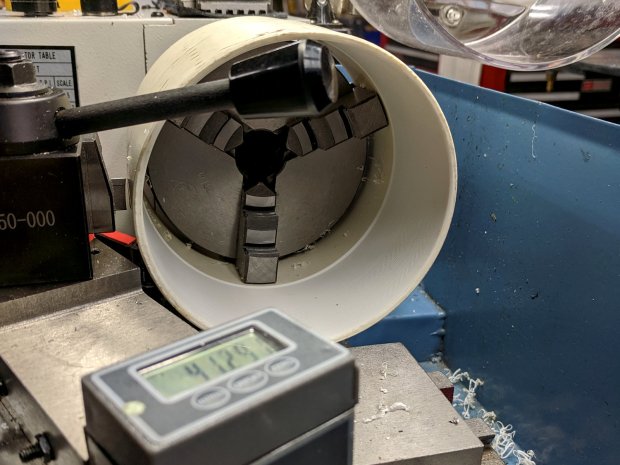
Cutting it off required as much workspace as the poor little lathe had:
PVC fitting – cutoff setup
Ignore the toolpost handle across the top. What’s important: the cutoff blade poking out of the QCTP, above the orange carriage stop lock lever, extending just far enough to cut through the coupling’s wall before the compound hits the coupling. The compound slide is all the way out against the cross-slide DRO, rotated at the only angle putting the tool where it needs to be and clearing the end of the coupling.
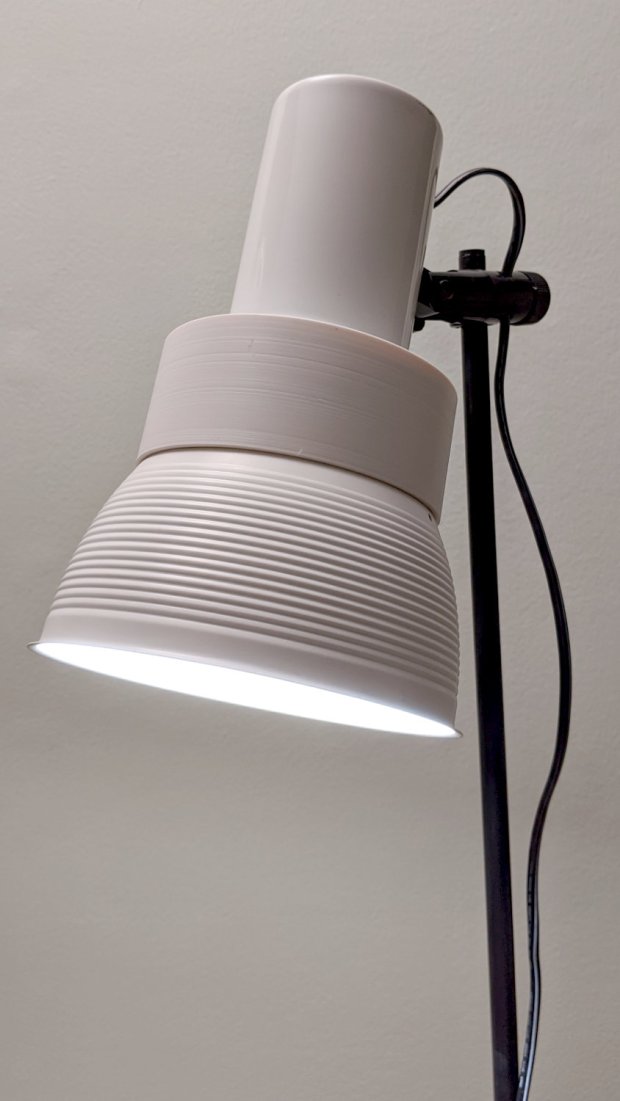
It ended reasonably well:
PVC fitting – LED floor lamp
But, in retrospect, was hideously bad practice. Next time, I’ll make a fixture to hold the fitting on a faceplate.
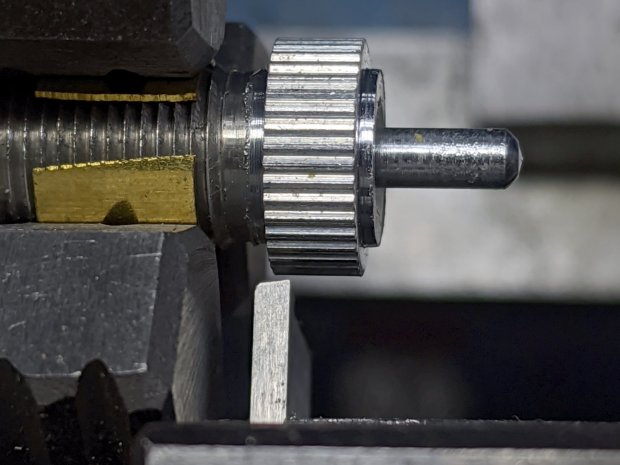
Attempting to cut laminated cardstock decks for the Homage Tektronix Circuit Computer required a bit more blade extension than my LM12UU holder made available:
Drag Knife – LM12UU ground shaft – assembled
Shortening the 12 mm shaft wasn’t going to happen, so I knocked a little bit off the blade holder to give the knurled lock ring slightly more travel:
Drag Knife Holder – shortening stop
The lathe cutoff blade is a bit to the right of the new cut, but you get the general idea: not a whole lot of clearance in there.
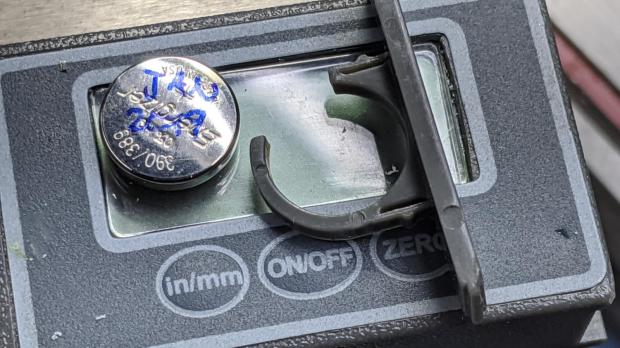
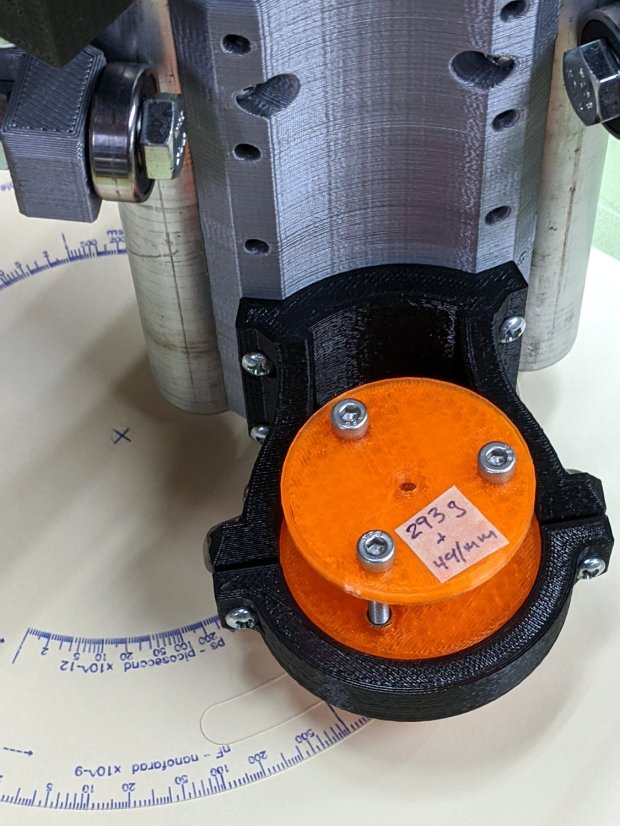
The Mini-Lathe DROs eat a 390 alkaline coin cell a year, more or less:
Mini-Lathe DRO – battery life
The other DRO’s cell was 10 mV higher, so it might have survived another few weeks. I’ll call it a year, as the OEM cells failed half a year after I got the thing and these are the second set.
The last time I did this, I wedged a thin foam sheet below the display PCB to put a bit more pressure on the (+) contact tab sticking down from the middle of the plate:
Mini-Lathe DRO – battery compartment
The (-) contact is a pad on the PCB below the battery compartment. The glaring metal reflector is part of the curved cell retainer.
lsusb
Bus 002 Device 002: ID 8087:0024 Intel Corp. Integrated Rate Matching Hub
Bus 002 Device 001: ID 1d6b:0002 Linux Foundation 2.0 root hub
Bus 001 Device 004: ID 248a:ff0f
Bus 001 Device 007: ID 058f:9410 Alcor Micro Corp. Keyboard
Bus 001 Device 006: ID 047d:1020 Kensington Expert Mouse Trackball
Bus 001 Device 005: ID 046d:c508 Logitech, Inc. Cordless Trackball
Bus 001 Device 003: ID 0451:2046 Texas Instruments, Inc. TUSB2046 Hub
Bus 001 Device 002: ID 8087:0024 Intel Corp. Integrated Rate Matching Hub
Bus 001 Device 001: ID 1d6b:0002 Linux Foundation 2.0 root hub
Bus 004 Device 006: ID 05e3:0748 Genesys Logic, Inc.
Bus 004 Device 005: ID 0480:a202 Toshiba America Inc Canvio Basics HDD
Bus 004 Device 004: ID 0bda:0411 Realtek Semiconductor Corp.
Bus 004 Device 003: ID 0451:8041 Texas Instruments, Inc.
Bus 004 Device 002: ID 0bda:0411 Realtek Semiconductor Corp.
Bus 004 Device 001: ID 1d6b:0003 Linux Foundation 3.0 root hub
Bus 003 Device 006: ID 256c:006d
Bus 003 Device 004: ID 0bda:5411 Realtek Semiconductor Corp.
Bus 003 Device 003: ID 0451:8043 Texas Instruments, Inc.
Bus 003 Device 002: ID 0bda:5411 Realtek Semiconductor Corp.
Bus 003 Device 001: ID 1d6b:0002 Linux Foundation 2.0 root hub
Yes, the space normally occupied by the product description is blank. The first blank description comes from a generic wireless keypad’s USB receiver; the 0x248a Vendor ID claims be Maxxter, a step down from the usual Logitech ID rip, and its 0xff0f Device ID looks bogus to me, too.
The 0x256c Vendor ID isn’t in the online databases yet, but some grepping found it in /lib/udev/rules.d/65-libwacom.rules:
Note, however, that the Device ID is 0x006e, where the upgraded V2 tablet is 0x006d; I have no idea why the number goes down as the version goes up. Change all instances of the former to the latter.
Even though the Wacom driver can apparently handle the older H610Pro, the V2 tablet’s buttons were missing in action.
xsetwacom --verbose set "HUION Huion Tablet Pen stylus" MapToOutput "DP-1"
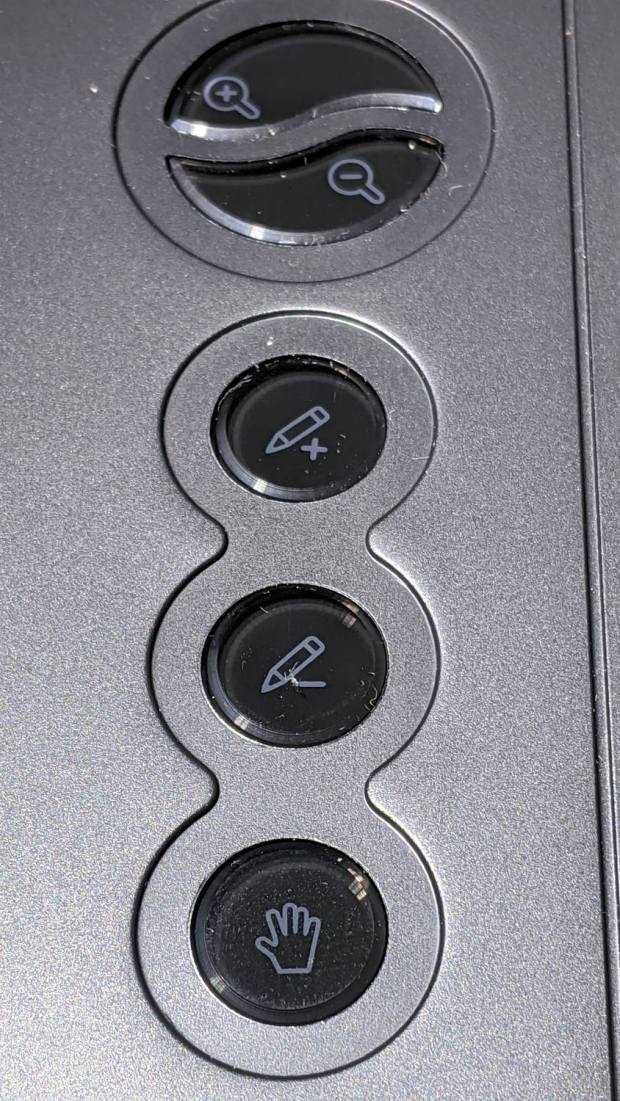
The various buttons still need configuration, although that’s in the nature of fine tuning. The top three buttons are 1, 2, 3, with the rest tagging along at 8 through 12. They take trendy gray-on-black labeling to an absurd limit:
Huion H610Pro V2 – embedded gray-on-black buttons
That’s with intense overhead lighting shining into the buttons and lighting up the lower-surface iconography. In normal light, they’re shiny black disks with invisible legends and, no, they’re not backlit.
The overall button-tweaking syntax:
xsetwacom set "HUION Huion Tablet Pad pad" button 12 key whatever
Where whatever comes from the list in /usr/include/X11/keysymdef.h, per the doc in man xsetwacom and a list of possibilities from:
xsetwacom --list modifiers "HUION Huion Tablet Pad pad"
For example, this causes the bottom button to spit out a question mark:
xsetwacom set "HUION Huion Tablet Pad pad" button 12 key shift /
It’s not obvious changing the buttons from their default button numbers to anything else makes any sense; just tweaking individual programs to map those numbers into useful actions should work better.
(*) It has a “battery-free” stylus which, to my way of thinking, is a major selling point.
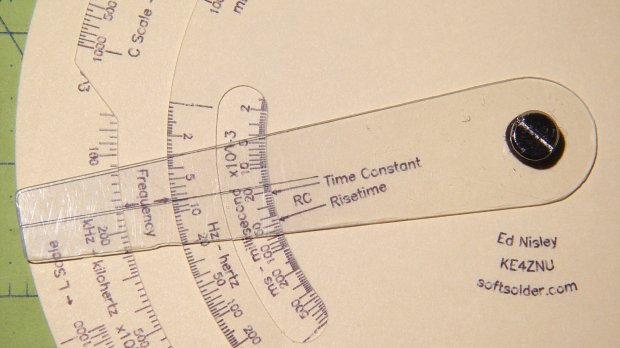
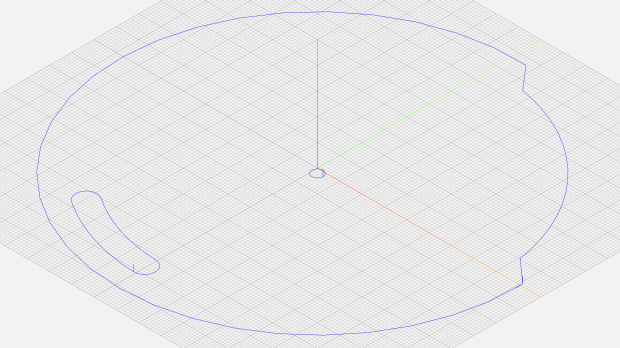
The middle deck is a disk with a notch exposing the FL scale, a cutout window exposing the inductive time constant / risetime scale, and a wee circle for the Chicago screw in the middle:
Given those, along with the deck radius and notch height (equals the underlying scale height), calculate four points defining the start and end of the ramps and connect the dots:
  local a0 = FLNotchOffset;
  local p0 = DeckRad * [cos(a0),sin(a0),-];

  local a1 = a0 + FLNotchArc;
  local p1 = DeckRad * [cos(a1),sin(a1),-];

  goto(p0);
  move([-,-,KnifeZ]);
  arc_cw(p1,-DeckRad);          // largest arc

  local r = DeckRad - ScaleHeight;
  local a3 = a1 - FLRampArc;
  local p3 = r * [cos(a3),sin(a3),-];

  local a4 = a0 + FLRampArc;
  local p4 = r * [cos(a4),sin(a4),-];

  move(p3);
  arc_cw(p4,r);                 // smallest arc

  move(p0);                     // end of notch

  arc_cw([DeckRad,0,-],DeckRad);      // round off corner
The arc_cw() functions draw arcs, as you’d expect, with a positive radius tracing the shortest arc and a negative radius for the longest arc. Although I know how that works, I must still preview the result to verify the G-Code does what I want, not what I said.
Cutting the window starts from its angular width and offset, which are hardcoded magic numbers from the Tek artifact, and proceeds similarly:
  local WindowArc = 39deg;

  local ac = -6 * ScaleArc;                  // center of window arc
  local r0 = DeckRad - ScaleHeight;         // outer
  local r1 = DeckRad - 2 * ScaleHeight;     // inner

  local aw = WindowArc - to_deg(atan(ScaleHeight,(r0 + r1)/2));    // window arc minus endcaps

  local p0 = r0 * [cos(ac + aw/2),sin(ac + aw/2),-];
  local p1 = r0 * [cos(ac - aw/2),sin(ac - aw/2),-];
  local p2 = r1 * [cos(ac - aw/2),sin(ac - aw/2),-];
  local p3 = r1 * [cos(ac + aw/2),sin(ac + aw/2),-];

  goto(p0);
  move([-,-,KnifeZ]);

  arc_cw(p1,r0);                          // smallest arc
  arc_cw(p2,ScaleHeight/2);               // half a circle
  arc_ccw(p3,r1);
  arc_cw(p0,ScaleHeight/2);
Trust me on this: incorrect radius signs generate unrecognizable outlines. Which, of course, is why you preview the G-Code before actually cutting anything:
Tek CC – MPCNC drag knife
A similar hunk of code cuts the top deck; the bottom deck is a simple circle.
The workflow, such as it is:
Tape a sheet of paper (Index stock, Basis 110 = 10 mil = 0.25 mm) at the center of the 3018-ProXL platform
Plot (“engrave”) the scales with a pen
Affix paper to a Cricut sticky mat taped to the MPCNC platform
Touch off the origin at the middle
Drag-cut (“mill”) the outlines
Less complex than it may appear, but the GCMC file now spits out two G-Code files per deck: one to engrave / draw the scales on the 3018 and another to mill / cut the outlines on the MPCNC.
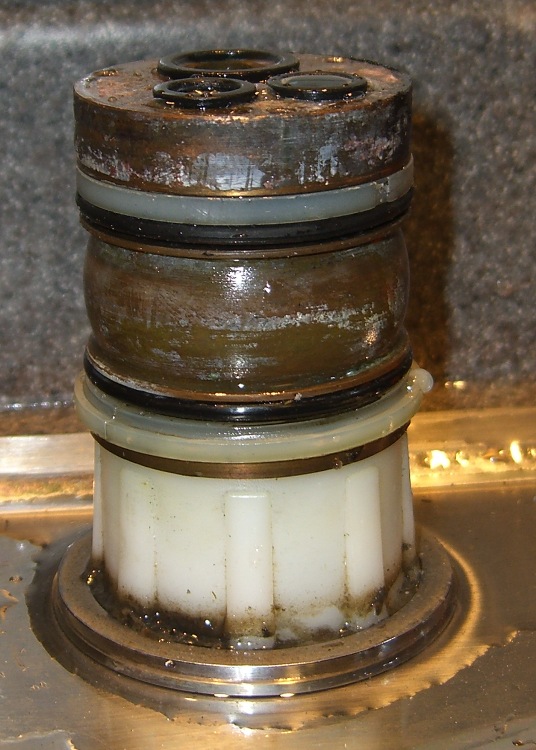
The O-ring replacement kit includes a pair of nylon (?) split rings which should provide bearing surfaces for the spout, but the upper ring sits in a groove putting its OD almost flush with the column:
Faucet column
This may be tolerance creep or just a design screwup, but the spout squashes the O-ring much more than (IMO) it should and wears it out entirely too soon.
This time around, I cut a strip of 0.4 mm thick polypropylene (from the Big Box o’ Clamshell Packages) long enough to wrap around the column and narrow enough to fit inside the groove, with the split ring holding it in place. The strip expands the ring’s OD to just barely fit inside the spout, so the spout now bears mostly on the ring, not the O-ring.
Despite measuring the groove OD and the spout ID, I had to cut-and-try several strips to find the proper thickness. Your mileage will certainly differ.
The spout now turns smoothly and freely, without leakage. We’ll see whether the new O-rings last longer than before.