The Smell of Molten Projects in the Morning

Ed Nisley's Blog: Shop notes, electronics, firmware, machinery, 3D printing, laser cuttery, and curiosities. Contents: 100% human thinking, 0% AI slop.

Author: Ed

  • Quilting Hexagon Template Generator: Knobless Half-Triangle

    Quilting Hexagon Template Generator: Knobless Half-Triangle

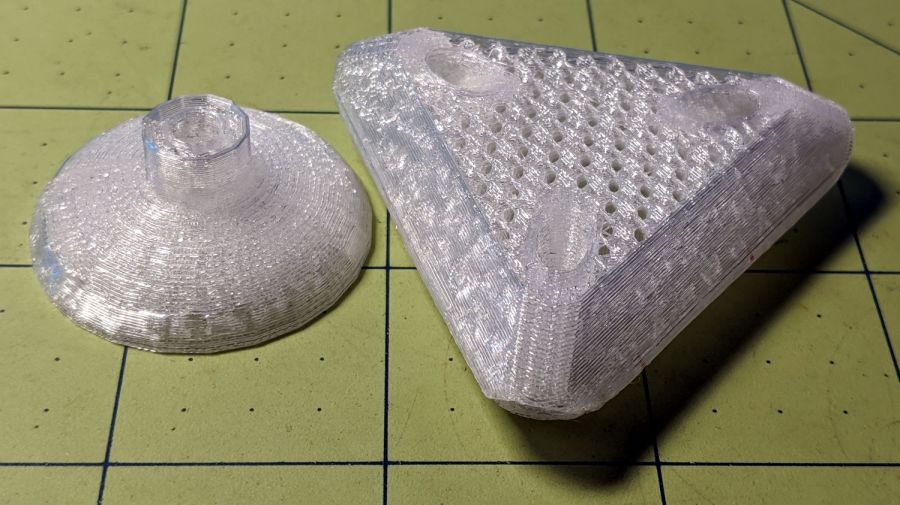
    Although I’d put the same knob on the half-triangle end piece template as on the equilateral triangle template for piecing hexagons into strips, Mary decided a flat chip would be easier to use:

    Quilting Hex Template - family - knobless half-triangle
    Quilting Hex Template – family – knobless half-triangle

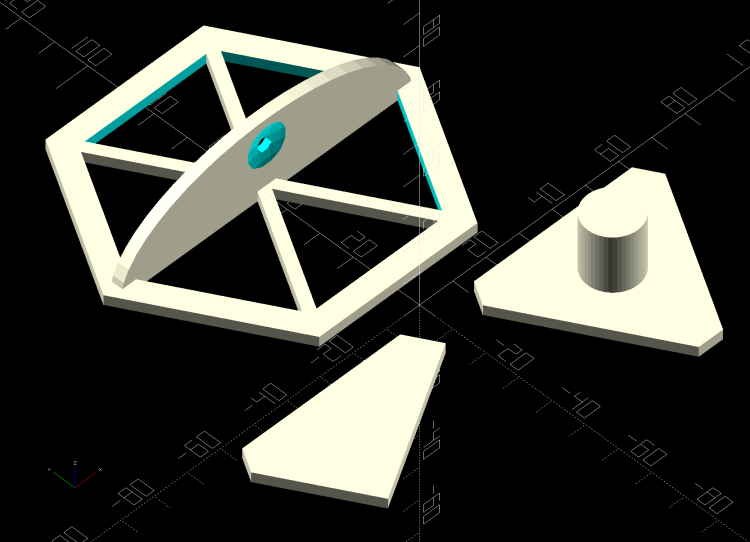
    Bonus: you can now flip it over to cut the other half-triangles, if you haven’t already figured out how to cut two layers of fabric folded wrong sides together.

    While I was at it, the knob on the triangle became optional, too. Flipping that one doesn’t buy you much, though.

    The OpenSCAD source as a GitHub Gist has been ever so slightly tweaked:

    // Quilting – Hexagon Templates
    // Ed Nisley KE4ZNU – July 2020
    // Reverse-engineered to repair a not-quite-standard hexagon quilt
    // Useful geometry:
    // https://en.wikipedia.org/wiki/Hexagon
    /* [Layout Options] */
    Layout = "Build"; // [Build, HexBuild, HexPlate, TriBuild, TriPlate, EndBuild, EndPlate]
    //——-
    //- Extrusion parameters must match reality!
    // Print with 2 shells
    /* [Hidden] */
    ThreadThick = 0.25;
    ThreadWidth = 0.40;
    HoleFinagle = 0.2;
    HoleFudge = 1.00;
    function HoleAdjust(Diameter) = HoleFudge*Diameter + HoleFinagle;
    Protrusion = 0.1; // make holes end cleanly
    function IntegerMultiple(Size,Unit) = Unit * ceil(Size / Unit);
    inch = 25.4;
    //——-
    // Dimensions
    /* [Layout Options] */
    FinishedWidthInch = 2.75;
    FinishedWidth = FinishedWidthInch * inch;
    SeamAllowanceInch = 0.25;
    SeamAllowance = SeamAllowanceInch * inch;
    TemplateThick = 3.0;
    TriKnob = true;
    EndKnob = false;
    /* [Hidden] */
    FinishedSideInch = FinishedWidthInch/sqrt(3);
    FinishedSide = FinishedSideInch * inch;
    echo(str("Finished side: ",FinishedSideInch," inch"));
    CutWidth = FinishedWidth + 2*SeamAllowance;
    CutSide = CutWidth/sqrt(3);
    echo(str("Cut side: ",CutSide / inch," inch"));
    // Make polygon-circles circumscribe the target widths
    TemplateID = FinishedWidth / cos(180/6);
    TemplateOD = CutWidth / cos(180/6);
    /* [Hidden] */
    TriRadius = FinishedSide/sqrt(3);
    TriPoints = [[TriRadius,0],
    [TriRadius*cos(120),TriRadius*sin(120)],
    [TriRadius*cos(240),TriRadius*sin(240)]
    ];
    echo(str("TriPoints: ",TriPoints));
    EndPoints = [[TriRadius,0],
    [TriRadius*cos(120),TriRadius*sin(120)],
    [TriRadius*cos(120),0]
    ];
    echo(str("EndPoints: ",EndPoints));
    TipCutRadius = 2*(TriRadius + SeamAllowance); // circumscribing radius of tip cutter
    TipPoints = [[TipCutRadius,0],
    [TipCutRadius*cos(120),TipCutRadius*sin(120)],
    [TipCutRadius*cos(240),TipCutRadius*sin(240)]
    ];
    HandleHeight = 1 * inch;
    HandleLength = (TemplateID + TemplateOD)/2;
    HandleThick = IntegerMultiple(3.0,ThreadWidth);
    HandleSides = 12*4;
    StringDia = 4.0;
    StringHeight = 0.6*HandleHeight;
    DentDepth = HandleThick/4;
    DentDia = 15 * DentDepth;
    DentSphereRadius = (pow(DentDepth,2) + pow(DentDia,2)/4)/(2*DentDepth);
    KnobOD = 15.0; // Triangle handle
    KnobHeight = 20.0;
    //——-
    module PolyCyl(Dia,Height,ForceSides=0) { // based on nophead's polyholes
    Sides = (ForceSides != 0) ? ForceSides : (ceil(Dia) + 2);
    FixDia = Dia / cos(180/Sides);
    cylinder(r=HoleAdjust(FixDia)/2,h=Height,$fn=Sides);
    }
    //——-
    // Hex template
    module HexPlate() {
    difference() {
    cylinder(r=TemplateOD/2,h=TemplateThick,$fn=6);
    translate([0,0,-Protrusion])
    cylinder(r=TemplateID/2,h=(TemplateThick + 2*Protrusion),$fn=6);
    }
    for (i=[1:6/2])
    rotate(i*60)
    translate([0,0,TemplateThick/2])
    cube([HandleLength,HandleThick,TemplateThick],center=true);
    }
    module HexHandle() {
    difference() {
    rotate([90,0,0])
    scale([1,HandleHeight/(TemplateOD/2),1])
    rotate(180/HandleSides)
    cylinder(d=HandleLength,h=HandleThick,center=true,$fn=HandleSides);
    translate([0,0,-HandleHeight])
    cube([2*TemplateOD,2*TemplateOD,2*HandleHeight],center=true);
    translate([0,HandleThick,StringHeight])
    rotate([90,090,0])
    rotate(180/8)
    PolyCyl(StringDia,2*HandleThick,8);
    for (j=[-1,1]) {
    translate([0,j*(DentSphereRadius + HandleThick/2 – DentDepth),StringHeight])
    rotate(180/48)
    sphere(r=DentSphereRadius,$fn=48);
    }
    }
    }
    module HexTemplate() {
    HexPlate();
    HexHandle();
    }
    //——-
    // Triangle template
    module TriPlate() {
    linear_extrude(height=TemplateThick)
    intersection() {
    offset(delta=SeamAllowance) // basic cutting outline
    polygon(points=TriPoints);
    rotate(180)
    polygon(points=TipPoints);
    }
    }
    module TriTemplate() {
    union() {
    if (TriKnob)
    cylinder(d=KnobOD,h=KnobHeight,$fn=HandleSides);
    TriPlate();
    }
    }
    //——-
    // End piece template
    module EndPlate() {
    linear_extrude(height=TemplateThick)
    intersection() {
    offset(delta=SeamAllowance) // basic cutting outline
    polygon(points=EndPoints);
    rotate(180)
    polygon(points=TipPoints);
    }
    }
    module EndTemplate() {
    union() {
    if (EndKnob)
    translate([0,(TriRadius/2)*sin(30),0])
    cylinder(d=KnobOD,h=KnobHeight,$fn=HandleSides);
    EndPlate();
    }
    }
    //——-
    // Build it!
    if (Layout == "HexPlate")
    HexPlate();
    if (Layout == "HexBuild")
    HexTemplate();
    if (Layout == "TriPlate")
    TriPlate();
    if (Layout == "TriBuild")
    TriTemplate();
    if (Layout == "EndPlate")
    EndPlate();
    if (Layout == "EndBuild")
    EndTemplate();
    if (Layout == "Build") {
    translate([1.5*TriRadius,-TriRadius,0])
    rotate(180/6)
    TriTemplate();
    translate([-1.5*TriRadius,-TriRadius,0])
    rotate(180/6)
    EndTemplate();
    translate([0,TemplateOD/2,0])
    HexTemplate();
    }

  • Power Outage

    Power Outage

    Just before Tropical Storm Isaias rolled through, my hygrometer reached a new high:

    Pre-Isaias humidity
    Pre-Isaias humidity

    The National Weather Service reported 99% at the airport a few miles away, so the meter’s calibration seems about right.

    Shortly thereafter, the humidity dropped to the mid-70s as the wind picked up and, over the next few hours, falling branches took out vast swaths of Central Hudson’s electrical infrastructure. My little generator saved our refrigerator & freezer during 15 hours of outage; three days later, thousands of folks around us still have no power.

    A confluence of other events, none nearly so dramatic, will throttle my posting over the next two weeks.

    We’re OK and hope you’re OK, too …

  • Rt 376 at Zach’s Way: Near Right Hook

    Rt 376 at Zach’s Way: Near Right Hook

    We exchanged waves as he rode by Vassar Farms:

    Rt 376 SB Marker 1124 Zachs Way - Near Right Hook - 2020-07-19 - 0
    Rt 376 SB Marker 1124 Zachs Way – Near Right Hook – 2020-07-19 – 0

    Although I can rarely hang with real roadies, I can put the fear in ’em for a while, so the chase is on.

    About 25 seconds later, I’m southbound on Rt 376, accelerating past 20 mph = 30 feet/s. The overtaking pickup, which I haven’t noticed yet, is signaling a right turn at Zach’s Way, 350 feet ahead:

    Rt 376 SB Marker 1124 Zachs Way - Near Right Hook - 2020-07-19 - 1
    Rt 376 SB Marker 1124 Zachs Way – Near Right Hook – 2020-07-19 – 1

    The pickup enters my field of view, but I can’t see the turn signals:

    Rt 376 SB Marker 1124 Zachs Way - Near Right Hook - 2020-07-19 - 2
    Rt 376 SB Marker 1124 Zachs Way – Near Right Hook – 2020-07-19 – 2

    Two seconds later, the driver is braking:

    Rt 376 SB Marker 1124 Zachs Way - Near Right Hook - 2020-07-19 - 3
    Rt 376 SB Marker 1124 Zachs Way – Near Right Hook – 2020-07-19 – 3

    During the next three seconds, the driver realizes I’m going much much faster than your usual cyclist and is braking hard:

    Rt 376 SB Marker 1124 Zachs Way - Near Right Hook - 2020-07-19 - 4
    Rt 376 SB Marker 1124 Zachs Way – Near Right Hook – 2020-07-19 – 4

    My startled shout (“Don’t even think about it!“) may be misinterpreted, but I try to be friendly,

    Rt 376 SB Marker 1124 Zachs Way - Near Right Hook - 2020-07-19 - 5
    Rt 376 SB Marker 1124 Zachs Way – Near Right Hook – 2020-07-19 – 5

    Alas, the cyclist turned into Boardman Road and all that adrenaline went to waste.

    Elapsed time since the fender appeared: six seconds.

  • EonSmoke Vape Debris

    EonSmoke Vape Debris

    Being the type of guy who uses metal bits & pieces, I thought this might be a useful aluminum rod:

    EonSmoke vape stick
    EonSmoke vape stick

    It turns out to be an aluminum tube holding a lithium cell and a reservoir of oily brown juice:

    EonSmoke - peeled open
    EonSmoke – peeled open

    The black plastic cap read “EonSmoke”, which led to a defunct website at the obvious URL. Apparently, EonSmoke went toes-up earlier this year after ten years of poisoning their customers, most likely due to “competitor litigation”.

    The black cap held what looks like a pressure switch:

    EonSmoke - switch
    EonSmoke – switch

    Suck on the icky end of the tube to activate the switch, pull air past the battery (?), pick up some toxic vapor around the heater, and carry it into your lungs:

    EonSmoke - reservoir heater
    EonSmoke – reservoir heater

    Maybe there’s a missing mouthpiece letting you suck on the icky end, activate the switch, pull vapor through the heater, and plate your lungs with toxic compounds. I admit certain aspects of my education have been sadly neglected.

    The lithium cell was down to 1.0 V, with no overdischarge protection and no provision for charging, so it’s a single-use item. I’m sure the instructions tell you to recycle the lithium cell according to local and state regulations, not toss it out the window of your car.

    I had to wash my hands so hard

  • Shuttles Game: Tapered Pegs

    Shuttles Game: Tapered Pegs

    As is all too common with 3D printed replacement parts done remotely, the first Shuttles game pegs didn’t quite fit into the game board’s holes. Fortunately, living in the future means rapid prototyping and quick turnaround:

    Shuttles Game pegs - tapered - solid model
    Shuttles Game pegs – tapered – solid model

    They’re slightly smaller, tapered toward the bottom, and take slightly less time to print.

    The OpenSCAD code in the GitHub Gist now has has the tweaks.

  • Finding & Copying Only The New Music Files

    Given a collection of music files in various subdirectories, find all the mp3 files that aren’t in the target directory and copy them. The only catch: don’t use rsync, because the target directory is on a Google Pixel phone filesystem which doesn’t support various attributes required by rsync.

    The solution goes like this:

    cd /mnt/music/Netlabel Mixes
    sudo jmtpfs /mnt/pixel -o allow_other,fsname="Pixel"
    find . -name \*mp3 -execdir test ! -e  /mnt/pixel/Internal\ shared\ storage/Music/Netlabel/\{\} \; -execdir cp -v -t /mnt/pixel/Internal\ shared\ storage/Music/Netlabel/ \{\} \;
    sudo umount /mnt/pixel

    The trick is remembering the second execdir operation in find happens only if the first succeeds, so the cp runs when the target file doesn’t exist.

    All the backslash escaping gets tedious, but it’s the least awful way to get the job done when the directories contain blanks, which is true for the default directory structure inside the Pixel.

    Your choice in music will surely be different …

  • Extruder Clog

    Extruder Clog

    The test pieces for the Mesh Screen Frame came out a bit short:

    Extruder Clog - failed print
    Extruder Clog – failed print

    Which turned out to be the M2’s first extruder clog in a long, long time. The printer shut down normally, with no error messages, and the objects look fine as far as they go, making the diagnosis fairly simple.

    Just to be sure, I verified:

    It’s worth noting I use only PETG plastic from a single supplier, so Slic3r uses set-and-forget temperature and speed values, and I manually change colors only on those rare occasions when color matters. Most clogs occur after switching from a higher- to a lower-temperature plastic (PETG to PLA), where a chunk of soft-but-not-molten plastic jams in the nozzle; not the situation here.

    Unscrew the clamp screw enough to release the spring pressure on the idler bearing:

    Makergear M2 - spring-loaded filament drive
    Makergear M2 – spring-loaded filament drive

    Undo the various screws holding the block to the drive gear housing and pull it off. The drive block looked fine, with a clear round hole along the entire filament path, so that’s not the problem.

    The filament snippet sticking up out of the hot end also looked fine, apart from the expected drive gear gouge, with nice serrations below that point into the hot end. It’s the third filament from the top in this group photo:

    Extruder Clog - filament snippets
    Extruder Clog – filament snippets

    Although it’s called a “cold pull“, you can’t yank a solid hunk of plastic out of the hot end. Warming the PETG to around 200 °C and pulling the snippet out produced the long tapered end shown above.

    I rammed another snippet into the hot end to bond with whatever was inside:

    Extruder Clog - PETG pull
    Extruder Clog – PETG pull

    Which produced the top snippet above, with no particular trouble found.

    Repeating the process with some nylon (?) cleaning filament:

    Extruder Clog - cleaner pull
    Extruder Clog – cleaner pull

    In need of more traction, I sank a #60 twist drill into the molten plastic:

    Extruder Clog - drill bit insertion
    Extruder Clog – drill bit insertion

    Let things cool a bit, haul it out (it’s halfway in the picture above), and we’re making progress:

    Extruder Clog - drill bit extraction
    Extruder Clog – drill bit extraction

    I warmed the PETG-encrusted bit over a butane flame, wiped it on a shop rag to get most of the plastic off, then drilled a few holes in a hardwood block.

    Note that a #60 drill (40 mil = 1 mm) is much much much larger than the nozzle hole:

    Extruder Clog - nozzle view
    Extruder Clog – nozzle view

    The vertiginous view looks downward into a small hand-held mirror.

    Although some folks swear by 0.3 mm carbide drills for nozzle cleaning, I doubt I could avoid wrecking that nice round 0.35 mm hole. The new red silicone coat has chipped from around the nozzle over the last few sessions, so it’s no longer wiping the top layer.

    During all this flailing, something that might have been a glass fiber emerged from the nozzle while shoving one of those PETG snippets into the hot end. Of course, when I pried it out of the goo with tweezers, it snapped away into the clutter, never to be seen again. Despite being covered in PETG, it was a rigid sliver, rather than the gooey extruded thread. Perhaps the whisker extending from the PETG surrounding the drill bit was a similar fiber, but I didn’t notice it at the time.

    One of the PETG cold warm pulls contained two brownish lumps:

    Extruder Clog - PETG inclusions
    Extruder Clog – PETG inclusions

    This chunk doesn’t appear in the group portrait. It’s obviously been melted, measures a bit under 1.75 mm diameter, and the drive gear tooth marks show it passed through the filament drive block under motor control, most likely retraction.

    Passing the Xacto Knife of Inquiry through the leftmost lump split it neatly in two. The left section:

    Extruder Clog - PETG inclusion - section L
    Extruder Clog – PETG inclusion – section L

    And the right section:

    Extruder Clog - PETG inclusion - section R
    Extruder Clog – PETG inclusion – section R

    In person, the sections look like granular / burned residue surrounded by clear PETG. I’d expect anything burned to come from inside the hot end, but I don’t know how those lumps would get surrounded by nice, clear PETG inside a reasonably cylindrical section with drive gear notches.

    Anyhow, the clog has now Gone Away™ and the M2 extrudes just fine. I’ll declare victory and move on …