Ed Nisley's Blog: Shop notes, electronics, firmware, machinery, 3D printing, laser cuttery, and curiosities. Contents: 100% human thinking, 0% AI slop.
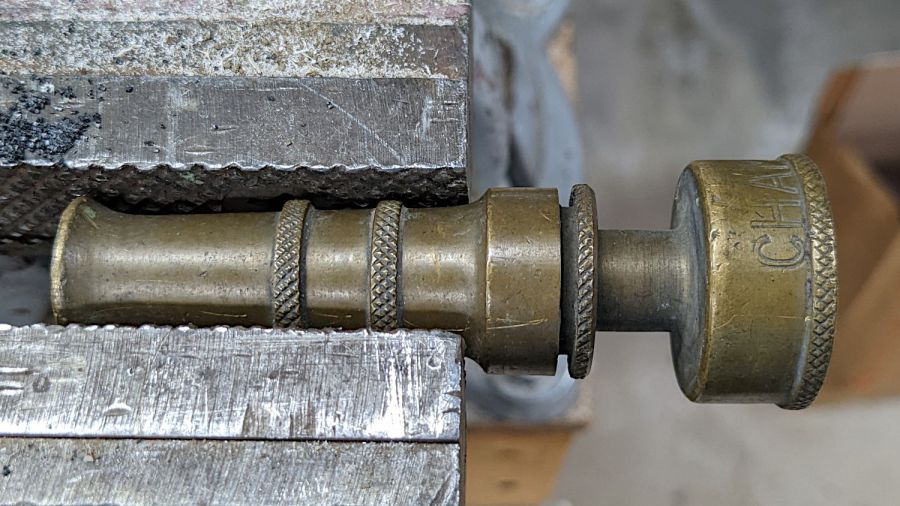
An old brass hose nozzle emerged from my garden hydraulics toolbox when a much newer plastic nozzle failed. Unfortunately, this one leaked a bit too much to serve as a replacement, so I grabbed it in the vise while pondering how to disassemble it:
Champion brass hose nozzle – disassembly
It turns out the knurled ring is threaded into the nozzle and, even at this late date, responds well to gentle persuasion with a Vise-Grip:
Champion brass hose nozzle – parts
The washer is a lost cause, but I managed to find an O-ring that fit perfectly in the space available. Clearing some crud around the nozzle hole and buffing up the matching conical section improved its sealing ability, so I’ll call it a win.
The word ITALY stamped opposite CHAMPION suggests this thing might be as old as I am; it’s been a while since either brass or Italy was competitive in the world of cheap manufactured goods.
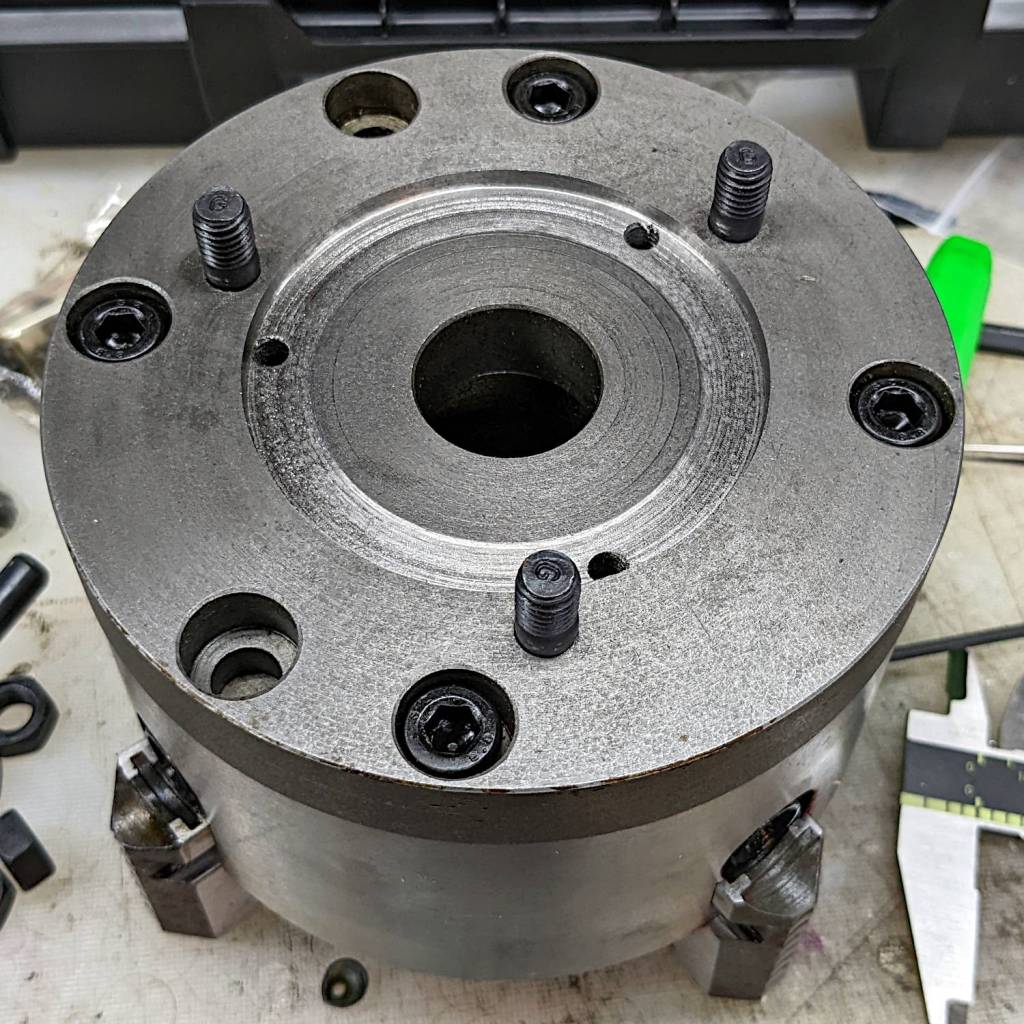
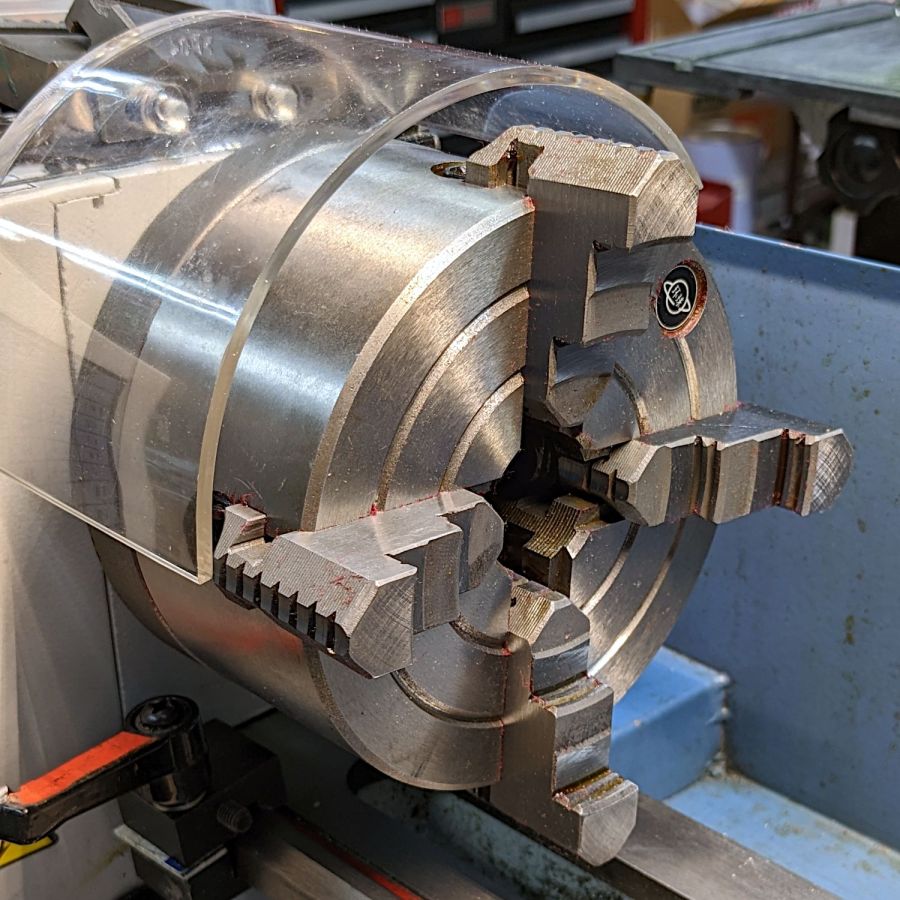
The kludge required to trim the coaster rims disturbed the silt enough to reveal a long-lost 5 inch 4 jaw chuck that fit neither the old South Bend lathe nor the new mini-lathe. In any event, the chuck does have an adapter plate on its backside, it’s just not the correct adapter plate for the spindle on my mini-lathe.
Making it fit required enlarging an existing recess to fit the spindle plate, a straightforward lathe job with the plate grabbed in the 3 jaw chuck’s outer jaws:
5 inch 4 jaw chuck – boring spindle recess
Carbide inserts don’t handle interrupted cuts very well, but sissy cuts saved the day. The plate is kinda-sorta cast iron, so the “chips” are dust and a vacuum snout reduces the mess; you can see some chips inside the bore.
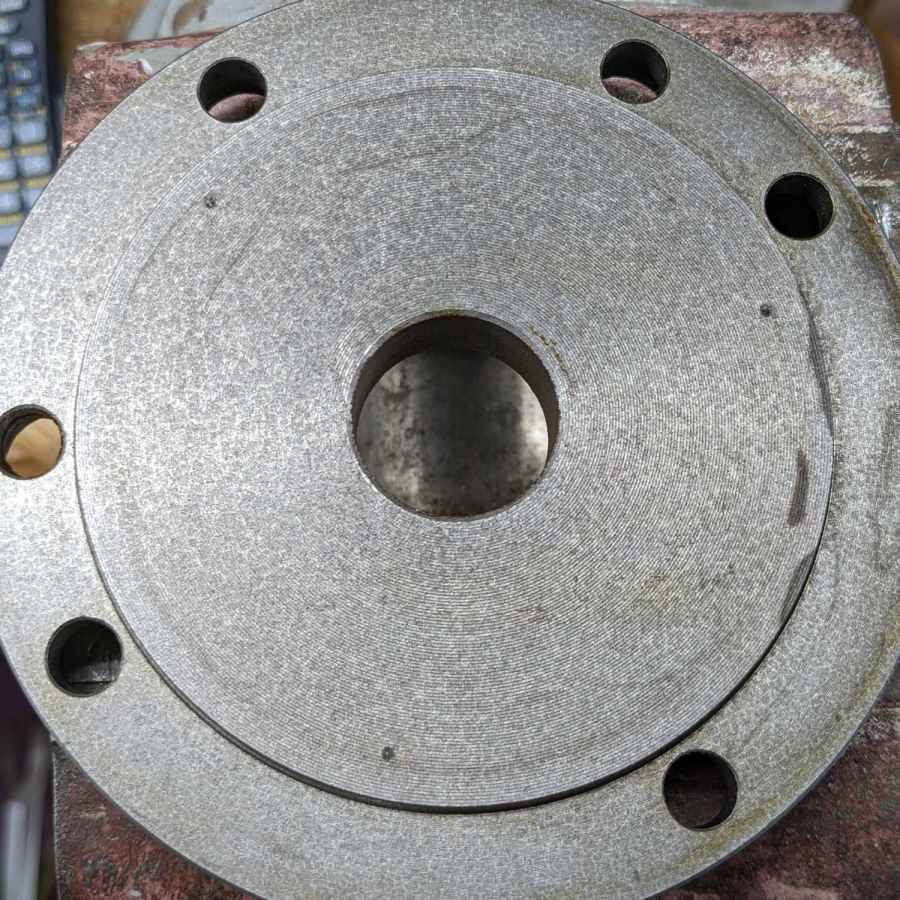
A faceplate for the mini-lathe lathe located three holes matching the spindle plate, after I noticed the amazing coincidence of both parts having 26 mm bores. Making an alignment tool from a scrap of 3/4 inch (!) Schedule 40 PVC pipe was an easy lathe job:
5 inch 4 jaw chuck – adapter plate alignment
Transfer-punching those holes produced pips on the chuck side of the adapter plate:
5 inch 4 jaw chuck – spindle bolt spotting
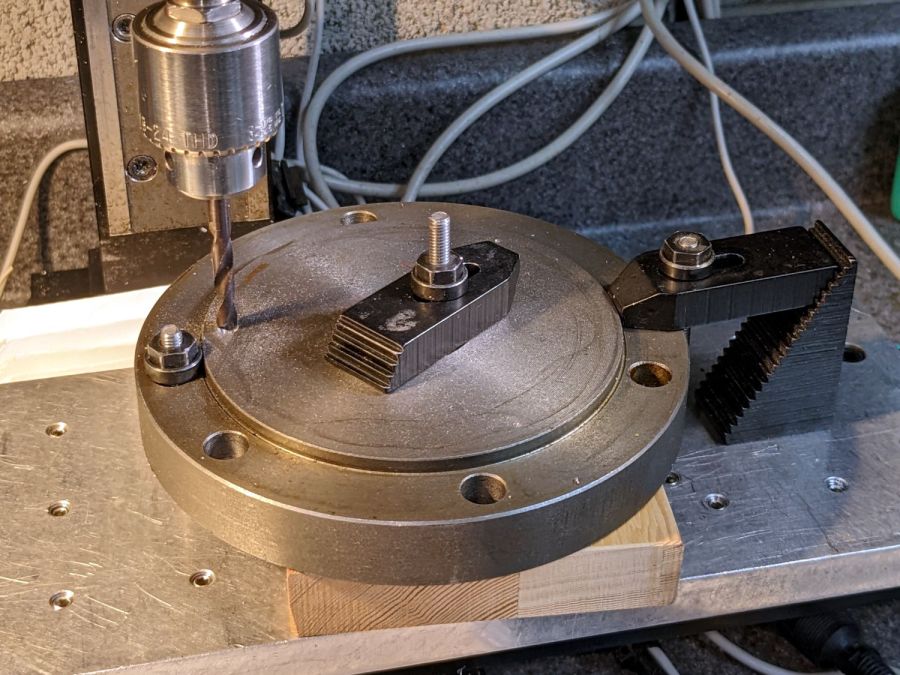
I thought about freehanding the holes, but came to my senses:
5 inch 4 jaw chuck – adapter plate drilling
Of course, the Sherline lacks enough throat for the plate, so each hole required clamping / locating / center-drilling / drilling / finish drilling. With all three drilled, hand-tapping the threads was no big deal:
5 inch 4 jaw chuck – rebuIlt adapter plate
Those are M8×1.25 studs from LMS (although the ones I got look like the 30 mm version), with the long end sunk in the adapter plate to put the other end flush with the nut on the far side of the spindle plate:
5 inch 4 jaw chuck – installed – spindle nuts
And then it fits just like it grew there, although the jaws don’t have much clearance inside the interlock cover:
5 inch 4 jaw chuck – installed – front view
Now I’m ready for the next set of coasters and, if the jaws stick out too far, I can gimmick the interlock switch for the occasion.
The description of the 4 inch chuck seems inconsistent with its listed dimensions, which may be why I ended up with the larger chuck in the first place. You can never have enough chucks: all’s well that ends well.
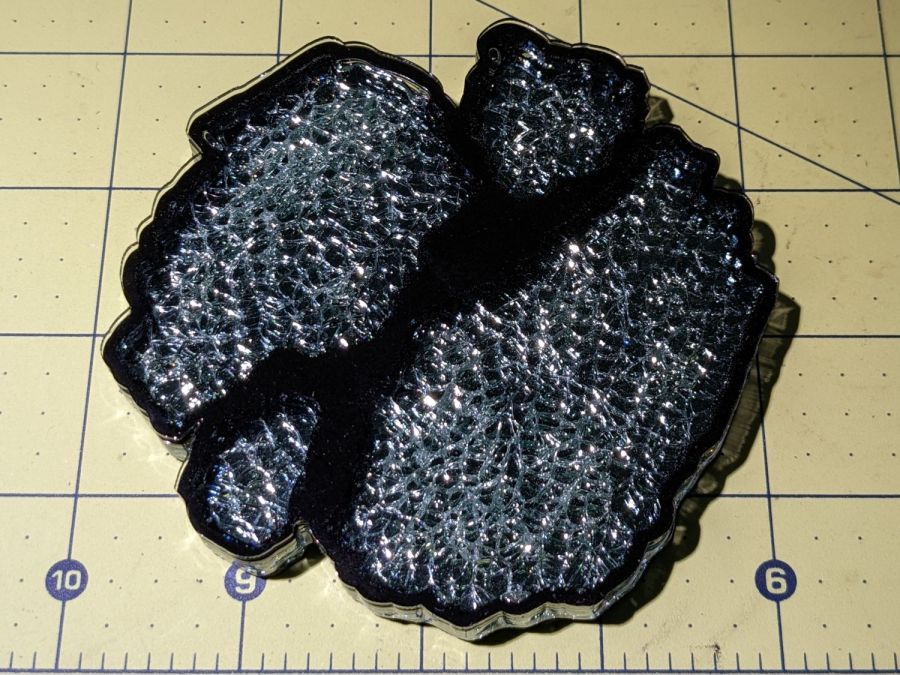
Snugging the perimeter around the smashed glass fragments definitely improves the result:
Smashed glass coaster – top view A
It’s just under 100 mm = 4 inch across the longest dimension and surprisingly glittery:
Smashed glass coaster – top view B
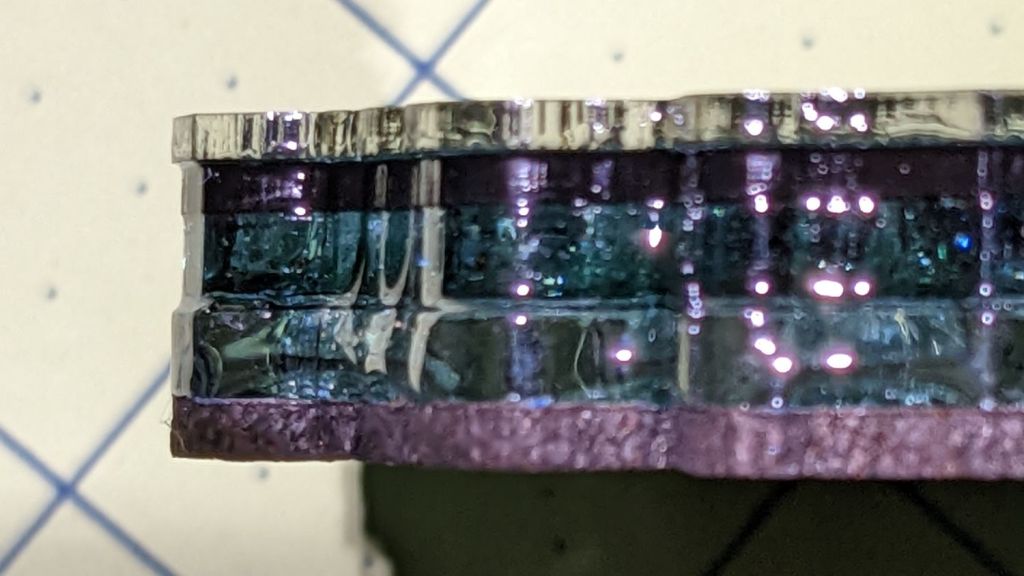
The coaster is a five-layer sandwich half an inch thick:
Smashed glass coaster – edge view
From the top:
Clear acrylic: 1.5 mm = 1/16 inch
Black acrylic: 1.5 mm = 1/16 inch
Clear acrylic: 3.2 mm = 1/8 inch
Mirror acrylic: 2.7 mm
Cork: 2.7 mm cut from a standard round coaster base
The smashed glass pieces sit atop the mirror, so the trick is making the layers around it add up to the same thickness. This is not possible by adding the nominal dimensions, because cast acrylic sheet thickness isn’t well controlled; I’ve finally written the actual (metric!) thickness on the sheets so I can select which 1/8 Inch sheet has the proper thickness.
A chipboard template (seen atop the finished coaster) verified the glass pieces fit easily within their openings:
Smashed glass coaster – top view – fit template
I laid the clear frame on the mirror, poured generous epoxy puddles along the middle of the fragment openings, eased the glass in place, and gently pressed the slabs down to get a uniform epoxy layer, with the excess oozing under the frame all around. Then lay the black frame around the glass atop the clear, squirt more epoxy along the gaps around the glass, pour more epoxy atop the fragments, ease the top sheet in place paying considerable attention to coaxing the bubbles along to the edge, align the sides, and wait.
The epoxy cured while stuck atop a styrofoam pillar to let it drain smoothly off the edges:
Smashed glass coaster – epoxy curing
I encouraged the epoxy out of the acute corners, as shown by the larger puddles, over the next few hours until the epoxy stiffened up. Those puddles also show the transparent black tint, to the tune of four drops in 8 ml of epoxy, which turned out to just barely suffice for the job. The whole assembly sat level while curing, but the layers didn’t remain aligned even after gently shoving them around while the stack cured.
The black epoxy joins nicely with the black frame layer to conceal most of the remaining bubbles. A different color frame with matching epoxy might looks less ominous, but colors more transparent than dark gray would likely reveal the bubbles.
It Would Be Nice™ if the acrylic sheet on the top had a transparent plastic film cover, but it arrived with brown paper on both sides. Despite that, I spattered only a few tiny drops on the bare surface and managed to scrape most of them off without further damage.
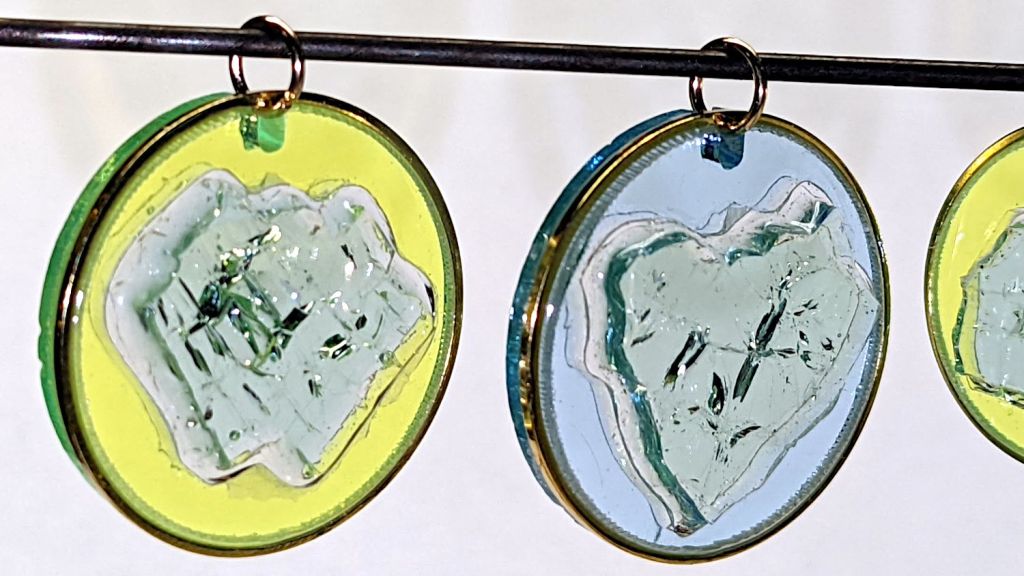
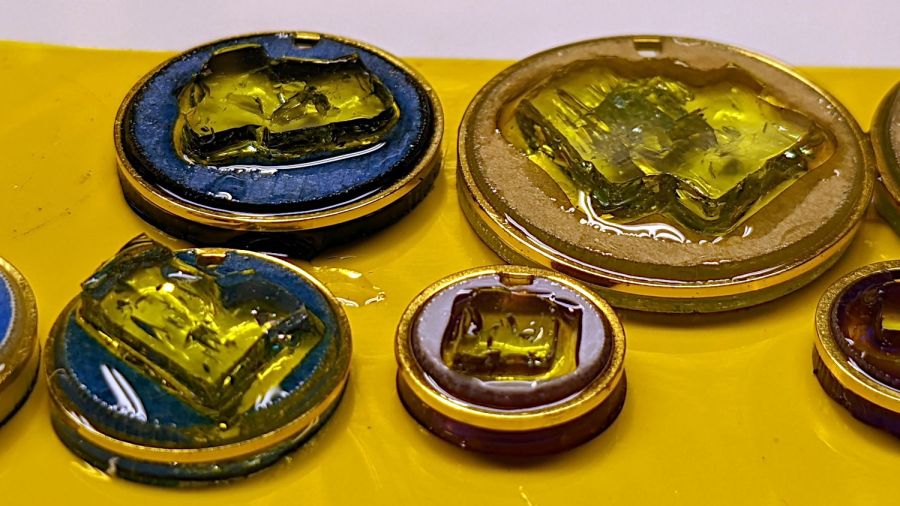
The POC earrings had a pair of 1.5 mm acrylic disks epoxied around the glass fragment, with the “gold” ring captured in a rebate around the rims. That process was both tedious and messy, so I tried laser-engraving a deeper rebate into a 3 mm sheet, then epoxying the fragment and the ring in place:
Earrings – epoxy curing
They’re stuck to a strip of Kapton tape to keep the epoxy off the bottom surface of the glass, while aligning it with the surrounding disk.
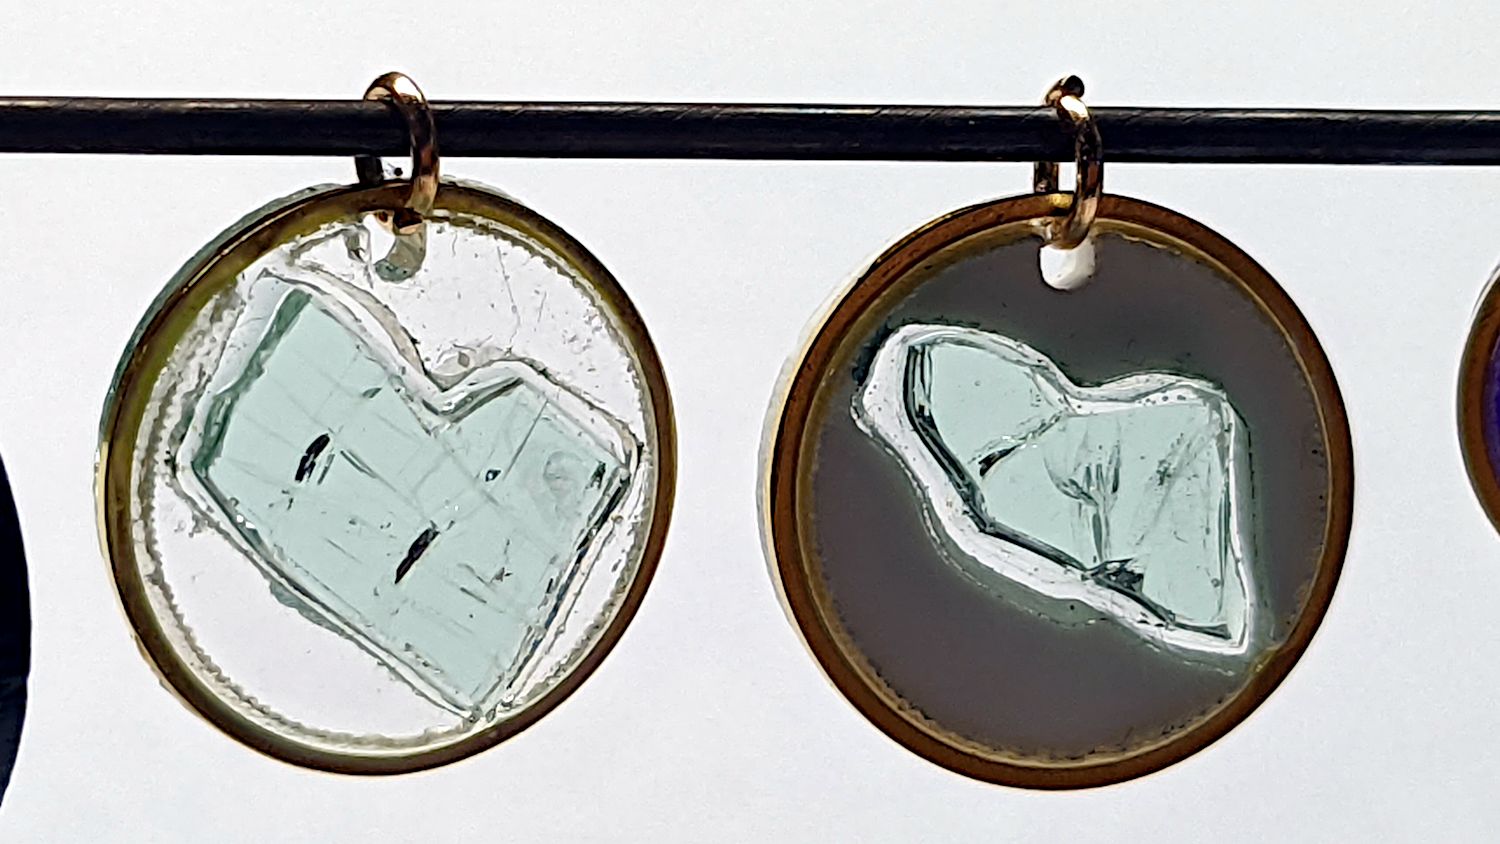
Peeling the protective film / plastic off reveals the acrylic disk:
Earrings – 25 20 16 12 mm first look
They all required more effort to remove the epoxy remaining around the ring, but it worked out better than I expected.
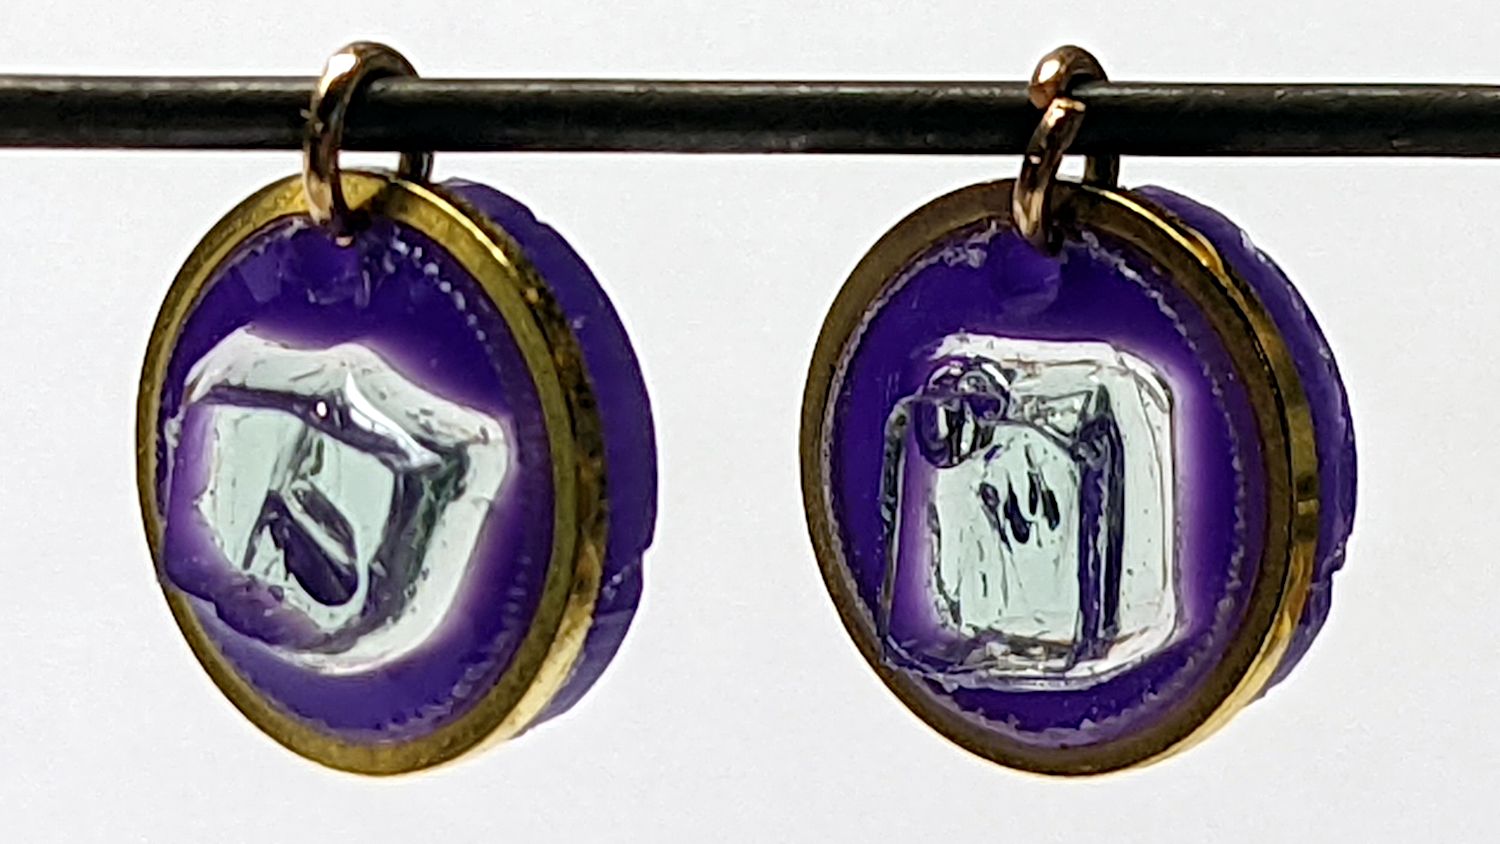
A lighter background shows off their internal structure:
Earrings – 25 20 16 12 mm set
A closer look at the pairs:
As always, glooping clear epoxy around the edges fills many of the internal cracks and reduces the glittery aspect of all those glass-to-air-to-glass interfaces, but I don’t see another good way to keep the fragments under control.
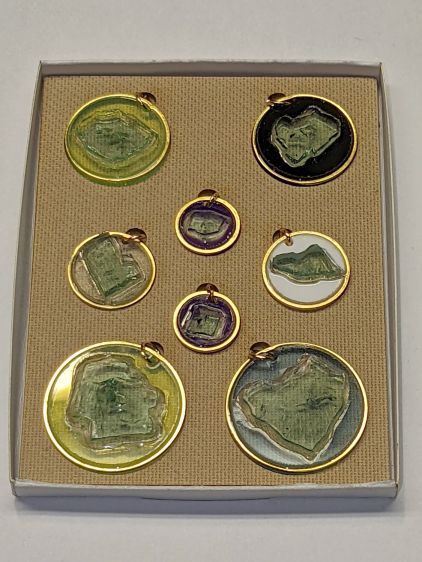
The results may not be up to a “fine jewelry” standard, whatever that may be, but a slipcase box definitely improves the presentation:
Earrings – presentation case
If I had the courage of my convictions, I’d go for the Mr Clean look myself, but …
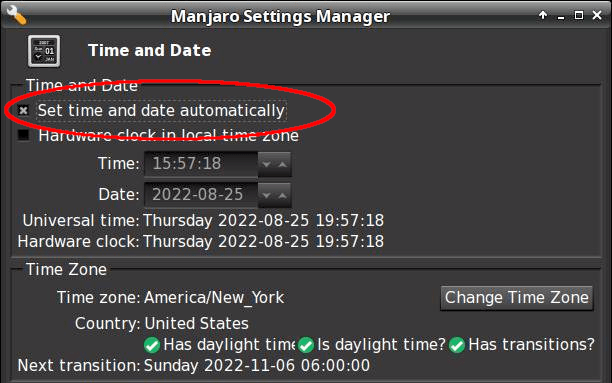
I set up my pobox.com account set up with two-factor authentication through my Yubikey, so logging in requires my user ID, password, and a Time-based One-time Password generated through the Yubikey Authenticator program. A few weeks ago, pobox occasionally rejected the TOTP and it eventually became a hard failure. Oddly, other sites I’ve set up with TOTP 2FA continued to work fine.
My initial trouble report:
The last couple of times I’ve tried to sign in, the usual TOTP copy-n-paste from my Yubikey authenticator has failed.
Up to that point, it worked flawlessly.
Manually typing the TOTP also fails.
I have reset my (complex!) password to no avail; I use Firefox’s password manager to fill it in.
I do have a set of lockout codes, but they’re a solution to a different problem.
Given the constant updates to Firefox (102.0.3), it’s almost certain the hole is in my end of the boat. I have disabled all the usual ad blocking for pobox.com, although there may be other domains I’ve overlooked.
Other than that, my email seems to be working just fine …
Any suggestions on how to proceed? (Obviously, I’m not going to be able to sign on to look at the ticket.)
Thanks …
This is the fastest I’ve ever reached Tier 2:
We’re happy to help you with this. I’ve escalated your ticket to our Tier 2 agents, as they are best suited to assist with this issue.
There is nothing like a good new problem to take your mind off all your old problems:
I’ve had a chat with our Tier 2 agents about this and they’ve suggested I escalate it to our developers to have a look at.
Somewhat later:
I am afraid to say that our developers were unable to find any clear reason as to why your Yubikey failed.
Yubikey devices verify by connecting with Yubikey’s server, and it is possible that this connection failed.
Can you please try using the Yubikey again to see if the issue is still occurring?
If it’s still failing, can you please try adding a new Yubikey device to see if it works?
Of course, the problem didn’t magically Go Away, but I did more experimentation and figured out where the hole was in my end of the boat:
Ah-HA! It’s a PEBKAC error!
For unknown reasons, this PC was not set for automatic NTP time updates(*). Its time had drifted (presumably since I installed it back in June 2021) and was now 58 seconds behind real time, exceeding pobox’s tolerance.
Other websites apparently allow a few more seconds of slop before disallowing a TOTP, so I had not yet run afoul of their limit.
Some lesser-used sites threw me out, however, but I had not looked beyond the most common sites.
The default TOTP interval is 30 seconds, so perhaps pobox allows only ±1 interval and the other sites allow ±2? Frankly, I think pobox has it right: everybody else prioritizes customer sat over security.
Got the clock set correctly and, gosh, TOTP works fine.
Mark it solved, but definitely add “Soooo, is your PC’s clock set for automatic updates?” to the debugging protocol.
Thanks …
(*) I’ve installed all of the boxen here and would not ever have picked “Yeah, sure, I want to dink with the clock.”
How you make sure time synchronization is enabled goes like this:
$ systemctl status systemd-timesyncd.service
● systemd-timesyncd.service - Network Time Synchronization
     Loaded: loaded (/usr/lib/systemd/system/systemd-timesyncd.service; enabled; preset: enabled)
     Active: active (running) since Thu 2022-08-25 06:49:31 EDT; 10h ago
       Docs: man:systemd-timesyncd.service(8)
   Main PID: 355 (systemd-timesyn)
     Status: "Contacted time server 23.157.160.168:123 (2.manjaro.pool.ntp.org)."
      Tasks: 2 (limit: 19063)
     Memory: 2.2M
        CPU: 188ms
     CGroup: /system.slice/systemd-timesyncd.service
             └─355 /usr/lib/systemd/systemd-timesyncd

Aug 25 06:49:31 shiitake systemd[1]: Starting Network Time Synchronization...
Aug 25 06:49:31 shiitake systemd[1]: Started Network Time Synchronization.
Aug 25 06:50:12 shiitake systemd-timesyncd[355]: Timed out waiting for reply from 162.159.200.123:123 (2.manjaro.pool.ntp.org).
Aug 25 06:50:12 shiitake systemd-timesyncd[355]: Contacted time server 23.157.160.168:123 (2.manjaro.pool.ntp.org).
Aug 25 06:50:12 shiitake systemd-timesyncd[355]: Initial clock synchronization to Thu 2022-08-25 06:50:12.850444 EDT.
If it’s enabled and running, then it’s all good.
Whereupon all my TOTP passwords began working again.
I checked two other Manjaro systems: one had auto updates enabled, one didn’t. I have no explanation.
A little more than two years after replacing its internal battery, the SJCAM M20 camera on my Tour Easy once again wouldn’t last to the end of the driveway if I forgot to turn on the external battery pack. This time around, the camera was so firmly jammed in the printed seat frame mount that I had to cut the mount apart.
Yup, that puppy is all swoll up:
SJCAM M20 swollen battery – side view
Poor thing looks like a tiny pillow:
SJCAM M20 swollen battery – pouch
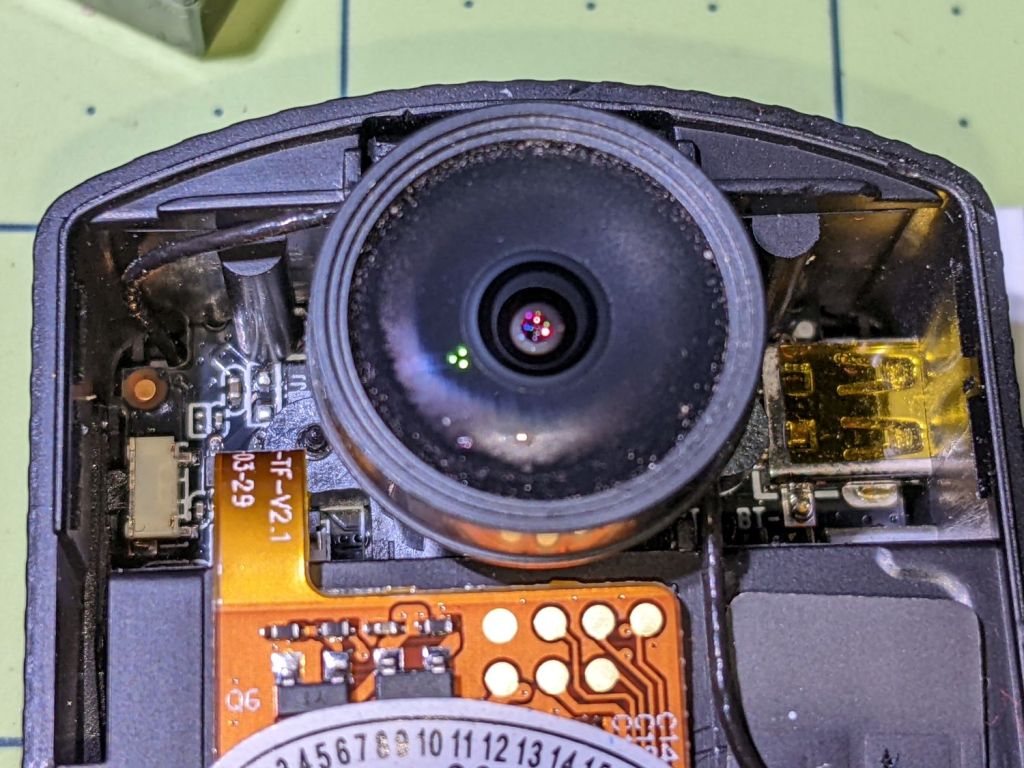
While I had it apart, I tried to clean / refurbish the button contacts on the top. Unfortunately, they’re pretty well buried in the camera frame and I was unwilling to dismantle the optics, remove the display, and gut the camera to find out if they were more accessible from the back surface:
SJCAM M20 – switch internals
While all that was going on, I ran off a new mount in white PETG:
SJCAM M20 – white case installed
I’m down to the last battery. The “4.35V” on the pillow indicates they’re special high-voltage lithium-polymer cells, so I can’t just drop a random lithium pouch cell in there and expect it to Just Work.
I think the “782633” is the cell size, so, if I were willing to have a few thousand on the shelf, a 552525 pouch might fit. The reduced capacity wouldn’t be a problem, as it must just keep the camera’s clock ticking between rides.
Over the course of a few days, my Tour Easy recumbent developed a slight squeak that turned into a definite creak, then the seat started shifting slightly under hill-climbing forces. Of course, no force I could apply in the garage caused the slightest squeak / creak / motion. A decade ago this was due to a sheared screw at the dropout, but everything seemed to be in good order.
So I applied a drop of penetrating oil to each of the many joints in the seat hardware, went on a few more rides, and eventually the seat started moving with normal pedaling forces.
The left strut clamp looked fine:
Tour Easy seat stay – left side
OK, it looks grubby. I’d rather ride than lick my bike clean.
The right clamp definitely showed signs of motion:
Tour Easy seat stay – right side slip
I extracted the strut assembly, degreased the clamps, reinstalled in reverse order, replaced the nuts, snugged everything down, and it’s all good again:
Tour Easy seat stay – renutted
Yeah, I should have replaced those screws, but I didn’t even have to take the wheel off, sooooo …