Ed Nisley's Blog: Shop notes, electronics, firmware, machinery, 3D printing, laser cuttery, and curiosities. Contents: 100% human thinking, 0% AI slop.
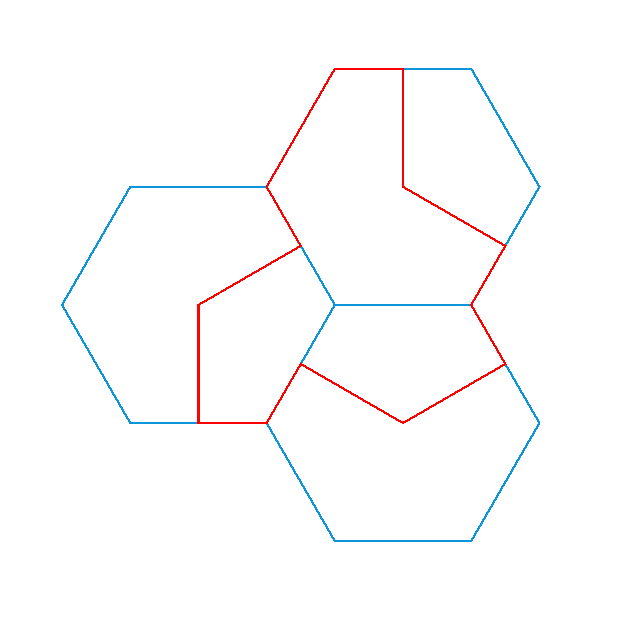
The aperiodic monotile discovery prompted some reverse engineering, snapping a path to regular hexagons for the proper lengths and angles without mathing too hard:
Aperiodic tile – hexagon overlay
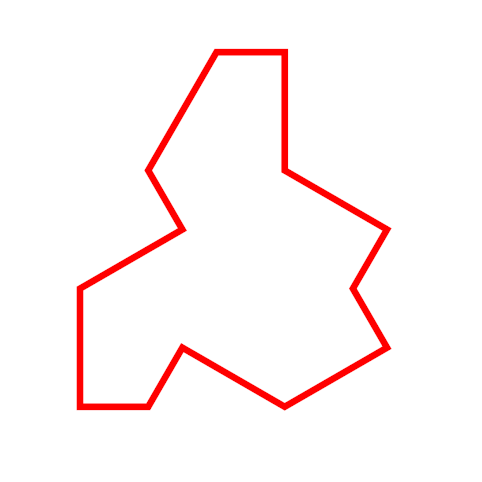
The resulting red path is the “hat” monotile, here shown as a PNG for neatness:
Aperiodic monotile
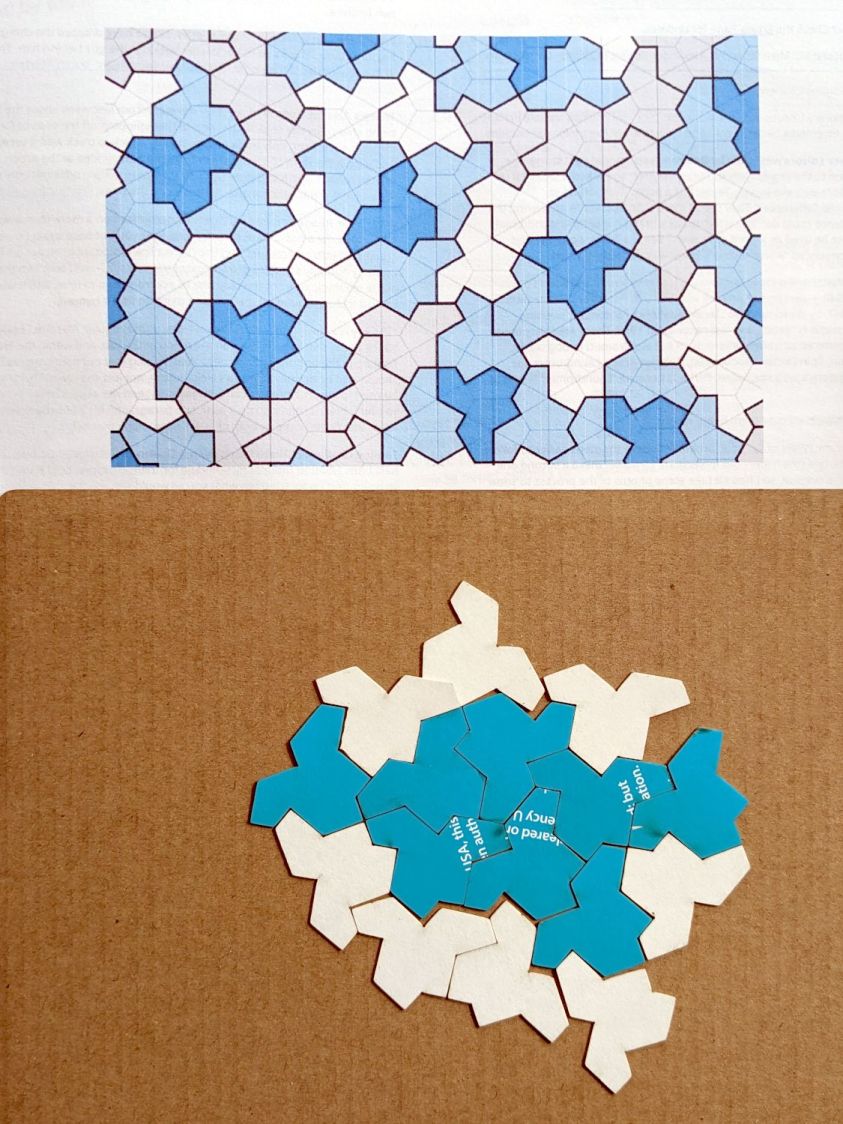
With SVG hat in hand, I laid and cut a trial puzzle based on the sample shown in the paper:
Aperiodic tile layout
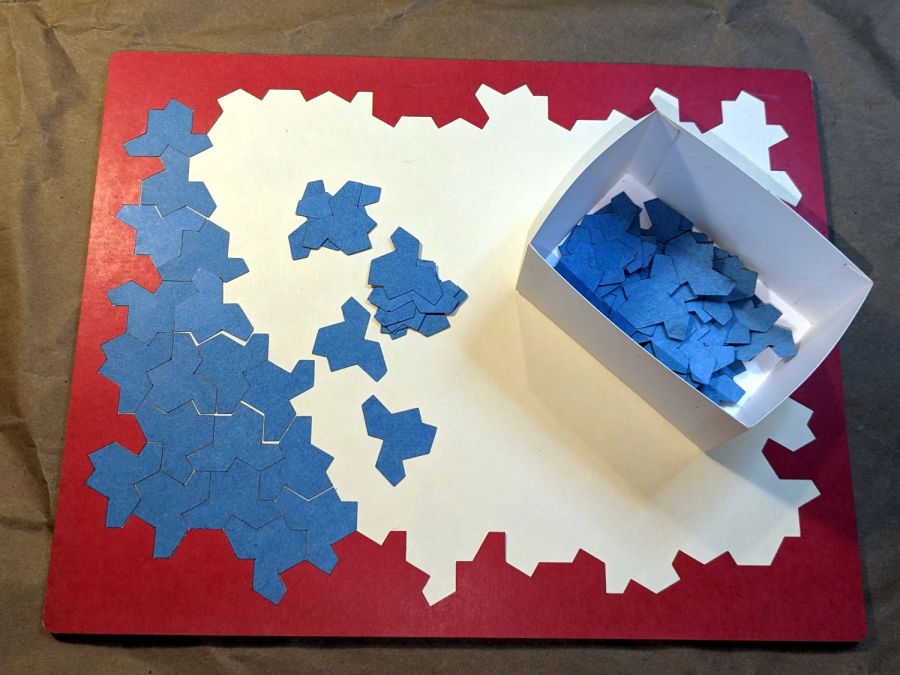
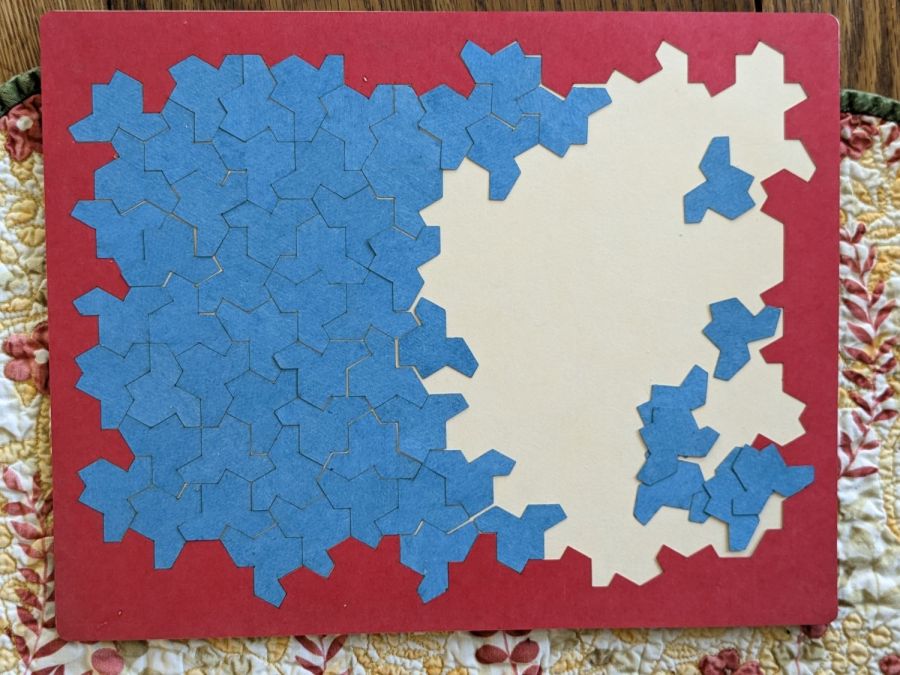
Which looked promising enough to add a few rings around that layout and turn it into an actual, albeit low budget, puzzle:
Aperiodic tile puzzle – starting
The paper notes that one can build mutually incompatible patches, which is the state I immediately blundered into:
Aperiodic tile puzzle – progress
The upper and lower left halves cannot be combined to extend rightward, as the middle section is incompatible with both. I began growing patches from the upper and lower right corners, hoping to use them to rectify the left half, but producing a small un-fillable situation in the middle:
Aperiodic tile puzzle – incorrect layout
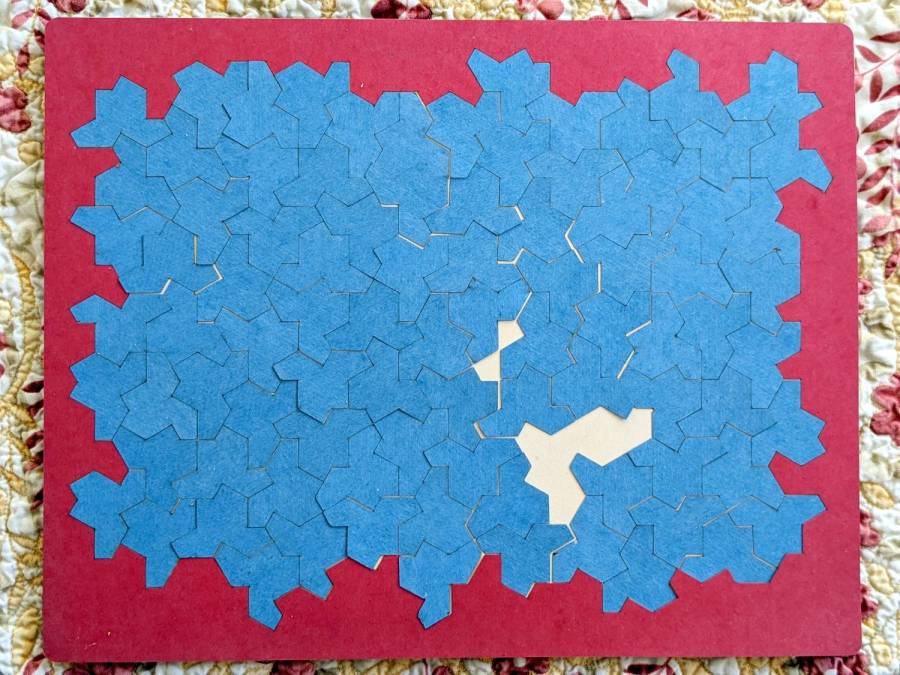
Obviously, I need a cheat code. I’m resolutely not looking at the source layout for a while.
The stock Bafang pedal cranks measure 170 mm on centers between the bottom bracket shaft and the pedal spindle. Having grown accustomed to the 165 mm cranks from Mary’s bike, I got a set of cheap 160 mm cranks to feel if there was any difference:
Bafang vs ProWheel crank forging
The bottom crank has a quick-and-dirty adaptation of the magnet mount for the Lekkie Buzz Bar offset cranks, but, of course, the 160 mm cranks have an entirely different profile. They are also heavier and more crudely forged, which is about what you’d (well, I’d) expect.
Also unlike the Lekkie cranks, neither the Bafang nor the Prowheel cranks correct the Bafang motor’s offset, so I’m using the left-side Kneesaver from the old cranks, which turns out to be close enough.
The black 3D printed mount in the upper right fit the Bafang crank and appears in the top photo.
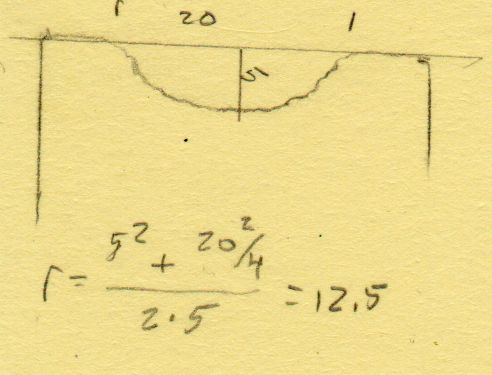
Transferring the new contour to paper and applying the Chord Equation got the radius of the not-quite circle:
CatEye magnet crank adapter – chord radius
Knowing the size of the magnet and the radius of the circle, drawing the profile in LightBurn was straightforward:
CatEye magnet crank adapter – framed
Applying the laser cutter to MDF produced the two successive test-fit pieces in the picture while figuring out how much stickout the magnet needed beyond the inner crank face to reach the sensor. LightBurn’s Node Editor simplified adjusting the size: drag-select a group of nodes, then move them in precise increments with the arrow keys.
Export the profile from LightBurn as an SVG file, import it into OpenSCAD, and extrude it to the proper length:
The translate puts the profile approximately at the XY origin. The center = true option moves the profile elsewhere on the XY plane, but does not center it, which may have something to do with the viewport used by LightBurn, the OpenSCAD version I’m using, or something else entirely.
In any event, the 3D printed mount fits the crank and puts the magnet where it will do the most good:
CatEye Magnet holder – ProWheel crank – installed
What looks like an obvious curvature mismatch comes from having the tape edge not quite squashed against the crank.
I should poke a channel through it for a cable tie around the crank, but that 3M foam tape is really good stuff and hasn’t failed me yet.
The Canon LiDE 120 scanner on Mary’s desk gets considerable use by both of us, until a recent update of something killed network access to it. The usual searches revealedcomments suggesting the sane scanner program has deliberatelydisabled network access to USB scanners which use the net back end, apparently to prevent loops when one instance shares a networked USB scanner already shared by another instance.
I have no clue how all that works, nor why the change has apparently taken half a dozen years to reach our scanner.
The workaround required downgradingsane on the “server” PC (the one with the Canon scanner) to the most recent version that doesn’t enforce the prohibition:
The pamac GUI interface now shows sane as eligible for an upgrade, then reports that it won’t do the deed. That’s survivable.
At some point, not updating the sane package will cause other problems. Perhaps by then we’ll have moved the hulking Epson ET-3830 printer/scanner upstairs and can recycle the Canon scanner.
It’s basically ten identical identical spacers cut from 3 mm plywood, with a side benefit of dramatically reducing my scrap plywood stash, then skewered by a pair of absurdly long 4 mm self-tapping metal screws into holes drilled half an inch into the ¾ inch solid wood cabinet floor.
It clears some clutter atop the microwave and, at least to my deflicted ears, sounds much better. At some point I must screw the Raspberry Pi under the cabinet, too, but that awaits further rearrangement.
Having just deployed a trail camera to see what might be skulking about in the middle of the night, this appeared just before the (not fresh) batteries died:
The Early Opossum
It’s hard to tell with possums, but I’d say that critter is on a mission!
I’m still figuring out proper distances; the possum is about two feet away, which is obviously much too close. Great focus on the water barrels standing by the garage, though.
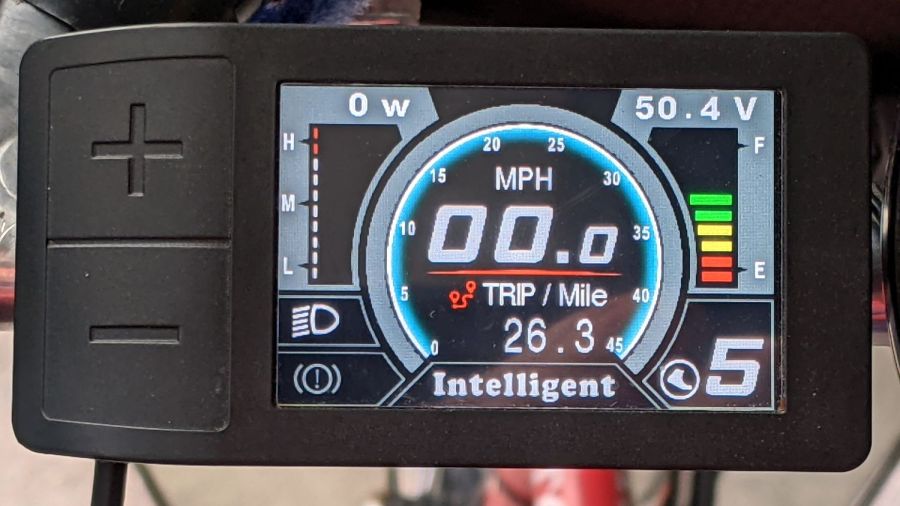
I got the Bafang DPC-18 display for my Tour Easy specifically to put the control buttons on the handgrip, rather than the buttons on the left of the 500C display on Mary’s bike:
Tour Easy Bafang – display 26 mi
The first pass put them on the left handgrip, just behind the thumb throttle:
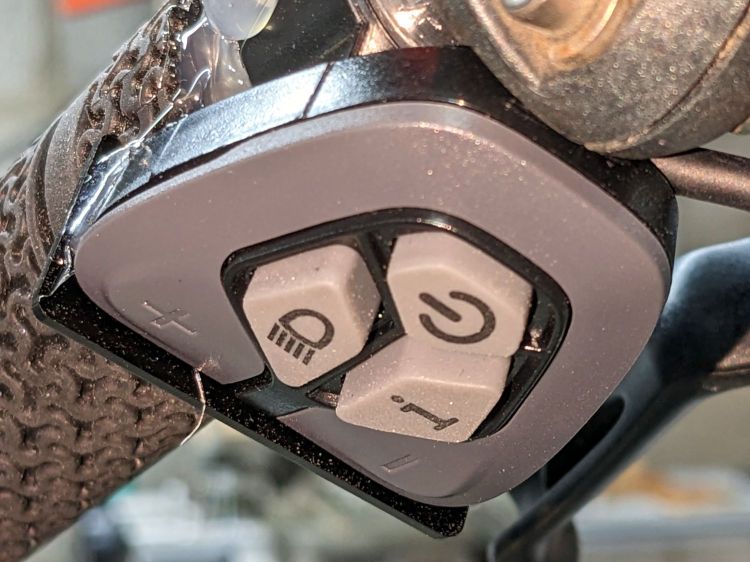
Bafang DPC-18 control buttons – initial mount
This turned out to be a catastrophically bad position, because the “buttons” extend all the way to the edge of the mount and trigger when pressed a fraction of a millimeter: the dark line visible under the light gray top is the entire range of motion.
My resting hand position on the grip put the edge of my gloved index finger along the buttons, where it would inexorably nudge the + button until I was riding in assist level 9 (Rocket Sled) mode.
One ride was enough to convince me those buttons needed a Mollyguard:
It is, of course, a laser-cut piece of 1.5 mil black acrylic, held in place with hot-melt glue. Because the button housing isn’t mounted symmetrically on the handlebar, I cut a few paper templates before getting the position and size right.
A view from the front shows the lip sticking up over the buttons:
Bafang DPC-18 button Mollyguard – front view
FWIW, the asymmetric mount put the buttons on the rider’s side of the flat handlebars found on contemporary upright city-rider style bikes. It makes perfect sense in that context, but didn’t help me in the least.
With the Mollyguard in place, I rotated the whole button assembly around the handgrip to allow pushing the buttons with my thumb in its natural position.
Now the assist level changes only when I want it to!


