Although I shouldn’t have used a hardened shaft for the case, the rest of the diamond drag tool holder worked out well enough:
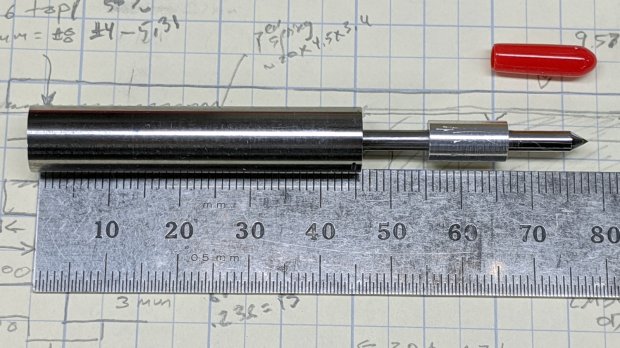
The dimension doodle shows what’s inside and gives some idea of the sizes:

From left to right, it’s an M6×1.0 setscrew to adjust the spring preload, a spring harvested from a cheap clicky ballpoint pen, a machined cap, a 3 mm rod (which should be a hardened & ground shaft, but isn’t) surrounded by a pair of LM3UU linear bearings, a machined coupler, and the stub of a diamond engraving tool’s shank.
Tapping 15 mm of M6×1.0 thread inside of the case took an unreasonable amount of grunt. Next time, brass.
The setscrew gets a little boss to hold the spring away from the adjacent threads in the case:
The little machined cap has a somewhat longer spring guide to prevent buckling:

The spring fits snugly on the slightly enlarged section inside the last few coils, with the rest being a loose fit around the guide. When the spring is fully compressed, it’s just slightly longer than the guide and can’t buckle to either side.
The cap gets epoxied onto the 3 mm rod with some attention to proper alignment:

The other end of the rod has a 3 mm thread, which would be a serious non-starter on a hardened rod.
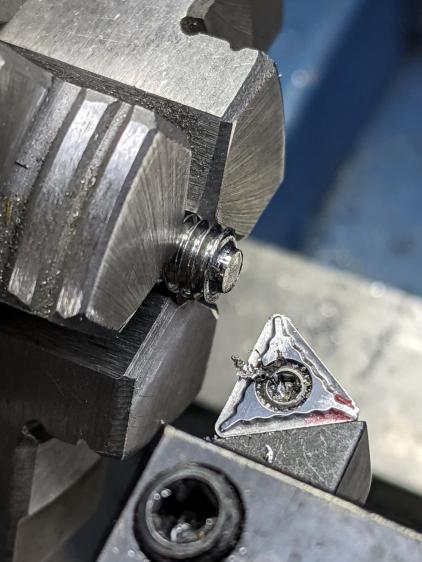
The shortened diamond tool shank gets epoxied into the gizmo connecting it to the now-threaded rod, again with some attention paid to having it come out nicely coaxial:

The LM3UU bearings got epoxied into the case, because I don’t have a deep emotional attachment to them.
Unscrew diamond tool, push spring onto cap, drop rod through bearings, crank setscrew more-or-less flush with the end of the case, screw diamond in place with some weak threadlock, add oil to rod, work it a few times to settle the bearings, and it’s all good.
A quick spring rate measurement setup, with a brass tube holding the diamond point off the scale pan:

The spring rate works out to 230 g + 33 g/mm for deflections between 1.0 mm (263 g) and 3.5 mm (346 g), so it’s in the same ballpark as the diamond tools on the MPCNC and CNC 3018.
Note: WordPress just “improved” their post editor, which has totally wrecked the image alignment. They’re all set to “centered” and the editor says they are, but they’re not. It’s a free blog and I’m using one of their ancient / obsolete / unsupported themes, so I must update the theme. Bleh.

Comments
10 responses to “Sherline: Diamond Drag Engraving Tool Holder”
WordPress Delenda Est
-RCP
I must devote a few days to screwing with themes / layouts / administrivia.
Too late now, but for the future, could you have heated the shaft with a torch to get it softer?
Beats me. I think it starts out induction-heated through the outer few millimeters, then ground to make it into a nice cylinder, which means my ham-fisted annealing would probably produce a pretzel or peppermint stick …
Sounds like a job for a programmable kiln. The O1 anneal cycle is straight-forward, but keeping the stock from rusting at temp would be a challenge*. Looks like the shafting would take about 10 hours of heating time in the kiln; not terribly high temperatures for the ceramics people, but the 25C/hour cool off cycle is a killer for manual methods.
(*) I think this is where stainless tool wrap and a bit of paper to get the oxygen comes to play, but buying pre-annealed steel is going to be cheaper. I thought about it once, then priced the stainless. Nope. (Wonders if the small kiln is still working. Hasn’t been turned on in several years.)
Thanks for the analysis: now I know what I’m missing!
Next time around, that brass rod’s definitely getting shortened.
[…] the hairline with the diamond drag bit was entirely […]
[…] the hairline with the diamond tool, ease the finished cursor off the fixture, scribble Sharpie into the scratch, and […]
[…] time, I diamond-scribed three PETG cursors through the transparent protective film, with two / four / six […]
[…] Its components will live on in other projects. […]