Ed Nisley's Blog: Shop notes, electronics, firmware, machinery, 3D printing, laser cuttery, and curiosities. Contents: 100% human thinking, 0% AI slop.
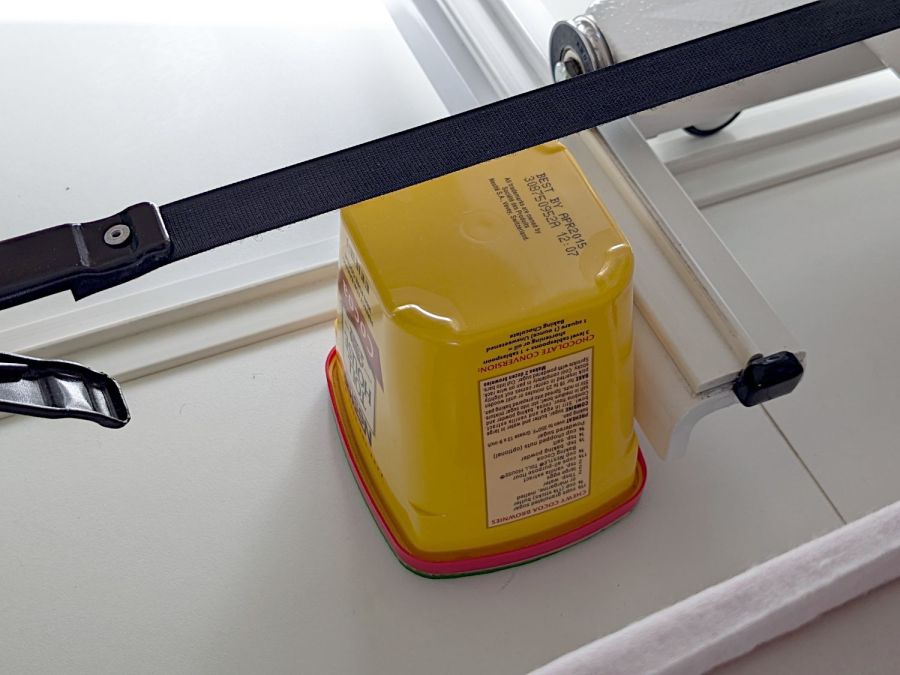
Although I devoted considerable attention to leveling & shimming the table under Mary’s HQ Sixteen, the machine rolls on ball bearing wheels atop (relatively) smooth plastic tracks. Parked at a few spots along the dozen feet of table, the machine will slowly and quietly roll away. This calls for some sort of parking brake, but until inspiration strikes, a simple anchor will suffice:
HQ Sixteen – anchor
It’s a cocoa container chosen from (one of) my Boxes o’ Containers, with a husky chunk of steel atop some very sticky double-sided foam tape inside the red lid.
You can see one of the ball bearing wheel just above the strap applying tension to the practice quilt out of view on the left. The thing that looks like a wheel just under the strap is an encoder for the stitch regulator that we haven’t connected yet.
To prevent the machine from simply bulldozing the container along with it, the lid sits on a sheet of EVA craft foam stuck to a sheet of rigid foam board (with adhesive on both sides).
Scan the lid:
Container lid scan
Select all the red pixels, do a little cleanup, turn it into a binary mask:
Container lid mask
Import it into LightBurn, trace the perimeter, do some curve optimization / smoothing, duplicate the outline, set one to cut EVA foam and the other to cut adhesive board, and Fire The Laser.
Elapsed time: about fifteen minutes from realizing what was needed to plunking the anchor in place.
I briefly considered a full-frontal laser-cut finger-jointed box for the weight, but … Mary’s not a big fan of that campfire smell, particularly in a room dedicated to the Fiber Arts.
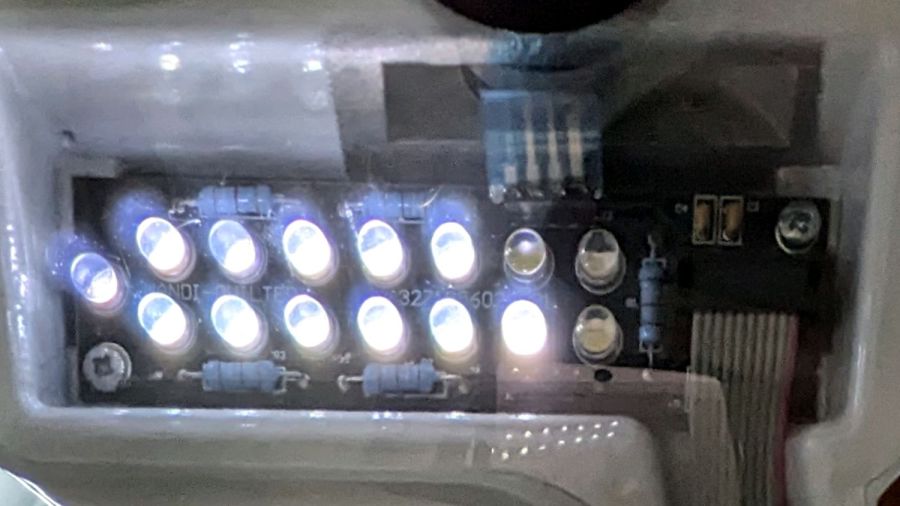
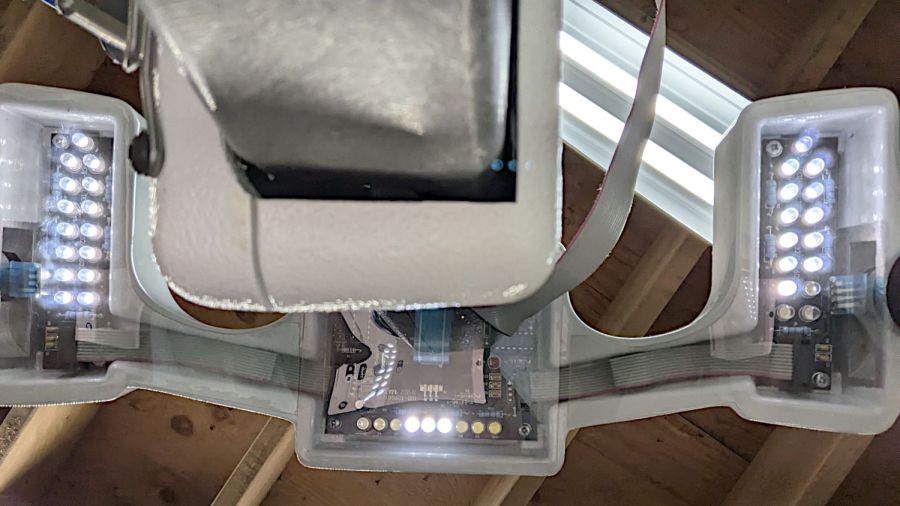
One string of three white LEDs in the left handlebar of Mary’s Handi-Quilter HQ Sixteen died over the past two decades:
HQ Sixteen – left LED deaders
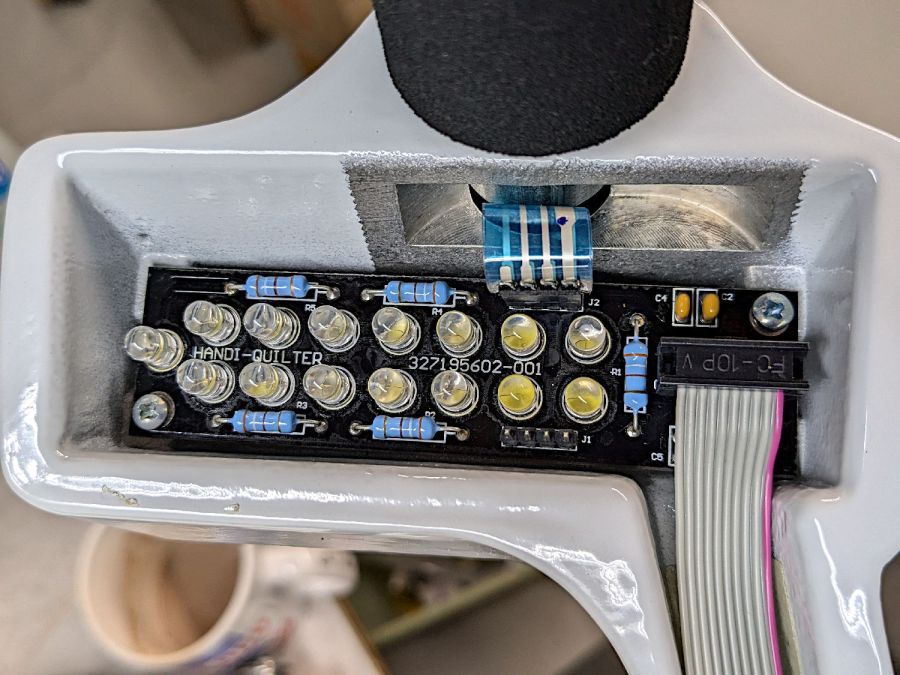
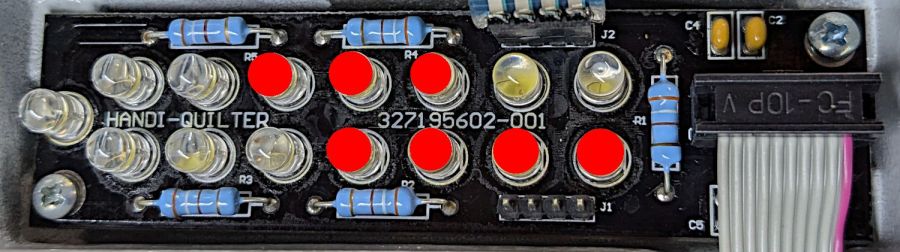
A view minus the glare:
HQ Sixteen – left LED PCB
I replaced all 15 LEDs with new-old-stock white LEDs from my stash, while neglecting to pay close attention to the silkscreened orientation marks.
I used up a lot of solder wick while re-extracting seven of the LEDs :
HQ Sixteen – left LED PCB – orientation
The LED in the front-right corner is in the string with the two LEDs just above it, while pointing in the opposite direction. This definitely violates the Principle of Least Surprise.
Being of sound mind, I tested all the replacement LEDs before installing them:
HQ Sixteen – LED testing
Which tedious process weeded out a couple of deaders, one with its case on backwards, and a handful of completely different white LEDs evidently from a different manufacturing batch. Buying low-budget LEDs directly from a sketchy source halfway around the planet does have its downsides.
Being that type of guy, I also tested the removed LEDs. Weirdly, one of the strings had two dead LEDs, which suggests one failed short and the increased current took another LED down with it.
Two of the three strings in the central PCB had died and were replaced without incident: they all pointed in the same direction and I can deal with consistency.
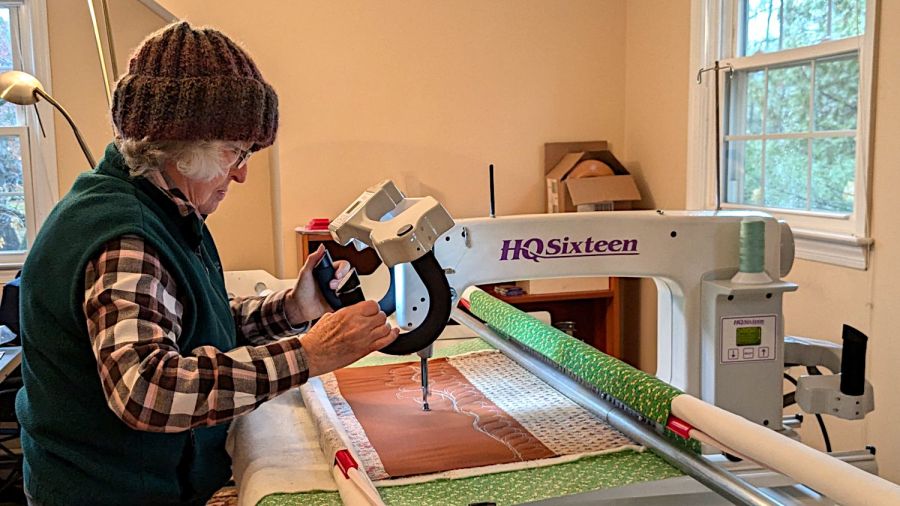
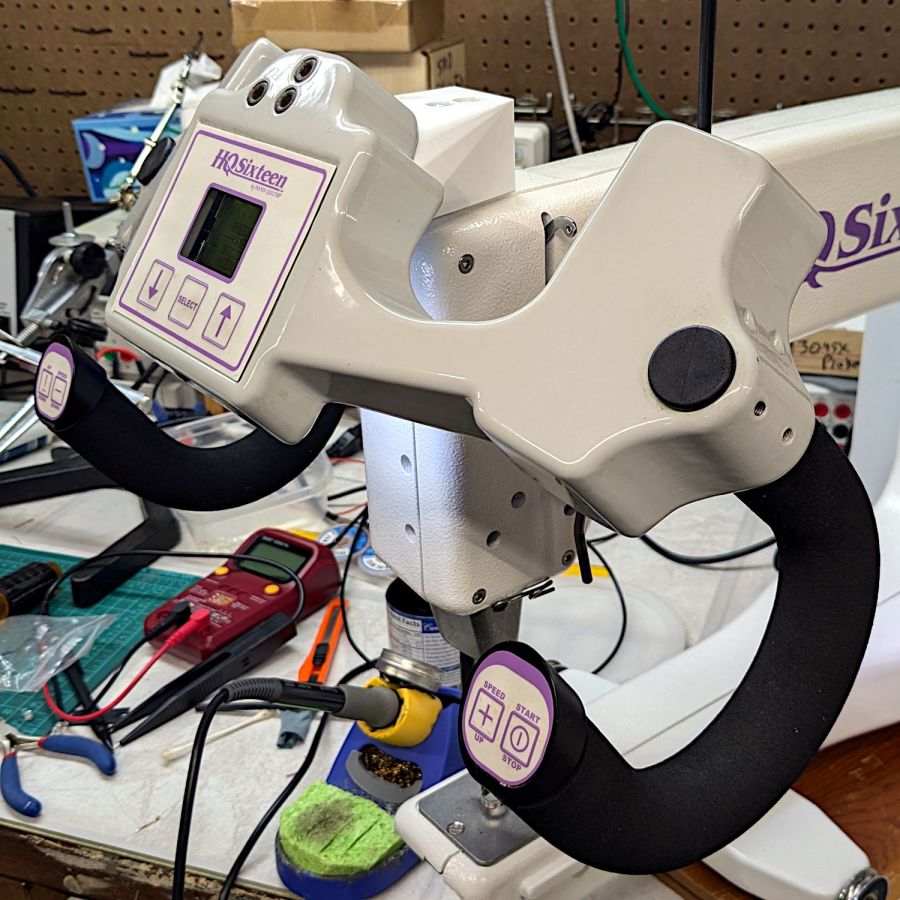
So as to not bury the lede, I remounted the front handlebar unit of Mary’s Handi-Quilter HQ Sixteen long-arm sewing machine so she can see the control panel with its small LCD:
HQ Sixteen – remounted handlebars in use
The new and old white LEDs produce distinctly different colors and intensities on the practice quilt fabric.
The original HQ Sixteen design bolted squarely atop the arm:
HQ Sixteen – original front handlebar mount
The control surface is, admittedly, angled slightly forward, but Mary was unable to see the lower few lines of the LCD without standing on tiptoe.
Begin with a crude tracing of the mating surfaces:
Front handlebar base tracings
Import the image into Inkscape and lay some shapes on it:
Front handlebar base layout – Inkscape
Import the SVG into LightBurn and cut templates to verify the hole positions:
HQ Sixteen – handlebar bolt templates
Obviously that took more than one try.
Rationalize the outlines, clean things up, and organize the shapes into useful named layers:
Front handlebar base layout – Inkscape layers
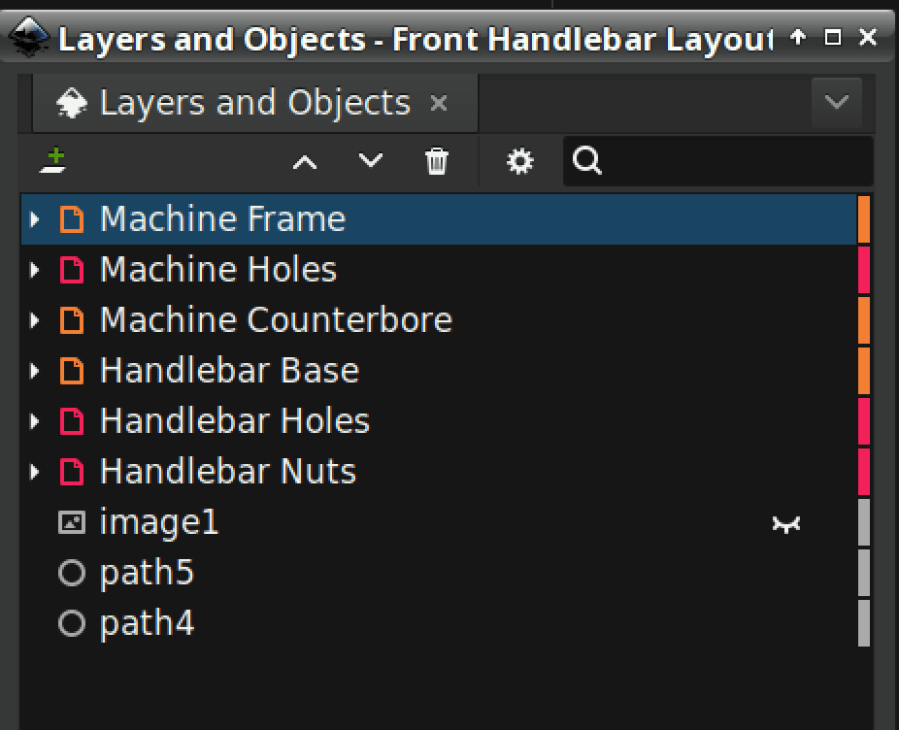
Save as an Inkscape SVG, import into OpenSCAD, and extrude the layers defining all those shapes into a solid model:
Handlebar Base Mount – solid model
That’s the most recent iteration; earlier ones appear in various pix.
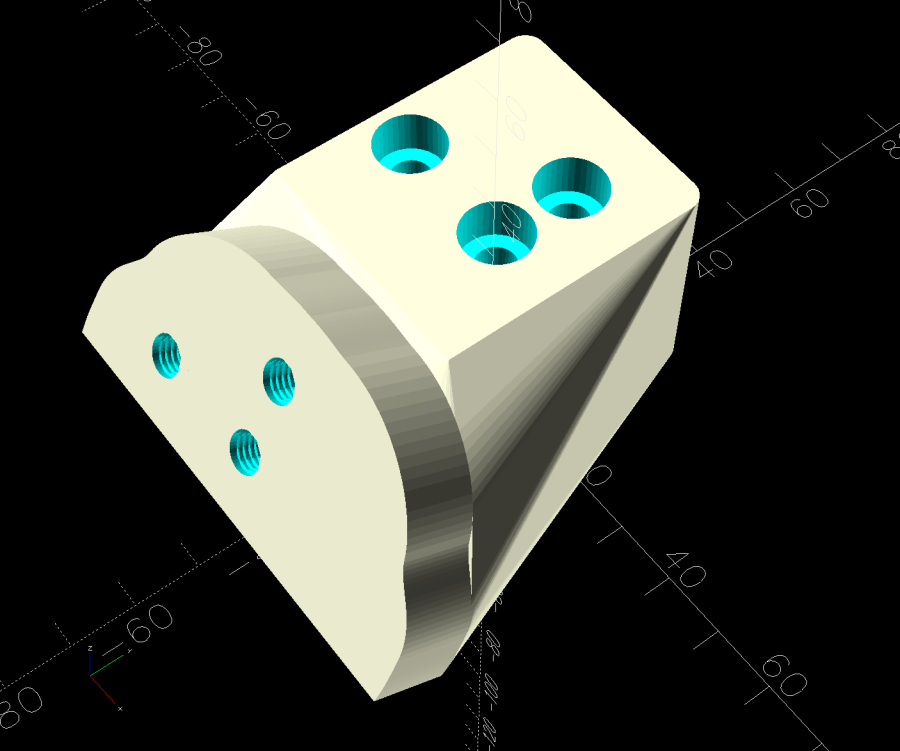
I had intended to use either square nuts or heat-set inserts, but it turned out to be easier to just slam BOSL2 threaded nuts into the front plate and be done with it:
Handlebar Base Mount – solid model – hex nuts
The trick is to sink the nuts around a hole sized slightly larger than the screw’s nominal diameter, letting the threads fill empty space.
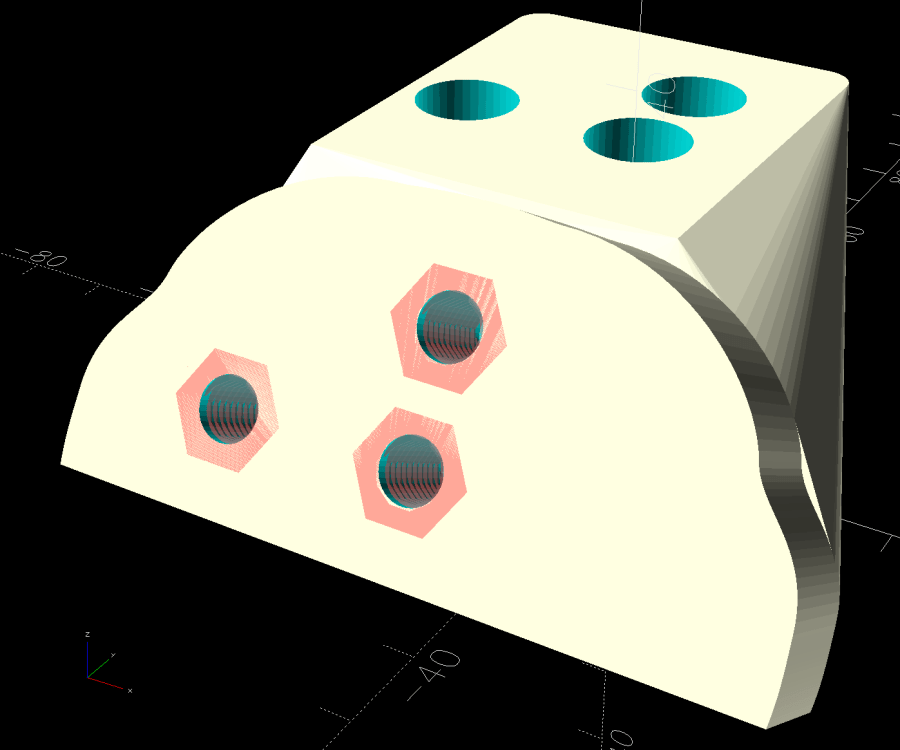
The handlebar base is mounted symmetrically along the machine arm centerline aligned with the two screws on the right. The rear block is offset to the left to clear the machine cover on the right, so the hull() wrapped around the two looks weird.
The front plate stands proud of the rest by dint of incorporating only a small slice of its back face into the hull() filling the gaps between the two. It’s not particularly stylin’, but it’s pretty close.
Finding the correct angle for the front plate required a couple of iterations, but they all built successfully:
HQ Sixteen – handlebar mount – on platform
Putting the threaded holes vertical created nicely formed threads that accepted the screws without hassle.
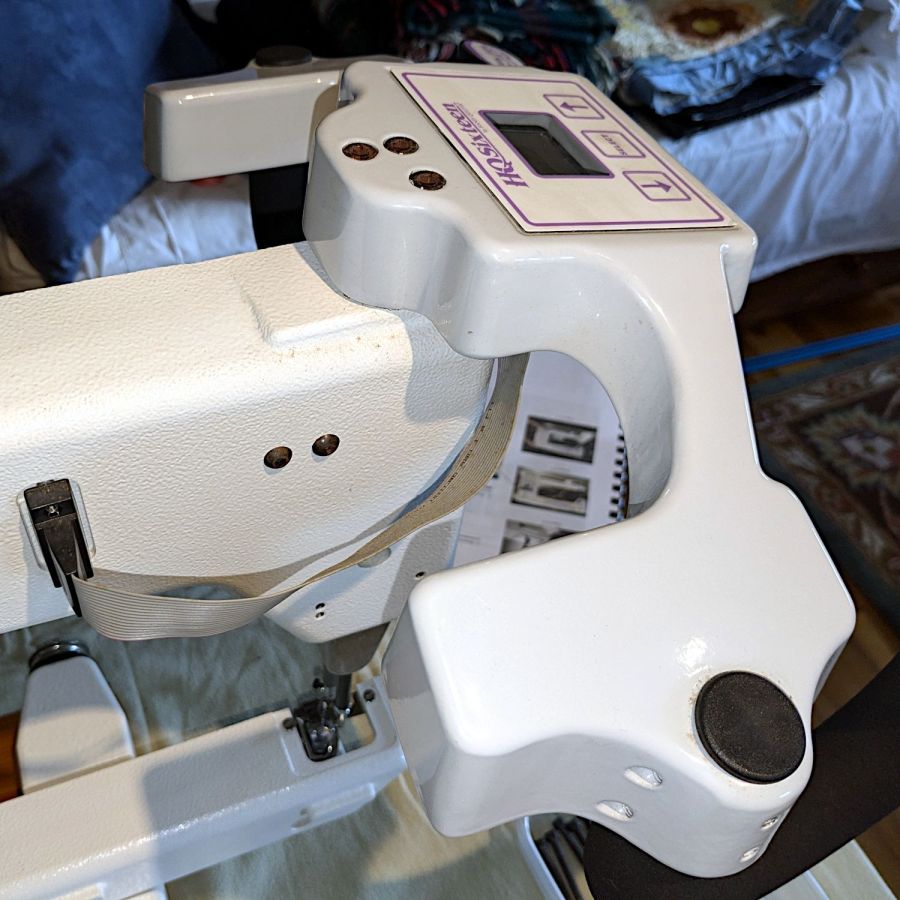
The block screws firmly to the arm and the handlebar unit screws to the block:
HQ Sixteen – remounted handlebars – side
The display now faces front:
HQ Sixteen – remounted handlebars – front
I eventually replaced those black oxide screws with shiny stainless ones, just for pretty.
The nine LEDs under the display now do a great job of lighting up the front of the machine’s arm, rather than the fabric at the needle, but fixing that will be a whole ‘nother project.
The handlebar grips with their control buttons now tilt at a somewhat inconvenient angle, which is also a whole ‘nother project.
Early reports from the user community are overwhelmingly positive.
The OpenSCAD source code and the SVG layout as a GitHub Gist:
This file contains hidden or bidirectional Unicode text that may be interpreted or compiled differently than what appears below. To review, open the file in an editor that reveals hidden Unicode characters.
Learn more about bidirectional Unicode characters
Judging from the dates codes on the ICs inside, Mary’s HandiQuilter Sixteen long-arm machine is about two decades old and many of the white LEDs in the front handlebars have gone dark:
HQ Sixteen – dead handlebar LEDs
The vertiginous view looks upward into the handlebar at the top of the machine (more on this later). The PCBs run strings of three series LEDs from a 16 VDC supply with a 390 Ω ballast resistor (oddly enough, on the ground end of the string), so one failed LED takes down all three.
I decided to replace all the LEDs, on the principle they’re surely dimmer than they used to beand to take advantage of a decade or so of improvement in white LEDs (yes, I have old stock).
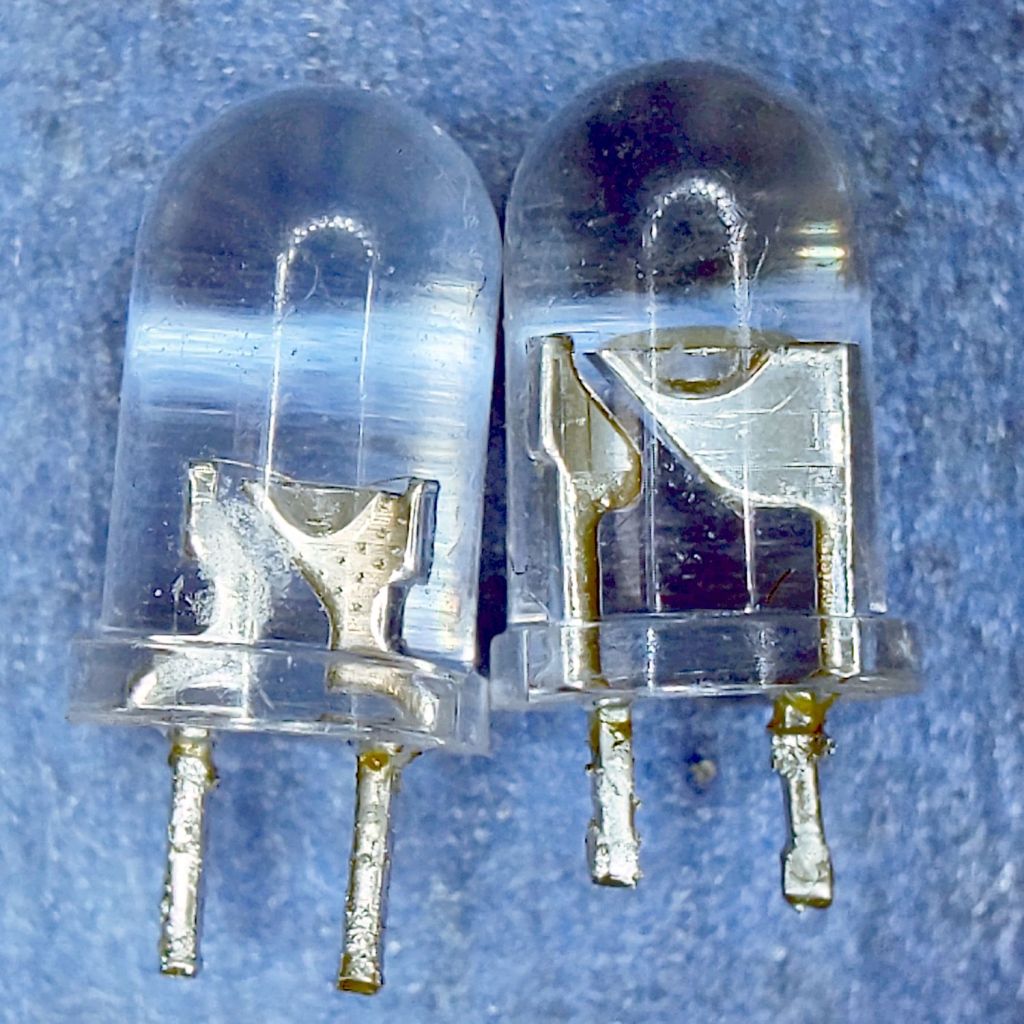
After discovering that the HandiQuilter engineers violated the Principle of Least Surprise by orienting adjacent LED strings in opposite directions, I found one of the strings still didn’t light up.
Pop quiz: which one of these LEDs caused the problem?
5 mm LEDs – swapped polarity
To the best of my knowledge, all 5 mm round LED packages mark the cathode lead with a flat edge. It’s easy to remember, as the cathode side of the schematic symbol has a bar: straight bar = straight edge.
Inside, the LED chip’s cathode lead is bonded to the reflective cup, with the anode lead wire-bonded to the top.
Took me a while to see what was wrong, too.
For whatever it’s worth, the backward LED works fine.
Mary is at least the third owner of a steel rack, originally intended to hold packages of retail stuff, which now holds (much of) her collection of quilting rulers:
Quilting Ruler Rack Base – overview
Obviously, it was never intended to hold heavy acrylic sheets, but it worked surprisingly well, right up to the point where too many of the rulers collected on two adjacent columns of pegs and overbalanced the whole affair atop her while she attempted to remove a ruler.
Subsequent accident recreation showed the rack toppled when the weight of the rulers on the two adjacent columns of hooks moved the center of mass outward, just inside the line between those feet, whereupon the slightest tug on a ruler pulled it over.
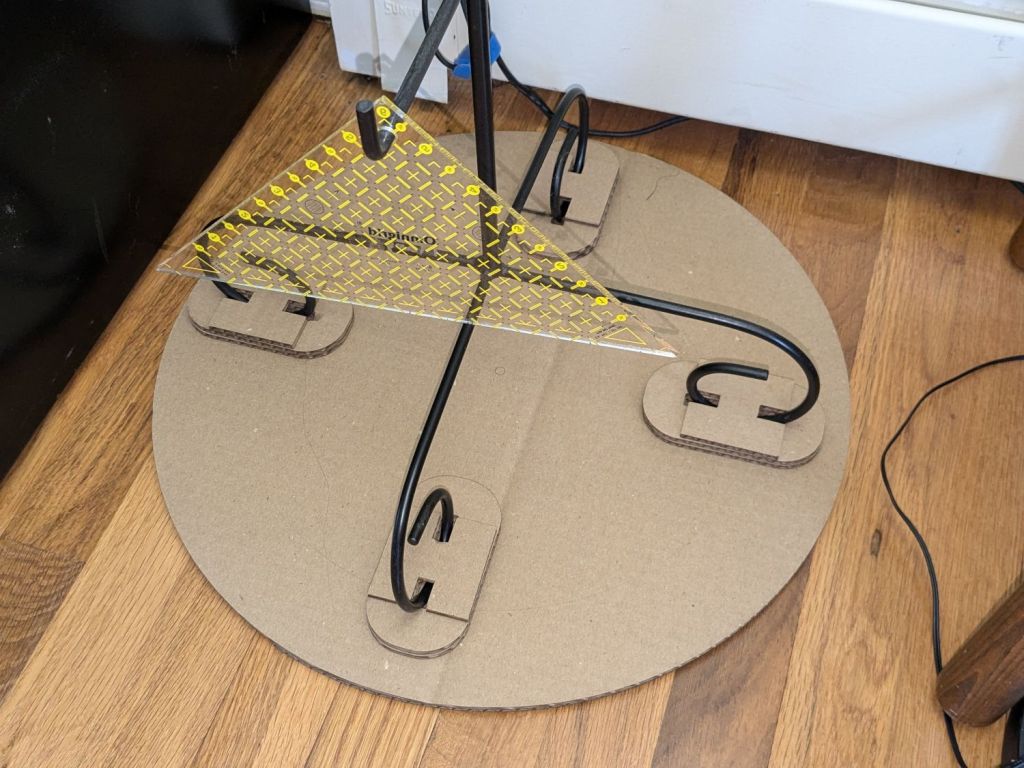
Measurements revealed the four legs do not sit on a square contact patch, are not parallel to the radii from the center point, and are not uniformly distant from the center. Rather than committing to a finished product, I made a cardboard prototype to verify a bigger base would solve the problem and I could capture all those feet.
You don’t have such a rack, so the exact dimensions don’t matter, but the LightBurn layout looks like this:
Quilting Ruler Rack Base
The disk is two cross-laid sheets for stiffness, with marks burned on the top to help align the feet more-or-less around the center point.
The oblong rings fit around the feet to capture them, so cut eight or twelve to make four stacks a bit taller than the wire diameter.
The H shape then glues atop the rings to hold the feet in place. They’re not removable, but a razor knife will eventually solve that problem.
I slobbered hot melt glue across the cardboard disks to hold them together, glued and aligned the rings where the feet dented the disks, stood the rack in the rings, and glued the H plates.
About an hour elapsed from the sound of the crash to the rack once again standing quietly beside the fabric cabinets.
We’ll run this for a while and eventually replace it with a plywood disk and screwed-in-place clamps for the feet, which will surely call for wood surface preparation / stain / seal treatment.
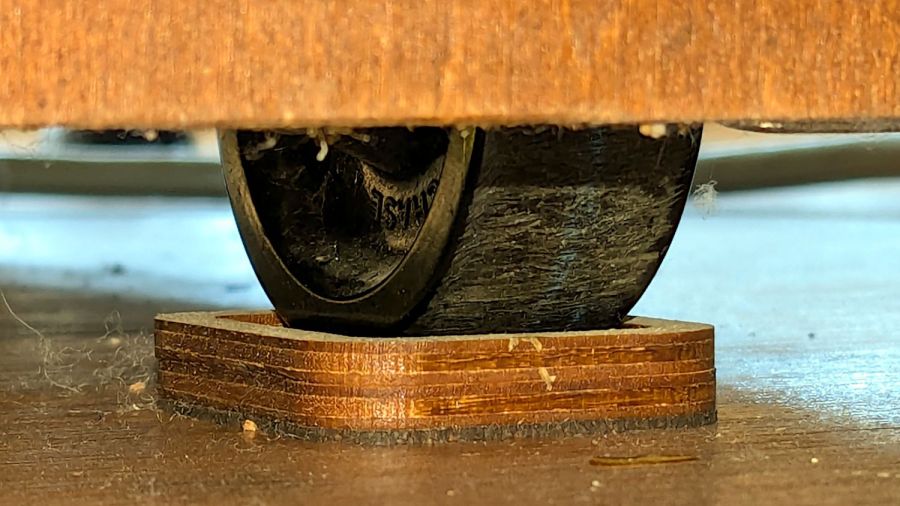
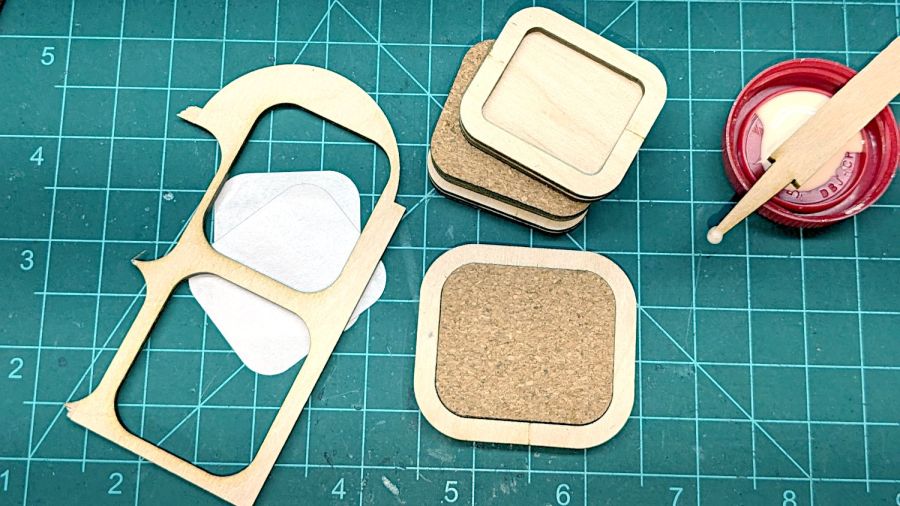
Mary’s much-improved / -repaired Sears Sewing Table wanted to move around on the wood floor in the Sewing Room, so I captured its casters in little pads:
Sears Sewing Table caster pad – installed
A layer of 1 mm cork with PSA adhesive provides griptivity against the floor, a solid layer of 3 mm plywood spreads the wheel force over the cork, and a top ring of 3 mm plywood captures the wheel.
Which looked like this during gluing:
Sears Sewing Table caster pad – gluing fixtures
The scrap on the left served to align cork & plywood; it came from the plywood contributing the shapes. The ring around the cork is a glued-up pair of plywood rings (4 mm wide, outset from the perimeter of the pads) serving to align the two plywood layers.
Verily: time spent making a fixture is never wasted!
And having a laser cutter makes fixtures trivially easy, at least for simple fixtures like those.
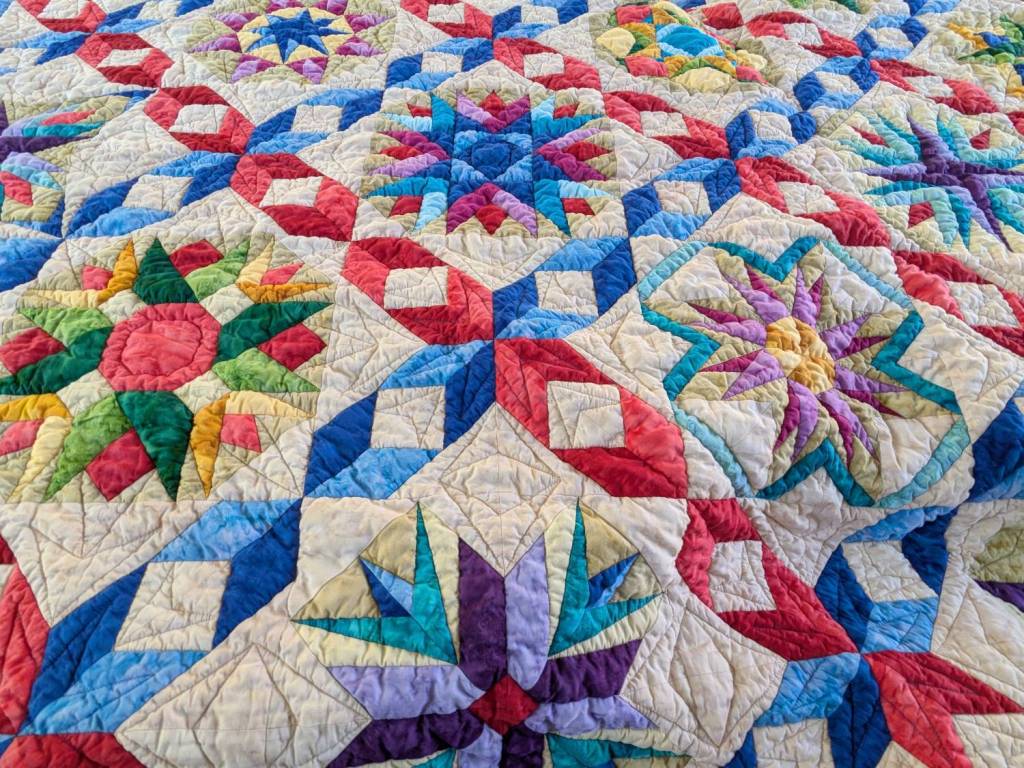
Mary recently finished a multi-year quilt project:
Dancine With The Stars quilt – detail
The overall pattern is “Dancing With The Stars” and it involves more intensive detail work than I have ever deployed on anything I’ve ever done:
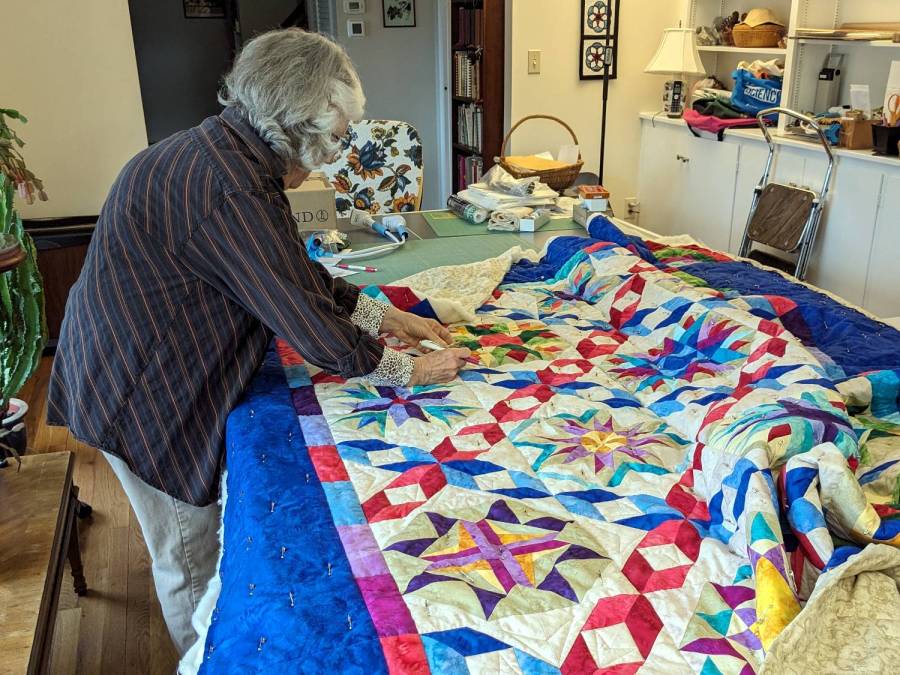
Mary with quilt on ping-pong table
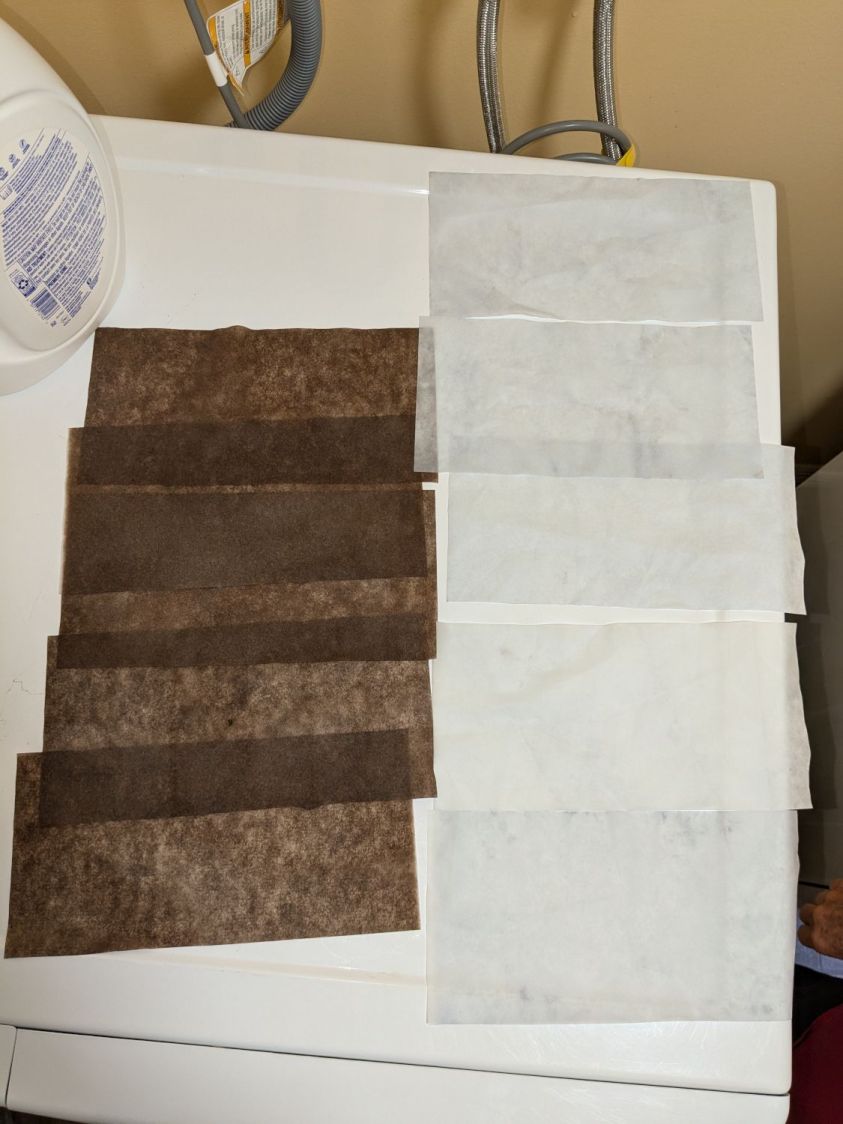
Washing the quilt required a generous handful of Color Catchers to prevent the bold colors from bleeding into the lighter fabrics:
Dancing With The Stars quilt – color catchers
The sheets on the left came from the wash and the ones on the right came from a separate rinse cycle. We didn’t expect the “average” color to be brown, but there it is. We were both mightily relieved when they performed as expected!


