Ed Nisley's Blog: Shop notes, electronics, firmware, machinery, 3D printing, laser cuttery, and curiosities. Contents: 100% human thinking, 0% AI slop.
FC1002 Frequency Counter – faceplate – circular polarizer
A sheet of linear polarizing film held in front of the lens:
FC1002 Frequency Counter – faceplate – linear polarizer
For reference, none of the other instrument faceplates on the bench show anything other than uniform gray, with one exception that points directly to the plastic injection point.
I’d say this plate cracked due to unrelieved internal stresses and not anything I did or didn’t do.
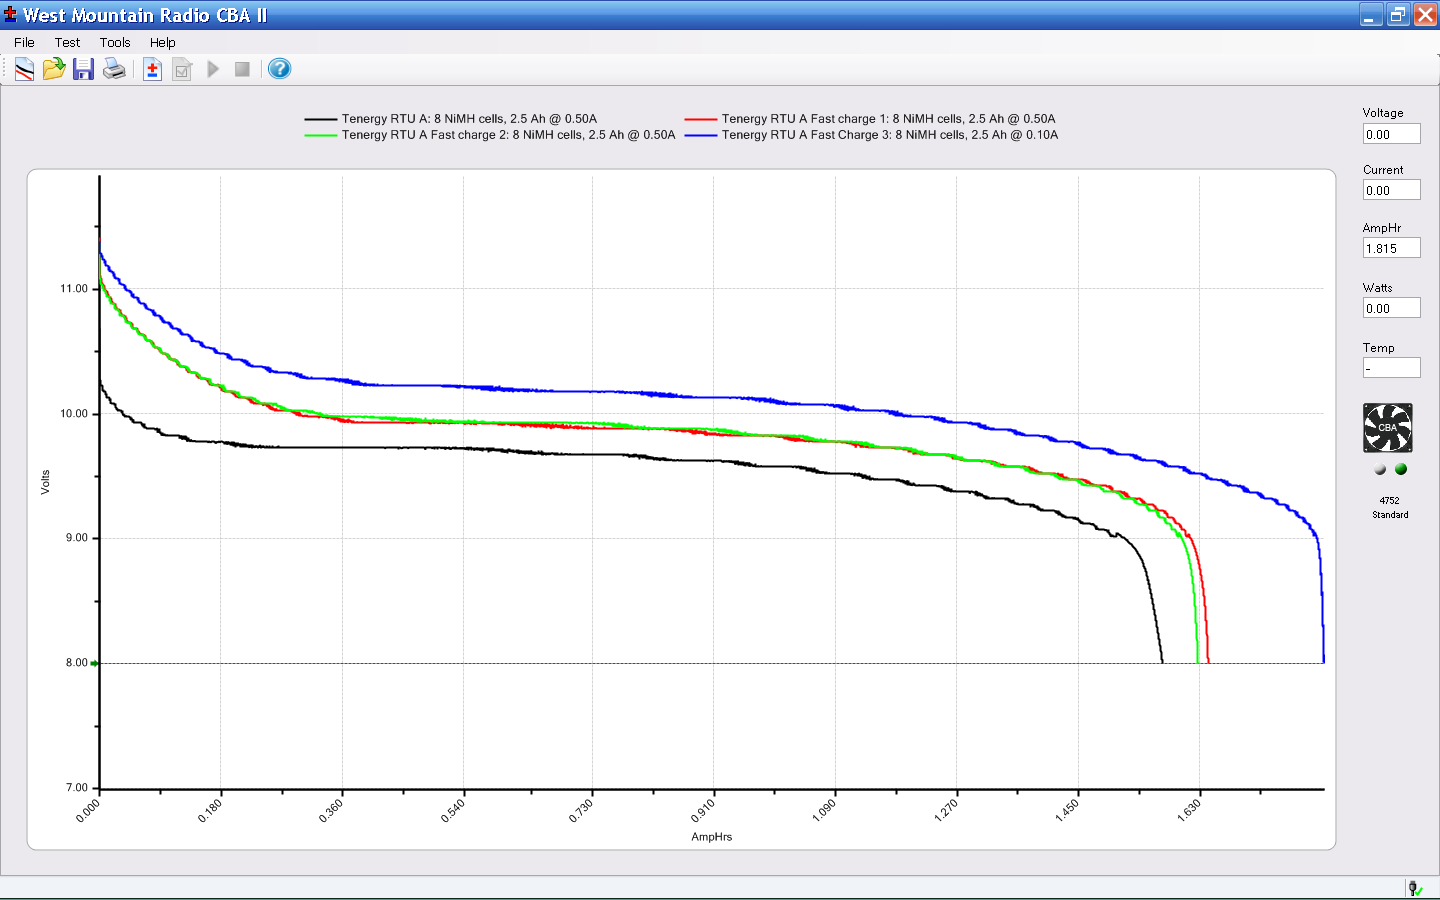
The main reason for taking the FC1002 frequency counter apart was to replace the failed quad-AA NiCd battery pack. Rather than buy new cells with tabs, I recycled some low-discharge “ready to use” NiMH cells from the heap. Back in 2009, they looked like this:
Tenergy RTU Pack A Tests – Aug 2009
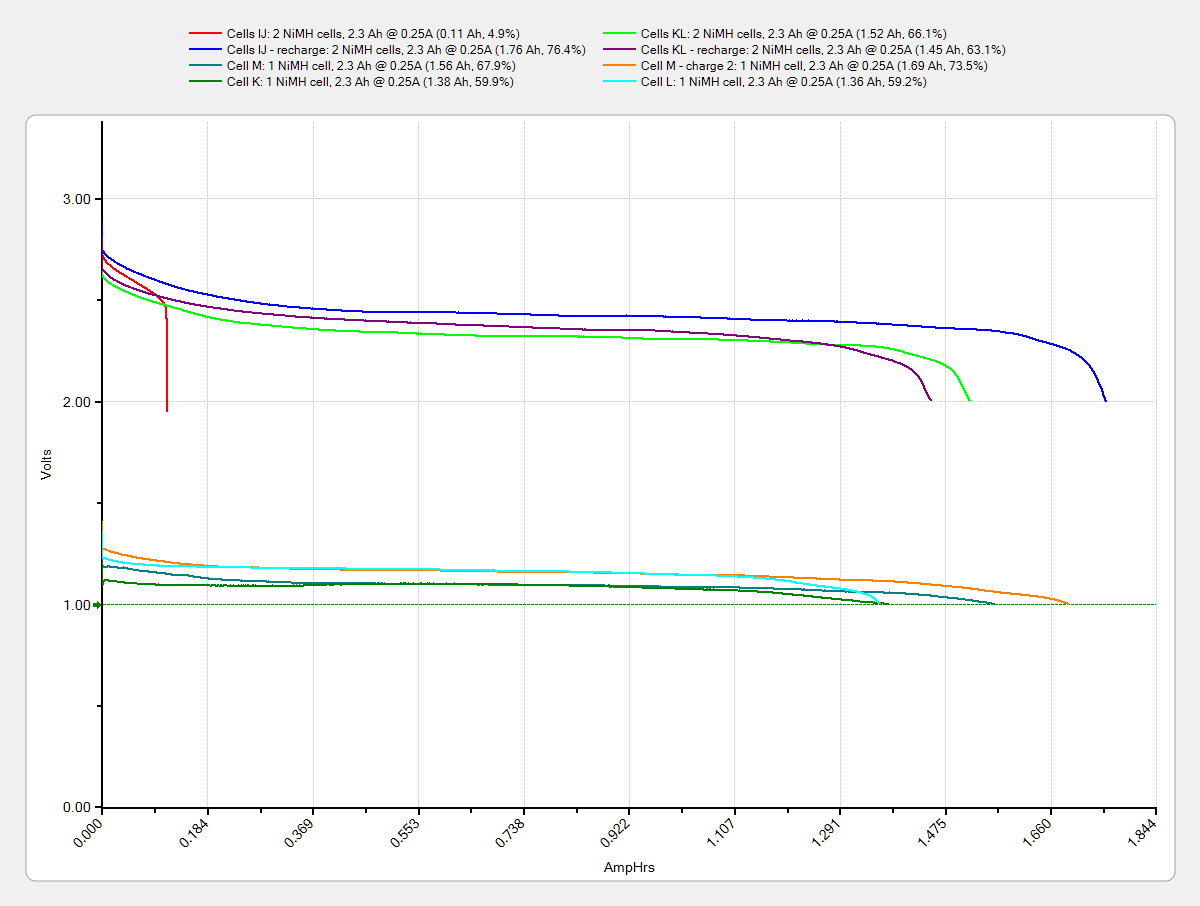
Nowadays, they’re a bit less peppy:
Tenergy RTU – 2014-01 – loose cells
The red blooper shows that you can’t trust a smart fast charger to get the right answer; it concluded that pair was fully charged. After the discharge test and an overnight C/10 charge, they regained as much enthusiasm as they’ll ever have.
They have slightly less capacity than in 2009 and also a somewhat lower terminal voltage. That shouldn’t matter here, as the frequency meter has a power supply to take care of that problem.
Although I’ve sometimes been able to (quickly!) solder directly to ordinary AA cells, a trial run on a defunct RTU cell showed that wasn’t going to work on whatever variety of steel they used, no matter how much I scuffed it and despite using aggressive flux that normally blends silver solder onto stainless steel.
Fortunately, the top half of a four cell case fit exactly in the space available, so I used woven copper fabric tape inside the case to interconnect the cells, then lashed everything together with the obligatory Kapton tape:
FC1002 Frequency Counter – battery pack
That cracked faceplate isn’t the nicest thing to confront, but it’ll suffice until I get more motivation:
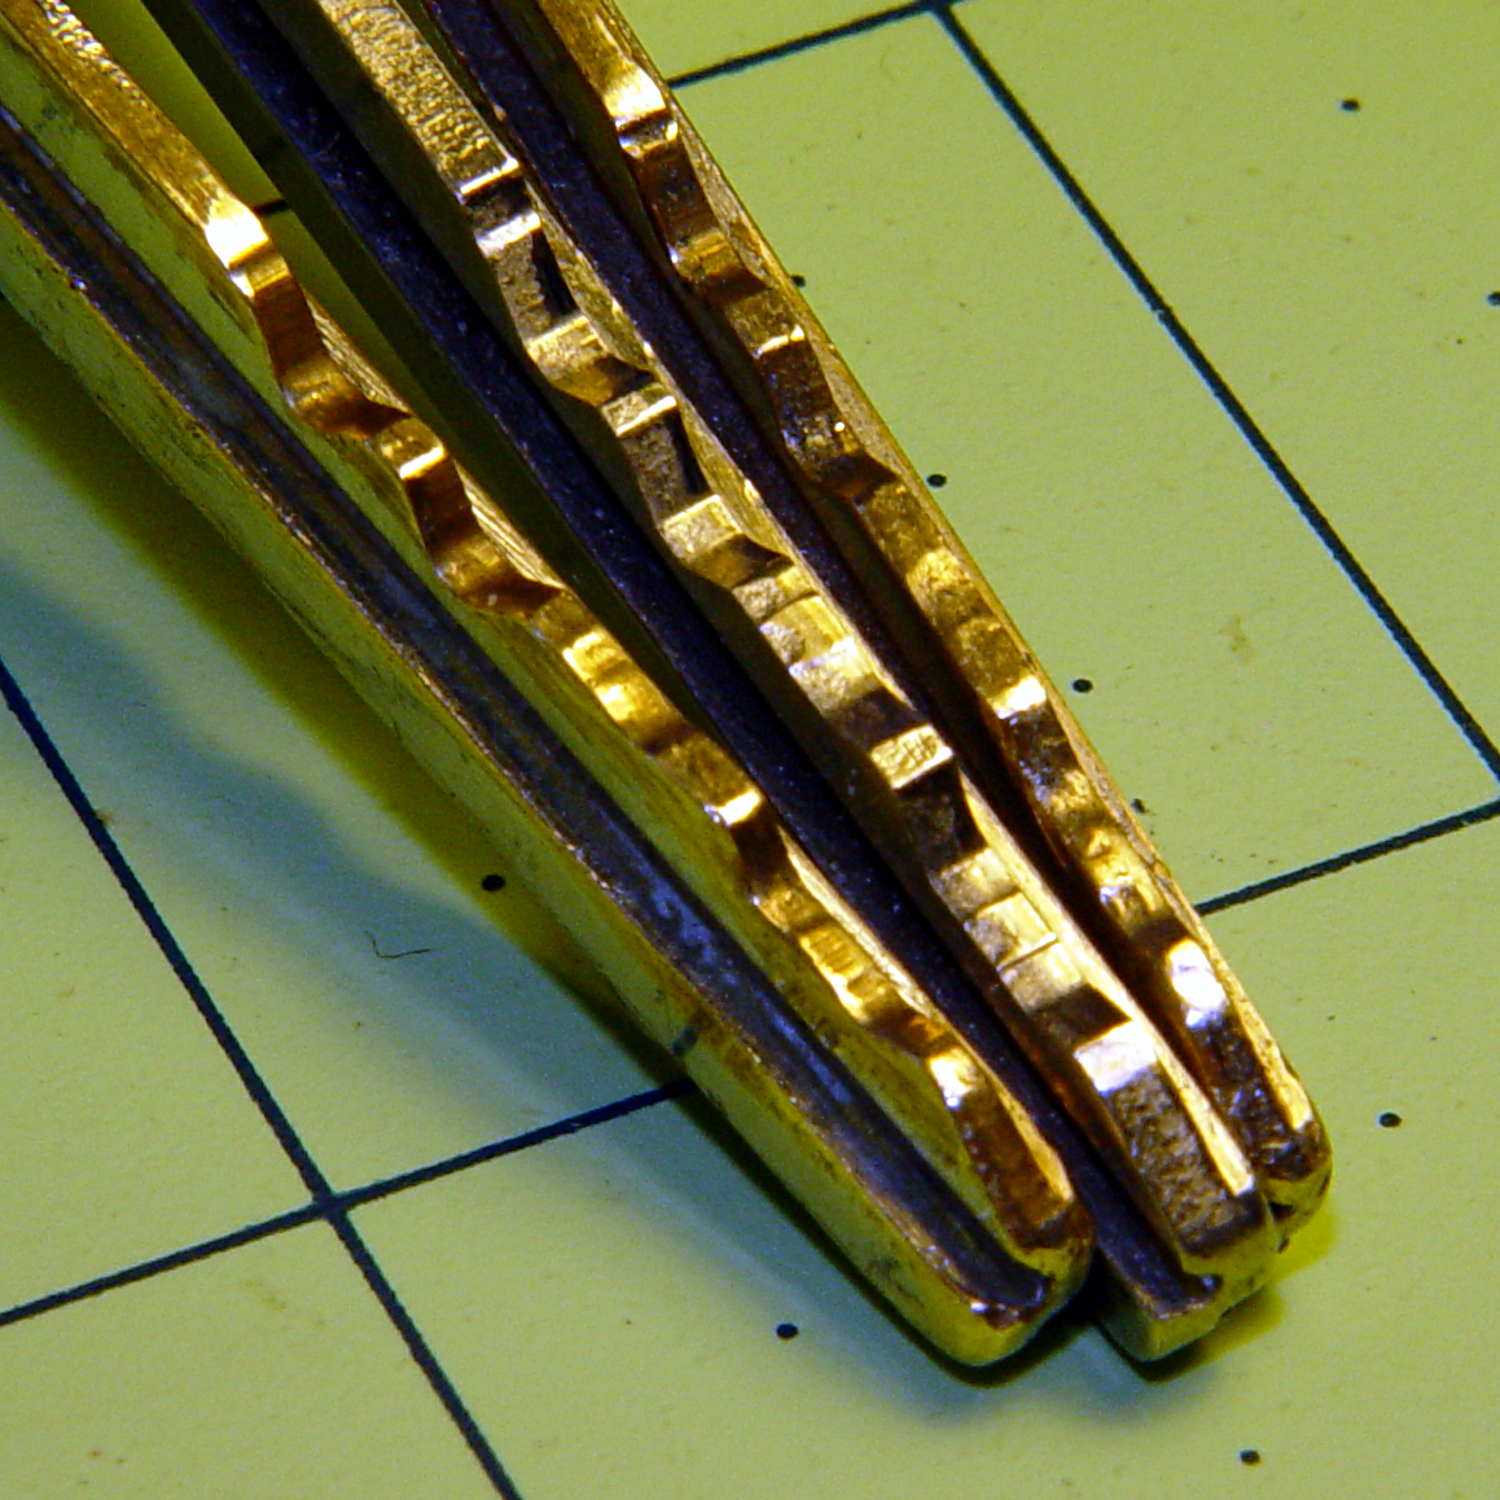
And it came to pass in the Christmas Season that our ignition keys began jamming in the lock, rather than just starting the van. It seems Toyota used split wafers in their locks up through the early part of this millennium, with the result that the delicate wafer edges tend to wear out both themselves and the edges of the keys.
I can’t vouch for the wafers, but the keys definitely aren’t in good shape:
Ignition keys – worn vs new
Given that picture, someone can probably conjure up a shiny new key and drive away with our 14-year-old Sienna van. It just rolled over 90 k miles and is in pretty good condition. New battery and hood prop pivot, too.
Being that type of guy, the first thing I did with the new van was to get duplicate keys and drop the OEM keys into the “2000 Sienna” file folder. The middle key in that photo has had maybe a dozen uses and is in pristine condition.
Rumor has it that one can cannibalize a set of split wafers from the glove box lock:
Glove box latch
Or, according to different sources, you can simply discard the split wafers and be done with it.
The trick to removing the lock cylinder lies in turning the key to the Accessory position, then poking a pointy object into a small hole to depress an internal spring-loaded pin. Of course, one must disable the air bags, dismantle the steering wheel, and remove half a dozen trim panels to reveal the small hole.
Fortunately, the two “new” keys from the file folder work perfectly and we’ll run with them for a while. I suppose I should get another set of duplicates, but …
The backup scripts running on Mary’s folks’ PC kvetched on each backup:
WARNING: Some files and/or directories in /home/ only transferred partially during rsync operation

WARNING: /usr/bin/rsnapshot daily: completed, but with some warnings
Poking around showed that the problem came from the .gvfs “directory” tucked into each home directory, which produced this unenlightening ls -al result:
d????????? ? ? ? ? ? .gvfs
Come to find out that it’s an old problem with mysterious causes that should be fixed by now; evidently I triggered it by installing basic Ubuntu-with-Unity and then installing the Xbubuntu desktop. Or something like that.
Anyhow, the solution workaround involves an rsnapshot configuration entry that bypasses that directory:
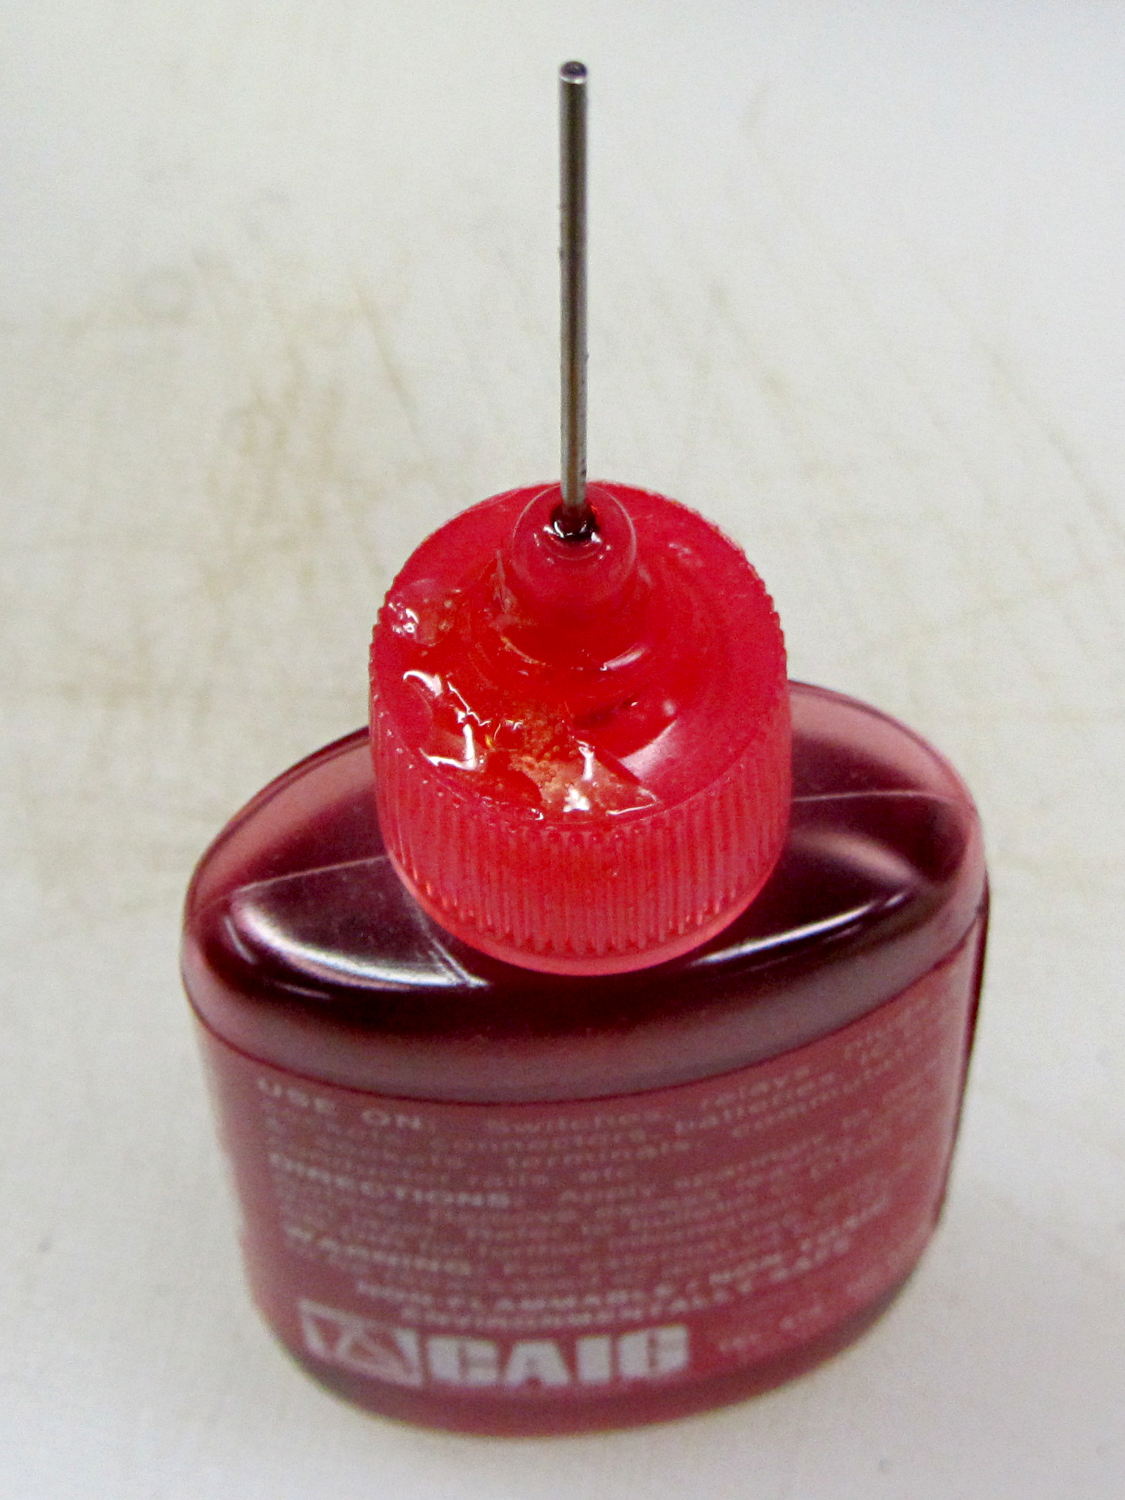
For years this bottle of DeoxIT has been covered with a very thin layer of red juice, despite having the lid screwed firmly in place and a cap (removed here) pushed over the tube:
Caig DeoxIT bottle – lid crack repair
Turns out that there’s a minute crack in the cap. Every time I use the bottle, I refresh the oil layer on the inside of the bottle, which then gets pumped outside through capillary action. I’d been keeping the bottle in a tall ziploc baggie, specifically to contain the oil, and always assumed it was a simple leak.
The bottle still contains a lifetime supply of DeoxIT that may become a cherished family heirloom, one to be handed down through the generations. I can’t think of a better applicator, either, so I’m kind of stuck with that cap.
The cap is, of course, un-bondable polyethylene covered with thin oil, so there’s no possible way to repair it. I wiped it down with alcohol and acetone, then quick-like-a-bunny dabbed on a blob of Duco cement (which is the irregular shape on the cap) and worked it into the crack, in the hope it would stick well enough to reduce the pumping.
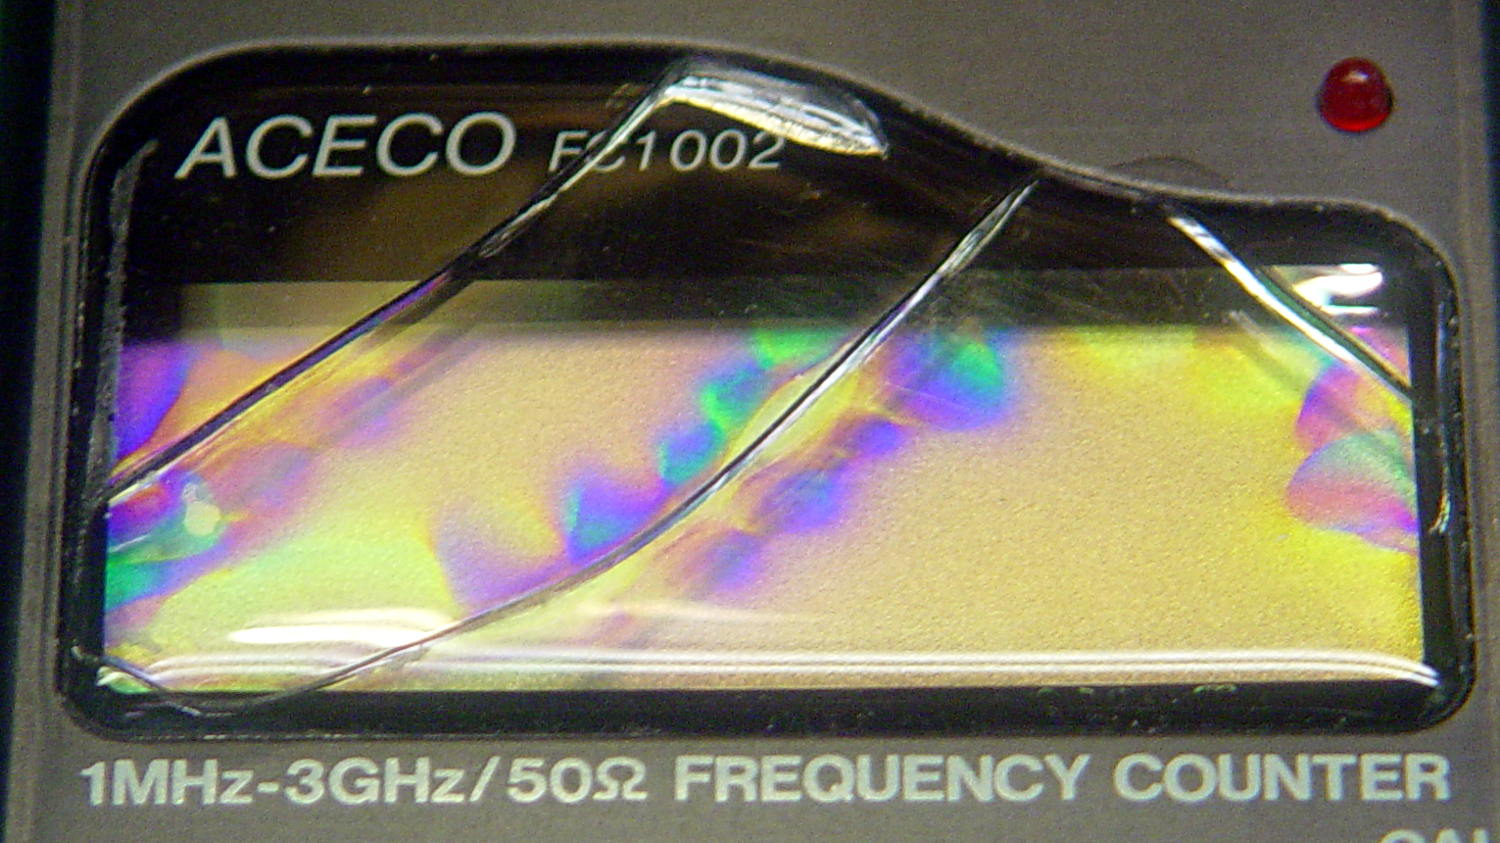
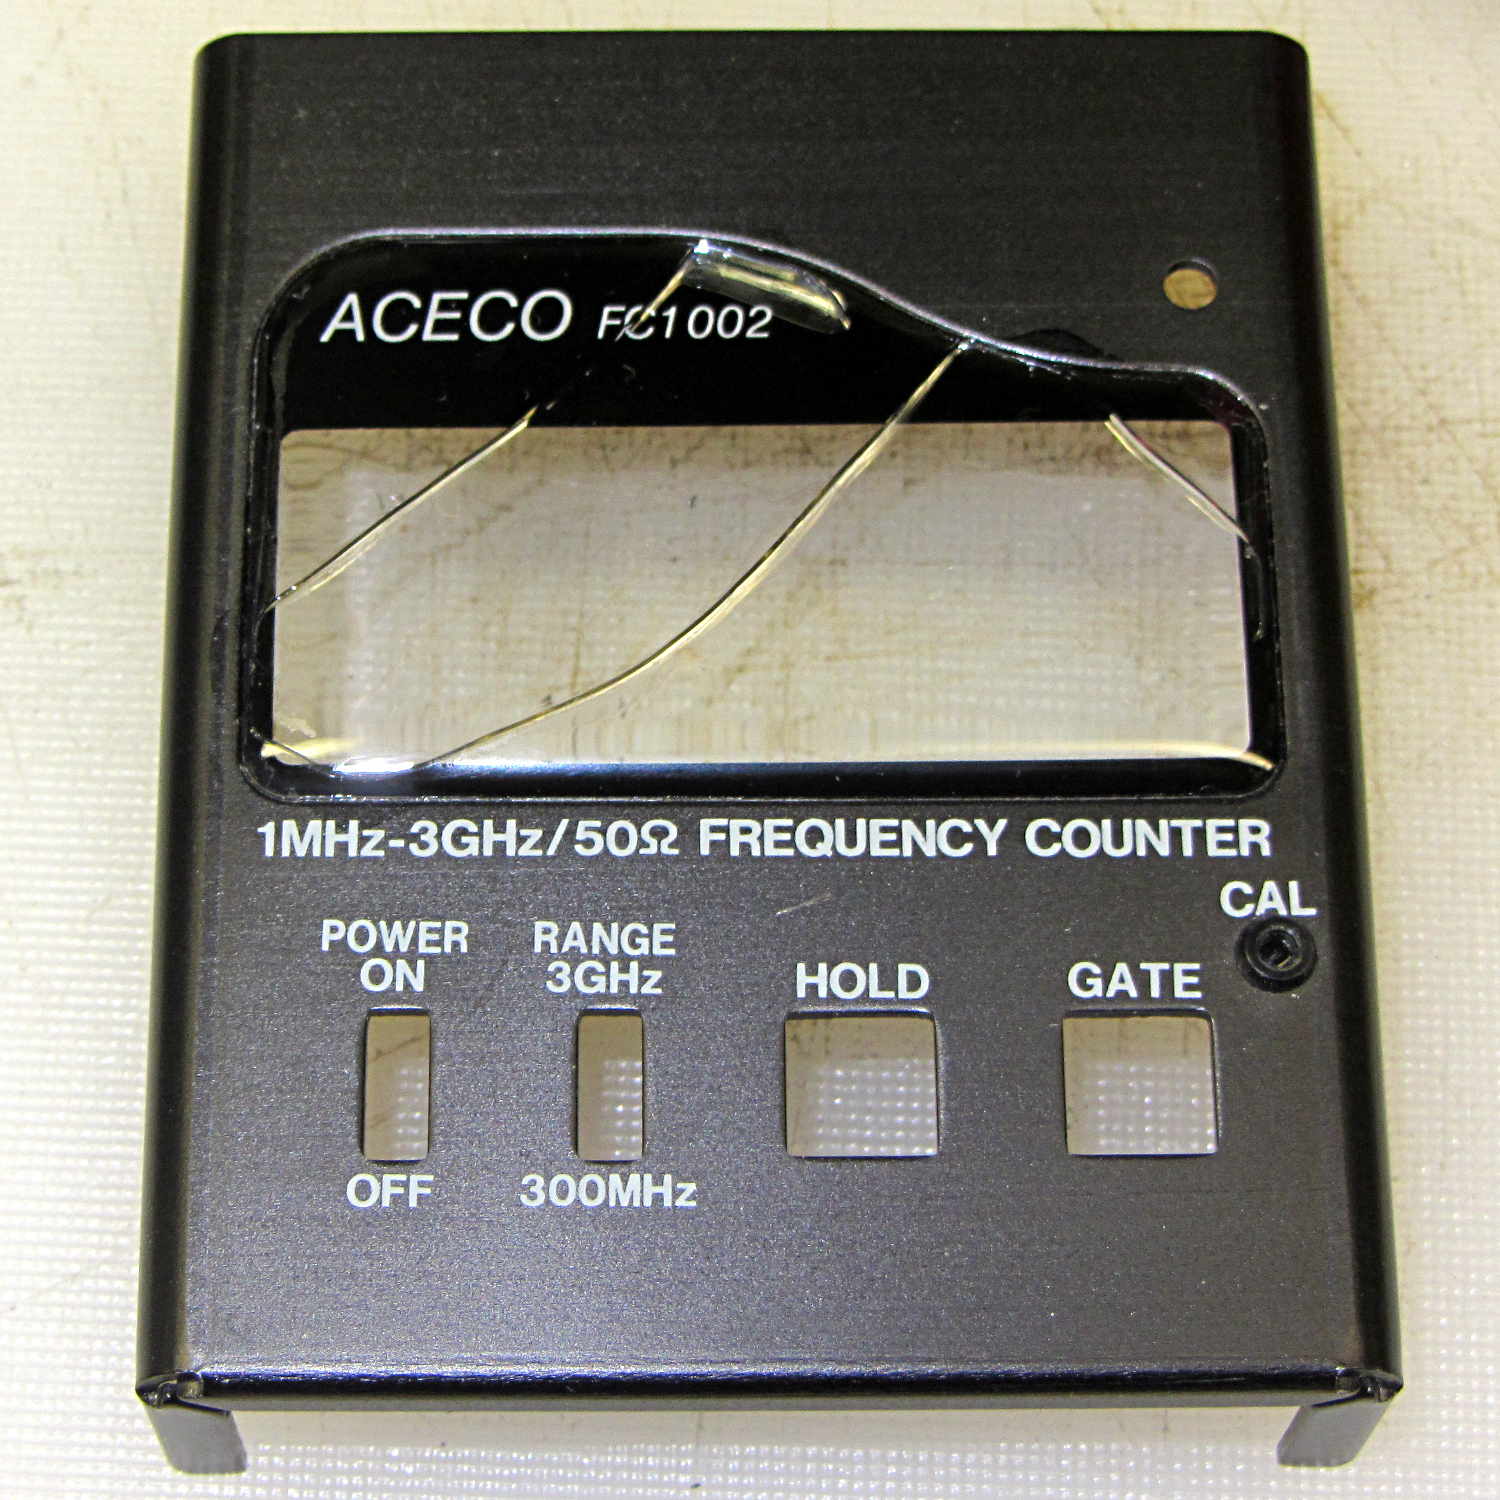
The plastic faceplate over the display cracked quite a while ago:
FC1002 Frequency Counter – cracked plastic
I don’t recall dropping the poor thing. Given the interesting pattern, it could be inherent stress that finally let loose as the plastic aged.
While I have it apart to rebuild the battery pack (more on that later), I’ve been easing acetone/MEK into those cracks by capillary attraction in the hopes of dissolving just enough plastic to rejoin them, without slobbering solvent all over the faceplate and scarring it.
If all else fails, I suppose I can mill out a replacement from thin acrylic sheet, but those nicely rounded cast / molded edges lie well beyond my abilities…
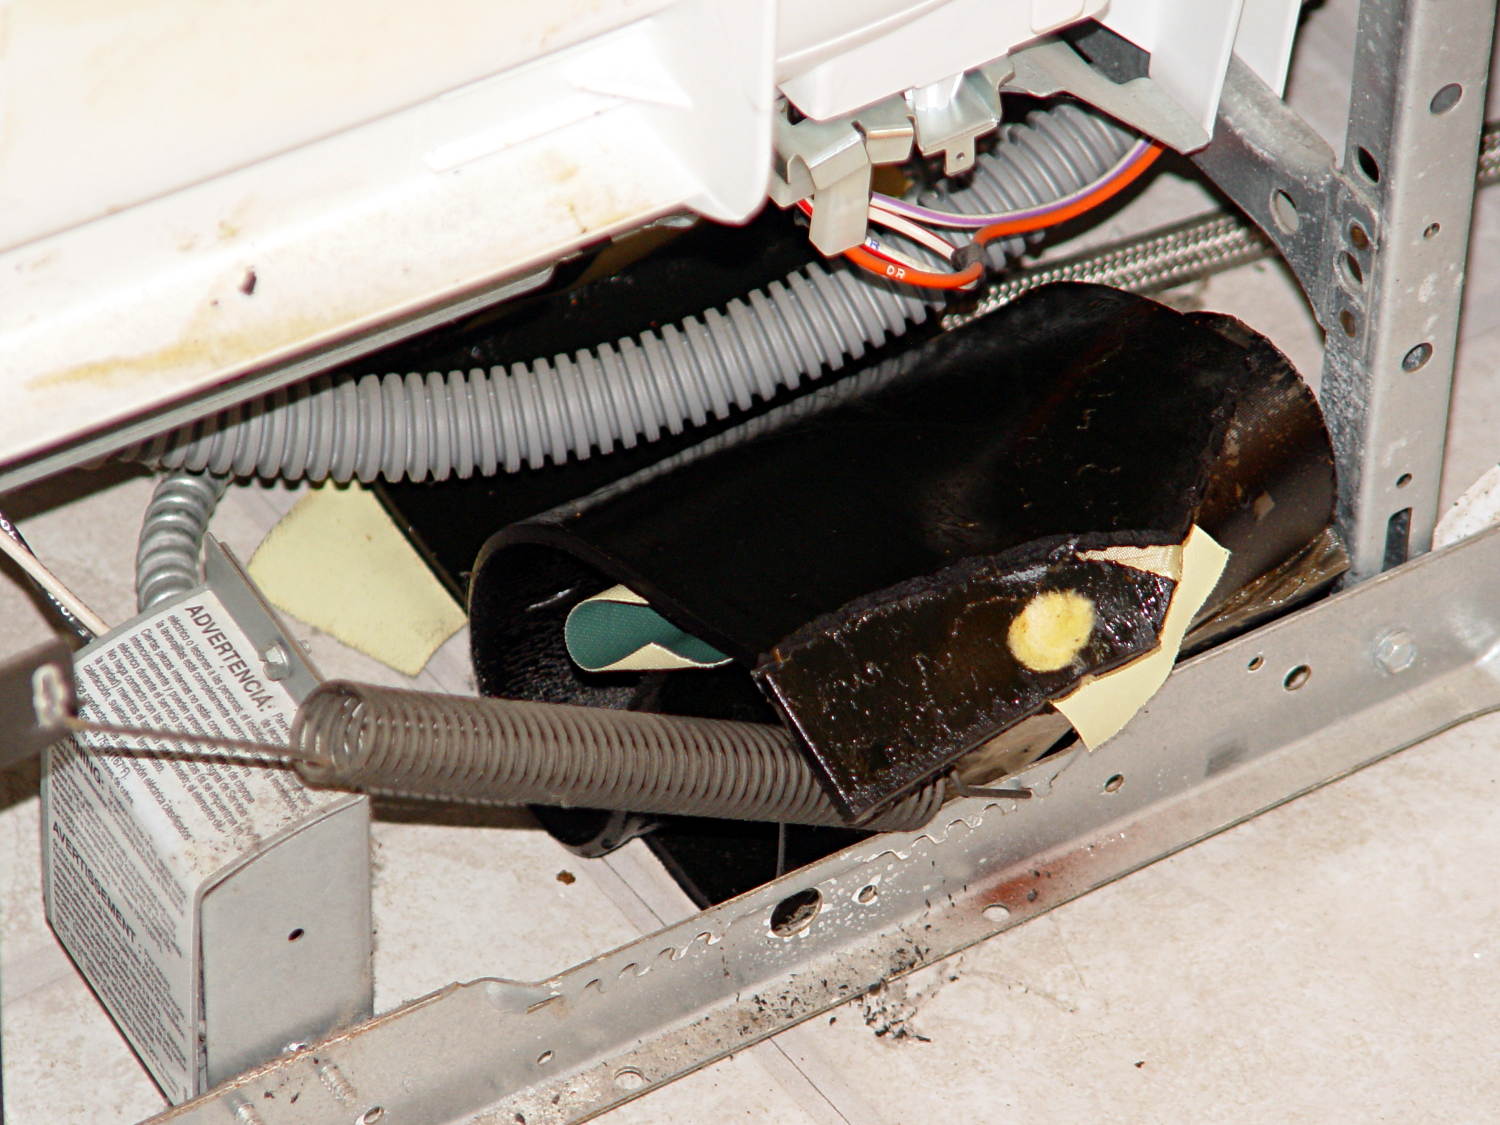
The springs balancing the dishwasher door started twanging again, which I now know is the diagnostic sign that an asphalt sound deadening sheet has slipped off the tub. A sheet on the right side almost perpetrated a clean escape, but the flap drooping over the spring gave it away:
Dishwasher sound deadener – slipped away
Another sheet on the left side was inching away, but hadn’t quite gotten over the fence:
Dishwasher sound deadener – slipping away
They’re pretty much a rigid solid at room temperature:
It puts one in mind of the pitch drop experiments now running in various labs. In this case, we now know it takes about four years for an asphalt sheet to slide completely off the tub; those two sheets were definitely in place when I buttoned it up after the previous one broke free.
I applied a heat gun to soften the sheets, then smoothed them around the tub again. This time I applied long strips of Gorilla Tape from one side to the other, rather than short strips of ordinary duct tape along the edges, and maybe this fix will outlast either the dishwasher or our tenure here, whichever comes first…