Ed Nisley's Blog: Shop notes, electronics, firmware, machinery, 3D printing, laser cuttery, and curiosities. Contents: 100% human thinking, 0% AI slop.
The LCD gibberish comes from an interaction with the camera shutter. It scrolls a lengthy set of instructions, but the peeling labels demonstrate ain’t nobody got time for that.
You were supposed to figure out how to use this thing with no instructions other than the scrolling display. In particular, the multi-multi-function keypad has no labels.
I suspect most folks just haul out their phones and call the tenant.
The IR sensor on the under-cabinet LED lights I installed half a dozen years ago became increasingly flaky. Its wall wart power supply was on the hot side of uncomfortably warm, so I had an obvious culprit.
The data plate says it’s UL Listed, which is comforting:
Flypower LED wart – data plate
The open-circuit output of a 12 VDC power supply should not look like this:
FlyPower 12V 1A – no load
The horizontal scale is 100 ms/div, so those ramps seem much more languid than you might expect from a 60 Hz wall wart.
Adding a 16 Ω load to draw maybe 750 mA got its attention:
FlyPower 12V 1A – 16ohm load
The average may be 12 V with too-large dips at the expected 120 Hz, but looky at all the hash riding the output!
No wonder the IR sensor was having such a hard time. When the LEDs are off the voltage ramps between 16 and 5 V. When it eventually turns on the supply has impossible noise levels.
So I cracked the case and extracted the electronics:
Flypower LED wart – components
Those caps over there on the left rear don’t look healthy, do they?
Flypower LED wart – failed caps
No. No, they don’t and you shouldn’t be able to see the wiring inside the inductor between them, either.
Probing the Box o’ Wall Warts produced a similar-ish wart that only required harvesting and splicing the teeny coax plug from the failed adapter to put the LED strips back into normal operation.
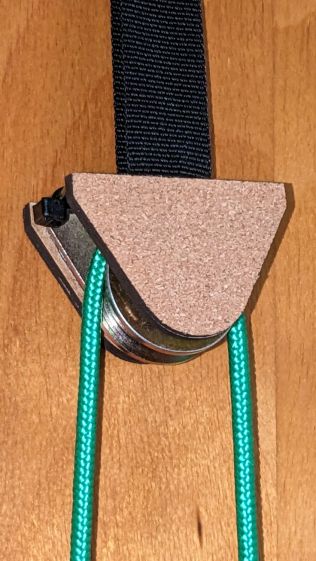
Mary’s PT requires a Shoulder Pulley, so I got one that seemed better constructed than the cheapest Amazon crap. In particular, this view suggested the pulley ran on a bearing:
Slim Panda Shoulder Pulley – detail view
Which turned out to be the case, but, also as expected, the whole thing required a bit of finishing before being put in service.
It’s intended to hang from a strap trapped between an interior door and its frame. The strap was intended to attach to the block (a.k.a. “Thickened base”) through a breathtakingly awkward pair of low-end carabiners:
Slim Panda Shoulder Pulley – carabiners
Which I immediately replaced with a simple, silent, sufficiently strong black nylon cable tie:
Shoulder PT Pulley – block hardware
Rather than let the metal block clunk against the door, it now sports a pair of cork-surfaced bumper plates:
Shoulder PT Pulley – side plates installed
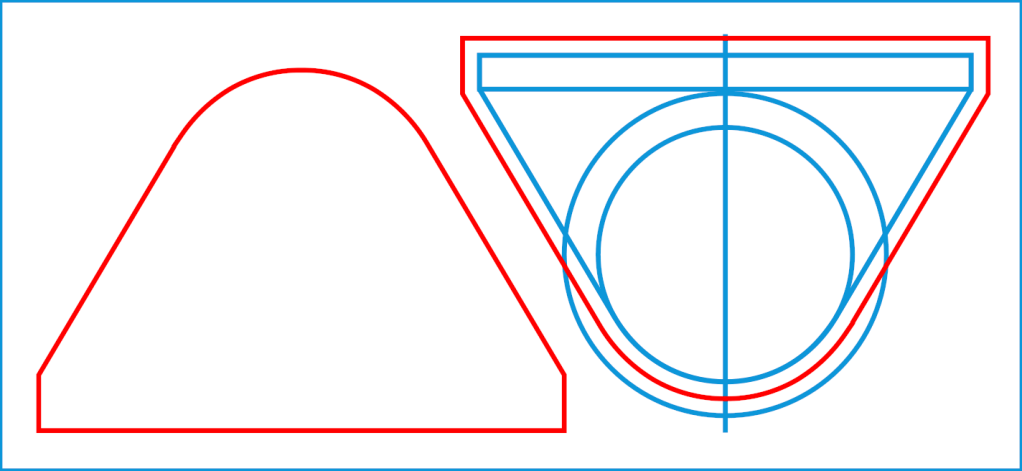
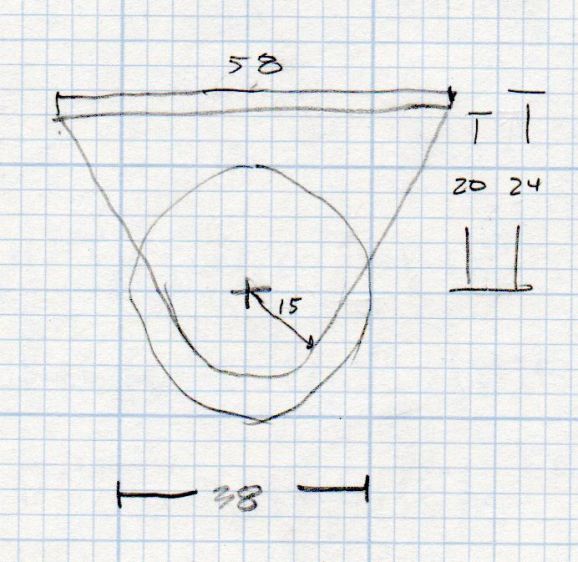
A doodle of the block dimensions:
Shoulder Pulley – dimension doodle
Which turned into a simple LightBurn layout:
Shoulder PT Pulley Side Plates – LB layout
The blue construction lines represent the actual block & pulley, with the red cut lines offset 2 mm to the outside to ensure the metal stays within the bumpers. It’s possible to pick the block up and whack the pulley against the door, so don’t do that.
Cut out two pieces of 3 mm MDF, two pieces from a cork coaster (covered with blue tape and cut with the paper backing up), peel-n-stick the cork to the MDF, put double-sided foam tape on the block, peel-n-stick the bumpers, then hang on the attic door.
Rt 376 had accumulated some sleet overnight and freezing rain was still falling. The driver apparently lost control around the curve, missed the fire hydrant behind me, and went up the embankment sideways at a pretty good clip.
As far as I can make out, the left front door took out the mailbox post, which was the stump of a utility pole installed long before we bought the property:
Mailbox killer – snapped post
Admittedly, the post was rotten around its base, but remained a substantial chunk of wood. The black plastic curl is the air deflector formerly sealing the front of the car’s undercarriage.
Seen from the far end of the debris field, the car smashed dead center into the mighty honeysuckle bush, shed a variety of small parts, recoiled backwards, and tagged the tree as it rolled down the embankment:
Mailbox killer – yard view
The mailboxes sit on the shoulder to the right of the car.
No serious injuries to the driver or passengers, although they got an ambulance ride to the ER to make sure.
Those dents just ain’t gonna buff out:
Mailbox killer – flatbed
I did get three years out of the repaired mailbox hinges and perhaps I should preemptively transfer the hardware to the new mailbox.


