The Smell of Molten Projects in the Morning

Ed Nisley's Blog: Shop notes, electronics, firmware, machinery, 3D printing, laser cuttery, and curiosities. Contents: 100% human thinking, 0% AI slop.

Tag: Improvements

Making the world a better place, one piece at a time

  • Monthly Science: Maria Mitchell Astronomy Notebooks

    Back in 2016, the Special Collection Library at Vassar put on Seeing the Sun: Maria Mitchell’s Observations, 1868-1888, an exhibit featuring materials from her tenure as Vassar’s astronomer, including several notebooks of observations and calculations. Being that type of guy, I spent quite a while pondering the effort required to do science.

    Perhaps this notebook appeared in the exhibit:

    Mitchell 8.6 - Longitude computations of occultations 1872-1875
    Mitchell 8.6 – Longitude computations of occultations 1872-1875

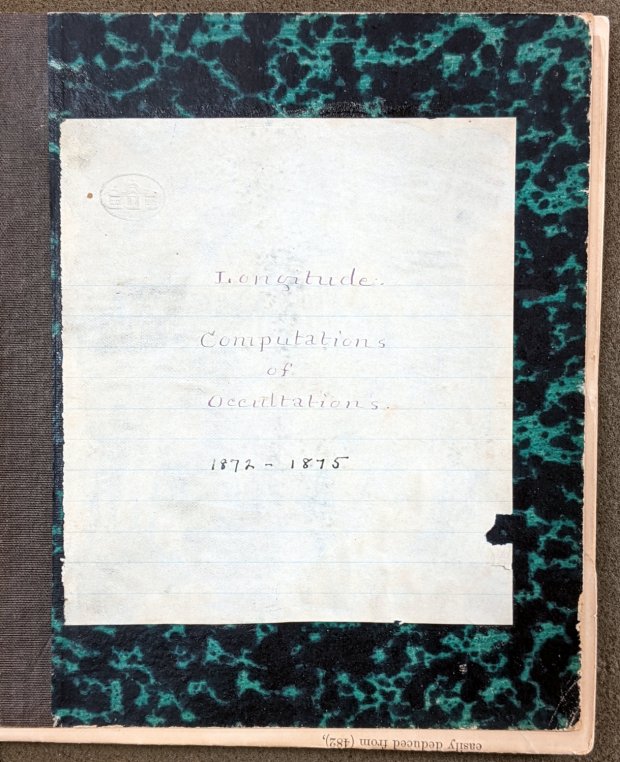
    Here’s what “calculations” looked like in 1872:

    Mitchell 8.6 p9 - Occultation of 1253 BAC at 11 hrs - calculation
    Mitchell 8.6 p9 – Occultation of 1253 BAC at 11 hrs – calculation

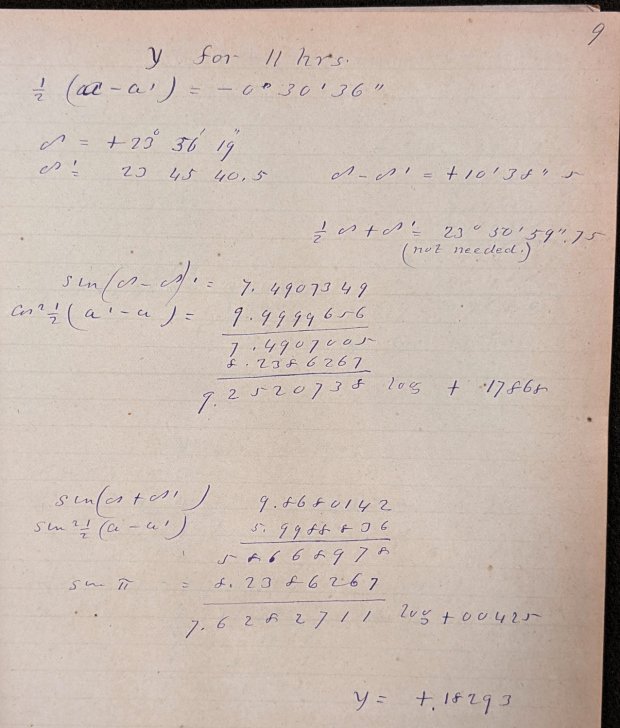
    Yeah, grinding out trigonometry by hand using seven-place logarithms:

    Mitchell 8.6 p9 - Occultation of 1253 BAC at 11 hrs - calculation detail 1
    Mitchell 8.6 p9 – Occultation of 1253 BAC at 11 hrs – calculation detail 1

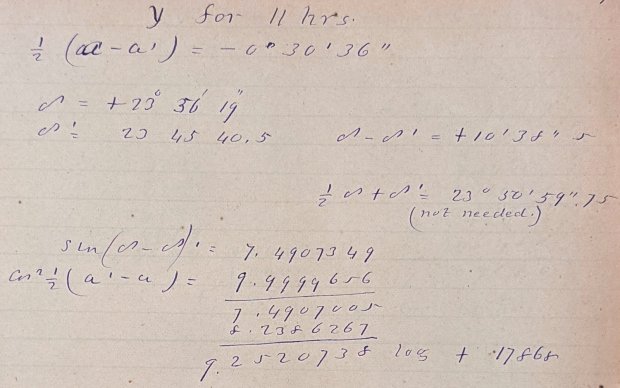
    Not just by hand, but by hand with pen and ink:

    Mitchell 8.6 p9 - Occultation of 1253 BAC at 11 hrs - calculation detail 2
    Mitchell 8.6 p9 – Occultation of 1253 BAC at 11 hrs – calculation detail 2

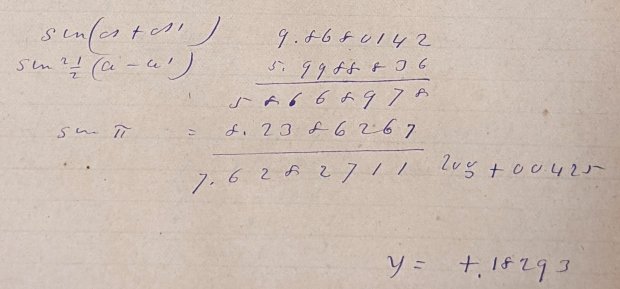
    Although you’ll find an occasional ink blot, she was probably using a fountain pen, rather than a dip pen, and made very few mistakes along the way. She often recorded direct instrument observations in pencil.

    The next time you start pissing & moaning about how hard solid modeling is, suck it up.

    Bonus: a Ginger Snap recipe suggesting it wasn’t all toil & trouble in the observatory:

    Mitchell 7.5 - Ginger Snap recipe
    Mitchell 7.5 – Ginger Snap recipe

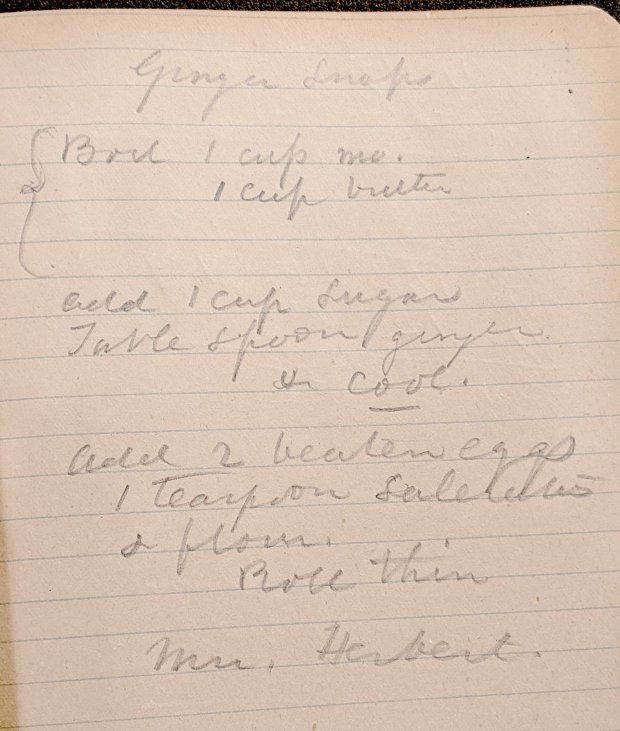
    The mystery ingredient is saleratus, “aerated salt”, now known as baking soda; they used potassium bicarbonate before today’s sodium bicarbonate.

    I spent several pleasant hours browsing through selected notebooks in search of computations, taking pictures of pages under field conditions in ambient light. All images from Maria Mitchell Papers, Archives and Special Collections, Vassar College Libraries.

  • HON Lateral File Cabinet Shelf Bumper Replacement

    Somewhat to our surprise, our “new” HON Lateral File Cabinets include a pop-out shelf:

    HON Lateral File - shelf - closed
    HON Lateral File – shelf – closed

    The trick: push the bar inward against fairly stiff spring pressure, release it suddenly, watch it pop out maybe half an inch, get some fingers under the front edge, then pull it outward:

    HON Lateral File - shelf - extended
    HON Lateral File – shelf – extended

    Obviously, opening the drawer above the shelf will sweep whatever you put there onto the floor and opening the drawer below seems futile. I suppose it produced a bullet item on the features list.

    Note that the topmost “drawer” is also called a “shelf”, because the front cover slides up-and-inward to reveal the contents. Should you stand eight feet tall, you might be able to look down on that shelf, but we mere mortals barely see its contents at eye level.

    Dismantling the cabinets preparatory to deep cleaning revealed a pair of rubber bumpers along the rear edge of the shelf:

    HON Lateral File - shelf bumper - installed
    HON Lateral File – shelf bumper – installed

    The slightly angled front side of the bumper (on the right) collides with a crossbar below the drawer just above it, preventing you from pulling the shelf entirely out of the cabinet.

    Remove the bumper by pressing down and rearward (to the left), shoving the protruding lip into the slot with a thumb / screwdriver, then pull it upward through the slot:

    HON Lateral File - shelf bumper - removed
    HON Lateral File – shelf bumper – removed

    The second cabinet had only one bumper, so I traced it twice onto a rubber sheet half as thick as the OEM bumper, bandsawed the shapes, and introduced them to Mr Belt Sander for cleanup:

    HON Lateral File - replacement shelf bumper
    HON Lateral File – replacement shelf bumper

    Jammed side-by-side into the slot, they’ll serve the purpose:

    HON Lateral File - replacement shelf bumper - installed
    HON Lateral File – replacement shelf bumper – installed

    As with the replacement foot on the first cabinet, they’re not the prettiest things you’ve ever seen, but Mary doesn’t expect to use the shelf and they’ll never actually bump into anything.

    Even the Pixel phone’s HDR image processing has trouble dealing with dark gray objects on a black background in dim light …

  • Refrigerator Coil Wand Adapter Rebuild

    After five years, the adapter between the Kenmore Progressive vacuum cleaner and the long wand required to reach inside the refrigerator evaporator coils broke at the latch opening:

    Kenmore Vacuum - refrigerator coil adapter - fracture
    Kenmore Vacuum – refrigerator coil adapter – fracture

    A quick fix let me continue the mission:

    Kenmore Vacuum - refrigerator coil adapter - temporary fix
    Kenmore Vacuum – refrigerator coil adapter – temporary fix

    A better fix required a few minutes of OpenSCAD tweakage and a few hours of hands-off build time:

    Refrigerator Coil Wand Adapter - Slic3r preview
    Refrigerator Coil Wand Adapter – Slic3r preview

    The fitting ID is now 2 mm smaller, the 3D honeycomb infill is 25%, and (contrary to the picture) it now has 4 perimeter threads. It’s a two-line change from the last time:

    OEMTube = [35.0 - 2.0,35.0,41.7,40.5,30.0];           // main fitting tube
    … then, inside MaleFitting() …
    cylinder(d1=OEMTube[ID2],d2=OEMTube[ID1],h=2*OEMTube[LENGTH] + 2*Protrusion);

    Those will propagate to anything I build from now on, although this is the first latch fracture.

    Gotta love it when 3D printing lives up to the hype!

  • The Return of High-Reliability / High-Availability Trash Cans

    The Return of High-Reliability / High-Availability Trash Cans

    Five years ago, robotic trash cans were a thing on Vassar’s campus, including this duo in front of Vassar’s library:

    Vassar Library - Trash and recycling containers
    Vassar Library – Trash and recycling containers

    That was then, this is now:

    Vassar Library trash cans
    Vassar Library trash cans

    I infer the robotics did not work out as anticipated.

  • Bird Box Entrance Reducers: Round 2

    One of the bird box entrance reducers I installed nigh onto a decade ago is still on duty, although downy woodpeckers definitely want a larger hole:

    Bird Box - gray PVC pipe reducer - woodpecker damage
    Bird Box – gray PVC pipe reducer – woodpecker damage

    Another reducer had gone missing over the years, so I made one from a length of PVC pipe:

    Bird Box - PVC pipe reducer - shaping
    Bird Box – PVC pipe reducer – shaping

    It started as 1-½ PVC pipe, 1-⅞ inch actual OD and should fit into a 1-½ hole, so I measured 1.5 × 3.15 around the circumference, bandsawed out the excess, draped it over a 1-½ Forstner bit, toasted it with a heat gun, and squashed it so it’s just a little bit bigger than the (enlarged!) hole in the box.

    Now the entrance is 1-¼ (-ish), just like it should be:

    Bird Box - PVC pipe reducer - installed
    Bird Box – PVC pipe reducer – installed

    The bird box in the front yard has been attracting starlings, in addition to serving as a hawk perch:

    New Coopers Hawks - bird box takeoff whoops
    New Coopers Hawks – bird box takeoff whoops

    The oblong hole required advanced manufacturing techniques:

    Oval Entrance Reducer
    Oval Entrance Reducer

    The front face should be too slick for larger birds and the little ones will zip right into the hole:

    Bird Box - 3D printed entrance reducer
    Bird Box – 3D printed entrance reducer

    The two starlings who’d been evaluating the box seem to have moved on; we doubt they’re now homeless.

    The OpenSCAD source code as a GitHub Gist:

    // Bird Box – oval entrance reducer
    // Ed Nisley KE4ZNU 2020-02-12
    //- Extrusion parameters must match reality!
    // Print with 3 shells and 3 solid layers
    ThreadThick = 0.25;
    ThreadWidth = 0.40;
    HoleWindage = 0.2;
    function IntegerMultiple(Size,Unit) = Unit * ceil(Size / Unit);
    Protrusion = 0.1; // make holes end cleanly
    inch = 25.4;
    //———————-
    // Dimensions
    EntranceID = 1.25 * inch;
    BoxHole = [1.5,2.25] * inch;
    BoxWall = 0.75 * inch;
    HoleOC = BoxHole.y – BoxHole.x;
    FlangeWidth = 5.0;
    FlangeThick = 5*ThreadThick;
    $fn = 12*4;
    //——————-
    // Build it
    difference() {
    union() {
    linear_extrude(height=BoxWall + FlangeThick)
    hull()
    for (j=[-1,1])
    translate([0,j*HoleOC/2])
    circle(d=BoxHole.x);
    linear_extrude(height=FlangeThick)
    hull()
    for (j=[-1,1])
    translate([0,j*HoleOC/2])
    circle(d=BoxHole.x + 2*FlangeWidth);
    }
    translate([0,0,-Protrusion])
    cylinder(d=EntranceID,h=2*BoxWall);
    }

  • Kensington Expert Mouse Scroll Ring Fix

    Apparently the newest Kensington Expert “Mouse” trackballs have a hack re-orienting the scroll ring quadrature detector. The picture from my original writeup shows the previous situation:

    Scroll ring IR emitter-detector quadrature pair
    Scroll ring IR emitter-detector quadrature pair

    The quadrature detector, the black block on the left, is oriented with its lens (and, thus, the actual detectors) pointed away from the IR emitter. I thought it might be an assembly screwup, but it’s actually worse: the PCB layout is wrong.

    A note from Tristan in NZ explains the situation:

    So I have a later model than yours. It has a 2nd PCB chunk between where the legs normally would be. Just a floating piece with two holes for the legs, holding the legs from the board […] to the main board.It is also pointing the correct way (with the lens towards the three leg emitter).

    Kensington scroll wheel revision2
    Kensington scroll wheel revision2

    The new quad detector has only three pins and no convex lens, but the active area now faces the emitter across the gap.

    Because the interposer PCB occupies the space previously devoted to the emitter & detector leads, Kensington apparently soldered the new parts directly to the top surface without any clearance:

    It’s like they failed to put through-vias to the rear or didn’t route them to the bottom another way, hence the solder is under the component

    Tristan managed to wreck the detector while attempting to re-solder the intermittent joints, a situation I’m painfully familiar with. He replaced it with a quad detector harvested from a mid-90s optical mouse and it’s back in operation.

    So I think the correct “fix” for the old-style PCBs (without the new interposer) is to unsolder the detector, rotate it so the lens faces the emitter, then somehow rewire the pins to the original pads. This won’t be easy and definitely won’t be pretty, but as long as it’s pointed in the right general direction it should work:

    mine works off axis quite a bit

    Should either of my Expert Mouse trackballs fail, now I know what to do

    Many thanks to Tristan for reporting his findings!

    Update: A note from Alan brings more data to the discussion

  • Video-rated MicroSD Card Status Report

    Having just returned from the fourth ride of the season, it’s worthwhile to note how the MicroSD cards in the cameras are doing.

    The Sony HDR-AS30V helmet camera has been running a 64 GB Sandisk high-endurance video-rated card since late August 2017:

    Sandisk - 64 GB MicroSDXC cards
    Sandisk – 64 GB MicroSDXC cards

    In those 29 calendar months (maybe 20 riding months) I’ve ridden 4500-ish miles at perhaps 12 mph, so call it 375 hr = 22.5 k min. The camera fills a 4 GB file every 22.75 min, so it’s recorded 1000 files = 4 TB, which is 62× its capacity. This is better than the defunct Sandisk Extreme Pro card (3 TB & 50×) and much much better than the Sony cards (1 TB & 15×), although I have caught the camera in RCVR mode maybe twice, which means the card or camera occasionally coughs and reformats itself.

    The Cycliq Fly6 rear camera uses a Sandisk 32 GB card that’s been running flawlessly since late 2017:

    MicroSD 32 GB - Samsung EVO and SanDisk High Endurance
    MicroSD 32 GB – Samsung EVO and SanDisk High Endurance

    The new 16850 lithium cell continues to work fine, too.

    The SJCam M20 rear camera also uses a Sandisk 32 GB high-endurance card and has worked fine since early 2018. An external battery eliminated all the hassle of its feeble internal batteries, although the one that’s been in there has faded to the point of just barely keeping the clock ticking over during winter weeks without rides:

    SJCAM M20 Mount - Tour Easy side view
    SJCAM M20 Mount – Tour Easy side view

    All in all, paying the premium for video-rated MicroSD cards has been worthwhile!