Ed Nisley's Blog: Shop notes, electronics, firmware, machinery, 3D printing, laser cuttery, and curiosities. Contents: 100% human thinking, 0% AI slop.
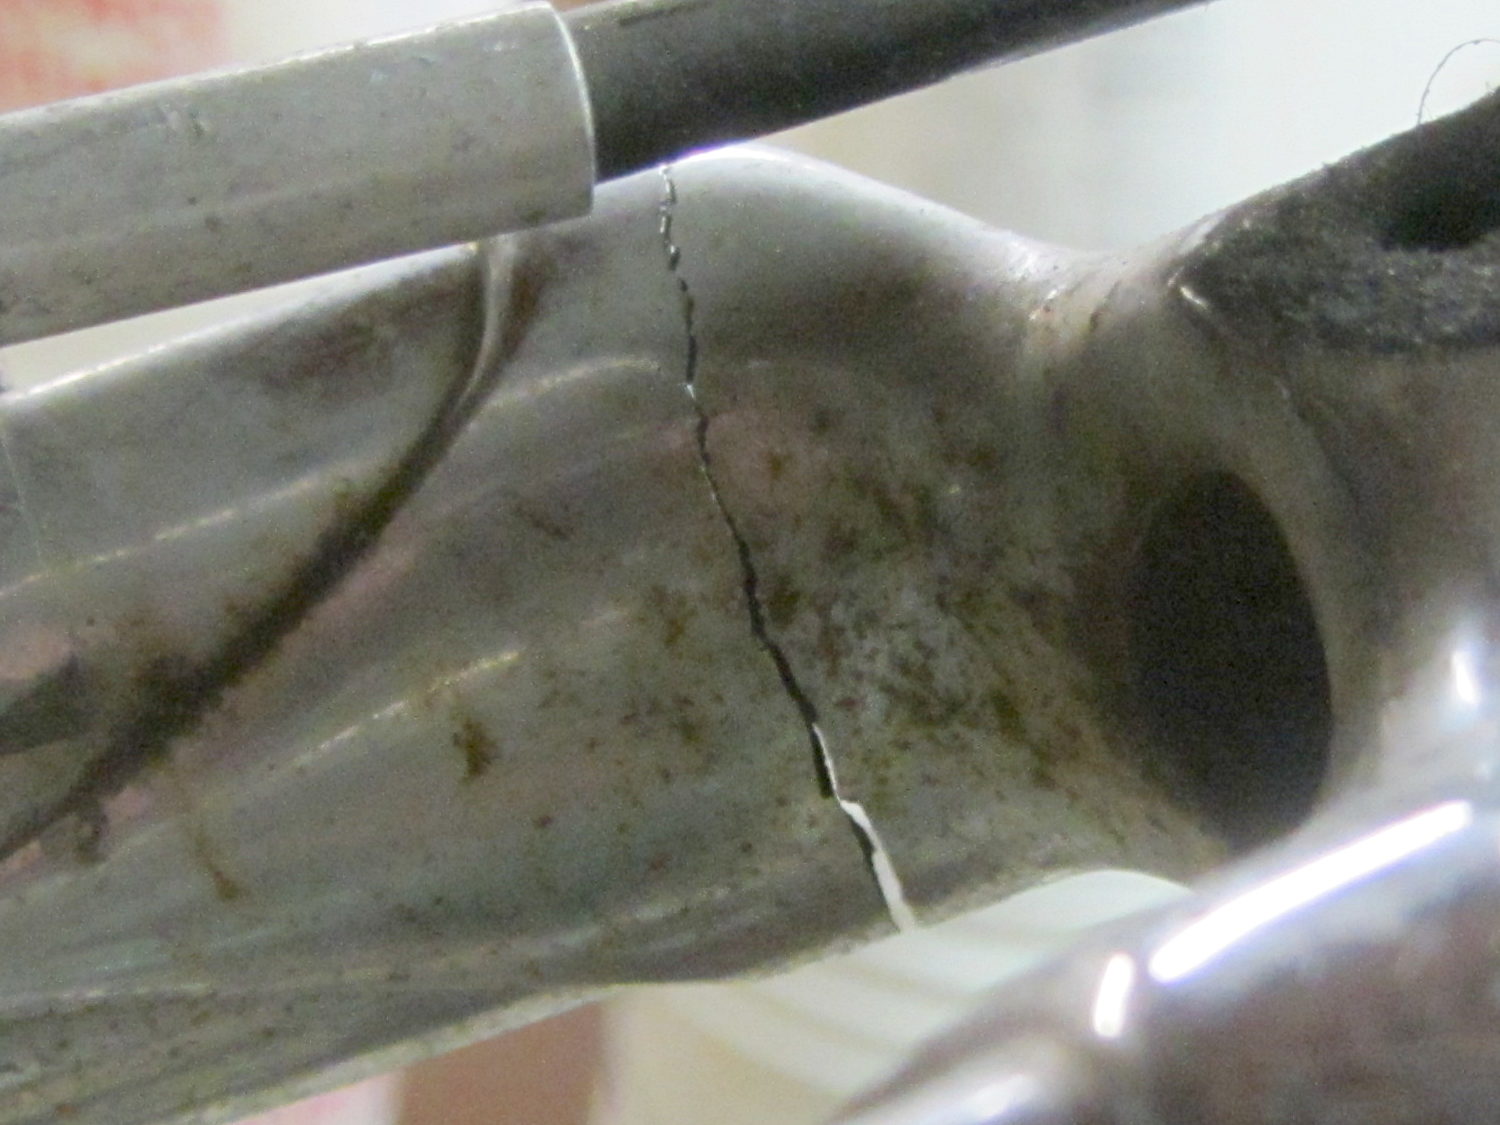
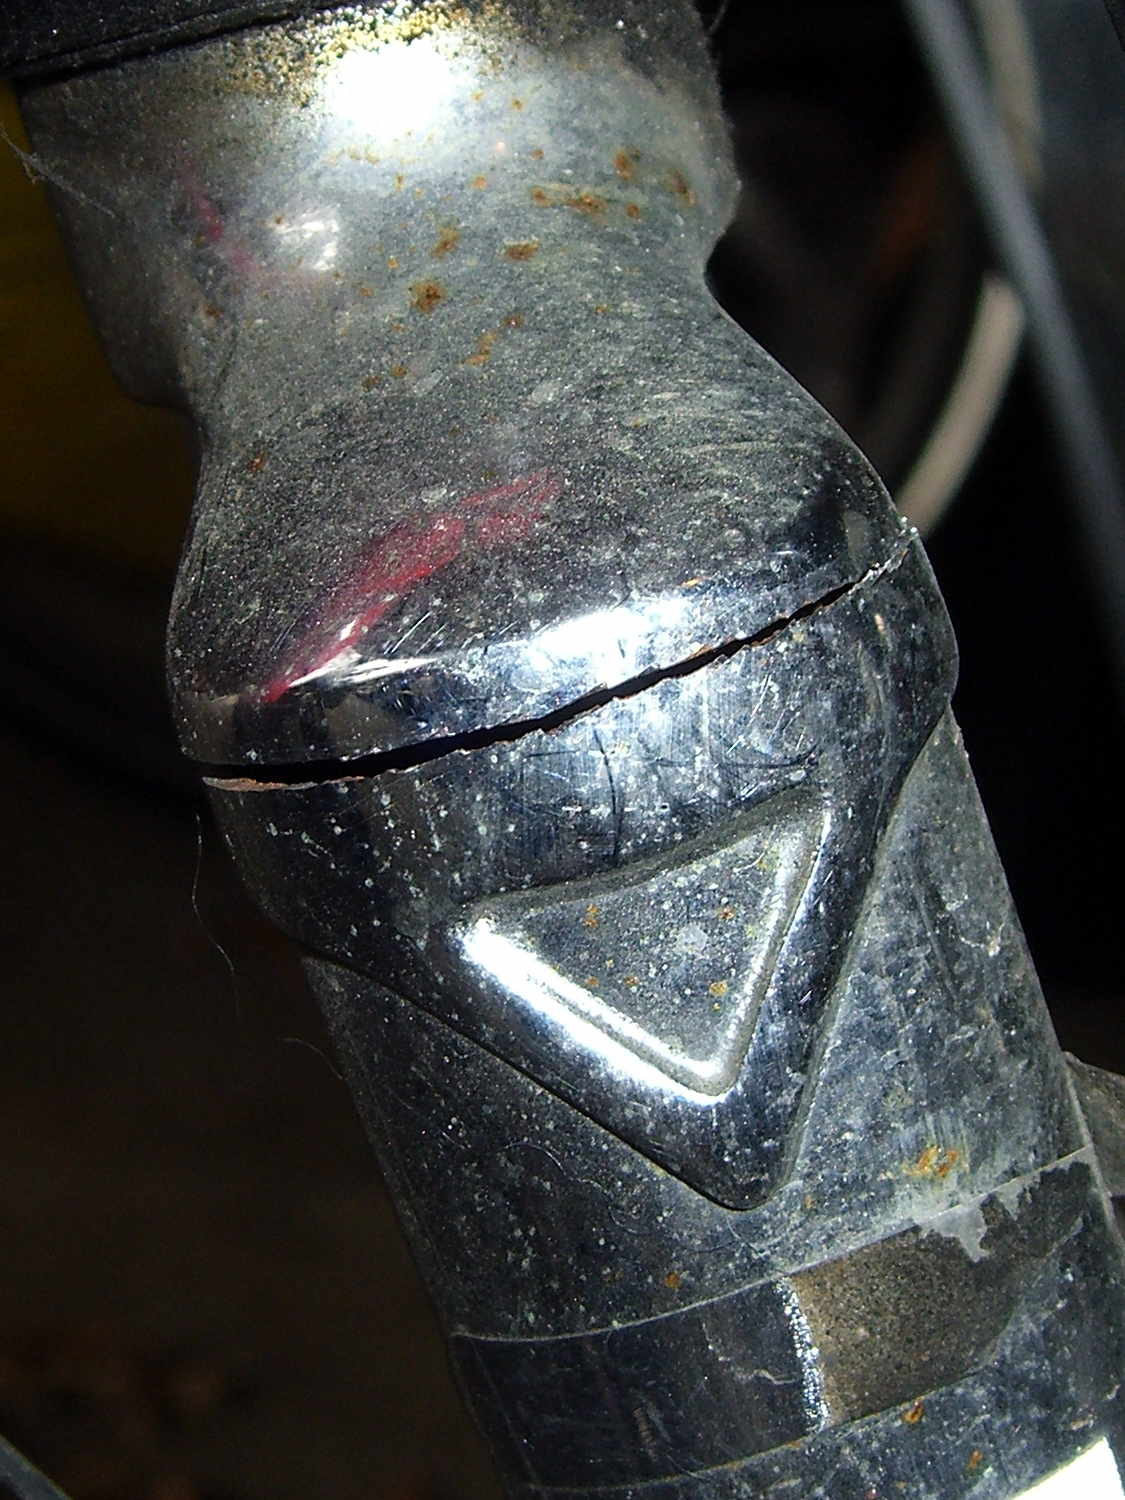
A view from the wheel side shows the crack in my Tour Easy’s fork lug had opened a bit more to the rear, which is about what you’d expect from the forces involved:
Tour Easy – cracked fork lug
Removing the handlebar stem from the fork steerer tube requires removing the fairing, its mounting brackets, the fender, a speed sensor, then snipping cable ties to release all the cables and wires. Minus the prep work, removing the fork from the bike isn’t anything special.
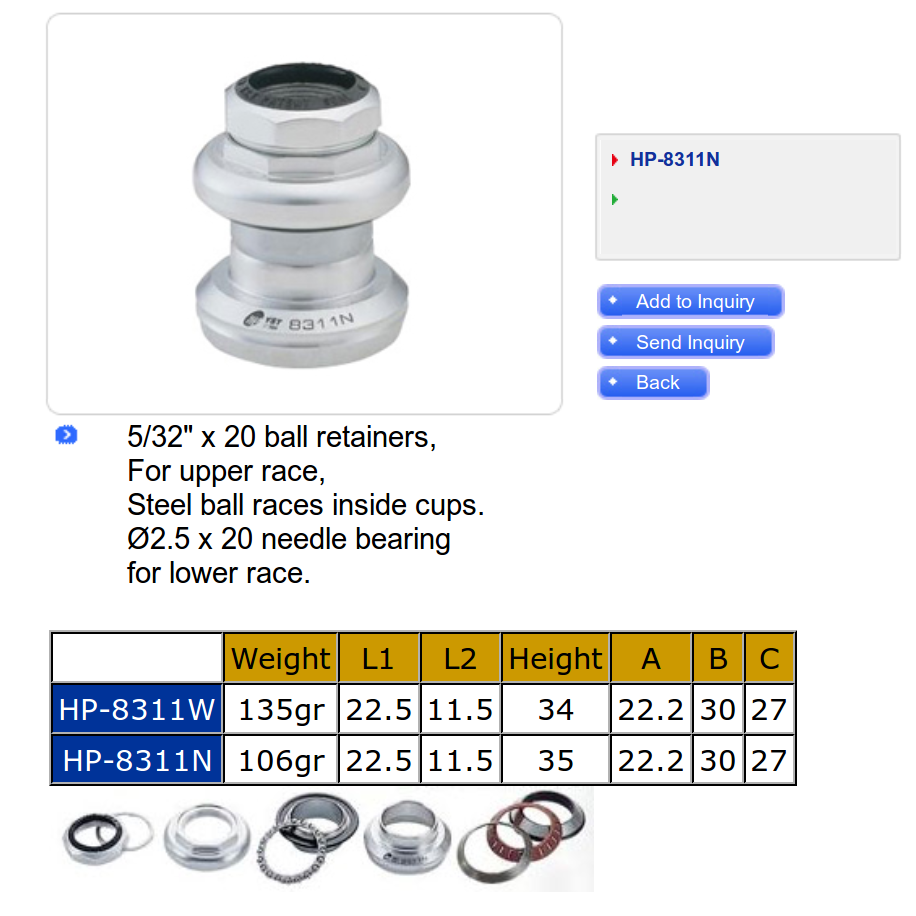
The lower bearing (a YST 8311N in black) has rollers, not balls. The headset has J.I.S. 1 inch dimensions, captured in a screen grab to forestall link rot:
YST 8311N headset data
Which means cheap & readily available ISO standard headsets aren’t a drop-in replacement. The incomparable Harris Cyclery has J.I.S. ball-bearing headsets in stock and their Tange Levin CDS HD1002 needs just 1.6 mm of additional washer to match the YST’s 35 mm stack height…
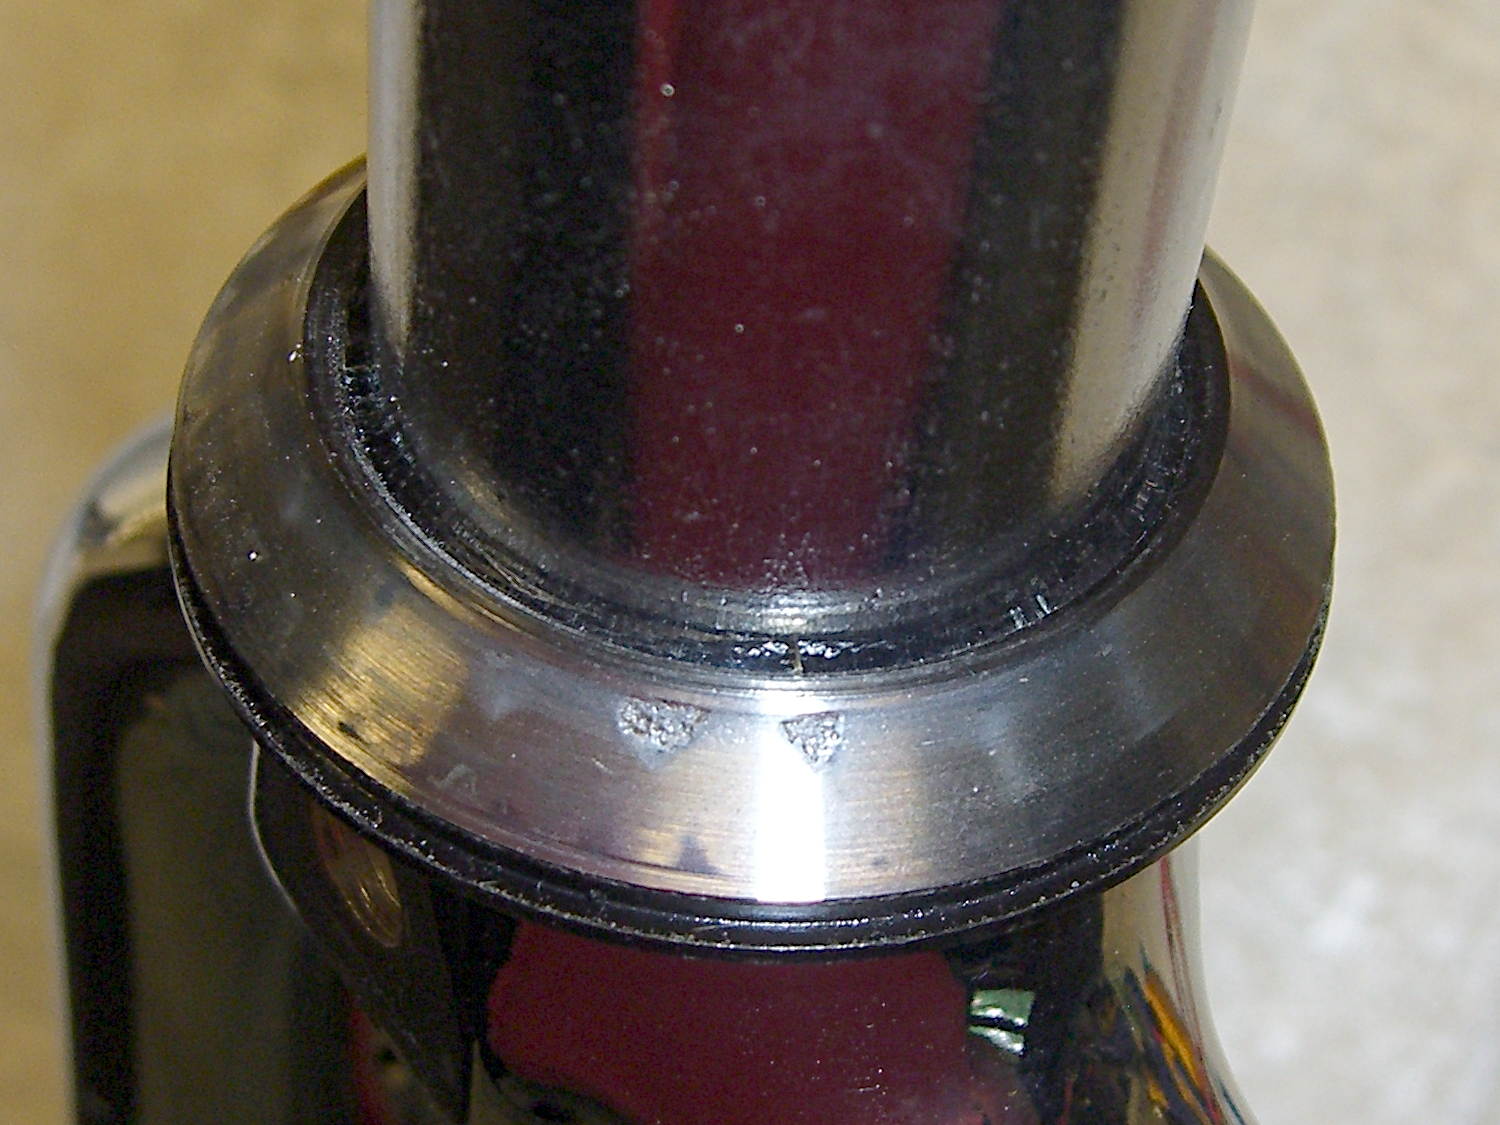
The front side of the crown got rather graunched over the last 14 years, but I punted the problem by rotating the race half a turn to put the eroded spots toward the rear, where they’ll be under minimal stress:
Tour Easy crown bearing – damage
Re-seating the race brought an ancient Headsetter tool from the drawer:
Tour Easy fork with Headsetter
It’s basically galvanized pipe, chamfered on one end, with a set of nuts & washers on a length of all-thread rod just slightly too short for the occasion: this might be the second time I’ve used the thing and I had to supply my own all-thread & nuts. Ah, well, it probably predates the Tour Easy’s design by a decade.
The lower headset race looked to be in pretty good shape, so I left it alone. Normally, such bearing damage gives you indexed steering, but Tour Easy handlebars provide so much lever arm that nothing interferes with the bike’s steering.
The new fork didn’t have a notch for the keyed washer isolating the locknut from the upper bearing race. The usual advice is to file off the key and apply threadlocker, which makes adjusting the two nuts tedious, so I restored the notch in the steerer threads:
Tour Easy – filed steerer tube key slot
Yes, that’s a lethally sharp steel shaving from the not-very-well-reamed ID curling up in the middle of the notch.
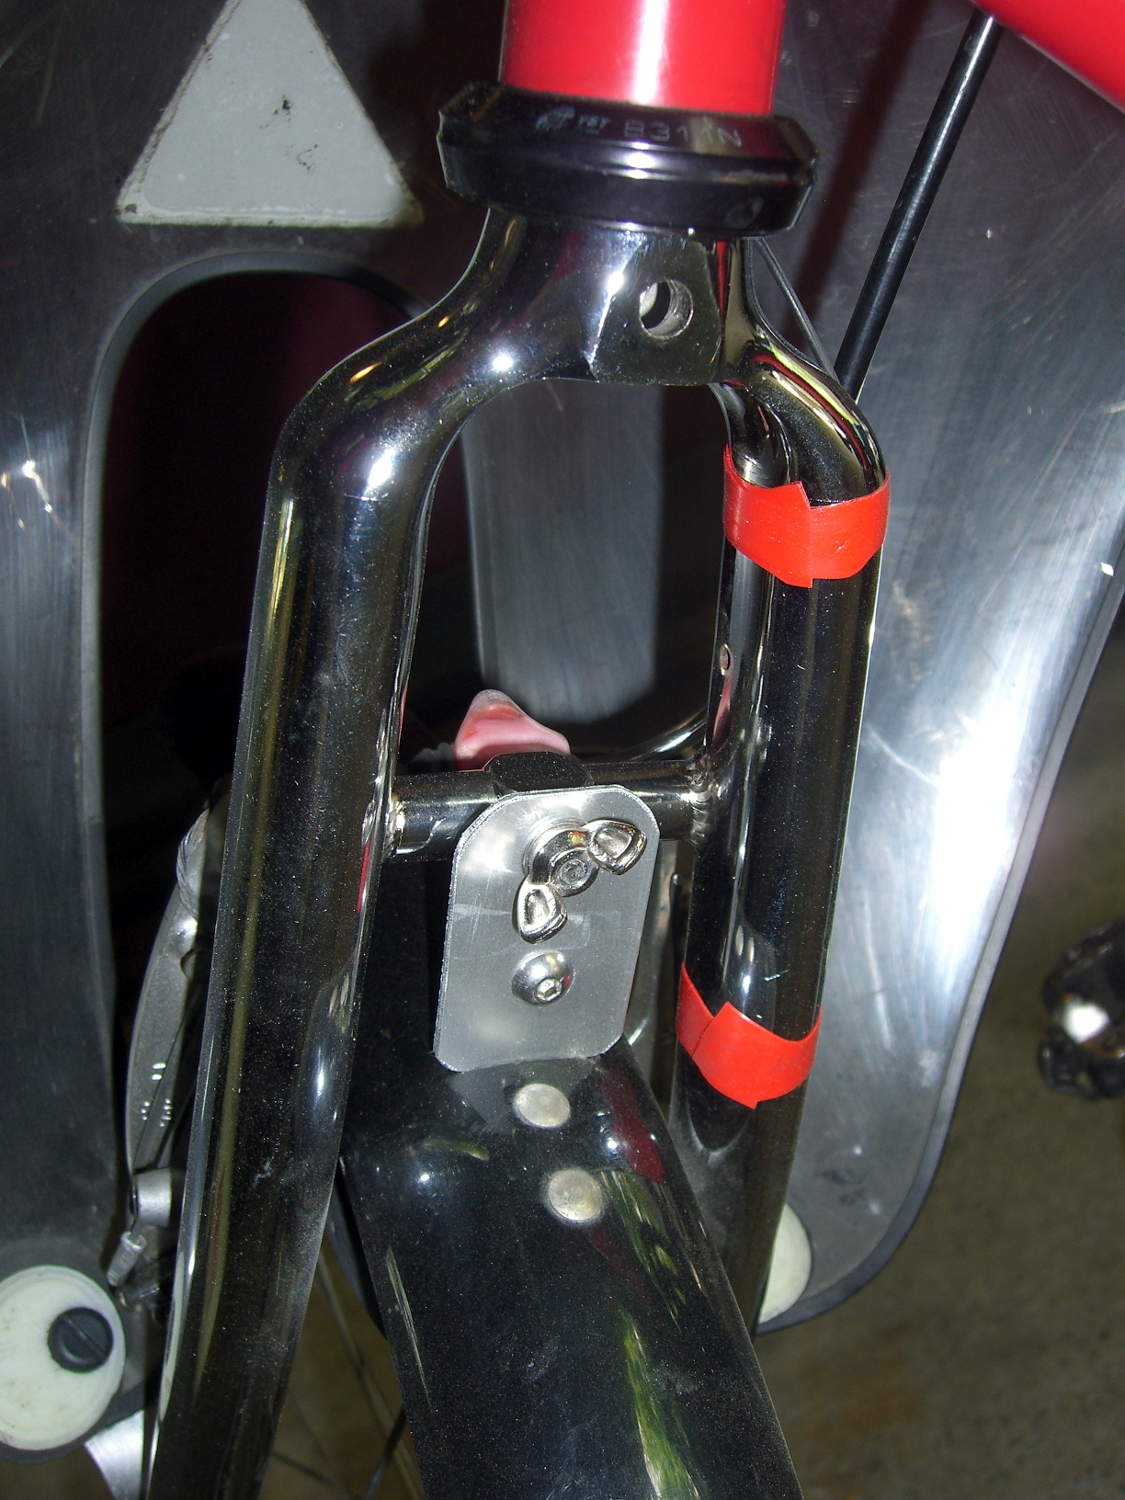
The fender mount bridge on the new fork sits half an inch higher in relation to the brake bosses, putting the fender against the V-brake cable hardware. Anything touching the V-brake messes up the pad-to-rim alignment, so I conjured a snippet of aluminum to lower the fender just enough to clear the brakes:
Tour Easy – new fork – fender extender
I think that calls for a nice 3D printed bracket, too, but the snippet got me back on the bike faster. When I preemptively replace the fork on Mary’s bike, then I’ll do a proper bracket for both of us.
The garish red silicone tape replaces the previous black cable ties. It matches the tube paint surprisingly well and doesn’t look good on the fork, so I’ll replace it with cable ties in due course.
A few miles of shakedown riding settled the crown race against the fork, another 1/6 turn of the upper race / lock nut snugged up the bearings, and it’s all good again.
Wow, it’s great to be back on the bike!
(Due to the vagaries of writing this stuff up ahead of time, there’s actually two weeks of realtime between the post that appeared on Monday and this one.)
The fairing on my Tour Easy started making unusually loud booming sounds while we were out on an errand, so when we got home I poked around the front end to see what had worked itself loose. I finally managed to produce the sound, which turned out to be due to a very small motion in the fork:
Cracked Tour Easy Fork
That’s after 14 years and maybe 30,000 miles, so I’d say it did pretty well, all things considered.
On an upright bike a front fork failure kills you: the broken blade rotates forward, jams into the ground, and flips you over the handlebars. I rode about 8 miles with a broken fork and nothing exciting happened.
The Tour Easy’s design dates back to the mid-1970s, when custom bike parts weren’t readily available, and the front fork seems sized for 26 inch tires. A tubular bridge welded across just over the 20 inch (37-406) tire provides a fender mount, stiffens the blades, and, in my case, acts as a second bridge. On my bike, the fork supports the polycarbonate fairing and the Phil Wood hub provides an absolutely rigid connection between the blade dropouts.
For reference, the headset uses J.I.S 1 inch dimensions, with a 27.0 mm ID crown bearing. The stack height runs around 35 mm, but I don’t know the head tube ID.
A pair of forks are on their way; I’ll replace the one on Mary’s bike before it fails…
It’s the start of a new riding season and we’re returning from a concert at Vassar. I’m cranking 20+ mph, pushed by a gusty tailwind.
T minus 7 seconds:
Cedar Valley Rd – Left Cross – T-7
The white car approaches the intersection a bit faster than usual, which leads me to expect a New York State Rolling Stop-and-Go right turn directly in front of me.
T minus 5 seconds:
Cedar Valley Rd – Left Cross – T-5
The white car slows enough that I now expect a stop with the front end well onto the shoulder. A quick check in the mirror shows no traffic behind me: I can take the lane if needed. This intersection always has a large gravel patch spanning the shoulder, so I must move closer to the fog line anyway.
T minus 2 seconds:
Cedar Valley Rd – Left Cross – T-2
The white car comes to a full stop, not too far onto the shoulder, and my fingers come off the brakes. I gotta work on that fingers-up position, though.
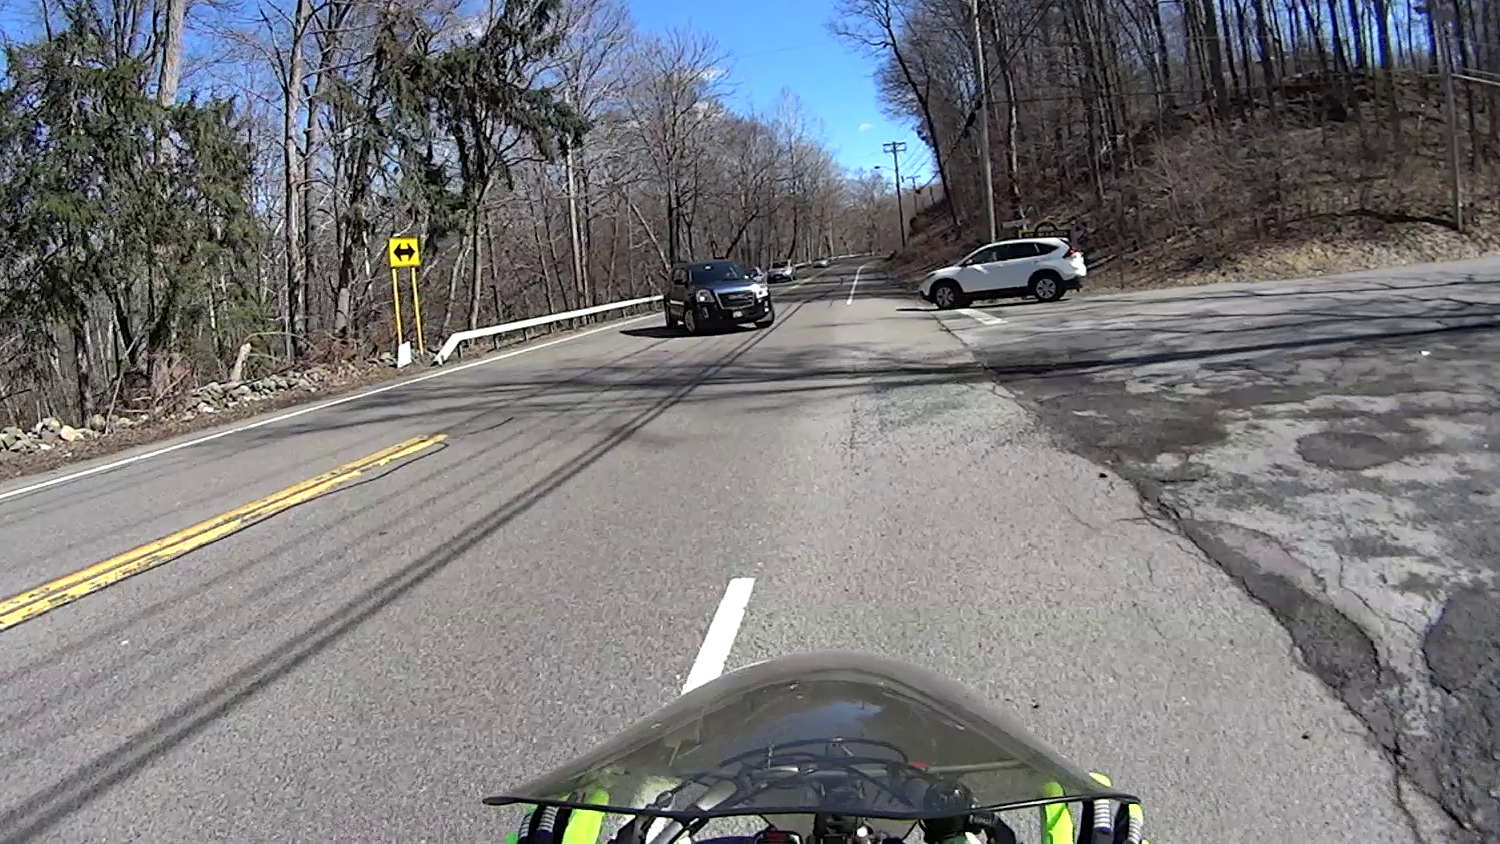
… Whoops, a classic left cross from the black SUV!
T minus 1 second:
Cedar Valley Rd – Left Cross – T-1
I’m now braking hard, barely to the left of the gravel patch.
T zero:
Cedar Valley Rd – Left Cross – T-0
Well, that was close.
Somewhat to my surprise, the white car hasn’t crept any further onto the shoulder.
The SUV driver gives me a cheery wave, as if to thank me for not scratching the doors. I never make hand gestures, but I did tell him he does nice work.
It is, apparently, easy to mis-judge a bike’s speed, although driver-ed courses used to recommend that you err on the side of not trying to beat an oncoming vehicle. Perhaps that recommendation has become inoperative?
The corresponding maneuver by a car passing you is known as a right hook.
Memo to Self: Always look at the license plate to give the camera a straight-on picture.
I’d originally secured the rear fender to the steel strap connecting the chainstays on Mary’s Tour Easy with a cable tie: small, simple, light weight, reliable. Unfortunately, that put the end of the fender just slightly lower than the strap and, I fear, sprayed water all over the strap, where it worked its way through a paint flaw and rusted the steel under the paint. A simple metal clip would chew its way through the pain[t] on the strap, so, seeing as how we’re living in the future…
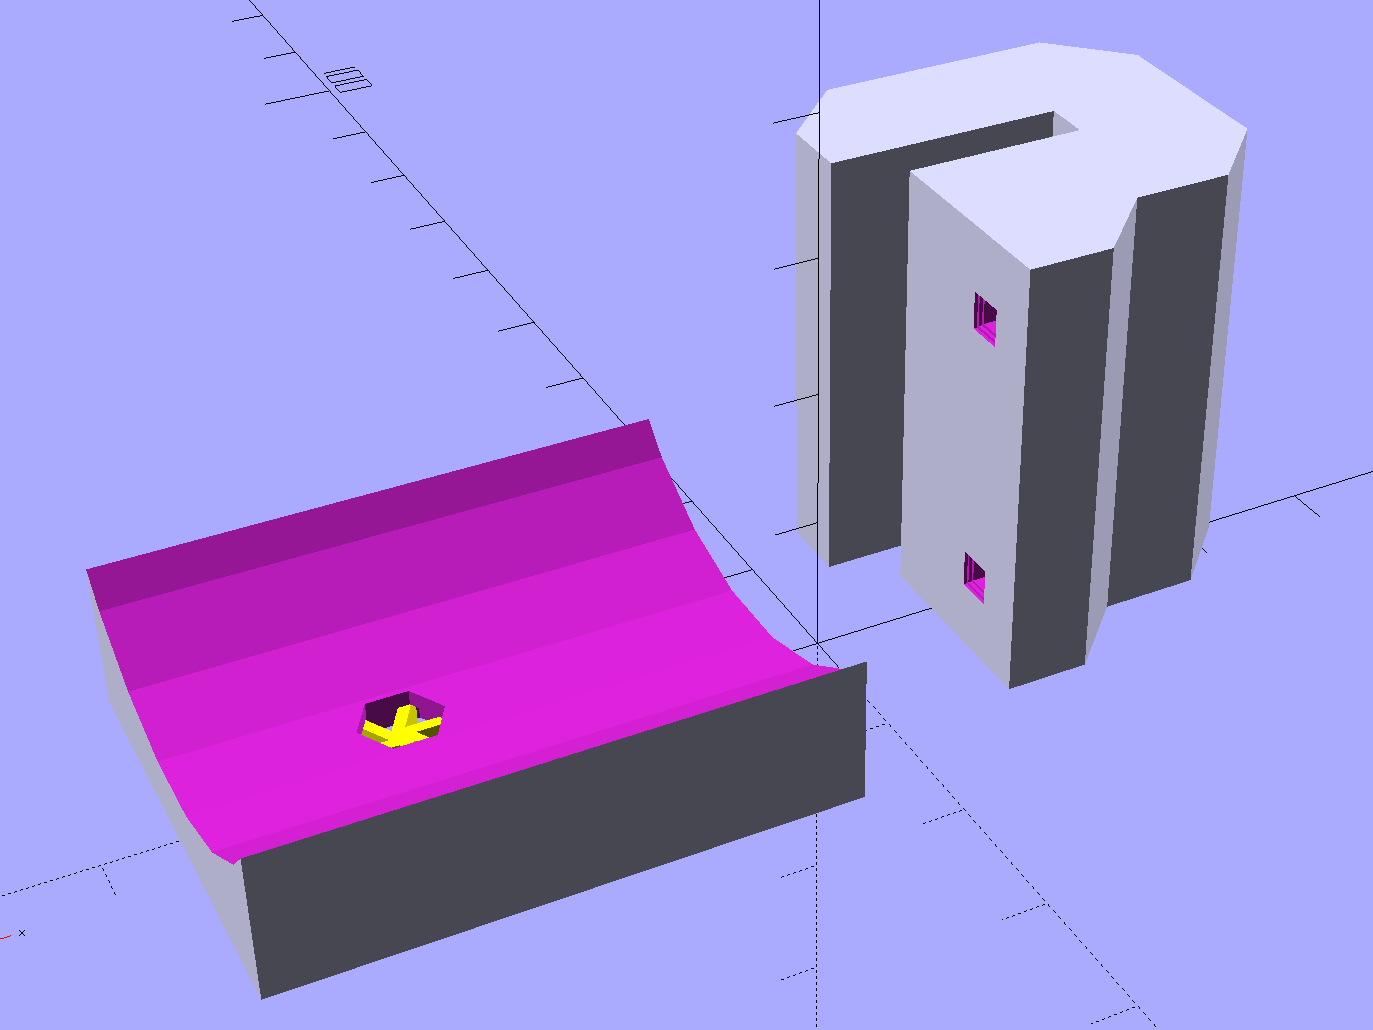
The C-shaped block on the top grips the steel cross-strap, the trough fits the fender’s curve, the little spider supports the inside of the nut recess, and a pair of alignment pin holes (one visible) help during gluing:
Tour Easy Rear Fender Bracket – solid model – show
Although it’s tempting to 3D print both parts as a single unit, laying them out like this aligns the threads for best strength in each piece:
Tour Easy Rear Fender Bracket – solid model – build
Pressing the bracket on the glass slab (flat side up, nubblies on the bottom) with the clamps in place finished the job. The slightly crushed support spider from the nut recess sits in the foreground:
Tour Easy rear fender bracket – gluing
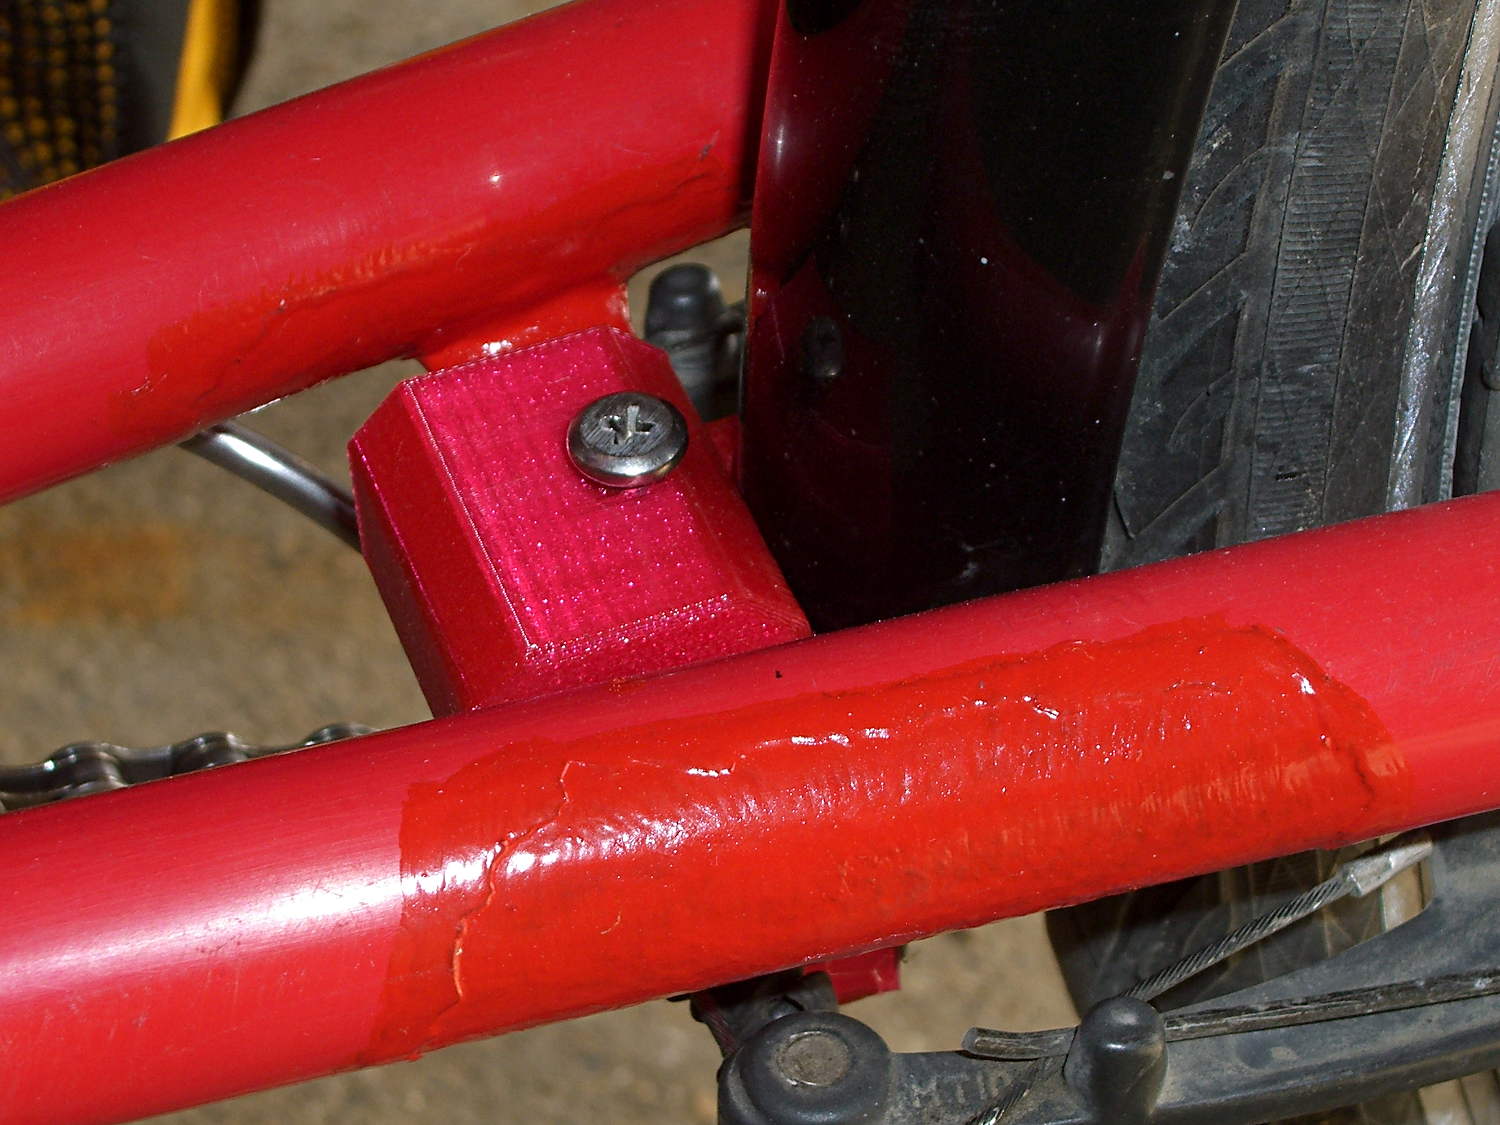
Magenta PETG matches the red Tour Easy paint surprisingly well:
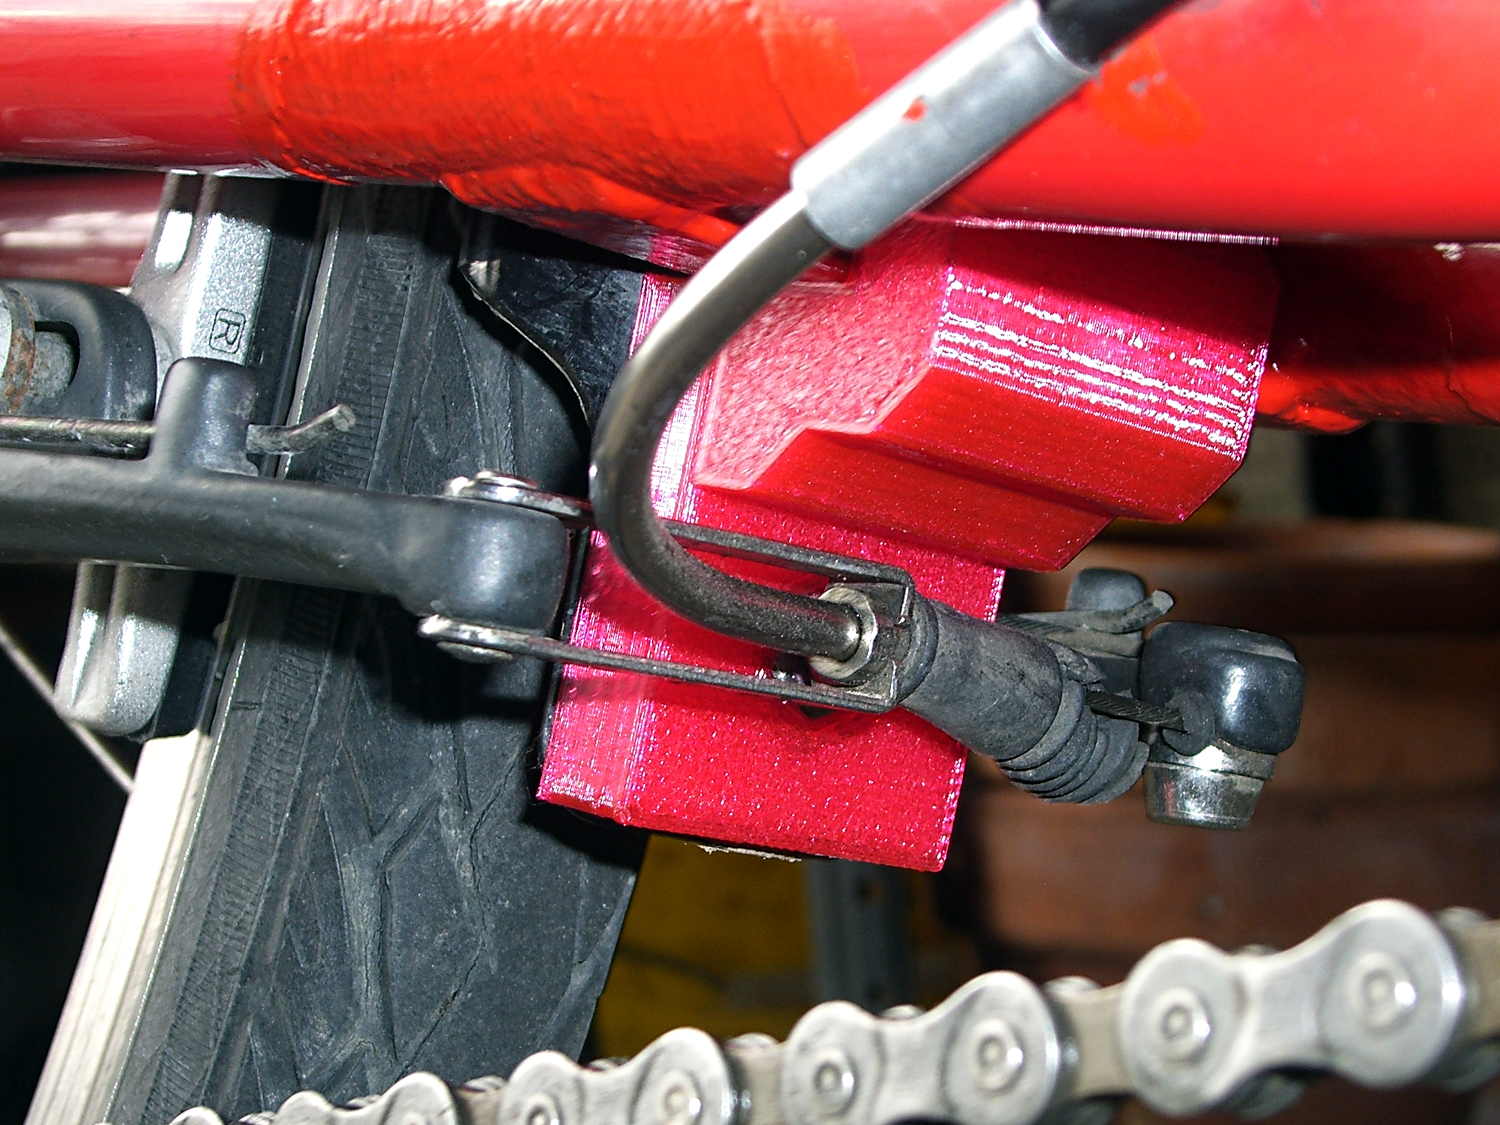
Tour Easy – rear fender bracket – installed – top
From below, you can see why the top block can’t extend all the way to the bottom of the fender mount:
Tour Easy rear fender bracket – installed
That rubber boot needs replacing in the worst possible way, but I didn’t have anything suitable on hand and wouldn’t dismount that cable even if I had; cables never go back on properly.
Alas, because the brakes weren’t mounted when I did the measurements, I had to build one to find out why a long block wouldn’t work:
Tour Easy rear fender bracket – long back
The screw atop the block (on the left in that picture) presses a small plastic slug against the steel strap, in the hopes it won’t chew through the paint quite as rapidly. The screws & nuts are stainless, so at least they’ll survive for a while.
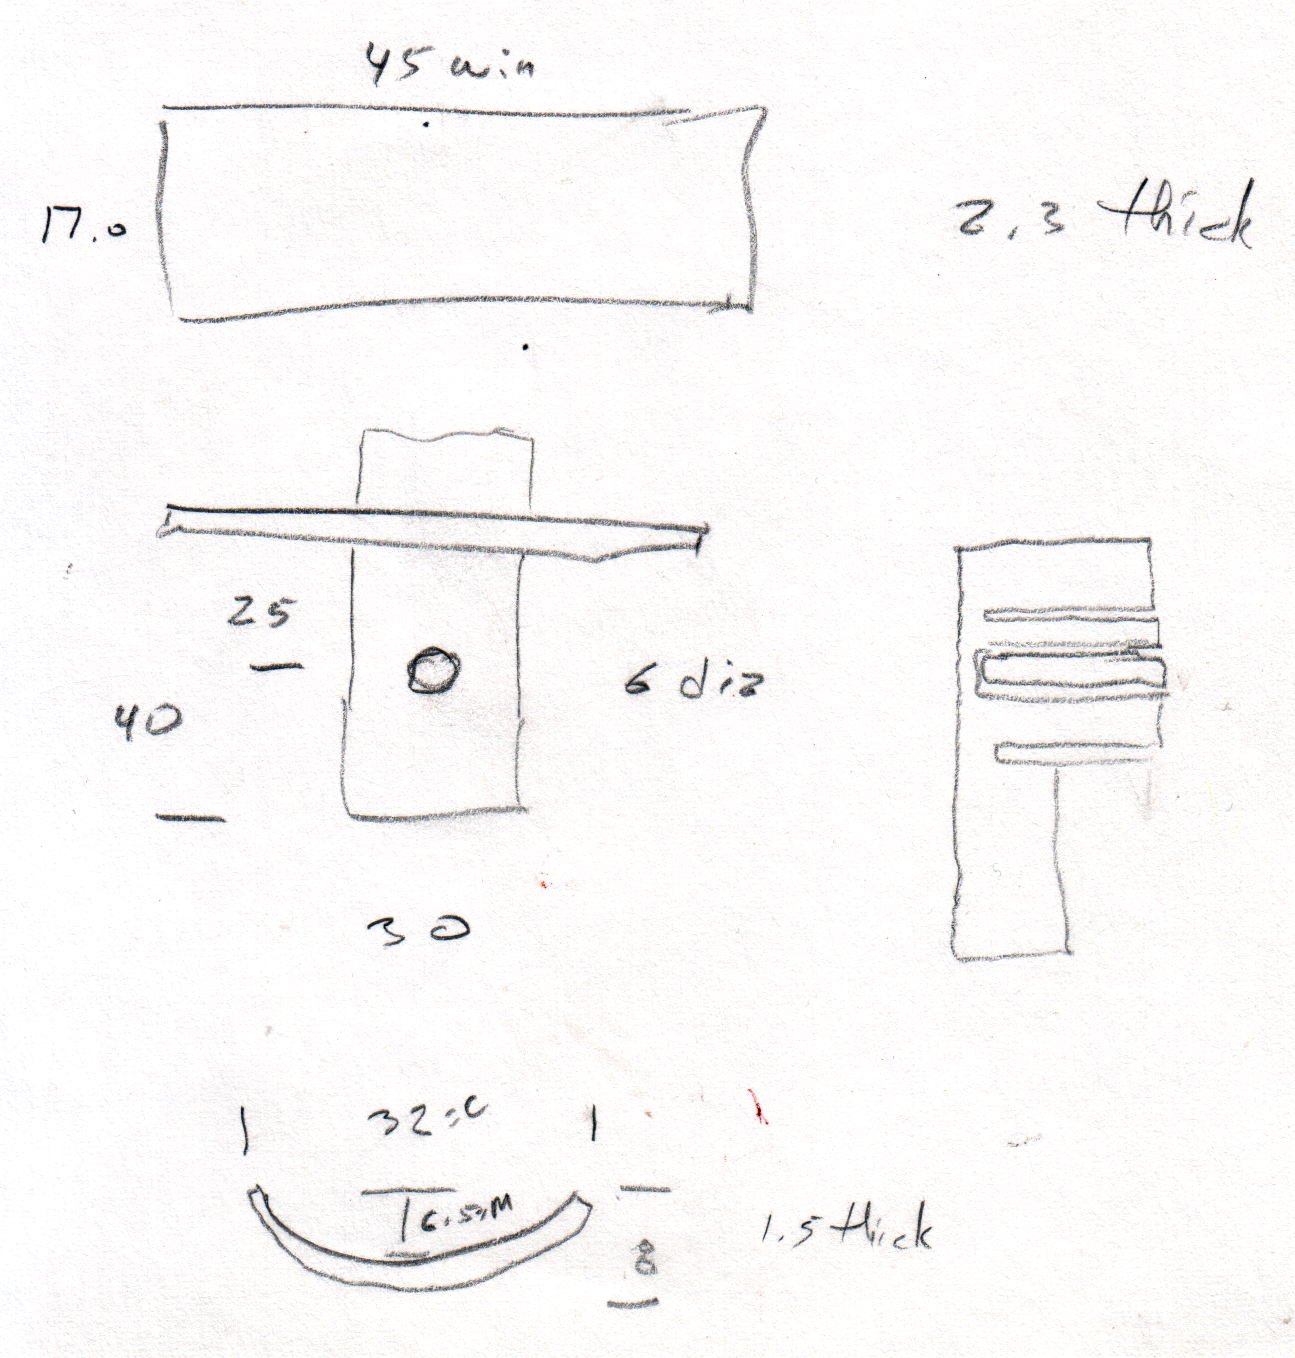
The curve in the trough comes from the chord equation applied to these crude measurements:
Tour Easy Rear Fender Bracket – measurement doodle
Fortunately, it’s tucked into a spot where nobody ever looks…
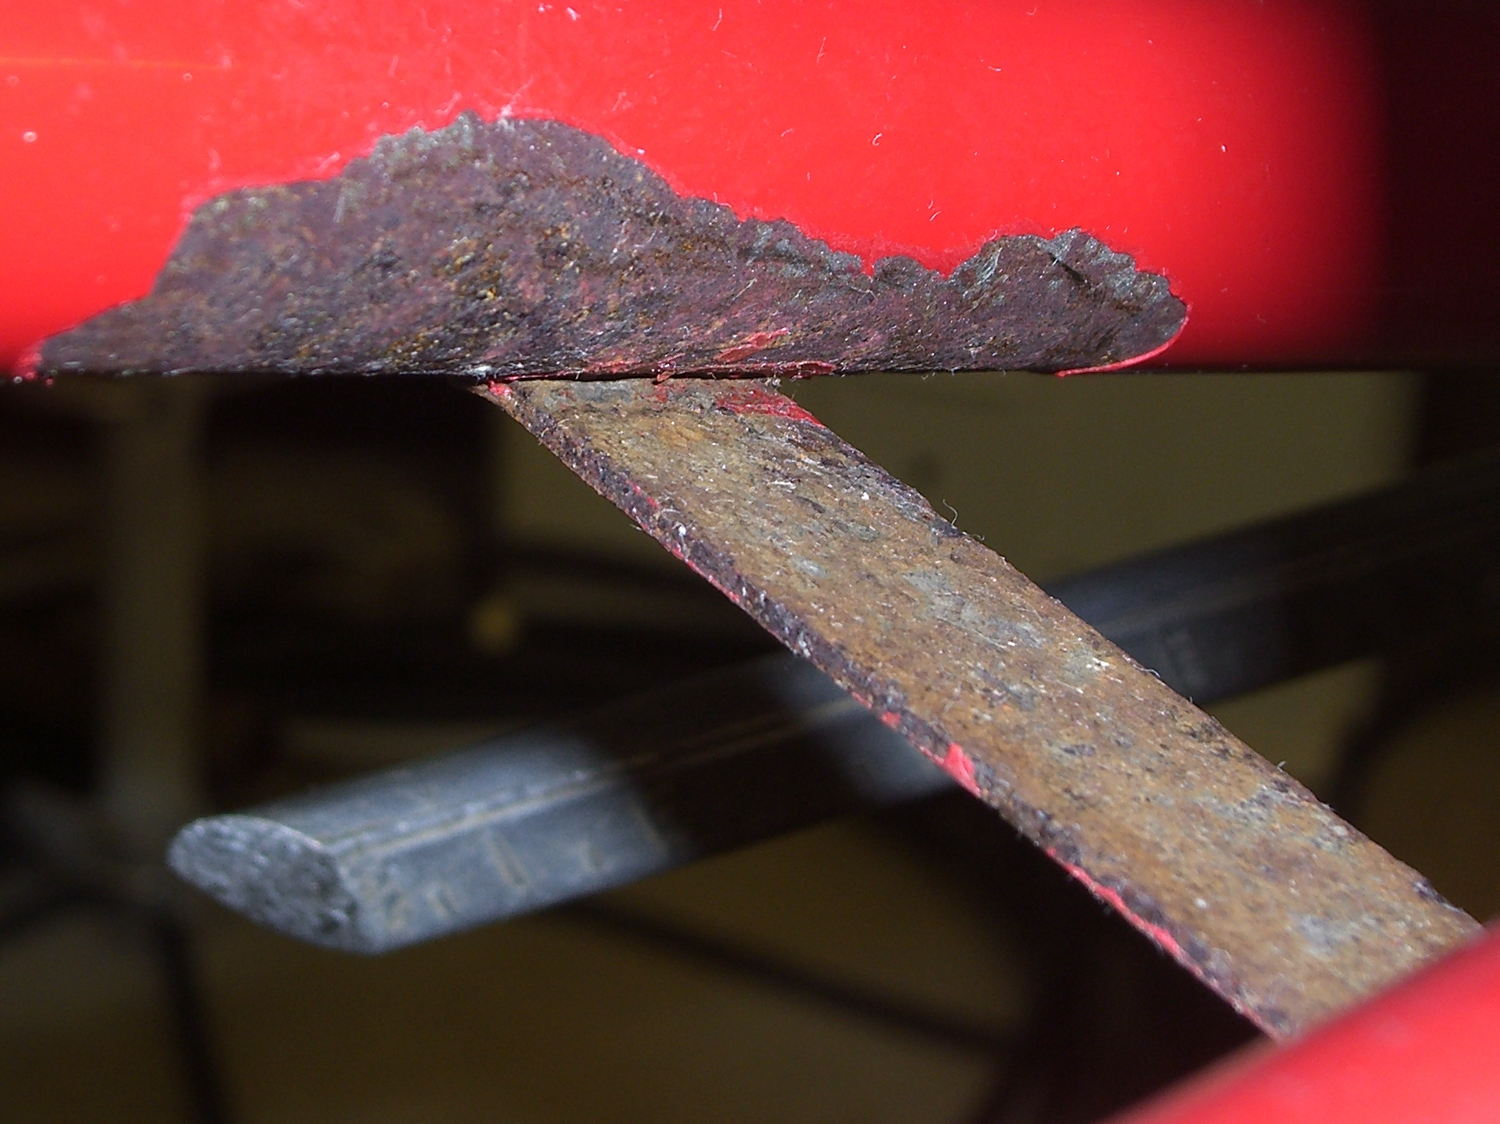
While replacing the well-worn sprocket / chain / chainrings on Mary’s bike, I finally got around to repairing some damaged paint tucked in an inconvenient spot…
Over the years, a flaw in the paint underneath the strap connecting the chainstays on Mary’s Tour Easy let in enough moisture to dislodge the paint over a considerable area. I chipped off the loose paint and used Evapo-Rust to convert the oxide to phosphate; there’s not much damage to the steel parts, despite what it may look like in the pictures.
A top view from the right rear, minus the wheel & fender, looking toward the left chainstay:
Tour Easy – rusted chainstay strap
Two epoxy fillets in the concave sections where the strap meets the chainstays should eliminate problems in those sections forever more:
Tour Easy – chainstay strap – epoxy fillet
Some rusty-metal primer and a few coats of red paint conceal most of the ugliness:
Tour Easy – rear fender bracket – installed – top
It’ll never be mistaken for showroom quality, but our bikes are tools, not art objects.
The obviously 3D printed red block in the middle of the strap holds the fender in place, about which more tomorrow…
I ran across your blog on Smart Beaconing and saw something that needed correction.
You state the Turn Slope is in units Degrees / MPH
This is incorrect. Although the term Turn Slope is not a real slope (such as rise/run classically) that is what the originators used albeit incorrectly. They do however correctly attribute the units to MPH * Degrees (a product and hence not really a slope).
In their formula they calculate a turn threshold as:
turn_threshold = min_turn_angle + turn_slope / speed
Looking at the units we see:
= Degrees + (MPH * Degrees) / MPH
which yields
= Degrees + Degrees
Which makes sense. It is too bad that the originators used the wrong term of Turn Slope which confuses most people. A better term would have been Turn Product.
In looking back over that post, I have no idea where or how I got the wrong units, other than by the plain reading of the “variable name”.
As he explained in a followup note:
As for units… I was introduced to making unit balance way back in 1967-1968 science class in HS by a really fine science teacher. It has served me all my life and I’m thankful for that training.
I have ever since told that teacher so!
A while back, our Larval Engineer rammed an engineering physics class head-on and sent me a meme image, observing that I’d trained her well: if the units don’t work out, then you’re doing it wrong.