The Smell of Molten Projects in the Morning

Ed Nisley's Blog: Shop notes, electronics, firmware, machinery, 3D printing, laser cuttery, and curiosities. Contents: 100% human thinking, 0% AI slop.

Category: Recumbent Bicycling

Cruisin’ the streets

  • Tour Easy Rear Fender Clip

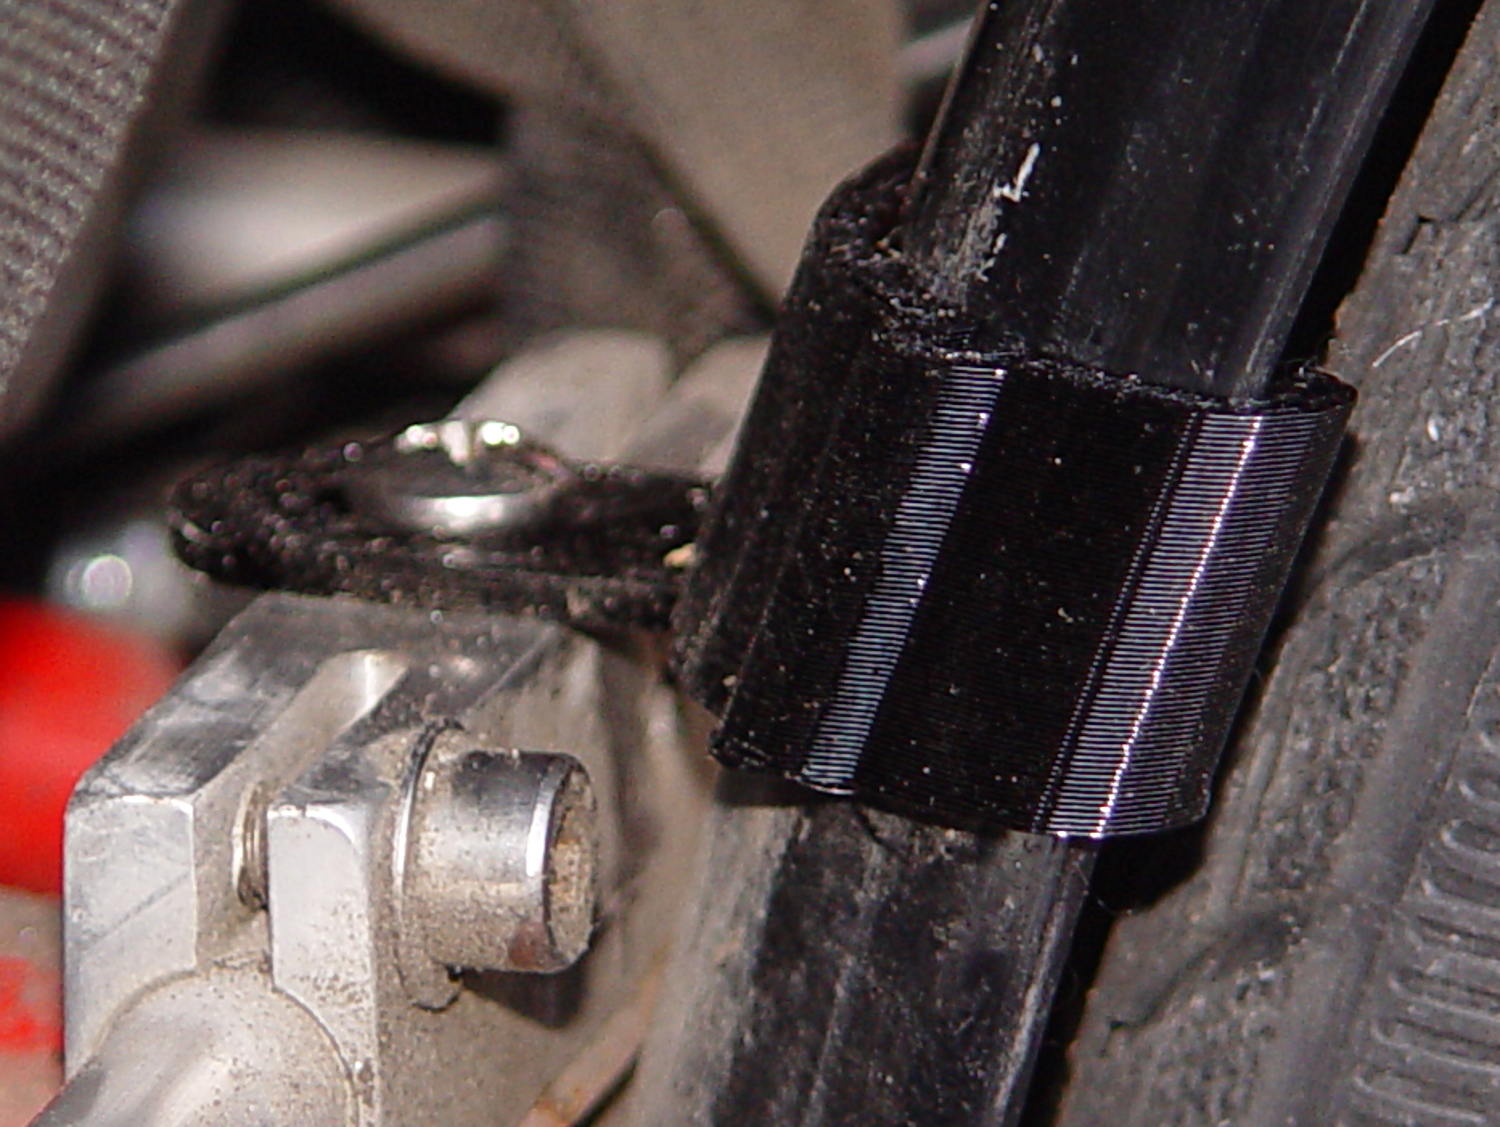
    One of the clips holding the rear fender on my Tour Easy broke:

    Rear fender clip - broken
    Rear fender clip – broken

    Well, if the truth be told, the fender jammed against the tire when I jackknifed the trailer while backing into a parking spot, dragged counterclockwise with the tire, and wiped that little tab right off the block. After 16 years of service, it doesn’t owe me a thing.

    Although the clip around the fender sits a bit lower than it used to (actually, the entire fender sits a bit lower than it should be), you can see the tab had a distinct bend at the edge of the aluminum block supporting the underseat bag frame: the block isn’t perpendicular to the tire / fender at that point.

    After devoting far too long to thinking about how to angle the tab relative to the clip, I realized that I live in the future and can just angle the clip relative to the tab. Soooo, the solid model has a rakish tilt:

    Fender Clip - Slic3r preview
    Fender Clip – Slic3r preview

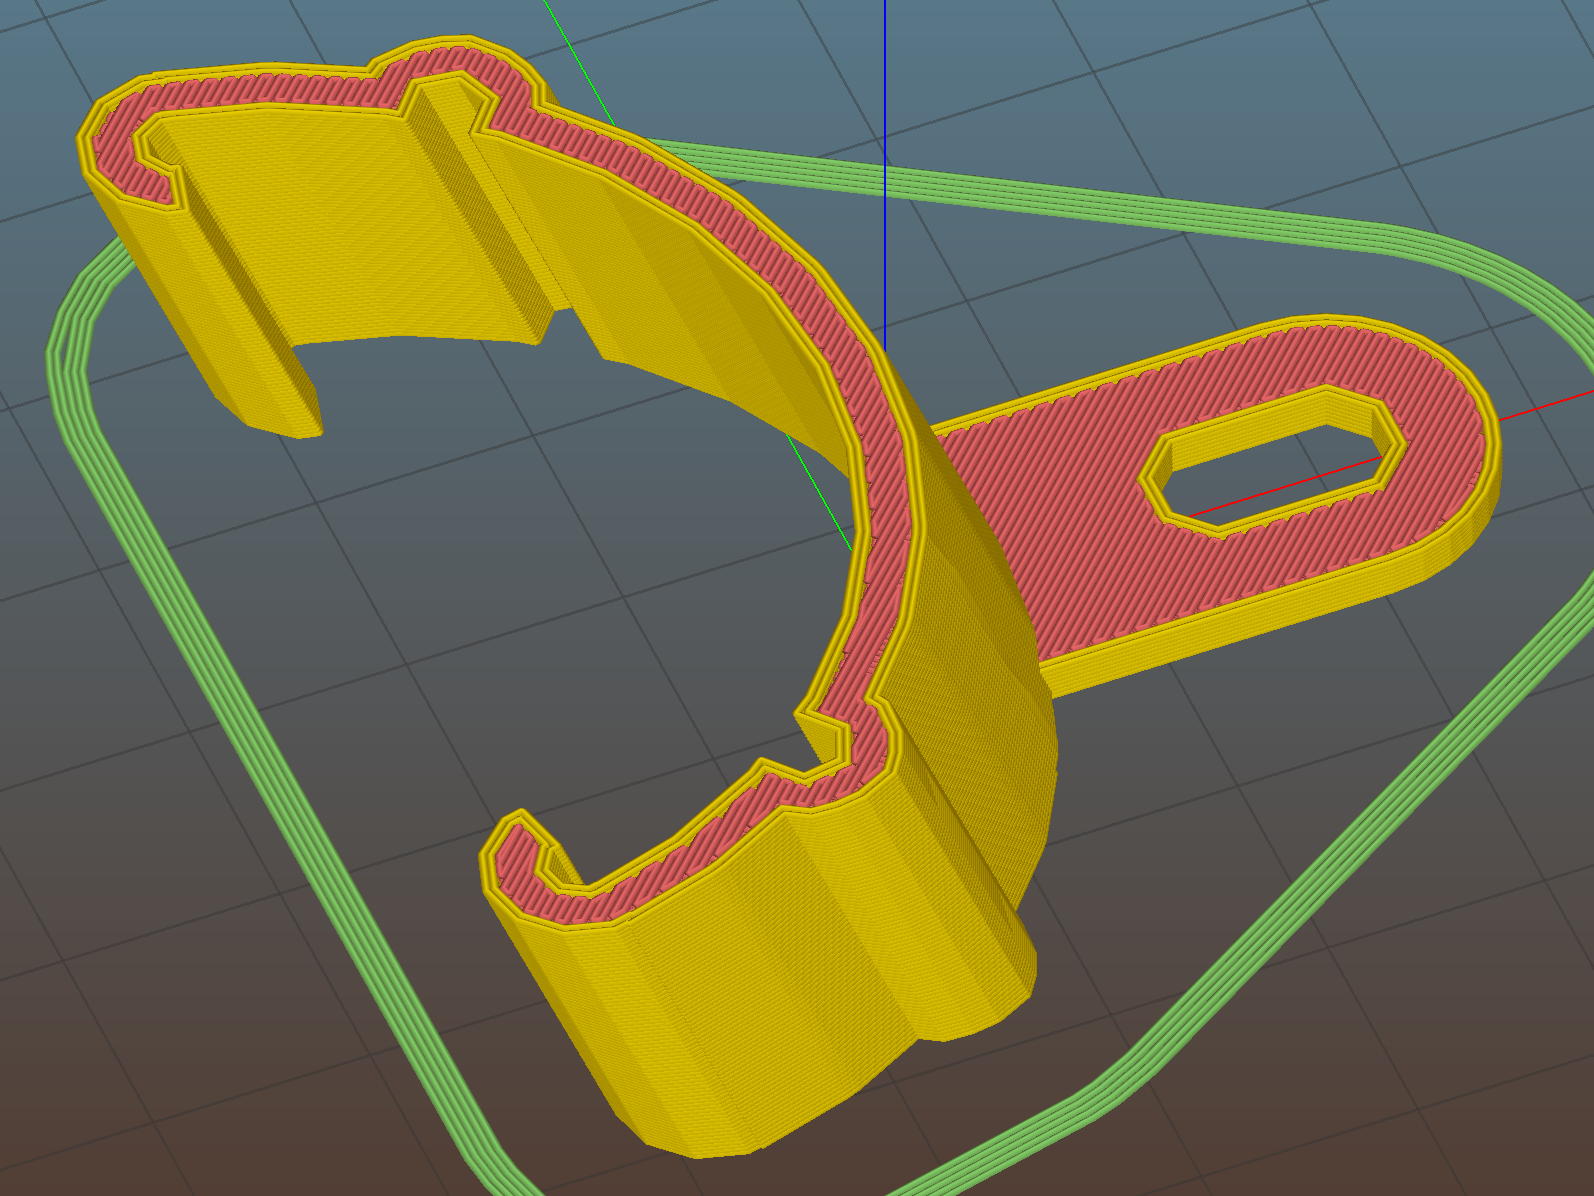
    The original design had a pair of strain relief struts where the tab meets the clip, but I figured I’ll add those after the PETG fractures.

    I mooched the small bumpouts along the arc from the original design; they provide a bit of stretch & bend so to ease the hooks around the fender.

    The hooks meet the clip with very slight discontinuities that, I think, come from slight differences between the 2D offset() operation and the circle() diameter; the usual 1/cos(180/numsides) trick was unavailing, so I tinkered until the answer came out right.

    Despite those stretchy bumps, it took three iterations, varying the chord height by about 1.5 mm, to securely snap those hooks onto the fender:

    Rear fender clip - 3D printed improvement
    Rear fender clip – 3D printed improvement

    Yeah, sorry ’bout the fuzzy focus on the screw head.

    It’s impossible to measure the chord height accurately enough in that position and I was not going to dismount the rear tire just to get a better measurement.

    You can see how the clip’s rakish tilt matches the fender’s slope, so the tab isn’t bent at all. It’ll probably break at the block the next time I jackknife the trailer, of course.

    I heroically resisted the urge to run off a lower fender mount.

    The OpenSCAD source code as a GitHub Gist:

    // Tour Easy rear fender clip
    // Ed Nisley KE4ZNU February 2017
    Layout = "Build"; // Build Profile Tab Clip
    //- Extrusion parameters must match reality!
    ThreadThick = 0.25;
    ThreadWidth = 0.40;
    HoleWindage = 0.2;
    Protrusion = 0.1; // make holes end cleanly
    inch = 25.4;
    function IntegerMultiple(Size,Unit) = Unit * ceil(Size / Unit);
    //———————-
    // Dimensions
    // special case: fender is exactly half a circle!
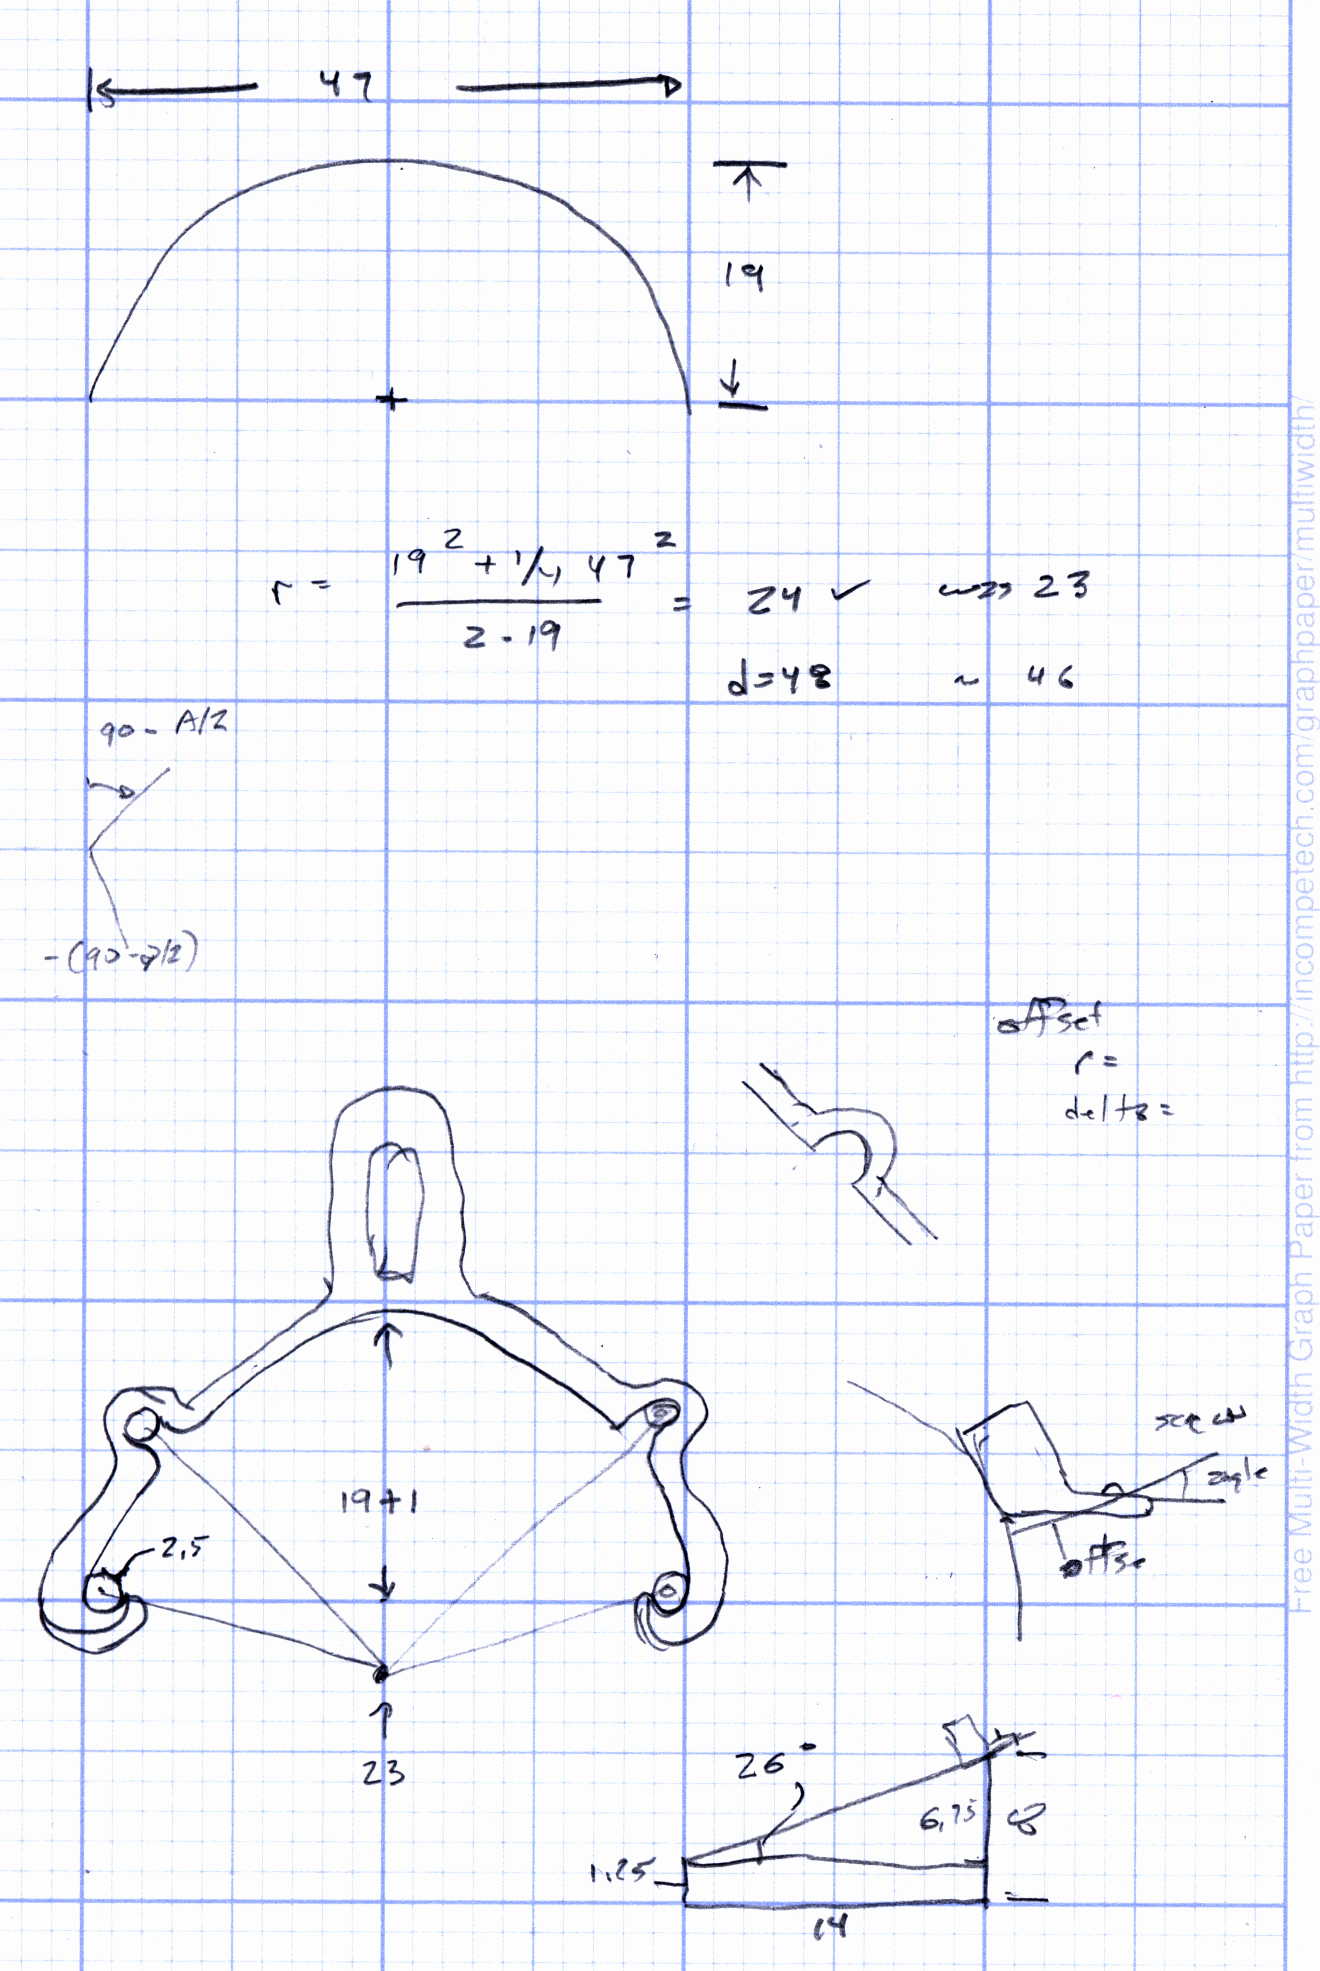
    FenderC = 47.0; // fender outside width = chord
    FenderM = 18.5; // height of chord
    FenderR = (pow(FenderM,2) + pow(FenderC,2)/4) / (2 * FenderM); // radius
    echo(str("Fender radius: ", FenderR));
    FenderD = 2*FenderR;
    FenderA = 2 * asin(FenderC / (2*FenderR));
    echo(str(" … arc: ",FenderA," deg"));
    FenderThick = 2.5; // fender thickness, assume dia of edge
    ClipHeight = 18.0; // top to bottom, ignoring rakish tilt
    ClipThick = 3.0; // thickness of clip around fender
    ClipD = FenderD; // ID of clip against
    ClipSides = 4 * 8; // polygon sides around clip circle
    BendReliefD = 2.5; // bend arch diameter
    BendReliefA = 2/3 * FenderA/2; // … angle from dead ahead
    BendReliefCut = 1.0; // factor to thin outside of bend
    TabAngle = -20; // angle from perpendicular to fender
    TabThick = 2.0;
    TabWidth = 15.0;
    ScrewOffset = 15.0; // screw center to fender along perpendicular
    ScrewD = 5.0;
    ScrewSlotLength = 2*ScrewD;
    //———————-
    // Useful routines
    module PolyCyl(Dia,Height,ForceSides=0) { // based on nophead's polyholes
    Sides = (ForceSides != 0) ? ForceSides : (ceil(Dia) + 2);
    FixDia = Dia / cos(180/Sides);
    cylinder(r=(FixDia + HoleWindage)/2,
    h=Height,
    $fn=Sides);
    }
    //———————-
    // Clip profile around fender
    // Centered on fender arc
    module Profile(HeightScale = 1) {
    linear_extrude(height=HeightScale*ClipHeight,convexity=5) {
    difference() {
    offset(r=ClipThick) // outside of clip
    union() {
    circle(d=ClipD,$fn=ClipSides);
    for (i=[-1,1])
    rotate(i*BendReliefA) {
    translate([ClipD/2 + BendReliefD/2,0,0])
    circle(d=BendReliefD,$fn=6);
    }
    }
    union() { // inside of clip
    circle(d=ClipD,$fn=ClipSides);
    for (i=[-1,1])
    rotate(i*BendReliefA) {
    translate([ClipD/2 + BendReliefCut*BendReliefD/2,0,0])
    circle(d=BendReliefD/cos(180/6),$fn=6);
    translate([ClipD/2,0,0])
    square([BendReliefCut*BendReliefD,BendReliefD],center=true);
    }
    }
    translate([(FenderR – FenderM – FenderD/2),0]) // trim ends
    square([FenderD,2*FenderD],center=true);
    }
    for (a=[-1,1]) // hooks around fender
    rotate(a*(FenderA/2))
    translate([FenderR – FenderThick/2,0]) {
    difference() {
    rotate(1*180/12)
    circle(d=FenderThick + 2*ClipThick,$fn=12);
    rotate(1*180/8)
    circle(d=FenderThick,$fn=8);
    rotate(a * -90)
    translate([0,-2*FenderThick,0])
    square(4*FenderThick,center=false);
    }
    }
    }
    }
    //———————-
    // Mounting tab
    module Tab() {
    linear_extrude(height=TabThick,convexity=3)
    difference() {
    hull() {
    circle(d=TabWidth,$fn=ClipSides);
    translate([(ScrewSlotLength – ScrewD)/2 + (FenderR + ScrewOffset),0,0])
    circle(d=TabWidth,$fn=ClipSides);
    }
    circle(d=ClipD,$fn=ClipSides); // remove fender arc
    hull() // screw slot
    for (i=[-1,1])
    translate([i*(ScrewSlotLength – ScrewD)/2 + (FenderR + ScrewOffset),0,0])
    rotate(180/8)
    circle(d=ScrewD/cos(180/8),$fn=8);
    }
    }
    //———————-
    // Combine at mounting angle
    module Clip() {
    difference() {
    union() {
    translate([-FenderR,0,0])
    Tab();
    rotate([0,TabAngle,0])
    translate([-FenderR,0,0])
    Profile(2); // scale upward for trimming
    }
    translate([0,0,-ClipHeight]) // trim bottom
    cube(2*[FenderD,FenderD,ClipHeight],center=true);
    translate([0,0,ClipHeight*cos(TabAngle)+ClipHeight]) // trim top
    cube(2*[FenderD,FenderD,ClipHeight],center=true);
    }
    }
    //———————-
    // Build it
    if (Layout == "Profile") {
    Profile();
    }
    if (Layout == "Tab") {
    Tab();
    }
    if (Layout == "Clip") {
    Clip();
    }
    if (Layout == "Build") {
    Clip();
    }

    The original doodle, with some measurements unable to withstand the test of time:

    Rear Fender Clip - measurement doodles
    Rear Fender Clip – measurement doodles
  • Rail Trail Blockage

    This big branch must have landed with a mighty thump across the Maloney Road entrance to the Dutchess Rail Trail:

    DCRT - Maloney Rd - tree down - 2017-02-20
    DCRT – Maloney Rd – tree down – 2017-02-20

    Yeah, some jerk ran a snowmobile up the slope around the tree, leaving a pile of dirt on the ramp. So it goes.

    We took an alternate route, I emailed The Right Folks, and (most of) the tree vanished two days later; evidently, the property owner gets to deal with everything to the left of the line of trees.

  • Turkeys in the Snow

    These guys looked completely disgusted with the situation:

    Turkeys on rail fence in snow
    Turkeys on rail fence in snow

    They’re about 130 feet away in a heavy snowstorm that eventually deposited about a foot of wet snow on the area.

    The top rail really does slant downward: the tenon on the right end broke and fell out of the mortise.

    The DSC-H5 carries the 1.7× teleadapter, zoomed all the way tight through two layers of 1955-ish window glass, hand-held, braced against the pane.

    The day before that snowstorm, we biked 18 miles out-and-back over the Walkway in beautiful, sunny, mid-50s (°F) weather:

    KE4ZNU-9 - APRS track - 2017-02-08
    KE4ZNU-9 – APRS track – 2017-02-08

    We ride when we can and shovel when we must!

  • Truth In Labeling: Bike Tube Division

    The lumpy surface of the Michelin Pro-Tek Max tubes now in the back tire of our bikes can’t be patched, which means (being that type of guy) I must carry along a spare tube in addition to a handful of CO2 cartridges. So, having cleaned out my tube stash, I ordered a pair from an Amazon supplier, not my usual bottom-dollar eBay suppliers, clearly described as fitting the Schwalbe Marathon Plus 700x35C tires.

    The Amazon listing and the box label agreed, but (being that type of guy) I just had to extract the tube to see what I got:

    Meetlocks tube size mismatch
    Meetlocks tube size mismatch

    Huh.

    According to the seller, who speaks and writes English far better than I can handle Mandarin (or whatever):

    Yes, you are right, you also didn’t bought wrong items for your tire. we marked the 700×28-32, just for our manufacture to difference from another big size from 700/35-45C, because if we marked the size 700×28-35C, sometimes , the worker will packing 700×35-45c into the packing, and let the tube can not used for the 700x35c customer..

    Huh.

    It turns out the tube has 35-38 embossed into the rubber, so it’s not obvious the tube would fit into the smaller  28-32 size tires as labeled. It all depends on what you trust: the mold, the tube’s stamp, the box label, or the advertising.

    Next time around, an event I hope (but do not expect) lies far in the future, I’ll spend a bit more for what will undoubtedly be the same tube from the same factory, but from a vendor buying enough QC to ensure the workers know what they’re packing. Having all the labels match would be a definite bonus.

  • Schwalbe Marathon vs. Glass Chips, Yet Again

    We biked to some errands on an unseasonably warm 4 January and, a few days later, I noticed the rear tire on Mary’s bike was flat. A bit of Quality Shop Time later:

    Brown Glass Chip
    Brown Glass Chip

    On the upside, I found it in the garage and fixed it in the basement.

    The chip emerged from one of two adjacent gashes in the middle of the tread, but hadn’t quite cut through the tire. A somewhat larger chip (that’s a 0.1 inch grid) in the other gash cut through the Schwalbe Marathon’s protective belt to puncture the tube, then fell out.

    The rear wheel of her bike now sports a Michelin Pro-Tek Max tube inside a Schwalbe Marathon Plus tire, as does mine. The wheel + tube + tire probably weighs as much as some entire carbon-fiber bikes, but it doesn’t matter.

    Searching for the obvious keywords will produce many other instances…

  • ATX Lithium Ion 18650 Cell Capacity

    The 2016-11A and 2016-11B cells produced the overlapping red and green curves, with the gritty section due to crappy battery pack connections:

    Li-Ion 18650 cells - ATX prot - bare - Ah scale - 2016-12-17
    Li-Ion 18650 cells – ATX prot – bare – Ah scale – 2016-12-17

    The lower curve comes from an old unprotected cell harvested from a defunct media player and retrieved from the to-be-recycled pile.

    I picked 1 A as a reasonable value for their intended use in flashlights and maybe a helmet camera. Unlike some other cells in the recent past, these deliver 3.0 A·h, reasonably close to their rated 3.4 A·h capacity at a (presumably) lower current.

    Replotting the voltage vs. energy delivered doesn’t show any surprises:

    Li-Ion 18650 cells - ATX prot - bare - Wh scale - 2016-12-17
    Li-Ion 18650 cells – ATX prot – bare – Wh scale – 2016-12-17

    The voltage declines more-or-less linearly, without the relatively flat discharge curve for smaller cells, which explains why the J5 V2 flashlight becomes seriously dim after a few hours. On the upside, that allows a reasonably accurate state-of-charge display.

    Assuming the Sony HDR-AS30V camera burns 0.1 W·h/min while recording (which is a fancy way of saying it dissipates 6 W), then it should run for (10 W·h)/(0.1W·h/min) = 100 min from one of these cells fitted as an outrigger. The best of the NP-BX1 cells for the camera delivers something like 90 minutes from a measured capacity of 4 A·h at 500 mA; I don’t know what to make of those numbers. Perhaps the camera runs the NP-BX1 cells below the 2.8 V cutoff I’ve been assuming?

  • Left on Maloney Rd from Rt 376: Eyes Right!

    We’re waiting for oncoming traffic to clear before making the left turn from Rt 376 onto Maloney, on our way to the rail trail:

    Maloney Rd Intersection Conflict - 2016-12-07 - waiting
    Maloney Rd Intersection Conflict – 2016-12-07 – waiting

    Traffic’s clear, we have the green, we’re turning, and the car exiting the gas station starts accelerating directly at us:

    Maloney Rd Intersection Conflict - 2016-12-07 - turning
    Maloney Rd Intersection Conflict – 2016-12-07 – turning

    Mary shouts, I jam to a stop, the driver jams to a stop, I proceed, the driver then proceeds to turn in front of the truck behind us:

    Maloney Rd Intersection Conflict - 2016-12-07 - rear view
    Maloney Rd Intersection Conflict – 2016-12-07 – rear view

    There’s no signal aimed into the gas station, so you must use your best judgement to determine when to enter the intersection. I’m not in enough of a hurry to (try to) ace out a truck, but ya never know …