The Smell of Molten Projects in the Morning

Ed Nisley's Blog: Shop notes, electronics, firmware, machinery, 3D printing, laser cuttery, and curiosities. Contents: 100% human thinking, 0% AI slop.

Category: Machine Shop

Mechanical widgetry

  • Dishwasher Rack Pins: More Plastic

    Those 3D printed dishwasher rack protectors solved the problem on the bottom of the pins, but the tops also had some rust. I dosed the pins with Evapo-Rust to stabilize the corrosion:

    Dishwasher rack - rusted pins
    Dishwasher rack – rusted pins

    After that picture, the pins soaked for a while, got a rinse & blotting, then sat for a while to dry. I can’t say that’s in complete accordance with the directions, but it’s close to the spirit of the thing.

    Meanwhile, the MEK / xylene / acetone I added to the bottle of stiffened ReRACK repair coating had softened it up pretty well.  They recommend several coats at half-hour intervals, of which this was the first:

    Dishwasher rack - first plastic layer
    Dishwasher rack – first plastic layer

    I probably should have chewed off the corrosion bulging the OEM coating, but, given the number of pins that needed chewing, that started looking like a major project. Let’s face it, I can always touch things up if the pins continue rotting out.

    The next morning, the rack was back in service:

    Dishwasher rack - recoated pins
    Dishwasher rack – recoated pins

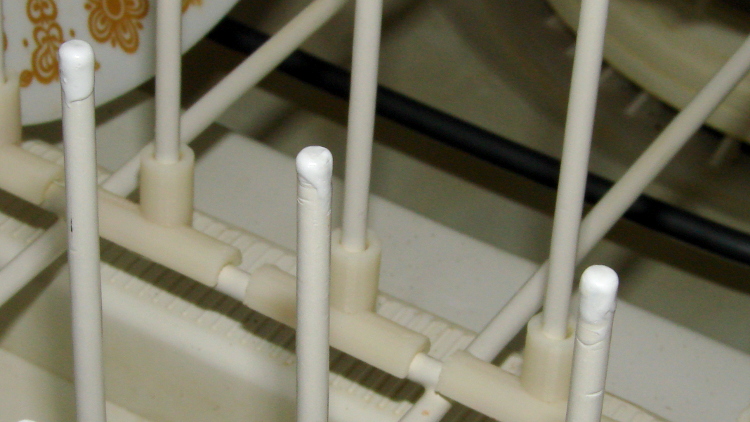
    One advantage of a big blob atop each pin: the printed rack protectors might not wriggle off quite so easily.


  • Kill A Watt: IEC Adapters

    I should have done this a long time ago:

    Kill-A-Watt - IEC plug and socket
    Kill-A-Watt – IEC plug and socket

    It makes measuring PC power consumption much easier!

    I picked up some cheap AC plugs and sockets, cut a short IEC extender cable in half, and wired ’em up. If the IEC extender link breaks again, search amazon.com for something like “computer power cord extension” and rummage around.

    IEC color code hint: brown = hot, blue = neutral (unless they cheat).

    US NEMA 5 plug / socket hint: the blade marked W is neutral. More expensive hardware will have dark brass = hot, light brass = neutral, but don’t bet your life on it.

  • RayTek IR Thermometer: Trigger Switch Replacement

    According to the sticker inside, I’ve been using my RayTek IR Thermometer since 2000. At some point in the last dozen or so year, Fluke Borged RayTek, which means yellow plastic instead of gray.

    The pushbutton switch behind the trigger has recently gone from intermittent to nonfunctional, but everything else still works fine: some simple surgery should suffice…

    The handle has a flip-down cover, for the battery compartment and °C/°F switch, that pivots on molded hinges.  The cover’s hinge pins are rectangular with a slight bevel and the case sockets have a notch that will just clear a properly aligned pin. Given this hint, you’ll get the cover off much faster than I did:

    RayTek IR Thermometer - handle joint
    RayTek IR Thermometer – handle joint

    Remove the obvious screw and press the latches while prying the two halves apart. A small screwdriver helps persuade the latches to release their death grip:

    RayTek IR Thermometer - case latches
    RayTek IR Thermometer – case latches

    The parts heap didn’t have any suitable through-hole pushbutton switches, but I managed to solder an SMD switch in place; the original switch is parked atop the IC for reference. Yes, the white button is slightly taller than the original black one, but it doesn’t matter:

    RayTek IR Thermometer - new switch installed
    RayTek IR Thermometer – new switch installed

    Then it’s just a matter of tucking everything in place:

    RayTek IR Thermometer - contents
    RayTek IR Thermometer – contents

    There. That was easy.

  • Force-fitting a PCI-E Video Card in an Optiplex 780 SFF

    I bought an off-lease Optiplex 780 in the Small Form Factor (SFF) version to replace my ancient Pentium D; it’s also available in Small Desktop Tower (SDT) and Ultra-SFF variations. The SFF box has two PCI slots and one PCI-E slot, which let me install a half-height dual-output video card, with results described yesterday. I innocently believed the PCI-E slot would have enough clearance for the video card, what with these things being standardized and all.

    Turns out that the heatsink collided with a flange on the hard drive carrier, with about 5 mm of overlap. Fortunately, the bracket is plastic and I have no qualms about chopping up the hardware. A few minutes of Quality Shop Time removed a section of the offending flange and gave the video card just enough clearance:

    Optiplex 780 SFF drive bracket
    Optiplex 780 SFF drive bracket

    The heatsink reflects in the shiny surface of the carrier, with the scar from the missing flange just above that. The small dark-gray disk on the far left is a grommet holding a pin that supports the drive; it installs through the larger circular opening and snaps leftward.

    You must install the video card and then snap the drive carrier into place. The heatsink protrudes above the flange, with the left side just barely clearing that grommet.

  • Long-term Paint Storage: Just Don’t

    We probably should have noticed this sooner, but …

    Leaking paint can
    Leaking paint can

    Yes, that can really does did contain white paint!

    It cleaned up about as well as you’d expect, which is to say not very well at all:

    Leaking paint can - residue
    Leaking paint can – residue

    Fortunately, we’re not particularly fussy about shelves in the Basement Laboratory Paint Storage Wing.

    Memo to Self: Just throw the nearly empty paint cans out, OK?

  • X10 Controller Lid Hinge Repair

    The modified lid for our X10 controller didn’t quite survive a fall from the dresser to a wood floor:

    X10 controller - hinge chip
    X10 controller – hinge chip

    Not even I could use more than one clamp on this job:

    X10 controller - hinge clamping
    X10 controller – hinge clamping

    Sometimes, it’s OK to do easy ones…

  • LAW Lifetime Member Plaque: Rejuvenation Thereof

    The brass plate from this plaque rattled down the basement stairs(*) a while ago:

    League of American Wheelmen plaque
    League of American Wheelmen plaque

    As you might expect, the adhesive failed and has been replaced at least once. This time, I drilled a pair of 2-56 clearance holes in the plate, match-marked the wood with a punch, drilled a pair of tapping holes, and put it all back together.

    There’s not much to see, but I’m pretty sure that plate won’t fall off ever again:

    League of American Wheelmen plaque - detail
    League of American Wheelmen plaque – detail

    The lacquer finish has begun disintegrating, but I wasn’t in the mood to strip-and-restore that. The tile remains firmly affixed; when that falls out, it won’t be pretty.

    The LAW long ago morphed into the League of American Bicyclists, after deeming Wheelmen as too gender-specific for the modern era.

    (*) We hang plaques, certificates, diplomas, and suchlike on the walls beside the basement stairs. Every time we pass by, it’s an Ego Trip…