The Smell of Molten Projects in the Morning

Ed Nisley's Blog: Shop notes, electronics, firmware, machinery, 3D printing, laser cuttery, and curiosities. Contents: 100% human thinking, 0% AI slop.

Category: Machine Shop

Mechanical widgetry

  • Jonas Peeler: Reshaping and Origin Mystery

    Jonas Peeler: Reshaping and Origin Mystery

    This past summer we replaced a worn-out vegetable peeler with what was allegedly a high-quality Linden Jonas peeler. It worked quite well, which it should have, given that it cost nigh onto seven bucks, until I recently backed over it with my wheelchair (about which, more later) and smashed it flat.

    World+dog having recently discovered the virtues of home-cooked meals, the replacement cost nigh onto ten bucks and, through the wonders of Amazon, came from a different seller, albeit with a letter-for-letter identical description:

    Linden Jonas peeler orders
    Linden Jonas peeler orders

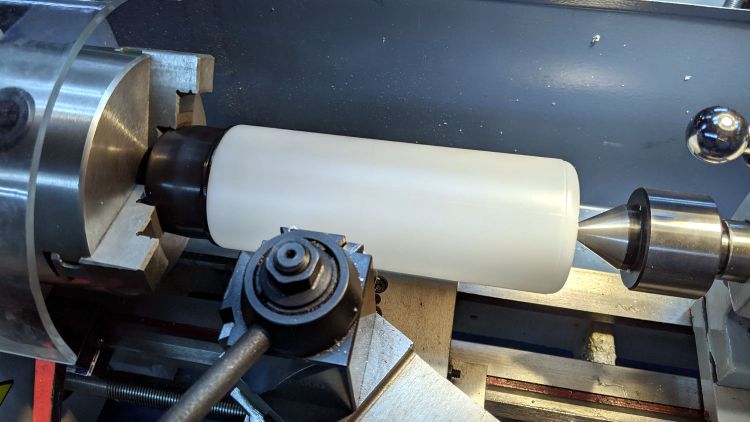
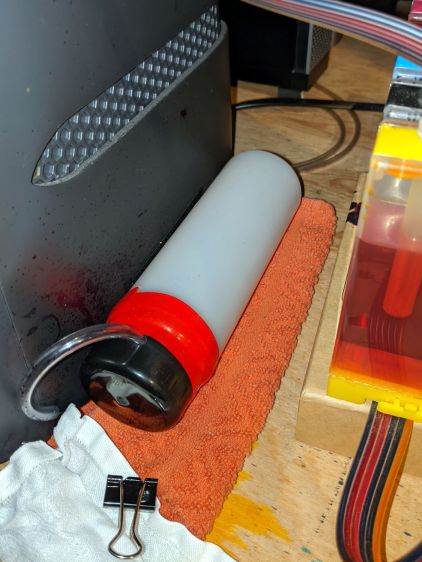
    With a spare in the kitchen, I applied some shop-fu to unbend the first peeler:

    Jonas peeler - reshaping tools
    Jonas peeler – reshaping tools

    Tapping the handle against the bandsawed dowel sufficed to remove the sharpest bends. The final trick involved clamping one edge of the handle to the section cut from a thread spool, resting the Vise-Grip on the bench vise, and whacking the other edge with the rubber mallet to restore the smooth curve around the main axis, repeating the process along the other side, then hand-forming the gentle curve closer to the blade. It ain’t perfect and never will be, but it’s once again comfortable in the hand.

    During that process I had plenty of time to admire the identification stamped into the handle:

    Jonas peeler - weak emboss
    Jonas peeler – weak emboss

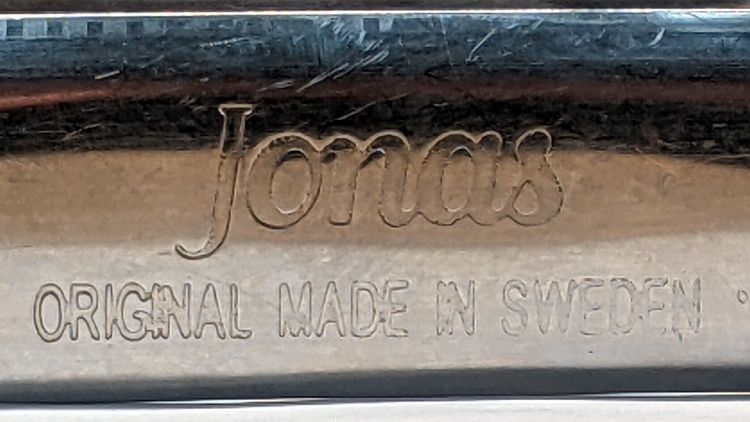
    Which, frankly, looks rather gritty on an allegedly high-quality product from a Swedish factory.

    Compare it with the new peeler:

    Jonas peeler - good emboss
    Jonas peeler – good emboss

    Now, that’s more like it.

    The genuine Linden website doesn’t provide much detail, so I can’t be absolutely sure which peeler is a counterfeit, but it sure looks like at least one fails the sniff test. Linden’s site redirects to Amazon through a Google search link (!) that, given the way Amazon works, could result in anything appearing as a valid result:

    https://www.google.com/search?q=amazon.com+linden+sweden

    As one should expect by now, Amazon’s commingled inventory produces a fair percentage of reviews complaining about craptastic peelers stamped “Made in China” from any of the sellers unearthed by that search.

  • Aerosol Can Corrosion

    Aerosol Can Corrosion

    An odd smell in the Basement Laboratory Chemical Warehouse led to this discovery:

    Leaking aerosol can
    Leaking aerosol can

    It’s a can of spray-on topical anesthetic That Came With The House™, so it’s almost certainly four decades old and, other than being moved to that shelf, hasn’t been touched in the last quarter century.

    Surprisingly, the orange-brown goo wiped off the shelf almost completely. The similarly old box of stain remover on the left was a dead loss.

  • Suet Feeder Extension

    Suet Feeder Extension

    Shortly after this season’s suet feeder deployment, the neighborhood raccoons emptied it. A few years ago, putting a 3D printed feeder at the end of a repurposed ski pole protected it for a few weeks, so I scrounged another pole from the pile, cut off the flattened top and battered tip, and put it into service:

    Suet Feeder Extension - deployed
    Suet Feeder Extension – deployed

    The near end has a loop made from a pair of stainless steel key cables, because a single cable was just slightly too short:

    Suet Feeder Extension - anchor loop
    Suet Feeder Extension – anchor loop

    The far end has what was once a hook, beaten straight to fit through the hole, then beaten around the curve of the pole:

    Suet Feeder Extension - chain anchor
    Suet Feeder Extension – chain anchor

    Raccoons lacking opposable thumbs, this should suffice until the black bear(s) spotted around here take up residence in the yard.

  • Astable Multivibrator: Dressed-up LED Spider

    Astable Multivibrator: Dressed-up LED Spider

    Adding a bit of trim to the bottom of the LED spider makes it look better and helps keep the strut wires in place:

    Astable Multivibrator - Alkaline - Radome trim
    Astable Multivibrator – Alkaline – Radome trim

    It’s obviously impossible to build like that, so it’s split across the middle of the strut:

    Astable Multivibrator - Alkaline - Radome trim
    Astable Multivibrator – Alkaline – Radome trim

    Glue it together with black adhesive and a couple of clamps:

    LED Spider - glue clamping
    LED Spider – glue clamping

    The aluminum fixtures (jigs?) are epoxied around snippets of strut wire aligning the spider parts:

    LED Spider - gluing fixture
    LED Spider – gluing fixture

    Those grossly oversized holes came pre-drilled in an otherwise suitable aluminum rod from the Little Tray o’ Cutoffs. I faced off the ends, chopped the rod in two, recessed the new ends, and declared victory. Might need better ones at some point, but they’ll do for now.

    Next step: wire up an astable with a yellow LED to go with the green and blue boosted LEDs.

  • Mini-lathe DRO Battery Lifetime

    Mini-lathe DRO Battery Lifetime

    It seems 390/389 alkaline button cells can power the mini-lathe’s DROs for about a year:

    Mini-lathe DRO battery replacement - 11 months
    Mini-lathe DRO battery replacement – 11 months

    Given that the replacement cells all come from the same batch, they’re aging on the shelf as well as in the DROs.

    Once again, I replaced both of them.

  • Epson R380 CISS Waste Ink Tank Replacement

    Epson R380 CISS Waste Ink Tank Replacement

    Transferring the printers to a new “server” provided an opportunity to dump another king’s ransom of waste ink down the drain, whereupon the tank cracked under finger pressure:

    Epson R380 - fractured CISS waste tank
    Epson R380 – fractured CISS waste tank

    The black smudge on the far side is an ink stain on adhesive left over from the hook-n-loop strip formerly holding it to the printer.

    It looks to be an ordinary polypropylene tube, nothing fancy, and, after a decade, it really doesn’t owe me anything.

    Scrounge a suitable bottle from one of the Big Boxes o’ Containers, run a bead of JB Weld Plasticbonder around the shoulder matching the discarded lid, jam on an original waste ink tank cap, and let the urethane goo cure while rotating slowly in the lathe to avoid unsightly dribbles:

    Epson R380 - DIY waste tank - epoxy curing
    Epson R380 – DIY waste tank – epoxy curing

    The goo surely won’t bond to the polyethylene bottle, but it’s likely better than anything else in my inventory. We shall see.

    Drill a hole for the hose, ignore the chips left inside the tank due to a sequence error, stick the original hook-n-loop tape in place, replace the drip-catcher rags, and install:

    Epson R380 - DIY waste tank - installed
    Epson R380 – DIY waste tank – installed

    The red silicone tape encourages the cap to remain in place against the urethane adhesive. One fewer endcap = one less seal.

    The cap need not be removable, as you just squeeze the tube slightly to squirt the aforementioned king’s ransom down the drain.

    It ought to last until I finally scrap out the printer.

  • Raspberry Pi Camera vs. RTSP Streaming

    Raspberry Pi Camera vs. RTSP Streaming

    It Would Be Nice to turn the various Raspberry Pi camera boxen around here into more-or-less full-automatic IP streaming cameras, perhaps using RTSP, so as to avoid having to start everything manually, then restart the machinery after a trivial interruption. I naively thought video streaming was a solved problem, especially on an RPi, particularly with an Official RPi Camera, given the number of solutions found by casual searching with the obvious keywords.

    As far as I can tell, however, all of the recommended setups fail in glorious / amusing / tragic ways. Some failures may be due to old configurations no longer applicable to new software, but I’m nowhere near expert experienced enough to figure out what’s broken and how to fix anything in particular.

    Doing RTSP evidently requires the live555.com Streaming Media libraries & test suite. Compiling requires adding -DNO_SSL=1 to the COMPILE_OPTS line in the Makefile, then letting it bake it for a while.

    The v4l2rtspserver code fetches & cleanly compiles its version of the live555 code, then emits various buffer overflow errors while streaming; the partial buffers clearly show how the compression works on small blocks in successive lines. Increasing various buffer sizes from 60 kB to 100 kB to 300 kB had little effect. This may have to do with the stream’s encoding / compression methods / bit rates, none of which seem amenable to random futzing.

    Another straightforward configuration compiled fine, but VLC failed to actually show the stream, perhaps due to differences between the old version of Raspbian (“Stretch”) and the new version of Raspberry Pi OS (“Buster”).

    Running the RPi camera through the Video4Linux2 interface to create a /dev/video0 device seems to work, but controlling the camera’s exposure (and suchlike) with v4l2_ctl behaves erratically. Obvious effects, like rotation & flipping, work fine, but not the fine details along the lines of auto exposure and color modes.

    Attempting to fire raspivid through cvlc to produce an RTSP stream required installing VLC on a headless Raspberry Pi, plus enough co-requisite packages to outfit world+dog+kitchenSink. After all the huffing & puffing wound down, the recommended VLC parameters failed to produce an output stream. The VLC doc regarding streaming is, to me, impenetrable, so I have no idea how to improve the situation; I assume RTSP streaming is possible, just not by me.

    Whenever any of those lashups produced any video whatsoever, the images suffered from tens-of-seconds latency, dropped frames, out-of-order video updates, and generally poor behavior. Some maladies certainly came from the aforementioned inappropriate encoding / compression methods / bit rates.

    The least horrible alternative seems to be some variation on the original theme of using raspivid to directly create a tcp stream or firing raspivid into netcat to the same effect, then re-encoding it on a beefier PC as needed. I’m sure systemd can automagically restart raspivid (or, surely, a script with all the parameters) after it shuts down.

    So far, this has been an … unsatisfactory … experience, but now I can close a dozen browser tabs.