The Smell of Molten Projects in the Morning

Ed Nisley's Blog: Shop notes, electronics, firmware, machinery, 3D printing, laser cuttery, and curiosities. Contents: 100% human thinking, 0% AI slop.

Category: Home Ec

Things around the home & hearth

  • Tool Drawers: Cheap Foam Liner

    You can get fancy closed-cell foam sheets for the bottom of your tool chest drawers and tote, but it seems awfully spendy, even with Harbor Freight quality plastic, for something that you must cut-to-fit. The drawers are just under 22×11 and 22×17 inches, so a 18×72 inch roll would line maybe three drawers; call it three bucks per drawer and, with nearly three dozen drawers to line, I’d rather drop a hundred bucks on tools.

    Rather than do that, the usual eBay supplier provided 150 feet of 1/8 inch x 24 inch white polyethylene closed-cell foam sheet for $27 delivered:

    Polyethylene foam sheet - roll
    Polyethylene foam sheet – roll

    It’s intended for packaging small items for shipping, but I’ll never tell.

    I mooched Mary’s 2×3 foot rotary cutting mat (this reenactment shows the awkwardly sized 17×23 inch mat), her longest quilting rulers, and dullest rotary blades:

    Rotary cutting foam sheets
    Rotary cutting foam sheets

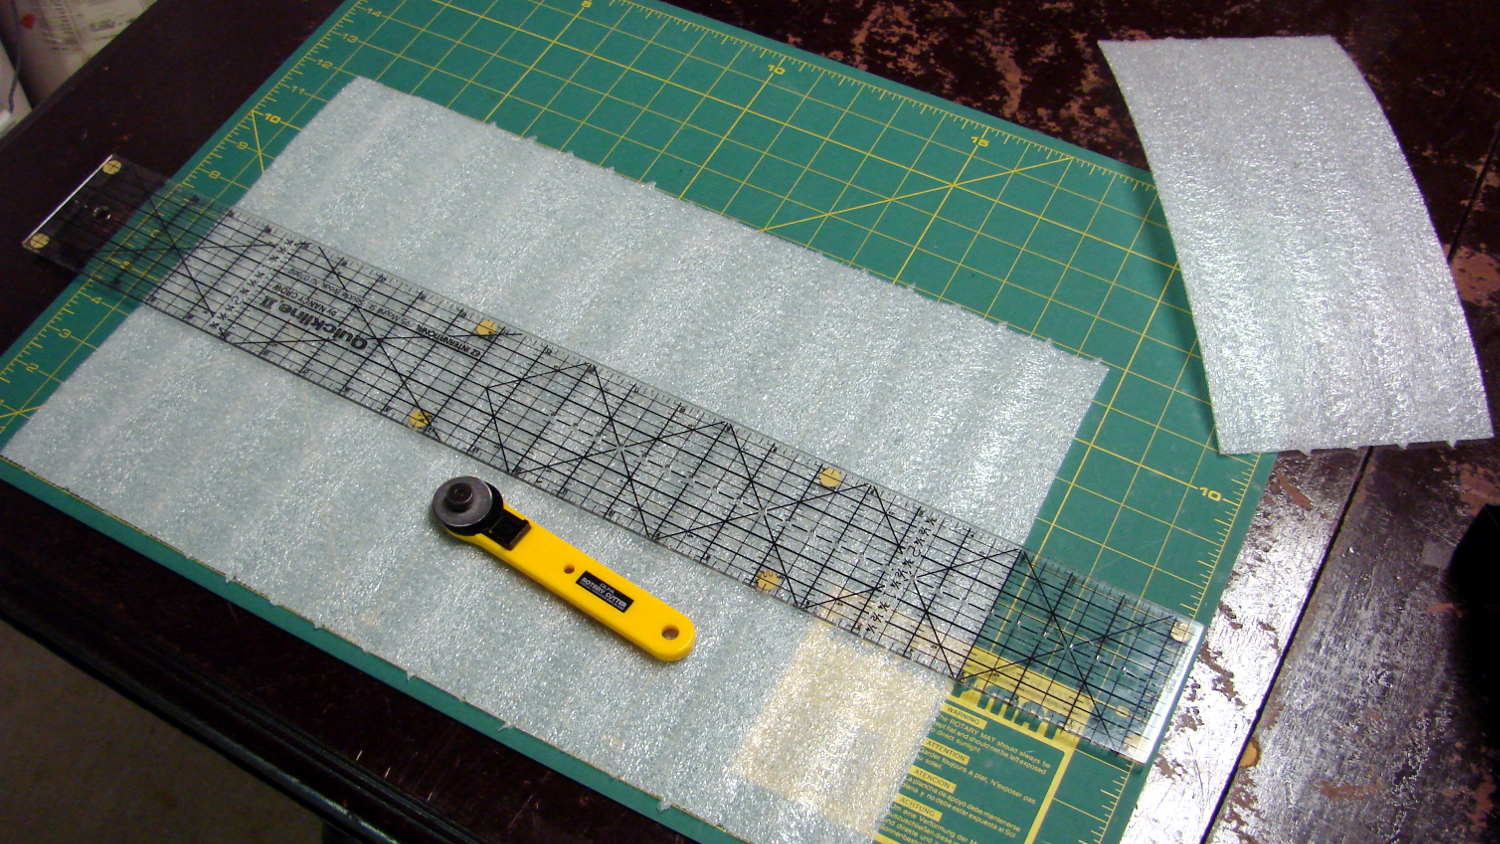
    After a few mis-steps, I got the hang of it:

    Foam-lined tool tray
    Foam-lined tool tray

    It’s not as contrast-y as black foam, but I can still find the tools:

    Foam-lined tool drawer
    Foam-lined tool drawer

    And I have plenty of foam left over for shipping small things, if I ever do any of that…


  • Salted Rabbit

    The original owner of our house positioned two blue plastic barrels along the driveway, filled with salt for ice melting. We’ve neither used the salt (a snowblower suffices for most storms) nor removed the barrels; they’ve been in those spots for at least three decades.

    Many critters pause in front of the barrels:

    Rabbit at salt barrel
    Rabbit at salt barrel

    Those who fit often hop inside:

    Rabbit inside salt barrel
    Rabbit inside salt barrel

    We’re pleased to provide public salt licks!

  • American Standard Faucet O-Ring Replacement

    The never-sufficiently-to-be-damned O-rings in the kitchen’s American Standard faucet wore out again; the faucet spout went from a tolerable piddle to a major flow over the course of a few weeks.

    The inner circumference of the bottom O-ring had most of the wear:

    American Standard faucet - worn lower o-ring
    American Standard faucet – worn lower o-ring

    In cross-section, it’s more of a D-ring:

    American Standard faucet - worn lower o-ring - section
    American Standard faucet – worn lower o-ring – section

    Once again, I soaked the spout & pillar in vinegar to remove the mineral deposits (despite the soft water), gave them a light sanding with 800 grit paper to regularize the surfaces, cleaned everything up, lubed it with petroleum jelly, and it’s all good.

    Disassembly and replacement went smoothly, mostly because I could look up what I did before and avoid all the usual mistakes.


  • Dishwasher Rack Protectors in PETG

    Our standard dishwasher loadout changed a while back, so I ran off more protectors to fill the bottom rack. The crystalline look of natural PETG is probably wasted in there, even though it puts the old, rather yellowed, PLA protectors to shame:

    Dishwasher Rack Protectors - old PLA new PETG
    Dishwasher Rack Protectors – old PLA new PETG

    Dollops of silicone sealant hold them in place: the bigger the blob, the better the job.

    We don’t activate the drying heater, so the plastic doesn’t get exposed to absurdly high temperatures. As nearly as I can tell, those PLA protectors remain in fine physical condition, even though they’re turning an odd color.

    The support structures peeled out easily with a fingernail pull:

    Dishwasher Rack Protectors - 0.20 mm PETG bridging - detail
    Dishwasher Rack Protectors – 0.20 mm PETG bridging – detail

    PETG doesn’t bridge well, as shown by the gaps between the support ridges. Those 0.20 mm layers seemed skimpy for lightly supported PETG, so I ran another set at 0.25 mm:

    Dishwasher Rack Protectors - 0.25 mm PETG bridging - detail
    Dishwasher Rack Protectors – 0.25 mm PETG bridging – detail

    Not quite enough improvement for a Happy Dance, although fine for the application.

    We look forward to seeing what grows in those little crevices…

  • Monthly Science: Chrysalid Engineer

    So then this happened:

    Karen - canonical tiger paw graduation picture
    Karen – canonical tiger paw graduation picture

    Yeah, tanker boots and all; not the weirdest thing we saw during RIT’s graduation ceremonies.

    This summer marks her fourth of four co-op semesters with Real Companies Doing Tech Stuff and her final classes end in December; RIT holds one ceremony in the spring and being offset by a semester apparently isn’t all that unusual. She (thinks she) has a job lined up after graduation and doesn’t need her doting father’s help.

    But, hey, should you know someone with a way-cool opportunity (*) for a bright, fresh techie who’s increasingly able to build electronic & mechanical gadgets and make them work, drop me a note and I’ll put the two of you in touch. [grin]

    (*) If that opportunity should involve 3D printed prosthetics with sensors and motors, she will crawl right out of your monitor…

  • Craftsman Mower Flywheel Key: Intact

    The mower tried to eat a protruding root, emitted a horrible crash, and ran poorly until I shut it off, after which it refused to restart. Hoping against hope that the flywheel’s aluminum key had sheared, I pulled the cover, removed the starter, and found:

    Mower flywheel key
    Mower flywheel key

    Alas, the key is in fine shape. I made the two diagonal scratches to confirm it really is aluminum.

    After letting the mower sit for a day, it started and ran briefly, blatted a giant backfire that probably startled the neighborhood (because I had the exhaust aimed into the garage, which served as a wonderful resonator), died a sudden death, then made clanking sounds whenever I pulled the rope. Something is definitely broken inside, but I suspect diagnosing & fixing it will require more time and money than is justified.

    I no longer form deep emotional attachments to lawn mowers, so I ordered a similar one online and the local Sears had it ready for pickup in an hour.

    If I had to pull the flywheel, I’d tap the two obvious holes (one behind the shaft in the picture) and gimmick up a puller with two matching screws around a central bolt that does the heavy lifting; I can’t justify the Special Service Tool I’m sure it requires.

    The old mower lasted an hour at the foot of the driveway with a “FREE – Engine probably severely broken” sign affixed to its handle; both parties got a great deal on that transaction!

  • Ed’s High-Traction Multi-Grain Bread, V 1.1

    A somewhat lighter, more rye-tasting loaf than my classic recipe:

    Combine dry ingredients in a 4.5-quart mixer bowl:

    • ½ Tbsp dry yeast (1 Tbsp for more boost)
    • 2 Tbsp brown sugar
    • ½ cup dried milk

    Stir in:

    • 1-½ cup warm water

    Dump more dry ingredients on top, do not mix:

    • ½ cup flax seed meal
    • 1 cup bread flour
    • 1 cup rye flour
    • 2-½ cup whole wheat flour
    • 1 tsp salt

    Let the dry ingredients sit on top of the liquid for 15 minutes as the yeast revs up, then run the mixer until the dough ball cleans the bowl sides. Oil the bowl, cover, and let the dough rise for maybe an hour (45 minutes in warm weather / oven).

    Form the ball into an ingot, pack it into a non-stick loaf pan, cover loosely with aluminum foil, and let it rise another hour (30 minutes in warm weather / oven) to fill the pan with a nice loaf. I’ve been using a King Authur 8-½ x 4-½ inch non-stick bread pan to good effect.

    Bake loaf with the foil on top in a 350 °F oven for 50 minutes. You can set the oven to start at a convenient time, run for an hour at 350 °F from a cold start, and the bread will come out fine. If it’s too durable, try 325 °F.

    Drop loaf onto a cooling rack, wait five minutes, slice generous QC sample from one end, apply (peanut) butter, give thanks to the yeast, enjoy.