Strange though it may seem, the kitchen faucet handle broke while Mary was using it. The rear wall of the socket that fits over the cartridge valve stem fractured:

Having no water in the kitchen is not to be tolerated, so I applied a redneck fix while pondering the problem:

Based on that comment, I called the American Standard hotline (800-442-1920), described the situation, and they’re sending a replacement handle and cartridge. Evidently the new handle won’t fit the old cartridge, which makes me feel better about not stockpiling repair parts, even while I now wonder what the new cartridge part number might be and how you’d tell them apart.
Anyhow, the redneck fix wouldn’t suffice for the next week; I needed something slightly more permanent. The broken wall fit neatly in place on the mount, but:
- It must withstand far more force than a simple glue joint can provide
- I can’t machine square holes
- Wrapping a metal sleeve around the mount seemed like too much work
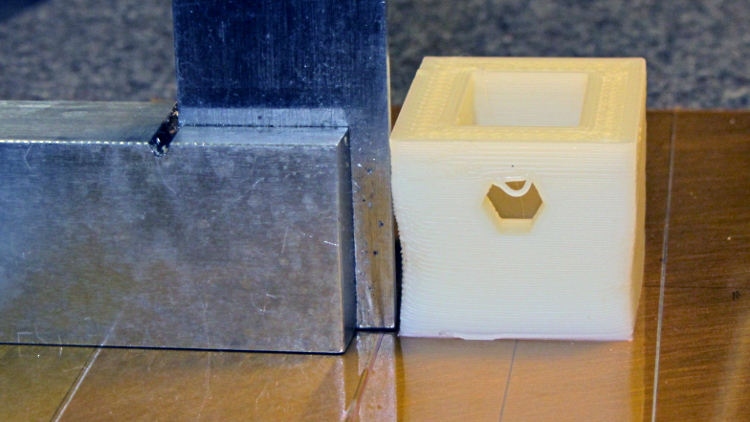
You undoubtedly saw this coming a while ago:

The mount tapers slightly from the handle body toward the open end to provide draft for the molding process. I applied a hull() operator to two thin rectangles spaced the right distance apart along the Z axis to create a positive model of the mount, which then gets subtracted from the blocky outer rectangle. The hole clears a 10-32 screw that fits the standard setscrew threads (normally hidden behind the handle’s red-and-blue button).
Unlike most printed parts I’ve done recently, the sleeve suffered from severe shrinkage along the outside walls:
The inside maintained the right shape, so I cleared the nubs with a file and pressed it in place around the mount with the rear wall snapped into position. The black plastic socket evidently isolates the handle from the valve stem and I used a stainless 10-32 screw to prevent the nightmare scenario of having the sleeve slide downward along the tapered mount and block the setscrew. Overall, it came out fine:

However, the chunky sleeve didn’t clear the opening in the escutcheon cap, which put the cap on the windowsill for the next week. The result works much better than the redneck fix and looks almost presentable. It’s certainly less conspicuous:

I hope the new handle has a much more robust socket…
The OpenSCAD source code:
// Quick fix for broken American Standard Elite 4454 faucet handle
// Ed Nisley KE4ZNU February 2013

//- Extrusion parameters must match reality!
//  Print with +2 shells and 3 solid layers

ThreadThick = 0.25;
ThreadWidth = 2.0 * ThreadThick;

HoleFinagle = 0.4;
HoleFudge = 1.00;

function IntegerMultiple(Size,Unit) = Unit * ceil(Size / Unit);
function HoleAdjust(Diameter) = HoleFudge*Diameter + HoleFinagle;

Protrusion = 0.1;           // make holes end cleanly

//----------------------
// Dimensions

Wall = 5.0;

Slice = ThreadThick;                // minimal thickness for hull object

ShaftEnd = [11.6,17.8,Slice];
ShaftBase = [12.1,18.8,Slice];
ShaftLength = 19.0;

Block = [(ShaftBase[0] + 2*Wall),(ShaftBase[1] + 2*Wall),ShaftLength - Protrusion];

ScrewOffset = 6.5;          // from End
ScrewDia = 5.0;             // clearance

//----------------------
// Useful routines

module ShowPegGrid(Space = 10.0,Size = 1.0) {

    Range = floor(50 / Space);

    for (x=[-Range:Range])
        for (y=[-Range:Range])
            translate([x*Space,y*Space,Size/2])
            %cube(Size,center=true);

}

module PolyCyl(Dia,Height,ForceSides=0) {           // based on nophead's polyholes
  Sides = (ForceSides != 0) ? ForceSides : (ceil(Dia) + 2);
  FixDia = Dia / cos(180/Sides);
  cylinder(r=HoleAdjust(FixDia)/2,h=Height,$fn=Sides);
}

//----------------------
// Model the handle's tapered shaft

module Shaft() {

    hull() {
        translate([0,0,ShaftLength - Slice/2])
            cube(ShaftEnd, center=true);
        translate([0,0,Slice/2])
            cube(ShaftBase, center=true);
    }

}

//----------------------
// Build it!

ShowPegGrid();

difference() {
    translate([0,0,ShaftLength/2])
        cube(Block,center=true);
    Shaft();
    translate([0,0,ShaftLength - ScrewOffset])
        rotate([-90,0,0])
            PolyCyl(ScrewDia,ShaftBase[1],6);
}

Comments
6 responses to “American Standard Elite Kitchen Faucet: Handle Failure”
We had a similar problem a few years ago. The socket cracked and bent but did not separate. As a temporary repair, I bent a piece of bare #14(??) copper wire around the socket then twisted the ends together to tighten it in place. A subsequent trip to a local plumbing parts place yielded a similar, but shorter, handle. The short handle failed to satisfy the kitchen management. Therefore, I milled and filed, from solid aluminum, a rectangular sleeve shaped much like yours. After forcing the sleeve over the deformed socket, tapping a thin wedge between the sleeve and socket closed the crack and held everything in place.
I grovel & abase myself at your feet.
The printer gets me out of that “filing” part, which I like a lot. Should’a done measurements, made a prototype or two, modeled a thinner & shaplier block that fit inside the escutcheon, and created a real repair like yours. Wouldn’t have taken me more than a few hours longer than you spent filing, not counting the printing time… [grin]
how long has the original handle been in service? (oh, I know….the whole time)
I wonder if the new handle’s box can be bolstered with JBWeld before putting into service?
According to the dates on the scanned manuals, First Water flowed in late 2003: the handle lasted just under a decade. I suppose that’s OK, but it’s just a chunk of dumb metal with no moving parts and it shouldn’t break, no matter what. I’m not all that strong with the hex key, either, so I’m pretty sure it’s not a case of over-torquing the setscrew.
Similarly, the durability of those spout O-ring seals isn’t anything they should be proud of…
We’ve got the conventional (more or less) two faucet system, with D shaped stems on the cartridges. Much better than the previous American Standard splined cartridge system, with a soft plastic bushing to “match” cartridge splines to the much larger handle splines. That didn’t last long.
The only problem with the current one is that the plastic bushing in the handle is an almost perfect fit, but until you hit perfection, running the faucet handle to the stops will cause the set screw to come off the sweet spot. I keep a set of allen keys in the household tool box and check the faucet periodically. If the vendor (Delta?) had smarts, they’d use a second screw at 90 degrees, but no luck.
Have to pull the assembly sooner or later–the metal in the mount has galvanic corrosion with the stainless sink. They skipped the insulating gasket… Hmm, something about old Rubbermaid containers, I suspect. The poly should be about the right thickness. It’s too big for an affordable 3D printer, so I’m safe from that temptation. [grin]
We have those in the shower and you’ve perfectly summed up the situation: that hex key lives in the drawer for well and good reason.
First you start thinking about a 3D printer and it’s all downhill from there…