The Smell of Molten Projects in the Morning

Ed Nisley's Blog: Shop notes, electronics, firmware, machinery, 3D printing, laser cuttery, and curiosities. Contents: 100% human thinking, 0% AI slop.

Author: Ed

  • Handi-Quilter HQ Sixteen: Preliminary Power PCB Schematic

    Handi-Quilter HQ Sixteen: Preliminary Power PCB Schematic

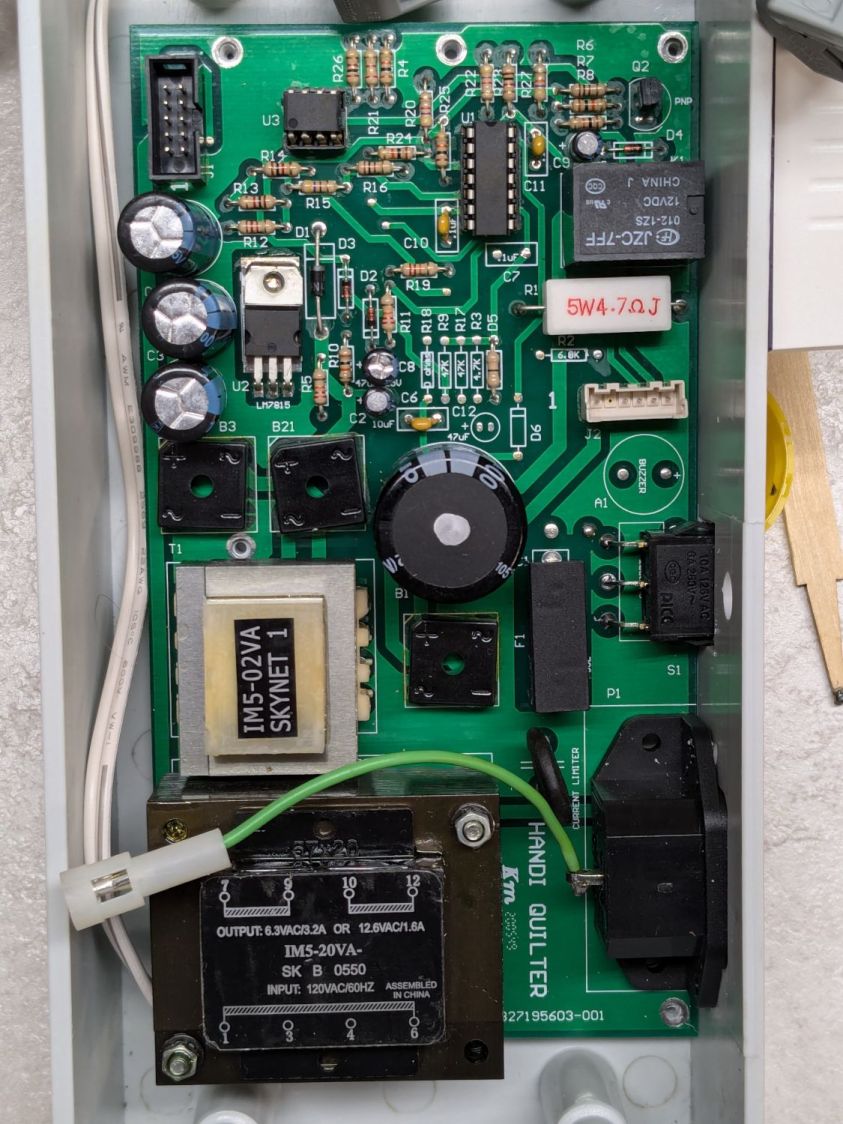
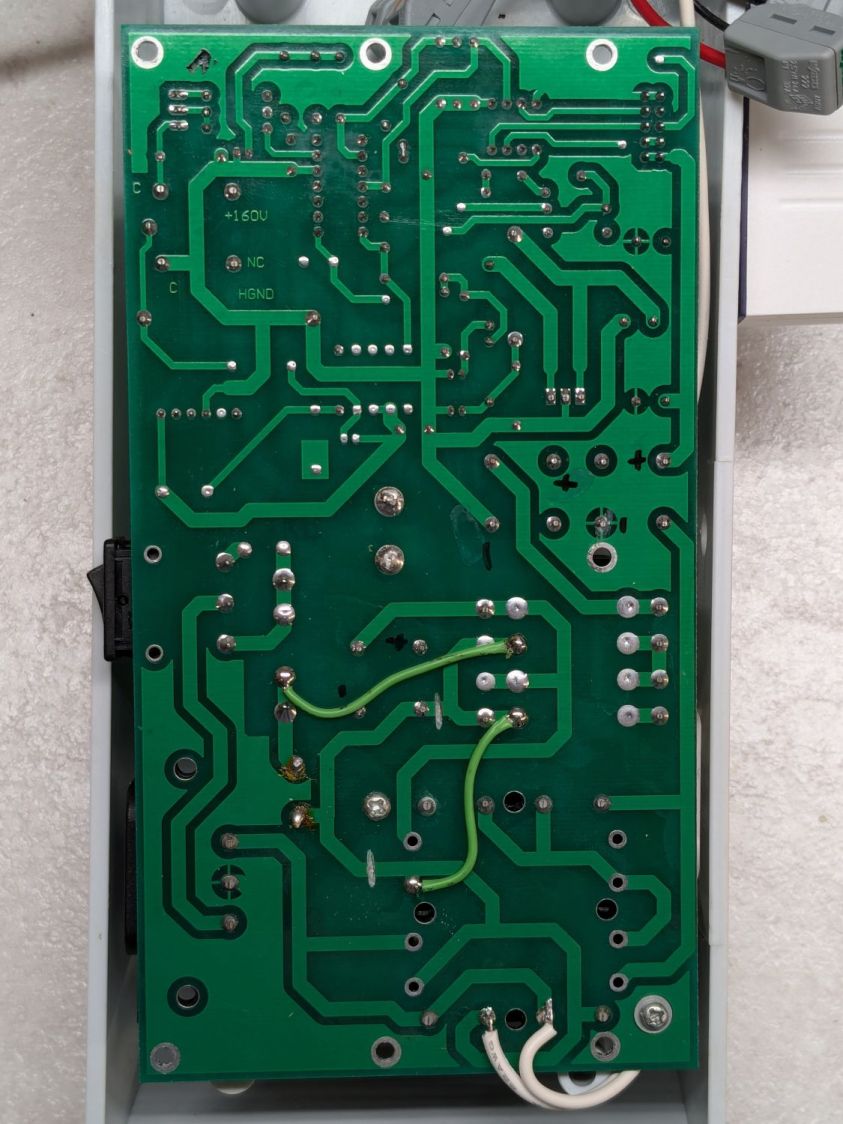
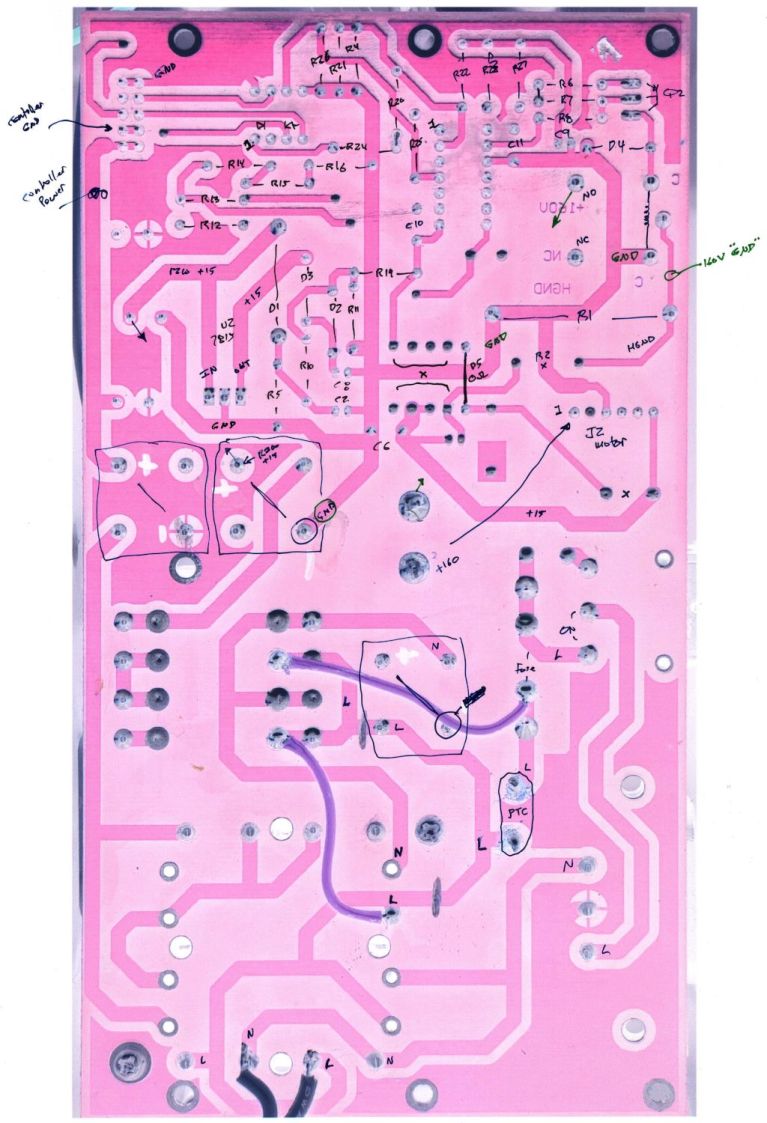
    Because I must eventually diagnose and fix the HQ Sixteen’s Motor Stall Heisenbug, I printed out several views of the power supply PCB on glossy photo paper for best visibility.

    The component side:

    Power PCB - components
    Power PCB – components

    The solder side:

    Power PCB - solder
    Power PCB – solder

    The X-ray view:

    Power PCB - overlaid
    Power PCB – overlaid

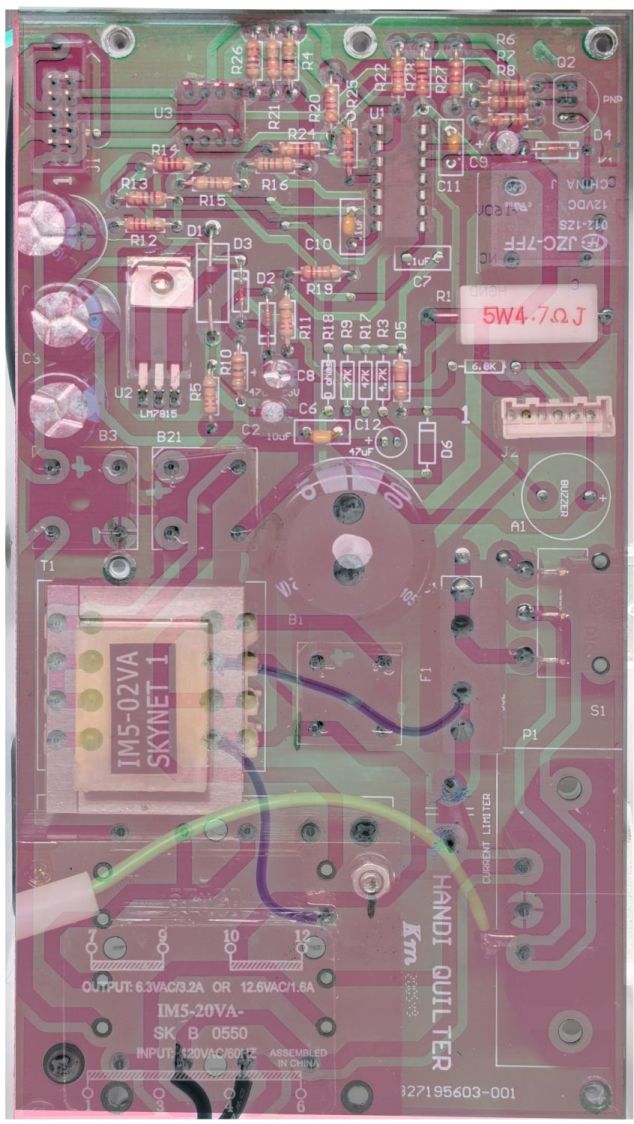
    Considerable pondering and sketching produced an annotated view of the solder side:

    HQ Sixteen - Power PCB - solder side - component labels - reduced
    HQ Sixteen – Power PCB – solder side – component labels – reduced

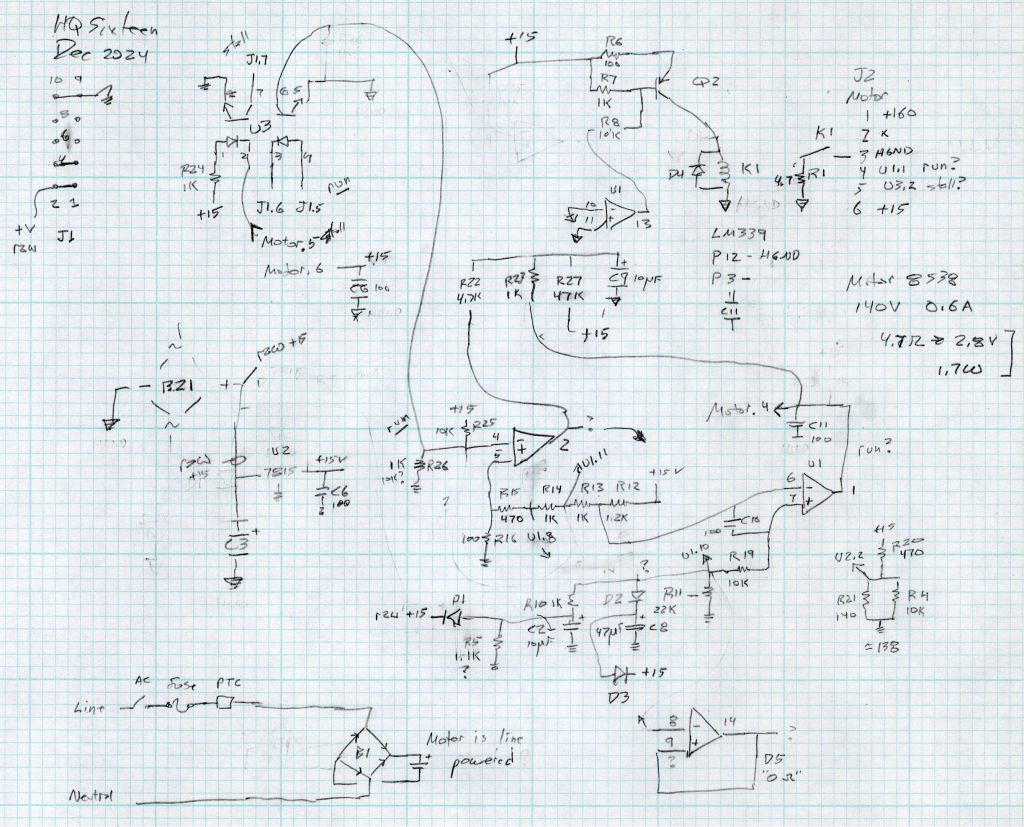
    Here’s a tentative schematic drawn on the fly while extracting it from the PCB traces:

    HQ Sixteen - Power PCB - rough schematic
    HQ Sixteen – Power PCB – rough schematic

    !!CAUTION!! I have not verified the schematic against the actual hardware / PCB / components, as the Heisenbug has not reoccurred and I had no occasion to take the machine apart for checking. Do not assume any connections or components are correctly drawn.

    Before I redraw the schematic in a more useful format, I must verify several nodes, because not everything in there makes sense.

    In particular, the elaborate resistor string in the middle of the page seems to establish reference voltages for everything else, from the motor power supply turn-on delay to the RUN signal starting the motor.

    The optoisolators definitely get the RUN command signal from the controller and feed the STALL motor status back to it. That’s assuming I understand enough to pin those labels on those connections.

    !!CAUTION!! Read my caveats about the direct-from-the-AC-line non-isolated +160 VDC motor supply before connecting your instruments. The GND traces are not isolated from the AC line and are not at the normal “0 V” AC neutral potential.

    But if this mess gets you further along with whatever you were doing, let me know how it all worked out for you.

  • Laser-Engraved PETG / PETG-CF

    Laser-Engraved PETG / PETG-CF

    Prompted by scruss’s report of successfully “engraving” PLA, I had to try this:

    Laser engraved PETG-CF
    Laser engraved PETG-CF

    It’s blue PETG-CF from the scrap box, done at 500 mm/s and 20% of a 60 W laser and came out looking really nice.

    I did a pass at 10%, low enough that the laser barely fired, and the mark was, correspondingly, barely visible: no color change and only a slight depth. Obviously, you’d want to tune for best picture depending on whatever you were trying to achieve.

    The results on black PETG, also from the scrap box, were somewhat less attractive:

    Laser engraved PETG - bottom surface
    Laser engraved PETG – bottom surface

    That’s at 500 mm/s with power at 10% and 20, so the outcome definitely depends on the material. That surface was against the platform when it was printed on the Makergear M2, explaining the glossy smooth threads.

    The other side was rougher and needed more power to punch a visible result into the plastic:

    Laser engraved PETG - top surface
    Laser engraved PETG – top surface

    All in all, the PETG-CF result looks usable, particularly for small-ish annotations on a flat surface where full-on multimaterial printing would take forever without adding much value.

  • HLP-200B Laser Power Meter: Variation Across the Platform

    HLP-200B Laser Power Meter: Variation Across the Platform

    It’s generally accepted that laser cutter performance varies across the platform due to differences in path length, with (in my OMTech 60 W machine) the rear left corner having more power because it’s closest to the laser tube and the front right corner having less power because it’s farthest away.

    Having measured the path lengths, set the laser pulse power to 25%, then plotted the power measurements against path length:

    HLP-200B Laser Power Meter - 60 W across platform measurements
    HLP-200B Laser Power Meter – 60 W across platform measurements

    I was mildly surprised at the minimal path length difference between the two corners and the center, but it’s due to the meter case reducing the distance along the X axis without a similar change along Y. In real life, you’d snuggle the HLP-200B sensor against the boundaries of the platform and measure the corresponding distances.

    Given the size of the standard deviation bars, you can surely draw different conclusions, but the linear fit suggests the beam loses 3.5 W per meter of path length: 3.9 W from left rear to right front. Using meters for the distance multiplies the coefficient by 1000 and brings the digits up out of the noise; don’t believe more than two digits.

    Although the beam diverges, the HLP-200B sensor is much larger than the beam and captures all the energy even in the front right corner, so beam divergence doesn’t matter and any square-law effect doesn’t apply.

    If I had measured the power at the tube exit, it would be around 34 W and the error bars would surely justify that expectation, too.

    Assuming the path loss in watts is proportional to the tube exit beam power, calling it 10% would be about right. That would definitely reduce the cutting performance in the front right corner if the power setting was barely adequate elsewhere on the platform.

  • OMTech 60 W Laser: Path Length Measurements

    OMTech 60 W Laser: Path Length Measurements

    Just to see if it worked, I tried measuring the path length between the laser tube exit and various spots on the platform with a laser distance measuring tool / rangefinder:

    Laser Path Length setup - distance meter
    Laser Path Length setup – distance meter

    That is a reenactment based on actual events.

    The trick is to put a retroreflective panel at the tube exit:

    Laser Path Length setup - retroreflector
    Laser Path Length setup – retroreflector

    The key under the tube comes from the key switch on the front panel, which is locked in the OFF position. That way, I can’t fire the CO₂ laser without opening the rear hatch to retrieve the key, whereupon I’ll most likely notice the retroreflective target I forgot earlier.

    Protip: Always set things up so you must make two mistakes before the bad thing happens. I’m certain to make one mistake, but I can generally catch myself before making the second mistake.

    Then it’s just a matter of positioning the base of the rangefinder on the laser head and convincing the targeting dot to go backward through the mirrors to the retroreflector:

    Laser Path Length setup - retroreflector target
    Laser Path Length setup – retroreflector target

    Which is a reenactment with a laser pointer through Mirror 2 to Mirror 1 to the reflector. If I had a few more hands, this stuff would be way easier.

    Then drive the laser head around the platform and make measurements:

    Path length measurements
    Path length measurements

    The distances down the left side are at the Mirror 2 entrance aperture, the rest are at the Mirror 3 entrance on the laser head. I think the measurements are within ±50 mm of the “true” path length at any given spot, because I did not jog the head to exact coordinates. The two values in the front right corner suggest ±10 mm repeatability with my slack process and cross-checking the various differences along the axes comes out reasonably close.

    Don’t believe all the digits.

    Doing this for real would involve figuring the offset from the Mirror 3 entrance to the HLP-200B Laser Power Meter target, then positioning the rangefinder at that point:

    HLP-200B Laser Power Meter - platform center
    HLP-200B Laser Power Meter – platform center

    My rangefinder (an ancient Bosch GLR_225) can use four different measurement origins; I used the default “end of the case” setting, put that end flush-ish against the mirror entrance aperture, and declared it Good Enough™.

  • Christmas Non-Wrapped Box

    Christmas Non-Wrapped Box

    Mostly to find out if I could do it:

    Christmas Wrap custom box
    Christmas Wrap custom box

    The process:

    • Fetch a printable wrapping paper pattern, ignore the watermark
    • Resize / crop to fit a Letter page, print two copies on glossy photo paper
    • Generate a suitable multi-sheet paper box in SVG format
    • Import into LightBurn
    • Rearrange / splice the parts to put the main box on one Letter size sheet and the end caps on another
    • Fire The Laser to score (blue lines) and cut (red lines) the paper
    • Assemble using a glue stick
    • Fill with Christmasy stuff (your choice may vary)
    • Tuck the flap, there’s no need to wrap!

    The rearranged main box just barely fits across a Letter page:

    Non-Wrapped Christmas Box - main piece - LightBurn layout
    Non-Wrapped Christmas Box – main piece – LightBurn layout

    You can make many more end caps than you need:

    Non-Wrapped Christmas Box - endcaps - LightBurn layout
    Non-Wrapped Christmas Box – endcaps – LightBurn layout

    Obviously, this makes no sense whatsoever in terms of box making, but the recipient smiled and that’s what I wanted.

  • Blog Summary: 2024

    Blog Summary: 2024

    It seems nobody else can find all the fuse boxes hidden around a Forester, either, and water heater anode rods continue to pose a challenge:

    Page views - year to 2024-12-28
    Page views – year to 2024-12-28

    What is it about the Thermador heater?

    Surely better cat pictures would create more traffic:

    All-time Total Views - 2024-12
    All-time Total Views – 2024-12

    So I asked the WordPress AI to come up with a picture, given the minimal text in this post:

    AI Generated Image for 2024 Blog Summary
    AI Generated Image for 2024 Blog Summary

    The cat has approximately the right number of legs, if not toes, but what is the head in the corner?

    Let’s take the rest of the day off …

  • PrusaSlicer Scarf Joints

    PrusaSlicer Scarf Joints

    The release notes for PrusaSlicer 2.9 mention the addition of scarf joints on outer perimeters. Smooth joints seem like a Good Idea™, so I turned it on for comparison with a recent object:

    Double Gear fidget toy - scarf vs normal
    Double Gear fidget toy – scarf vs normal

    Those are flipped from the as-printed orientation: the orange ring builds upward, starting with two concentric threads on the platform.

    The normal aligned joint is on the right above, with a closer look here:

    Double Gear fidget toy - normal joInt
    Double Gear fidget toy – normal joInt

    The scarf joint has a offset between layers:

    Double Gear fidget toy - scarf joint
    Double Gear fidget toy – scarf joint

    The PrusaSlicer visualization shows the effect, looking up from below the platform:

    Double Gear fidget toy - scarf joint visualization
    Double Gear fidget toy – scarf joint visualization

    The blue PETG-CF parts have no visible seams anywhere with either setting, probably because the stuff swells slightly and obliterates any subtle differences.

    Scarf joints don’t make much difference for a fidget toy, but should improve the outcome for more critical circular / spherical models.