Ed Nisley's Blog: Shop notes, electronics, firmware, machinery, 3D printing, laser cuttery, and curiosities. Contents: 100% human thinking, 0% AI slop.
All three had 36 working bulbs and, with a bit of good QC, should continue that way for a long, long time.
LED bulbs don’t have the intense point-source brilliance of clear tungsten bulbs and even the warm-white ones tend toward the cool end of the spectrum, but they’re Good Enough …
The matrix of bits covers nine slot lengths (= screw head diameters) with four / five / six slot widths. This is the set with 44 bits; the 58 bit set fills the empty holes with 14 hex / square / Phillips bits that I already have in multiples.
I reserve these lovely hollow-ground bits for specialty screws that must not be goobered; most of the time ordinary drivers work just fine and there’s no reason to chew these up.
Even these tips won’t fit every screw in existence, but you’ll go a long way before this set isn’t the right hammer for the job at hand.
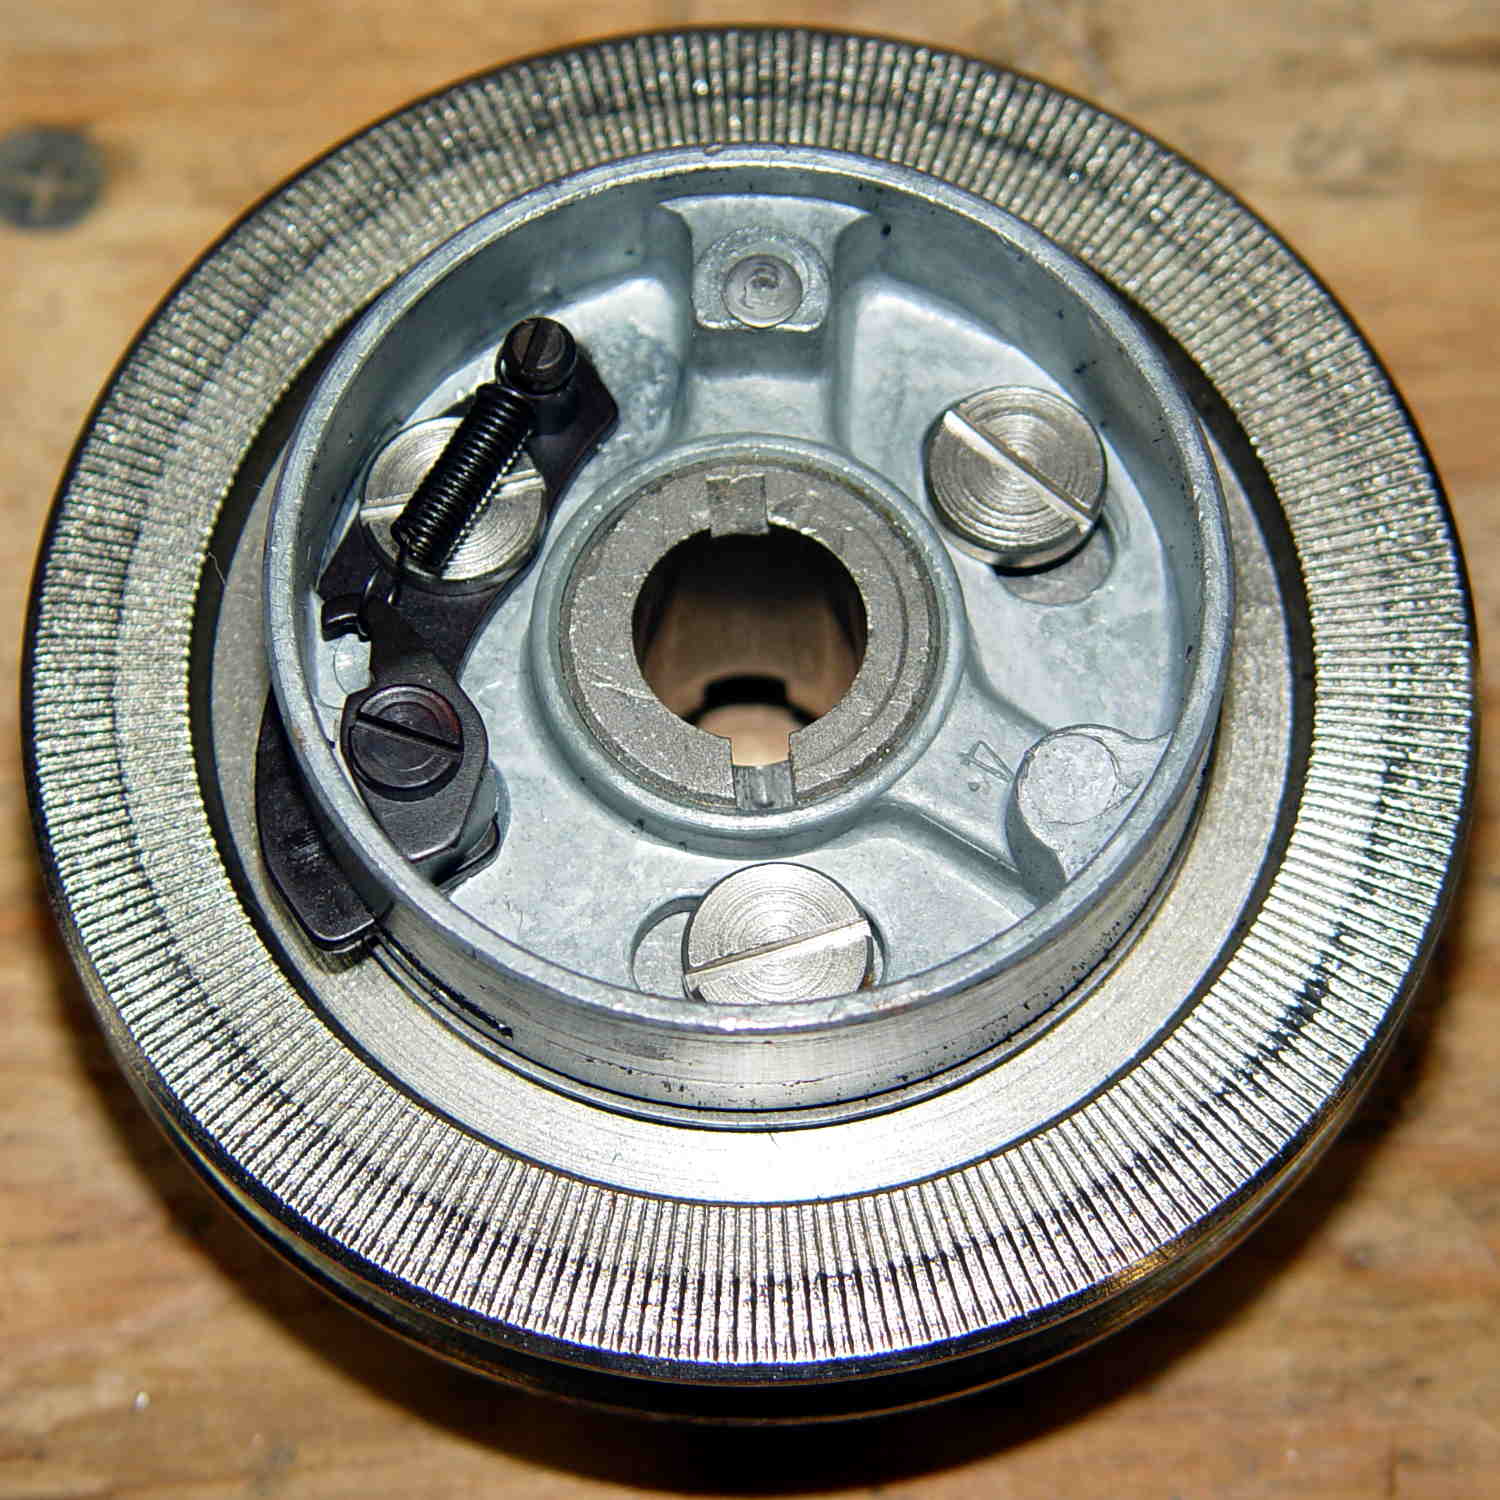
One of Mary’s friends asked us to take a look at her Kenmore 158.17032 sewing machine that suffered from a Showstopper Problem: the handwheel turned the main shaft, but the motor pulley spun freely. You could rev the motor to maximum speed without budging the shaft, which suggested something was wrong with the clutch joining the handwheel and the belt pulley to the main shaft. This being a slightly newer model than the others in our stable, I was mildly surprised to find a completely different clutch mechanism between the drive belt and the main shaft.
The plastic cover plate in the handwheel yielded to an old crochet hook:
Kenmore 158.17032 – Handwheel cap removal
Stick the hook into the tiny notch, engage hook with cover, pull outward, and it’ll fall into your other hand.
That exposes a simple screw holding the chromed plastic handwheel in place on the motor shaft. After taking the pulley and clutch off the Hard Way, I discovered the Right Way, which is hereby documented for The Next Time Around. In order to show what’s needed, I’ll start in the middle and work outward.
Pull the handwheel off and remove the machine’s end cover.
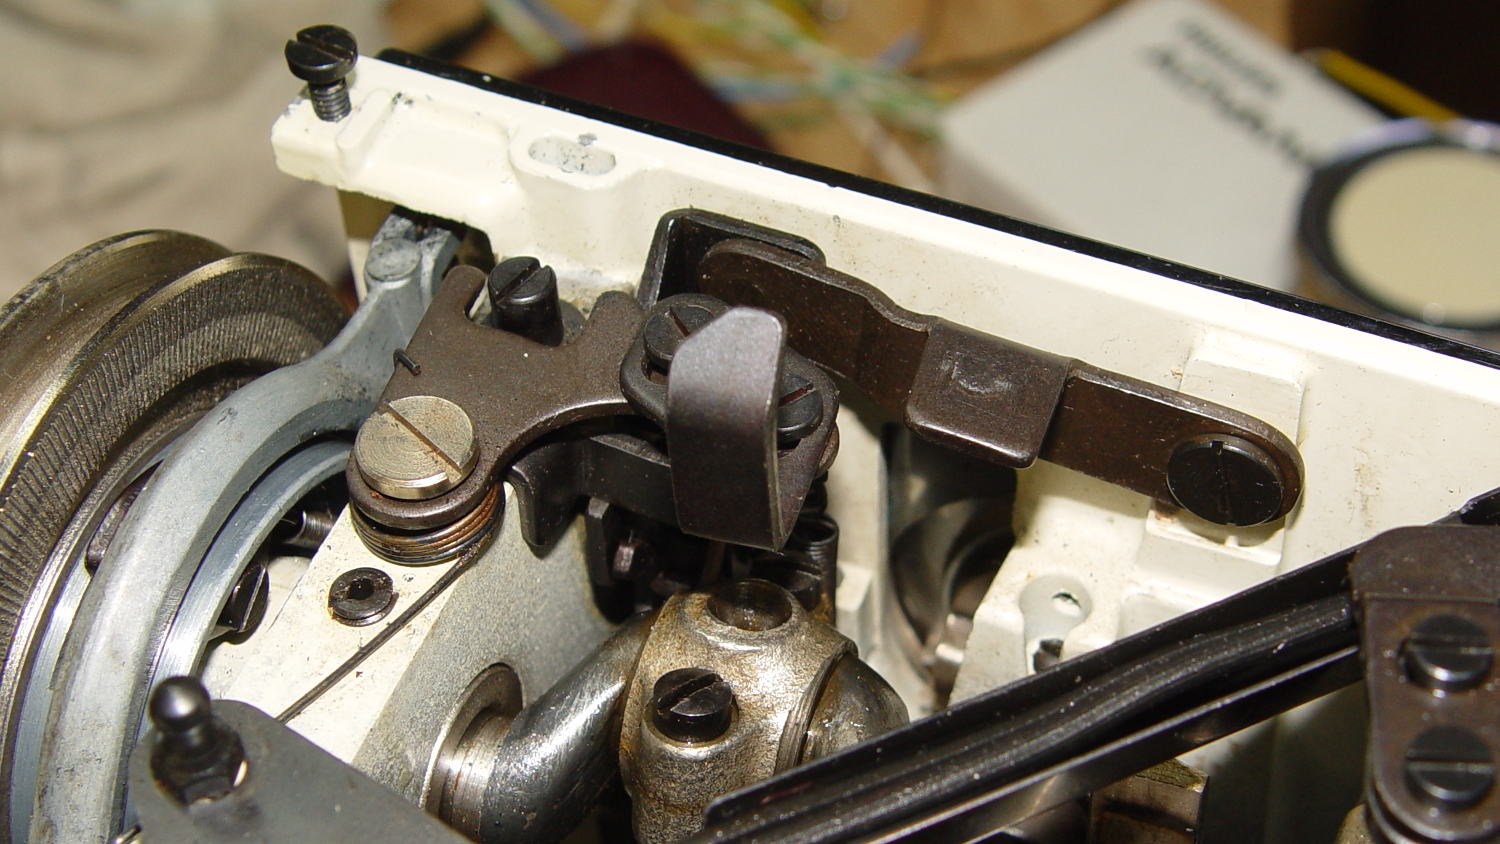
With the clutch assembly removed (which you can’t do yet), you can see a pair of pot metal bands that act as a brake when the bobbin winder snaps off a full bobbin. They look like this in the normal running position:
Kenmore 158.17032 – Clutch trip lever – normal position
The black bow-tie at 9 o’clock is vertical, holding the brake bands apart and clearing the tab on the clutch asembly (which you haven’t seen yet).
They look like this when the bobbin winder has just snapped:
Kenmore 158.17032 – Clutch trip lever – bobbin wind position
The Bobbin Winder Reset Button atop the machine (which our machines don’t have and this one does) presses on the tab sticking out toward you on the horizontal bar pivoting on the front of the machine:
Kenmore 158.17032 – Bobbin winder reset lever
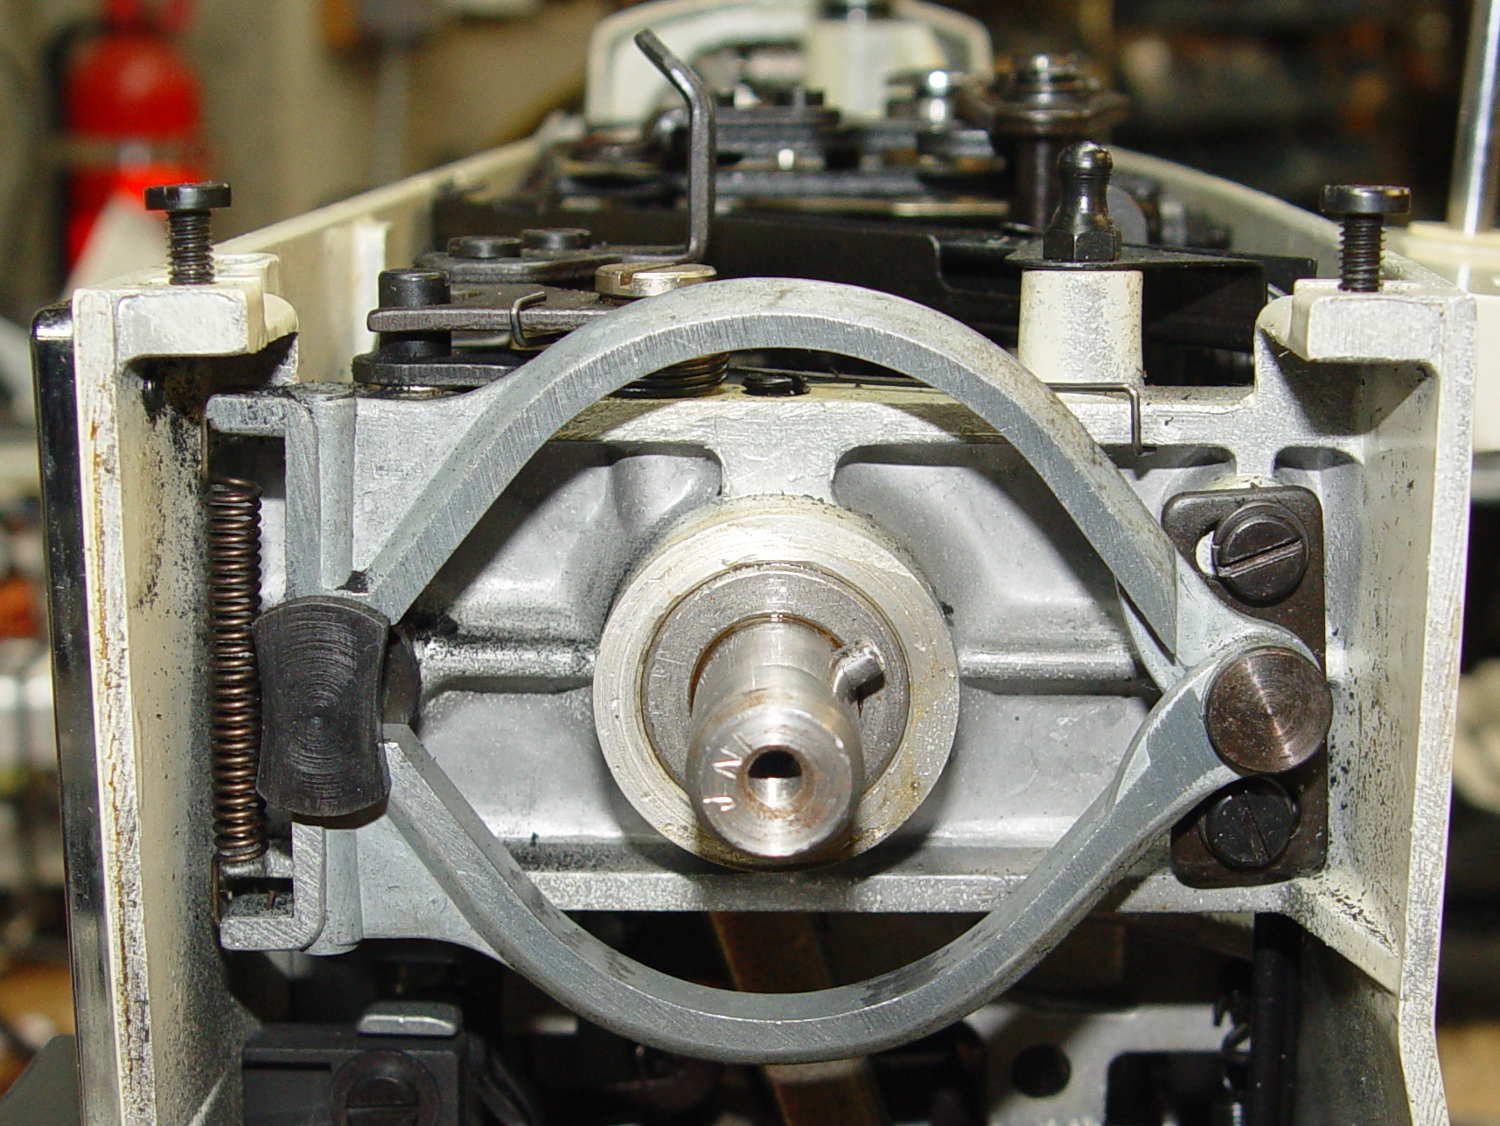
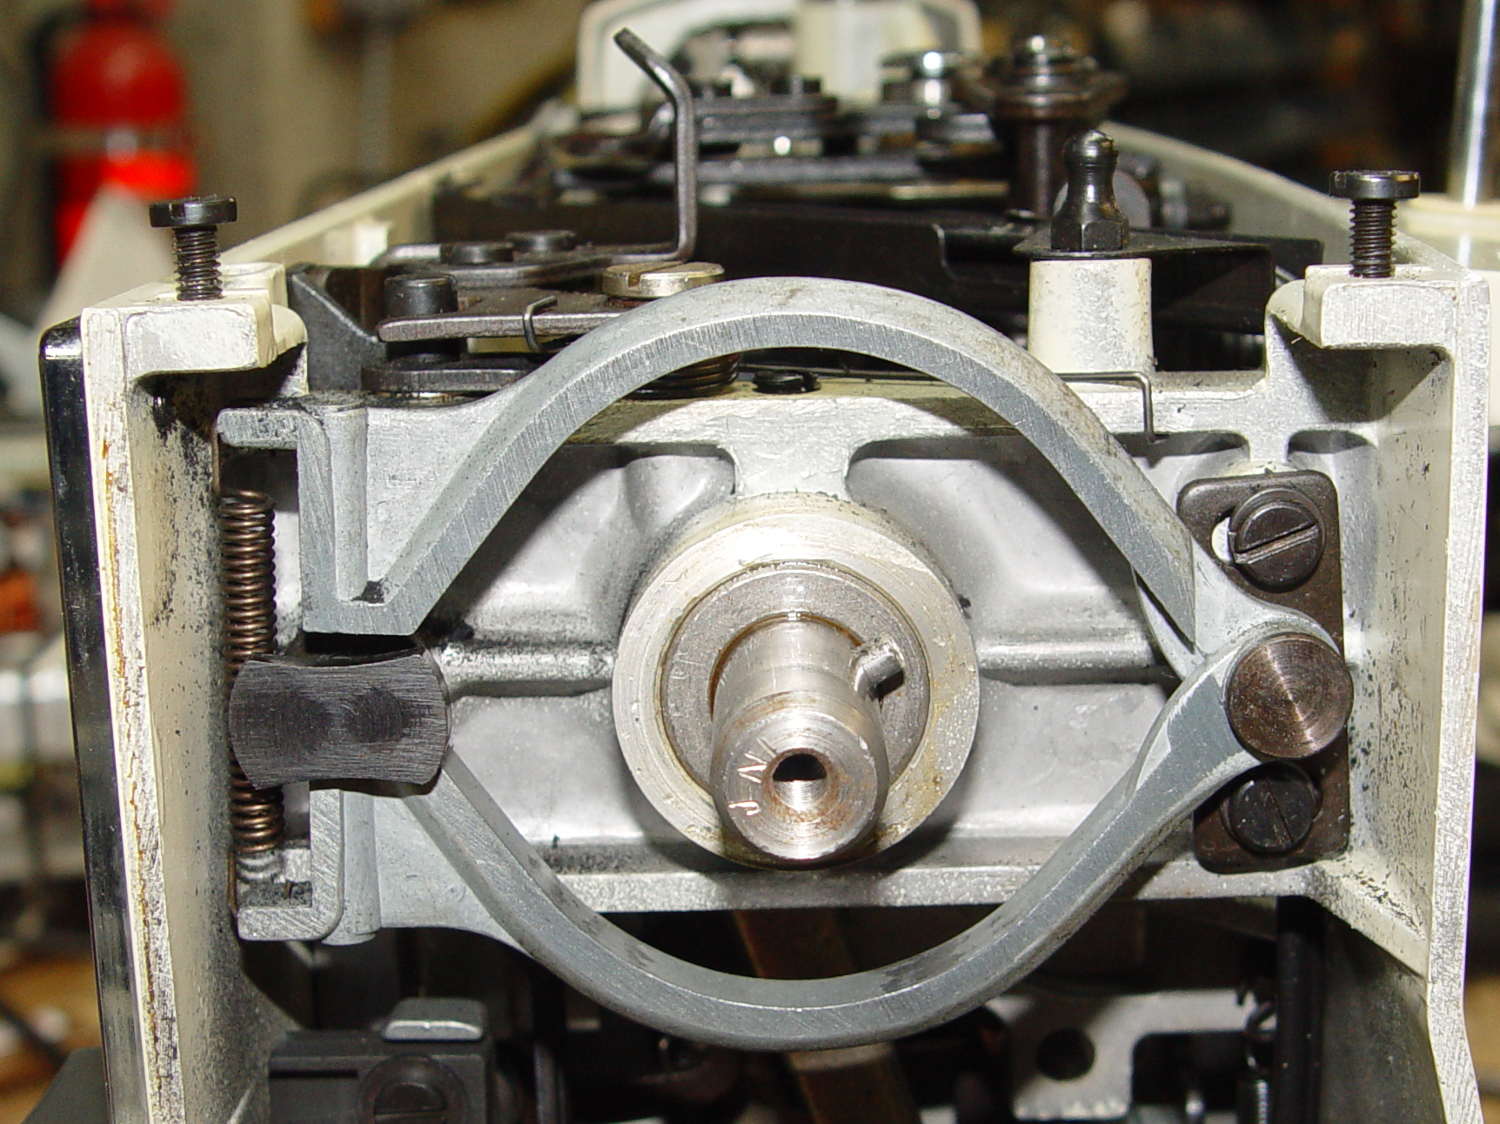
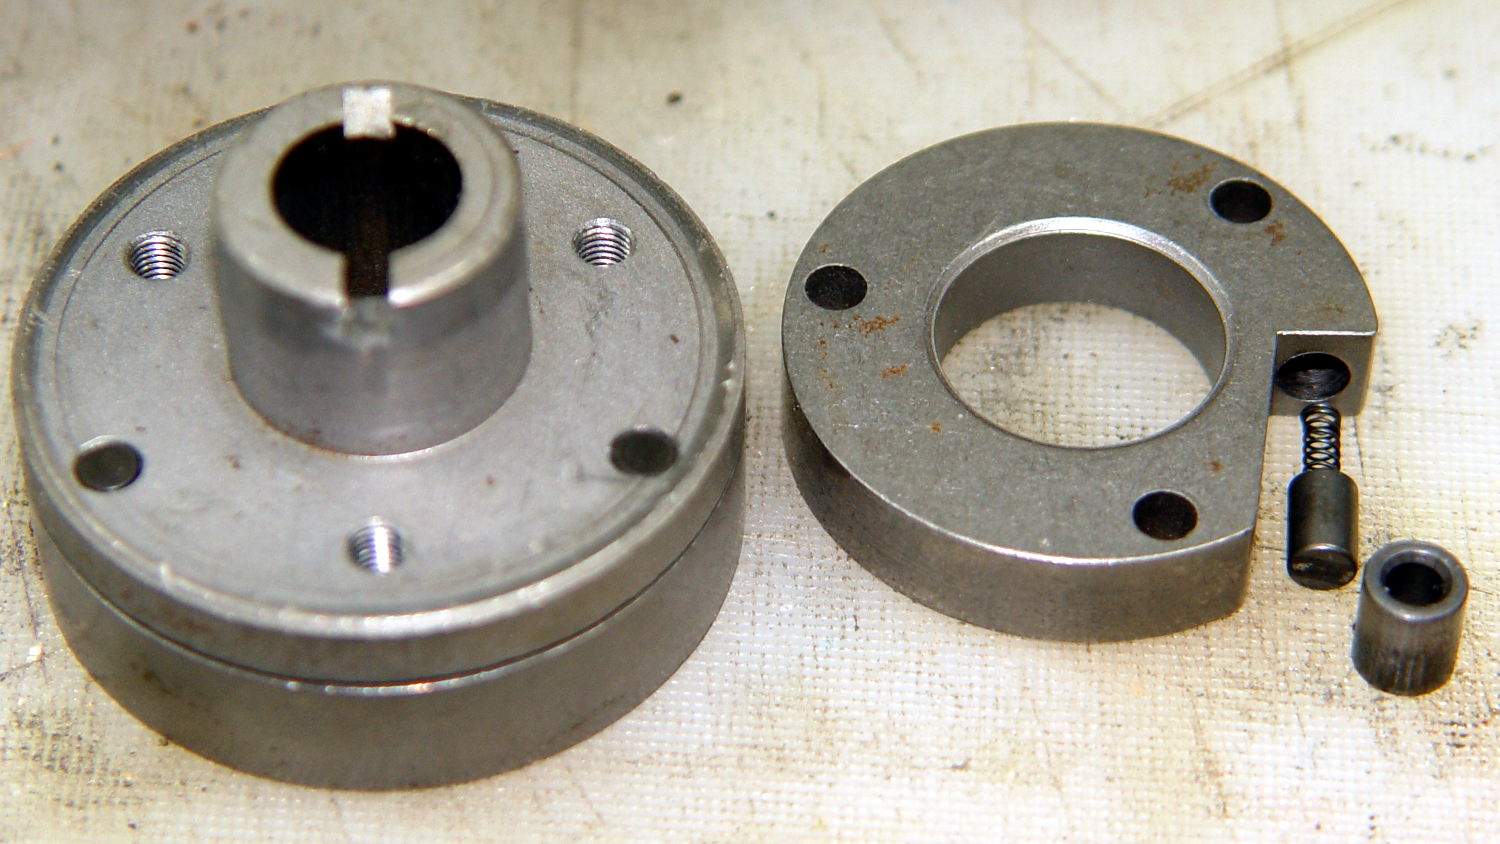
In that position, the button is up, the bobbin is ready to load, the brake bands are off, and you can gently tap the clutch assembly off the main crankshaft:
Kenmore 158.17032 – Handwheel clutch assembly
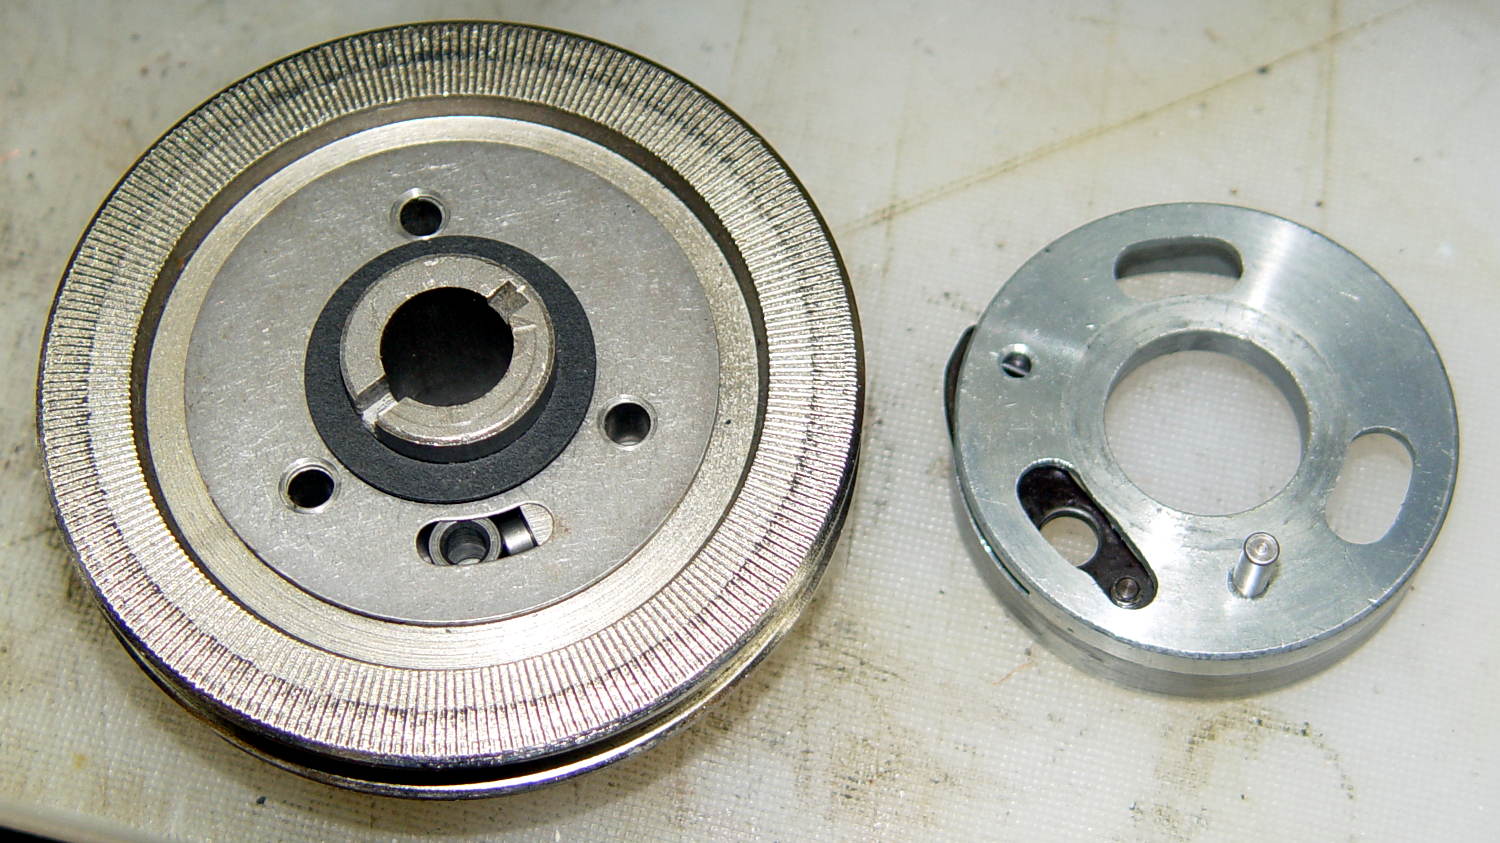
The inner hub rotates very slightly with respect to the belt drive pulley (which has the grooves that drive the bobbin winder tire). That didn’t quite work on this machine, due to the usual lack of lubrication / mechanical wear / what-have-you.
The innermost part (with the notches for the pin visible at 2 o’clock on the main shaft) rotates with the handwheel. The belt pulley rotates with the motor belt. The clutch lets you turn the handwheel with the motor stopped. Normal rotation is clockwise in this view; on the machine, you turn the top of the wheel toward you.
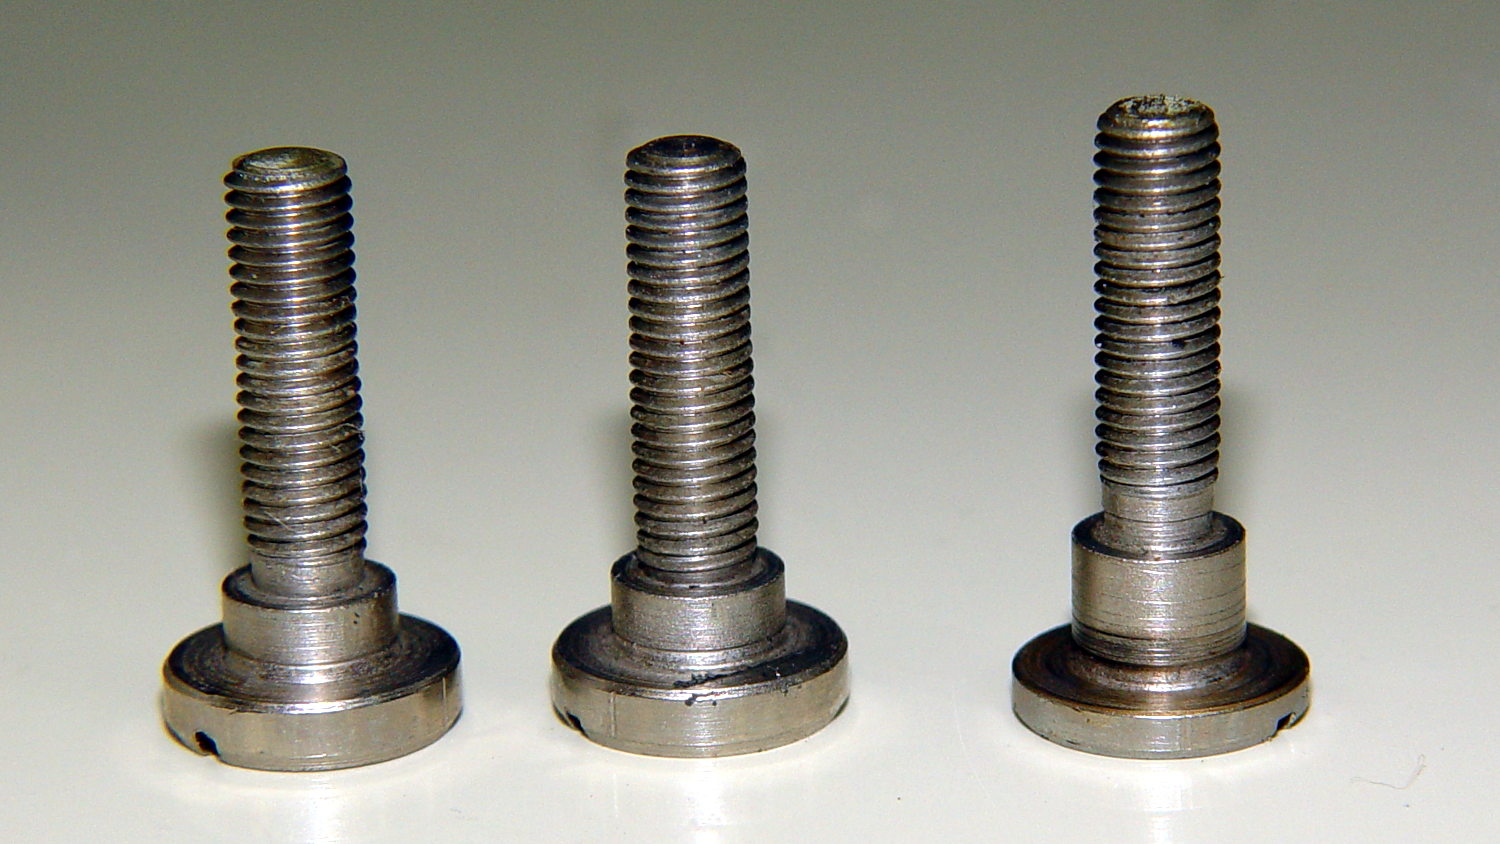
Carefully remove the spring that retracts the clutch lever, remove both black screws, remove the big flat head screw, and slide the black lever out to the side.
Unscrew the two remaining flat-head screws holding the hub / lever in place. The one with the longer shoulder goes into the lever:
Kenmore 158.17032 – Handwheel clutch screws
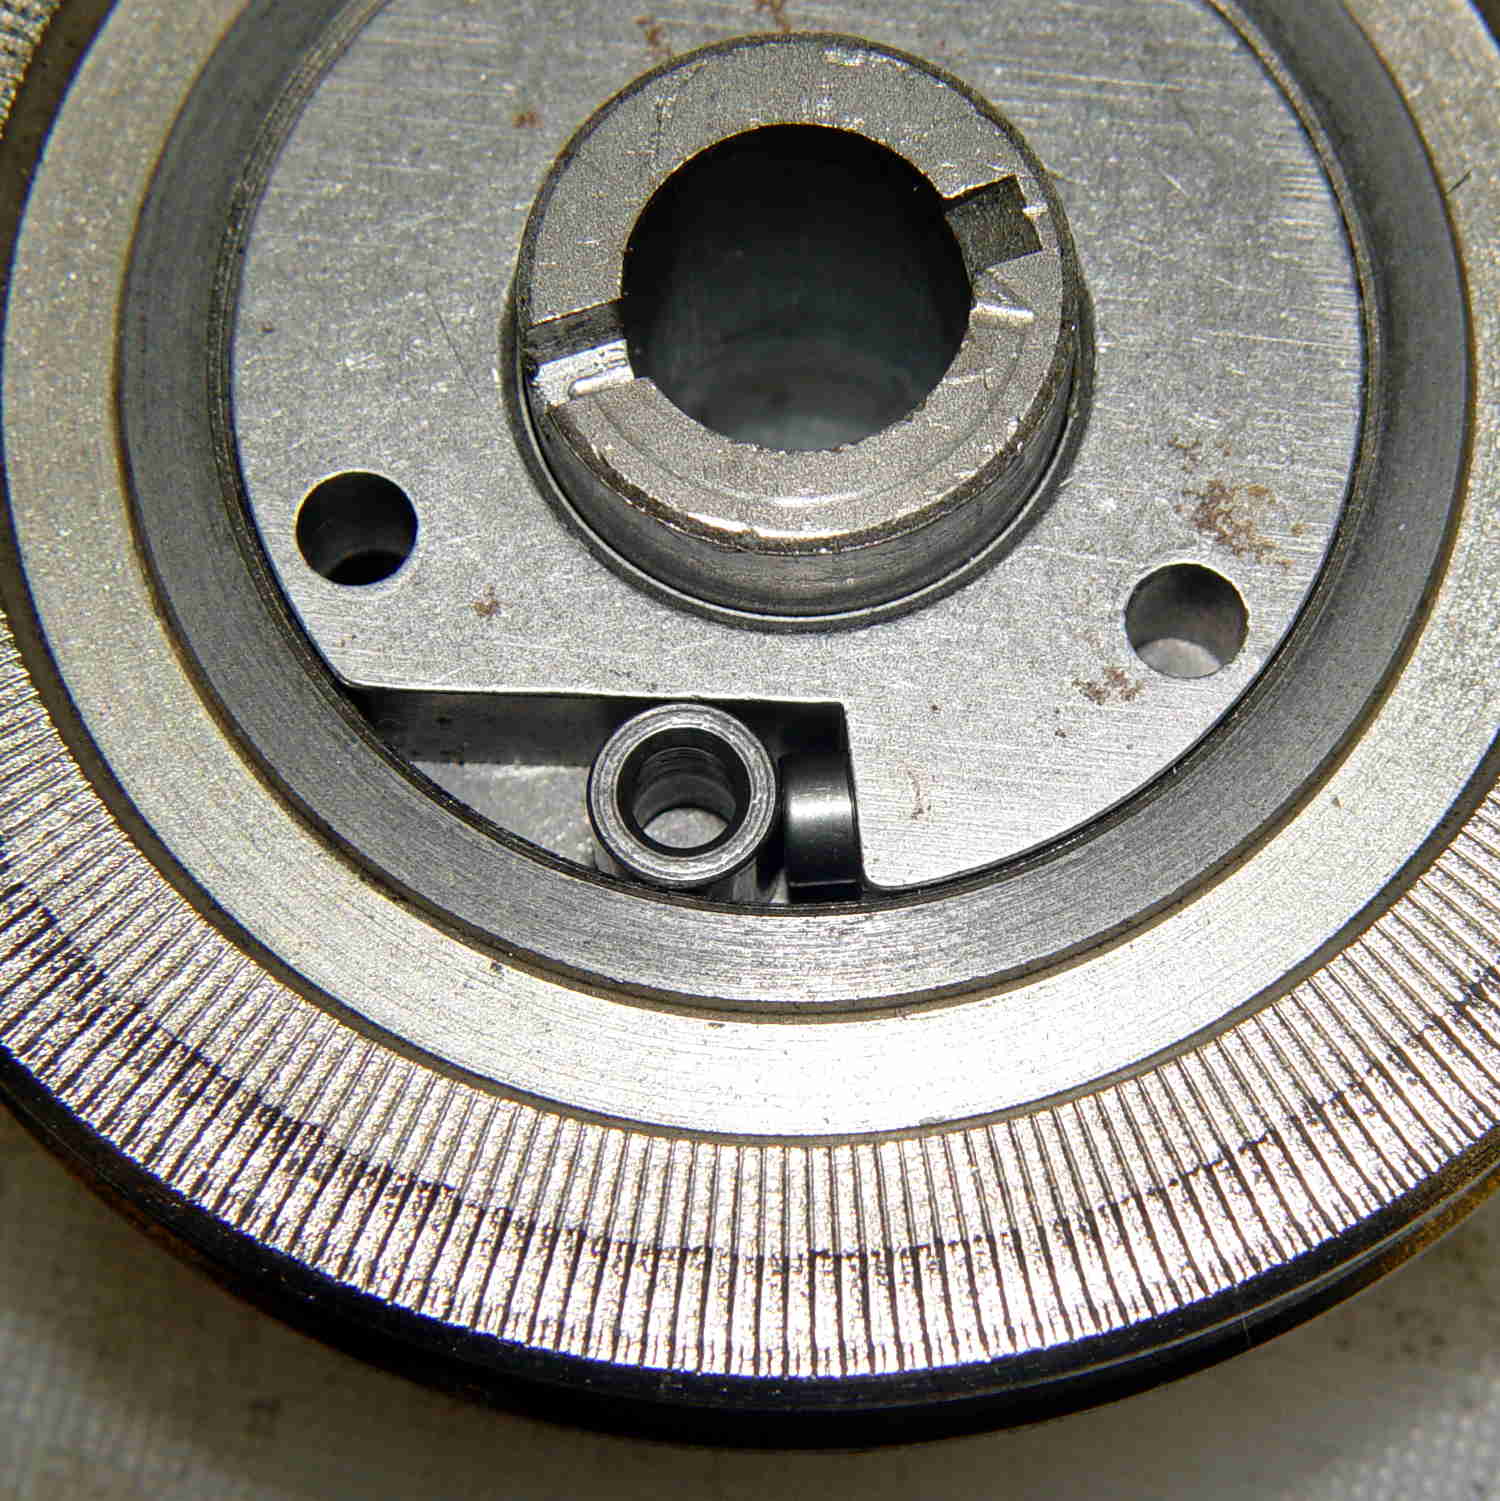
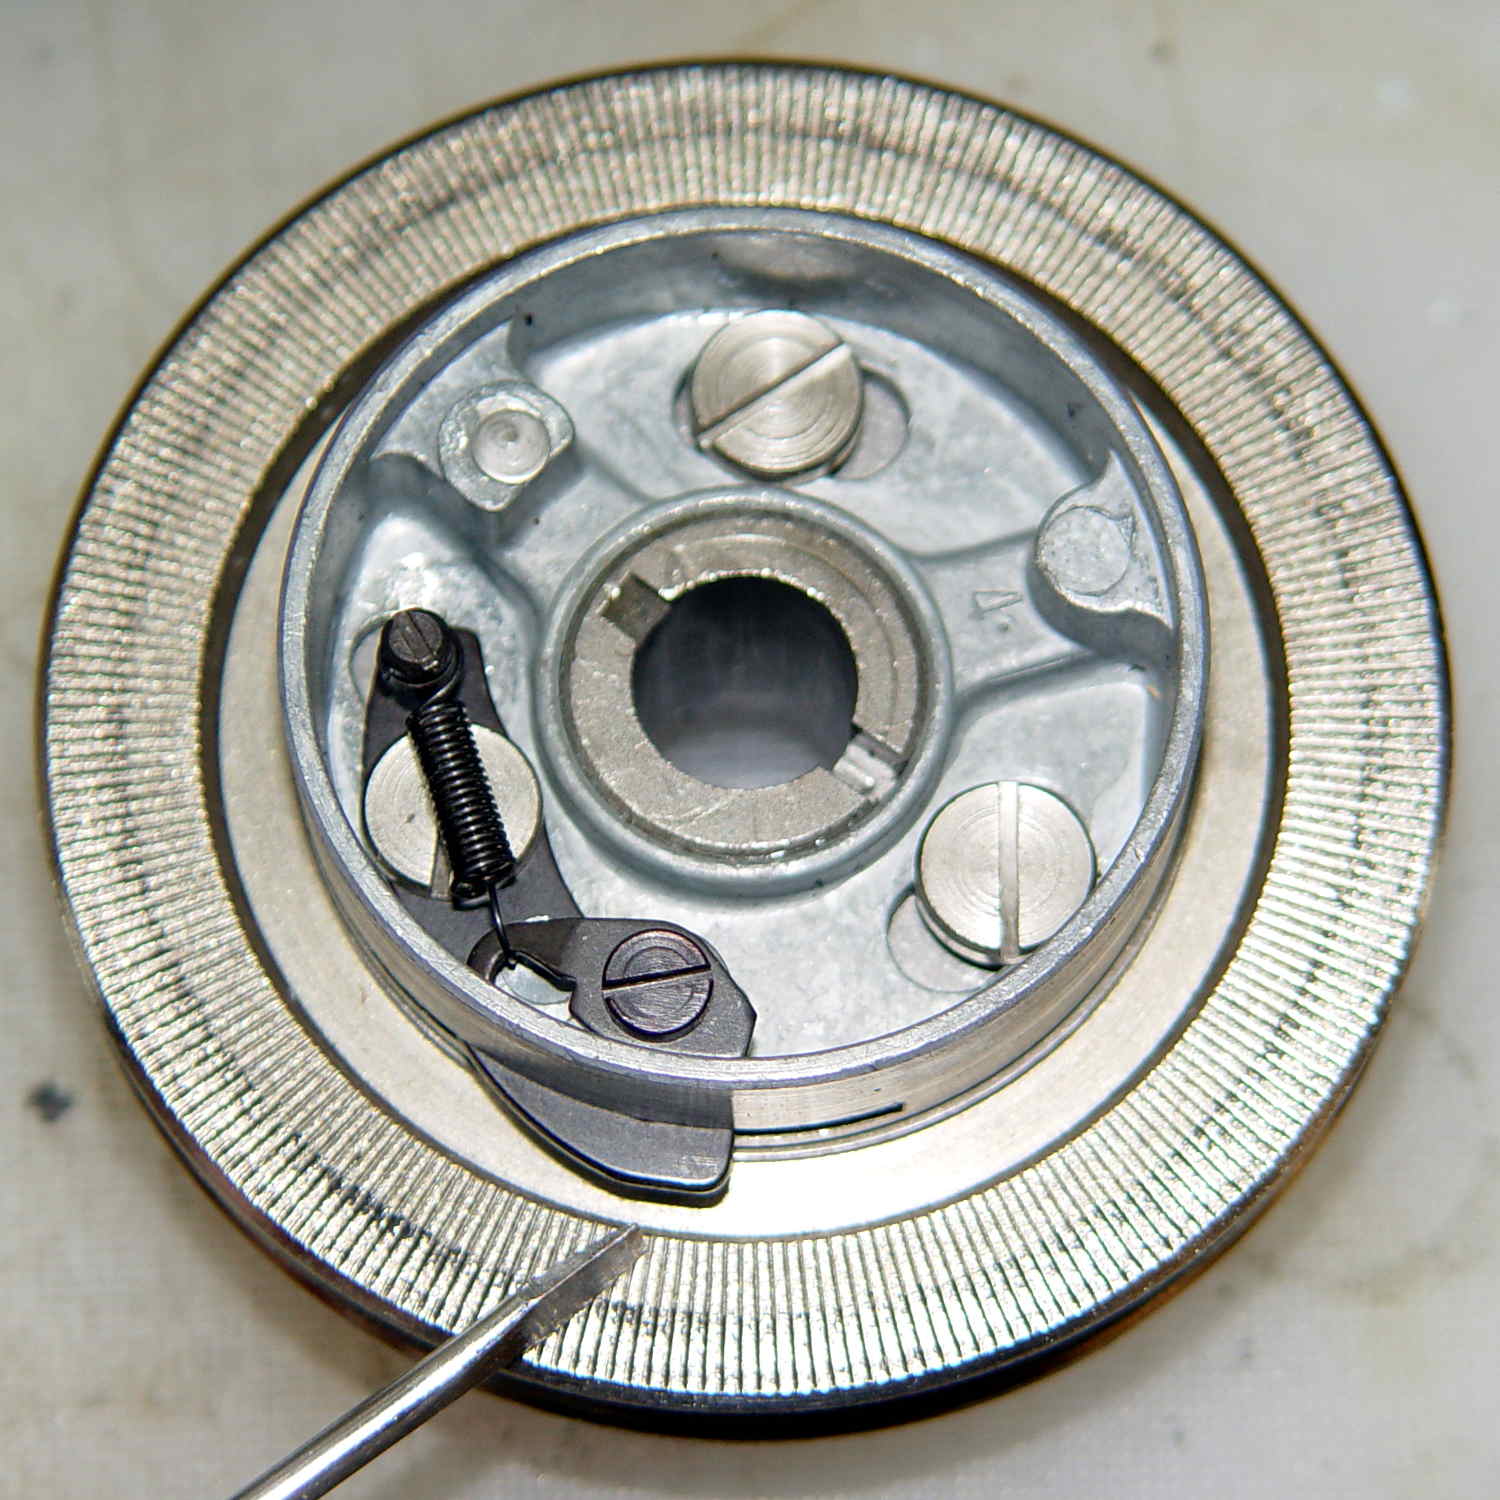
Removing the hub reveals the pin that engages the clutch mechanism visible through the slot at 6 o’clock in the handwheel:
Kenmore 158.17032 – Handwheel clutch dog
Remove the fiber washer and the steel cover plate to expose the clutch mechanism:
Kenmore 158.17032 – Handwheel clutch – detail
The pin pressing against the hollow cylinder (which is the actual clutch!) has a powerful spring:
Kenmore 158.17032 – Handwheel clutch interior
If you hold the cylinder in place, you can rotate the clutch body enough to unload the spring just enough to let you ease the cylinder out and gently release the spring. Good luck!
With all the parts on the bench, clean everything, lube only the parts that need it (like the spring-loaded pin, but not the clutch cylinder), put everything back together, and it should Just Work.
The screwdriver points out the tab engaging the black bow-tie doodad:
Kenmore 158.17032 – Handwheel clutch tab
The object of the games is to make the tab pivot smoothly around the large flat-head screw under the spring as you press the part that sticks out, so the clutch will be either completely disengaged or firmly engaged.
When you get it working smoothly, release the brake bands, slide the clutch assembly back on the shaft, reinstall the cover, install the handwheel, install the screw, pop the plastic hub back in, and you’re done!
Update:
Even though I write this stuff down to help me remember what I did, sometimes other folks find it useful:
Just read your article about Kenmore 158.17032 Handwheel clutch and was able to repair a machine because of you. I so appreciate that you take the time to post such things. I would not have taken the thing apart had I not found your article and I just wanted to say THANKS. I browsed some of your other projects also. Wow.
Thanks Again,
Donnie
… and …
I have spent weeks searching for how to fix the Kenmore 158.1703 clutch ( a very weird one) for a friend of mine. I was pointed to your post by the Vintage Kenmore sewing machine groups.io. I jumped up and down with joy to read and see the photos. Yes! I can fix this and get it back to her. THANK YOU! I will try later today with your post printed out. Thank you! Linda
More small victories in the struggle against entropy!
These QC20 earbuds came in the Android flavor, also known as the CTIA/AHJ “standard”:
Bose QC20 Earphones
The 3.5 mm plug connections:
Tip = left audio
Ring 1 = right audio
Ring 2 = ground
Sleeve = microphone and button signals
The blue Mode button on the side of the splitter box switches the noise cancelling between “some” and “silent”. The latter works surprisingly well; it can knock our vacuum cleaner down to a bearable level.
The three black buttons place resistive loads on the otherwise open-circuit microphone connection:
Volume + = 220 Ω
Answer/End = 56 Ω
Volume – = 520 Ω
Now, if only I had a device that would do something with those signals …
nnn = a unique, but not necessarily sequential, number
y = last digit of year
mm = month
dd = day
That produces these entries in my NAS hard drive full of bicycle action camera “footage”:
ll /mnt/video/Fly6/DCIM/
total 0
drwxr-xr-x 2 ed root 0 2015-12-10 14:18 10051210
drwxr-xr-x 2 ed root 0 2015-12-21 12:47 10051221
drwxr-xr-x 2 ed root 0 2015-12-24 20:26 10151224
drwxr-xr-x 2 ed root 0 2015-12-25 14:42 10251225
drwxr-xr-x 2 ed root 0 2015-12-26 15:26 10351226
drwxr-xr-x 2 ed root 0 2015-12-31 16:37 10451231
drwxr-xr-x 2 ed root 0 2016-01-16 16:56 10560115
drwxr-xr-x 2 ed root 0 2016-01-16 16:56 10660116
drwxr-xr-x 2 ed root 0 2016-01-31 13:28 10760131
drwxr-xr-x 2 ed root 0 2016-02-04 12:59 10860204
drwxr-xr-x 2 ed root 0 2016-02-07 17:05 10960207
drwxr-xr-x 2 ed root 0 2016-02-20 13:08 11060220
drwxr-xr-x 2 ed root 0 2016-02-21 12:03 11160221
drwxr-xr-x 2 ed root 0 2016-02-22 14:02 11260222
drwxr-xr-x 2 ed root 0 2016-03-06 18:16 11360306
drwxr-xr-x 2 ed root 0 2016-03-07 14:33 11460307
drwxr-xr-x 2 ed root 0 2016-03-08 14:57 11560308
drwxr-xr-x 2 ed root 0 2016-03-09 13:48 11660309
drwxr-xr-x 2 ed root 0 2016-03-10 11:24 11760310
drwxr-xr-x 2 ed root 0 2016-03-11 13:51 11860311
drwxr-xr-x 2 ed root 0 2016-03-12 16:04 11960312
drwxr-xr-x 2 ed root 0 2015-11-22 17:02 12051122
drwxr-xr-x 2 ed root 0 2015-11-25 19:14 12151125
drwxr-xr-x 2 ed root 0 2015-11-29 17:42 12251129
drwxr-xr-x 2 ed root 0 2015-11-30 16:53 12351130
drwxr-xr-x 2 ed root 0 2015-12-05 16:35 12451205
drwxr-xr-x 2 ed root 0 2015-12-07 16:53 12551207
drwxr-xr-x 2 ed root 0 2015-12-08 14:05 12690102
Annoyingly, the first three digits are not in ascending order of date, perhaps because the firmware recycles numbers previously used for now-deleted directories.
The year digit 9 in the last directory (12690102) came from the camera’s default 2009 startup date. You set the camera’s clock by editing its configuration file and rebooting that sucker, which I hadn’t done when I got a new Fly6 as a warranty replacement for the old one; apparently the battery shook itself loose after half a year of riding.
Deleting the directories created last November and December goes a little something like this:
rm -rf /mnt/video/Fly6/DCIM/???51[12]*
You probably want to dry-run that with a directory listing command (perhaps ls -al) just to be sure it will wipe out what you want and nothing else.
Within each directory, the file names follow a more rigid hhmmnnnn format:
hh = hour
mm = minute
nnnn = ascending sequence number
Which produces a set of files like this:
ll /mnt/video/Fly6/DCIM/11960312/
total 6.6G
-rwxr-xr-x 1 ed root 607M 2057-09-06 19:40 13120005.AVI
-rwxr-xr-x 1 ed root 810M 2057-09-06 19:40 13190006.AVI
-rwxr-xr-x 1 ed root 962M 2057-09-06 19:40 13290007.AVI
-rwxr-xr-x 1 ed root 573M 2057-09-06 19:40 13390008.AVI
-rwxr-xr-x 1 ed root 523M 2057-09-06 19:40 13470009.AVI
-rwxr-xr-x 1 ed root 596M 2057-09-06 19:40 13570010.AVI
-rwxr-xr-x 1 ed root 672M 2057-09-06 19:40 14070011.AVI
-rwxr-xr-x 1 ed root 716M 2057-09-06 19:40 14150012.AVI
-rwxr-xr-x 1 ed root 505M 2057-09-06 19:40 14250013.AVI
-rwxr-xr-x 1 ed root 497M 2057-09-06 19:40 14350014.AVI
-rwxr-xr-x 1 ed root 221M 2057-09-06 19:40 14450015.AVI
The NAS drive does not, for reasons I cannot explain, record the actual file creation timestamp; touch-ing the file afterward does update the timestamp correctly. So it goes.
The camera attempts to write the files in 10:00 minute chunks, but, because it deletes files (or, perhaps, entire directories) one-by-one in FIFO style, the actual file duration / size seems limited by the space made available by the deletions. The default 8 GB MicroSD card has something like 6.6 GB available and holds a bit under two hours of video; I should bump that to a 16 GB card to get a complete record of longer rides.
With three identical Raspberry Pi streaming players tootling around the house, it finally dawned on me that they should fetch their Python program directly from The Definitive Source, rather than a local copy.
Tweak the auto-startup in /etc/rc.local:
mount -o ro mollusk:/mnt/bulkdata/Project\ Files/Streaming\ Media\ Player/Firmware/ /mnt/part
sudo -u pi python /mnt/part/Streamer.py &
There’s probably a way to redirect all of the stdout and stderr results to a file for debugging, but the obvious method doesn’t work:
sudo -u pi sh -c "python /mnt/part/Streamer.py 2>&1 > /tmp/st.log" &
That redirects stdout from the subprocess call to set up the mixer, but doesn’t catch Python’s print output.
Using the Python logging library would get most of the way to the goal, although stdout from things like the mixer would still vanish.
Continuing with the network theme, one could netboot the RPi players, but that requires more sysadmin hackery than I’m willing to do, what with the good being the enemy of the best.
A monitor sound bar seems good enough for streaming background music and suchlike, with the benefit of eliminating the external USB audio converter and reducing the cable tangle:
Dell AC511 USB Soundbar – Dell Image 318-2885r3
That’s a Dell AC511 USB SoundBar (their choice of capitalization); I mooched the image from their description, because I cannot take a good picture of a dead-black device.
Depending on the description you read, it’s good for maybe 1.5 W, which is about all you can get directly from a USB port: 5 V at well under 500 mA. The audio output required no configuration at all: unplug the Behringer USB converter, plug this in, reboot that sucker, and It Just Worked. Sounds pretty good for as little power as it produces, too; organ music will never reach gut-pounding levels.
The far end of the bar sports a headphone output jack and a line-in jack, so apparently it can handle audio input, despite that not appearing in the online doc. Bonus!
The knob on this end spins endlessly while spitting out USB volume control events that, presumably, work seamlessly with an ordinary Windows setup. It’ll take a bit more effort with a headless Raspberry Pi.
In this case, the Name field seems reasonably unique, and, seeing as how the collection of devices required to do this thing keeps growing, I renamed the old /etc/udev/rules.d/KeyPad.rules to Streamer.rules and dropped the new rule in there to keep everything together: