The Smell of Molten Projects in the Morning

Ed Nisley's Blog: Shop notes, electronics, firmware, machinery, 3D printing, laser cuttery, and curiosities. Contents: 100% human thinking, 0% AI slop.

Author: Ed

  • Monthly Science: Audiograms

    The audio test CD I used to measure my hearing for a Circuit Cellar project back in 2007 came to light, so I ran some tests:

    Audiograms
    Audiograms

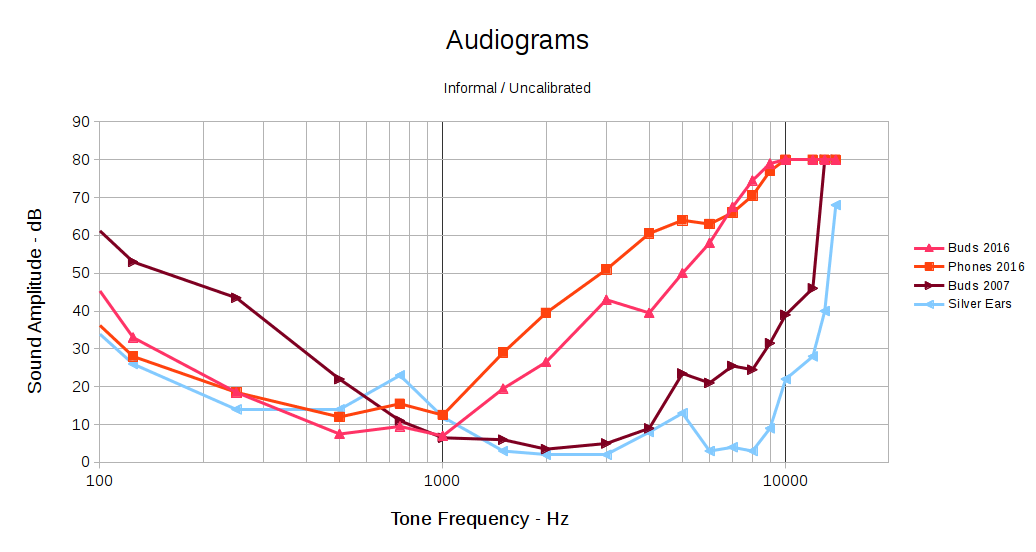
    I don’t have an absolute level calibration for any of those curves, so they can be shifted up or down by probably 10 dB without any loss of accuracy. The overall shape matters here, not the absolute level.

    The brown curve shows my hearing as of nine years ago. I built and (of course) wrote about a rather chunky low-pass shelving filter that matched the 20-ish dB difference between my midrange and treble responses, then boosted the flattened result enough for me to hear what I was missing:

    Board Top
    Board Top

    Surprisingly, it worked fairly well. That, however, was then and this is now.

    The two red curves show my current response, under slightly different conditions: the “buds” curve uses the same earbuds as the 2007 curve and the “phones” curve uses over-the-ear headphones. Perhaps:

    • The previous (lack of) bass sensitivity came from the circuitry of the day
    • My bass has mysteriously improved
    • More likely, my midrange has gotten that much worse

    The blue curve shows the response of a reference set of silver ears; the golden ears I used in 2007 were unavailable on short notice.

    Given my limited bandwidth and the steep slope of that curve out toward the high end, simply fixing my (lack of) treble won’t suffice any longer: 50 dB is a lot of amplification. Compressing the bandwidth between, say, 200 Hz and 4 kHz to fit into 200 Hz to 2 kHz, then equalizing the result, might give me enough treble to get by, but it’d require re-learning how to hear.

    That’s different from the straightforward frequency translation you get from a mixer. I don’t have enough audible bandwidth around 1 kHz to hear a 4 kHz slice of audio spectrum.

    Back in 2007-ish, a real audiologist determined that I wasn’t “aid-able”. Maybe that’s changed.

    The economics seem daunting. Michael Chorost gave a talk at Vassar lamenting the cost and terrible UX of his cochlear implants that reinforced my prejudices in that area. The discussion following my post on my Bose QC20 earphones includes useful links and rants.

    The GNURadio project has enough signal-processing mojo for a nontrivial hearing aid, modulo having enough CPU power at audio frequencies. Battery power density remains the limiting factor, but I’m not nearly as fussy about appearances as most folks and some full-frontal cyborg wearables might be in order.

  • Makerspace Starter Kit: Shipped!

    So I spent the last month (*) extracting the tools, parts, and stock I use on a regular basis, filling 20-ish boxes with stuff I wanted to keep:

    Basement shop - right - before
    Basement shop – right – before

    After I moved all those boxes out of the way, three very industrious guys (and two teens who gradually got into the spirit of the thing) from MakerSmiths devoted all of a Saturday and a bit of Sunday morning converting an entire basement like that into this:

    Basement Shop - right
    Basement Shop – right

    The stuff filled about 3/4 of the floor space in a pair of 26 foot box trucks:

    dsc08699 - Truck 1

    Each truck had a snug 10,000 pound load limit and the stuff didn’t stack well:

    dsc08698 - Truck 2

    The strap under the pile of metal, plus some plywood stiffeners, prevented it from running amok during transit. As long as they didn’t flip the truck, everything seemed well packed and cross-braced.

    Only a few minor injuries; all’s well that ends well.

    Alas, most of the spatial memory that let me find a tool or a part is now wrong; it’ll take a while to re-learn the new locations.

    (*) Samuel Johnson: “… when a man knows he is to be hanged in a fortnight, it concentrates his mind wonderfully.”

  • Road Conditions: 2816 Rt 376 Northbound Sinkhole Patched

    By my count, four NYSDOT repair crews, one sent specifically to repair this sinkhole, managed to not patch it during the last nine months:

    Rt 376 2016-04-20 - Northbound milepost 1110 - sinkhole
    Rt 376 2016-04-20 – Northbound milepost 1110 – sinkhole

    Good news comes to those who wait:

    Rt 376 2016-04-21 - Northbound milepost 1110 - sinkhole
    Rt 376 2016-04-21 – Northbound milepost 1110 – sinkhole

    It didn’t involve waiting: by random chance, a fifth NYSDOT road repair crew happened to be in that area when Mary rode by. She stopped directly atop the sinkhole and screamed at the flagger until he came over. She explained the problem and, wonder of wonders, this time they put asphalt in the right spot.

    The patch looks hand-tamped and will pop out after a while, but it’ll be great while it lasts.


  • Moth Flyby

    A moth came within arm’s reach during a ride along the Dutchess County Rail Trail:

    This slideshow requires JavaScript.

    Squinting at some earlier frames that show only a tiny moving dot, the moth disappears every five frames: one wingbeat requires either 5/60 or 10/60 s = 12 or 6 strokes/second.

    We continued our respective missions without incident…

    The moth came much closer to the camera than it looks. I should calibrate the images with known objects at known distances, but that seems like a lot of work.

  • Macrophotography Exposure Calculator

    Back in high school, I designed and built a slide rule exposure calculator to improve my macro photographs:

    Macrophotography Exposure Calculator - front
    Macrophotography Exposure Calculator – front

    The base consists of three layers of thin cardboard glued together with Elmer’s Glue. The three slides have three layers of thinner white cardboard glued together, with offsets forming tongue-and-groove interlocks, topped with yellow paper for that true slide rule look:

    Macrophotography Exposure Calculator - slide detail
    Macrophotography Exposure Calculator – slide detail

    Judging from the seams, I covered the hand-drawn scales with “invisible” matte-surface Scotch Tape. Worked well, if you ask me, and still looks pretty good:

    Macrophotography Exposure Calculator - front - detail
    Macrophotography Exposure Calculator – front – detail

    The reverse side carries instructions under a layer of packing tape (which hasn’t survived the test of time nearly as well), for anyone needing help:

    Macrophotography Exposure Calculator - rear
    Macrophotography Exposure Calculator – rear

    A closer look at the instructions:

    Macrophotography Exposure Calculator - instructions
    Macrophotography Exposure Calculator – instructions

    The slides still move, albeit stiffly, and it might be usable.

    I vaguely recall extension tubes on an early SLR, but memory fades after that. Getting the exposure settings close to the right value evidently posed something of a challenge and, given the cost of 35 mm film + development, it made sense to be careful.

    Fortunately, even today’s low-end cameras make macro photography, at least for my simple needs, easy enough, with the camera handling the exposure calculations all by itself:

    SX230HS - macro lens - 15 x 20 mA ring light
    SX230HS – macro lens – 15 x 20 mA ring light

    I’m definitely not on the level of a professional insect photographer!

    Randy’s observation to Amy in Neal Stephenson’s Cryptonomicon comes to mind:

    “… One of the most frightening things about your true nerd, for many people, is not that he’s socially inept — everybody’s been there — but rather his complete lack of embarrassment about it.”

    “Which is kind of pathetic.”

    “It was pathetic when they were in high school,” Randy says. “Now it’s something else. Something very different from pathetic.”

    “What, then?”

    “I don’t know. There is no word for it. You’ll see.”

  • OttLite LED Conversion: Lamp Shell Auto-Disassembly

    The converted OttLite hit the floor again and, this time, the shell around the lamp popped free. Given that I didn’t know how to take it apart before, this is new news.

    There’s a small snap latch inside the bottom / inner surface:

    OttLite LED Conversion - lamp shell - ventral
    OttLite LED Conversion – lamp shell – ventral

    And two guide notches + latch nubs inside the top / outer surface:

    OttLite LED Conversion - lamp shell - dorsal
    OttLite LED Conversion – lamp shell – dorsal

    So, if you had to get it apart by hand, a spudger-like tool applied to the bottom / inside of the shell and a bit of tugging should do the trick.

    It snapped back together without incident, but I really must figure out a bigger base for the damn thing.

  • Brother PT-1090 Tape Cartridge Innards

    Mad Phil gave me his Brother PT-1090 labeler, which I’ve been using rather often of late. The white tape cartridge (the TZ flavor) ran out, giving me the opportunity to pry it apart:

    Brother P-Touch TZ tape cartridge - disassembled
    Brother P-Touch TZ tape cartridge – disassembled

    Surprisingly, a few small pins molded into the cover, plus a few obvious latches, hold it together without a trace of glue or thermal welding.

    A detail of the little factory that assembles the label from several parts:

    Brother P-Touch TZ tape cartridge - detail
    Brother P-Touch TZ tape cartridge – detail

    Colored paper tape unwinds from the lower right and the top plastic layer from the lower left. Tape with thermal dye unspools from the upper left, the printhead (in the printer) heat-transfers pixels to the plastic tape in the opening right of center along the top, and the roller at the top right joins the just-printed plastic layer to the slightly sticky front surface of the paper tape. The used imaging tape respools in the gray cylinder near the middle.

    For those concerned with privacy, that gray spool of used imaging tape contains everything you’ve printed in order:

    Brother P-Touch TZ tape cartridge - imaging tape
    Brother P-Touch TZ tape cartridge – imaging tape

    I thought the thermal dye was part of the transparent tape cover layer, but in retrospect that doesn’t make sense: the printed tape would turn black in hot environments like, say, your car. So the printer must transfer the dye from a separate tape.

    The knockoff “ESD” tape cartridges from Amazon seem to have a slightly different tape path, probably to work around Brother’s patents. I’ll pry one of those apart in due course.