The Smell of Molten Projects in the Morning

Ed Nisley's Blog: Shop notes, electronics, firmware, machinery, 3D printing, laser cuttery, and curiosities. Contents: 100% human thinking, 0% AI slop.

Author: Ed

  • Read-Only MicroSDHC Card

    I iterated this sequence three times before I caught on:

    • ssh into Raspberry Pi
    • Edit /etc/rc.local, save changes
    • Reboot, observe the changes had no effect
    • cat /etc/rc.local shows no changes

    Then I:

    • Edited / saved
    • Listed the file to verify the changes
    • Rebooted, observe no effect from changes
    • Listed the file again: the changes were gone

    Huh.

    Defunct 8 GB MicroSDHC card
    Defunct 8 GB MicroSDHC card

    It turns out the card went read-only without warning, so I was displaying the contents of the file cache buffers after the edit, not the data stored on the card. Rebooting started with empty caches, read the previous file contents, and behaved accordingly.

    The F3 utilities now live in the Ubuntu repository and no longer require compiling from source. The result:

    sudo f3probe --time-ops /dev/sdb
    F3 probe 6.0
    Copyright (C) 2010 Digirati Internet LTDA.
    This is free software; see the source for copying conditions.
    
    WARNING: Probing normally takes from a few seconds to 15 minutes, but
             it can take longer. Please be patient.
    
    Probe finished, recovering blocks... Done
    
    Bad news: The device `/dev/sdb' is damaged
    
    Device geometry:
    	         *Usable* size: 0.00 Byte (0 blocks)
    	        Announced size: 7.35 GB (15415296 blocks)
    	                Module: 8.00 GB (2^33 Bytes)
    	Approximate cache size: 0.00 Byte (0 blocks), need-reset=no
    	   Physical block size: 512.00 Byte (2^9 Bytes)
    
    Probe time: 164.4ms
     Operation: total time / count = avg time
          Read: 107.1ms / 4098 = 26us
         Write: 56.6ms / 2049 = 27us
         Reset: 0us / 0 = 0us
    

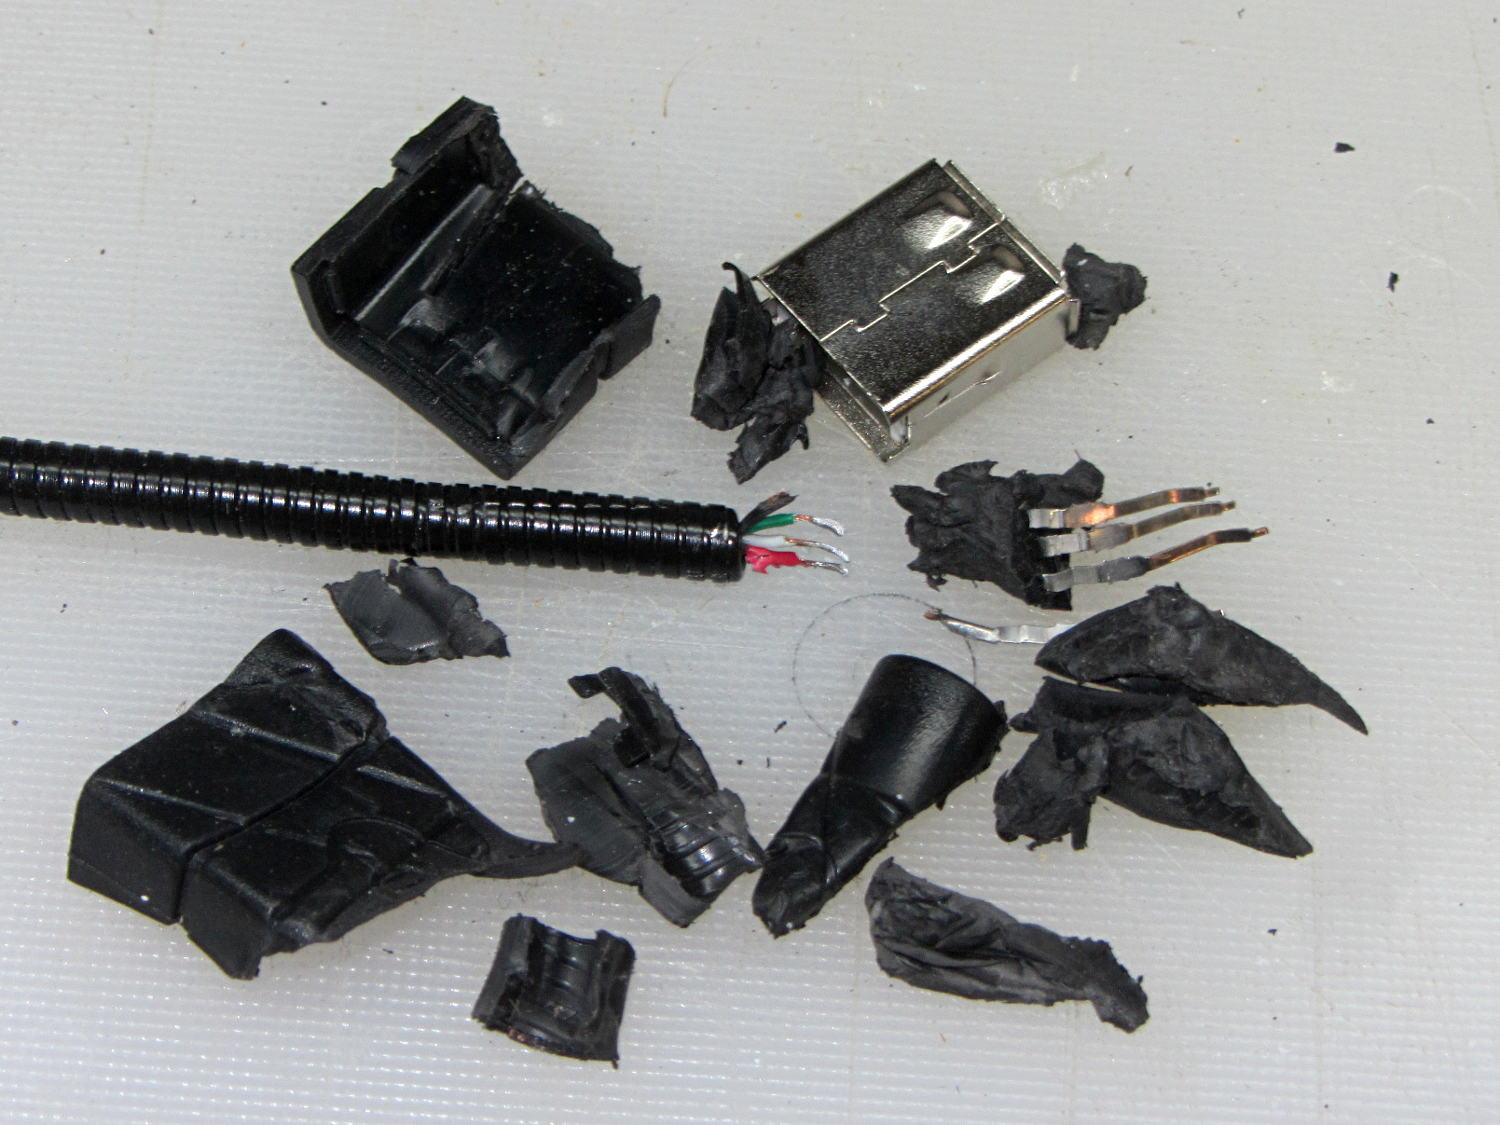
    That card has been kicking around for a while and started out as a no-name generic in some random gadget. Of course, those fancy Sony MicroSD cards weren’t shining examples of durability, either.

    I’m mildly astonished the streaming player worked perfectly with what amounts to a read-only filesystem, but that’s what caching is all about: there was no need to write the data to “disk”.

  • USB Gooseneck Extension Innards

    The bandsaw needs more light on the blade, but a fixed lamp will certainly get in the way of something. Pondering the solution space of available parts suggests a COB LED on a flexible gooseneck, which led to some 30 cm USB extenders, then smashing one of the connectors to reveal the wiring inside:

    USB Gooseneck Extender - disassembled
    USB Gooseneck Extender – disassembled

    It was (probably) assembled by soldering the USB terminals to the wires, mounting it in a fixture, then injection-molding the shell around everything. The injected plastic fills the end of the gooseneck and immobilizes the wires.

    I’d like slightly longer wire ends, although they’re workable if I don’t make any further mistakes. Perhaps I can heatsink the gooseneck, slit 10 mm of the metal sheath with an abrasive wheel, and peel off the pieces without damaging the wires. It could happen!

    Speaking of mistakes, wiring an ordinary USB connector with +12 VDC for an LED seems fraught with peril…

  • Electronics vs. Dark Rooms

    Despite its diminutive size, the white LED on the end of the Dell AC511 USB SoundBar lights up a dark bedroom surprisingly well:

    Dell AC511 USB SoundBar - white power LED
    Dell AC511 USB SoundBar – white power LED

    That’s pretty much the only power-on indicator for the streaming players, so I didn’t want to just slap a strip of black tape over it. Instead, because white LEDs don’t emit much energy toward the red end of the spectrum, I made a cute little filter from a snippet of Primary Red gel filter material, surrounded by a black Gorilla Tape donut:

    Red filter for Dell AC511 USB power LED
    Red filter for Dell AC511 USB power LED

    Two layers of Primary Red cut the light intensity to a dim glow that’s barely visible in daylight and completely inoffensive at night:

    Red filter for Dell AC511 - installed
    Red filter for Dell AC511 – installed

    The blue activity LED on the SunFounder got the black electrical tape treatment, however, with just a sliver showing through to give a hint that it’s still active:

    SunFounder RT5370 USB WiFi Adapter - masked LED
    SunFounder RT5370 USB WiFi Adapter – masked LED

    One of the other WiFi adapters has a pinhole over a red LED that’s barely visible. Another, seemingly identical one, lacks the red LED under the pinhole; when I asked the vendor about that, I was told it was removed “to save power.” Yeah, right. That was part of the motivation to try a different adapter next time around, with good results.

    Of course, you must wrap an opaque black case around the Raspberry Pi to tamp down the red and green LEDs on the PCB. It’s possible to control them in software, with varying degrees of difficulty depending on which Pi you have, but …

  • Raspberry Pi WiFi Adapters

    One might be forgiven for thinking these two USB Wifi adapters are essentially identical:

    USB Wifi adapters
    USB Wifi adapters

    Turns out the SunFounder RT5370 (on the top, with the stylin’ curved case) has better performance than the Wifi With Antenna (on the bottom, with full-frontal chunk goin’ on), by a not inconsiderable 5 to 10 dB. Boosting the received power level in the fringe areas of our house from -70 dBm to -63 dBm makes all the difference between not working and steady streaming.

    The built-in WiFi antenna on a Raspberry Pi 3 ticks along 10 dB lower, with -80 dBm (10 pW!) at the receiver making for poor communication: a Pi 3 works perfectly within reasonable line-of-sight of the router (even through our wood floor) and wakes up blind in fringe areas. Hacking an external antenna probably helps, but definitely isn’t a net win compared to ten bucks worth of USB adapter.

    The wavemon utility (it’s in the Raspbian repo) comes in handy for figuring that sort of thing.

    There is, of course, no way to determine anything important about the adapters from their product descriptions, which are essentially identical, right down to the price. Neither have any product identification on their cases. The back of the package for the SunFounder gadget gives some specs, none of which may mean anything (clicky for more dots):

    SunFounder RT5370 USB WiFi Adapter Specs
    SunFounder RT5370 USB WiFi Adapter Specs

    I ordered another SunFounder adapter, Just In Case it comes in handy, with the hope that both behave the same way.

  • Raspberry Pi 3 Reset Switch

    The (relatively) new Raspberry Pi 3 PCB layout puts the Run header in a different location than in the Pi 2, but a minute of filing gnaws a suitable opening:

    Raspberry Pi 3 - Reset Switch
    Raspberry Pi 3 – Reset Switch

    As before, a hot-melt glue blob holds the switch in place. I’d prefer a black case, if only to hide the blob, but clear-ish is what’s available right now.

    Remember those orderly shutdowns, even at the cost of a keypad button!

  • IBM 5100 APL: Nested Emulators

    A discussion about Raspberry Pi performance prompted this:

    IBM 5110 Emulator - Javascript on Raspberry Pi
    IBM 5110 Emulator – Javascript on Raspberry Pi

    From the inside out:

    Starting the show takes 17 seconds from clicking the Restart button (second from right, top row) to APL’s Clear WS prompt. I have no idea how that compares with a Genuine IBM 5100.

    I distinctly remember writing APL programs, but that’s about as far as my memory will take me. [sigh]

  • Cast Iron Pan Seasoning: Round 3

    After seasoning the pan after every meal for a few weeks, then not doing that for a few more weeks, its thick glaze began looking somewhat scuffed:

    Cast Iron Pan - scuffed
    Cast Iron Pan – scuffed

    You may recognize some of those scars from the previous picture:

    Wagner skillet - two weeks of use
    Wagner skillet – two weeks of use

    Perhaps the multi-layer seasoning was entirely too thick and prone to chipping; this time, I’ll try a thinner coating. Because it’s cast iron, the pan under the coating remains undamaged.

    A few hours in a bucket of sodium carbonate solution with a battery charger driving a few amps through it removed most of the glaze and a few minutes with a sponge sanding block cleaned off the rest. Applying flaxseed oil and heating it to 400 °F on a regular burner (under close supervision!) produced a nice coating:

    Cast Iron Pan - seasoned
    Cast Iron Pan – seasoned

    The single layer was way slick for veggies in the evening and handled the morning omelet with aplomb, so we’ll run with it until something interesting happens.