The Smell of Molten Projects in the Morning

Ed Nisley's Blog: Shop notes, electronics, firmware, machinery, 3D printing, laser cuttery, and curiosities. Contents: 100% human thinking, 0% AI slop.

Author: Ed

  • Makerbot-style Endstop Power Adapter for Protoneer Arduino CNC Shield

    The Protoneer Arduino CNC shield (*) has a row of 2-pin headers for bare endstop switches. Being a big fan of LED Blinkiness, I have a stock of 3-pin Makerbot-style mechanical endstops that require a +5 V connection in addition to ground and the output.

    A crude-but-effective adapter consists of half a dozen header pins soldered to a length of stout copper wire, with a pigtail to a +5 V pin elsewhere on the board:

    3-pin to 2-pin Endstop Power Adapter
    3-pin to 2-pin Endstop Power Adapter

    A closer look:

    3-pin to 2-pin Endstop Power Adapter - detail
    3-pin to 2-pin Endstop Power Adapter – detail

    The pins get trimmed on the other side of the bus wire, because they don’t go through the PCB.

    Installed on the board, it doesn’t look like much:

    3-pin endstop adapter on Prontoneer board
    3-pin endstop adapter on Prontoneer board

    Looks like it needs either Kapton tape or epoxy, doesn’t it?

    Three more endstops at the far end of the MPCNC rails (for hard limits) will fill the unused header pins.

    (*) It’s significantly more expensive than the Chinese knockoffs, but in this case I cheerfully pay to support the guy: good stuff, direct from the source.

  • Prototype Board Holder: Now With Mounting Holes and Common Board Sizes

    The folks I’ve been coaching through their plotter build project showed it off at the local MiniMakerFaire this past weekend. Next time around, I’ll insist they secure their circuit boards and use good wiring techniques, so as to avoid destroying more stepper drivers.

    To that end, adding mounting holes to my proto board holder seems in order:

    Proto Board Holder 90x70 - Flange mounting holes - Slic3r preview
    Proto Board Holder 90×70 – Flange mounting holes – Slic3r preview

    The board dimensions now live in an associative array, so you just pick the board name from a Configurator drop-down list:

    /* [Options] */
    
    PCBSelect = "ArdUno"; // ["20x80","40x60","30x70","50x70","70x90","80x120","ArdDuemil","ArdMega","ArdPro","ArdUno","ProtoneerCNC"]
    
    PCB_NAME = 0;
    PCB_DIMENSION = 1;
    
    PCBSizes = [
      ["40x60",[40,60,1.6]],
      ["30x70",[30,70,1.6]],
      ["50x70",[50,70,1.6]],
      ["20x80",[20,80,1.6]],
      ["70x90",[70,90,1.6]],
      ["80x120",[80,120,1.6]],
      ["ArdDuemil",[69,84,1.6]],
      ["ArdMega",[102,53.5,1.6]],
      ["ArdPro",[53,53.5,1.6]],
      ["ArdUno",[69,53.1,1.6]],
      ["ProtoneerCNC",[69,53.1,1.6]],
    ];
    

    Which seems easier than keeping track of the dimensions in comments.

    You can now put the PCB clamp screws and mounting holes on specific corners & sides, allowing oddball locations for Arduino boards with corner cutouts along the right edge:

    Proto Board Holder ArdUno - Slic3r preview
    Proto Board Holder ArdUno – Slic3r preview

    A “selector” notation separates the hole location from the board dimensions & coordinates:

    ScrewSites = [
    //  [-1,1],[1,1],[1,-1],[-1,-1],        // corners
    //  [-1,0],[1,0],[0,1],[0,-1]           // middles
      [-1,1],[-1,-1],[1,0]                  // Arduinos
    ];
    

    Might not be most obvious way, but it works for me. Most of the time, corner clamps seem just fine, so I’m not sure adding the clamp and mounting hole locations to the dimension array makes sense.

    The OpenSCAD source code as a GitHub Gist:

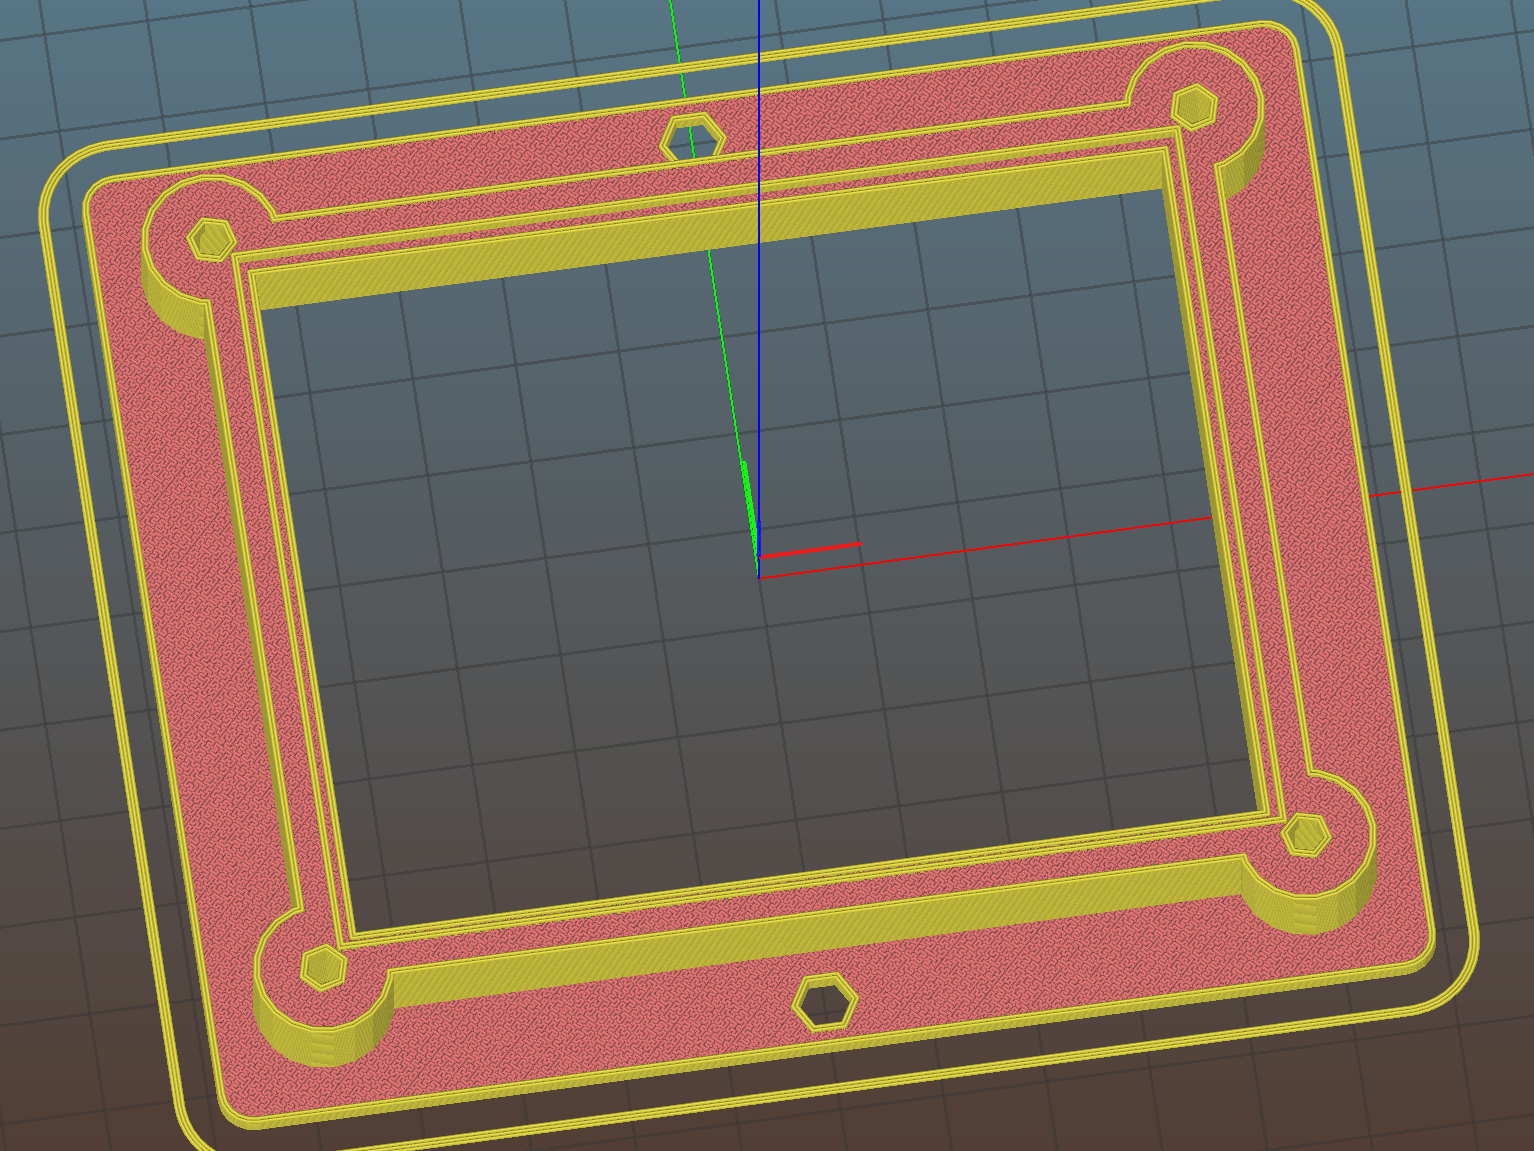
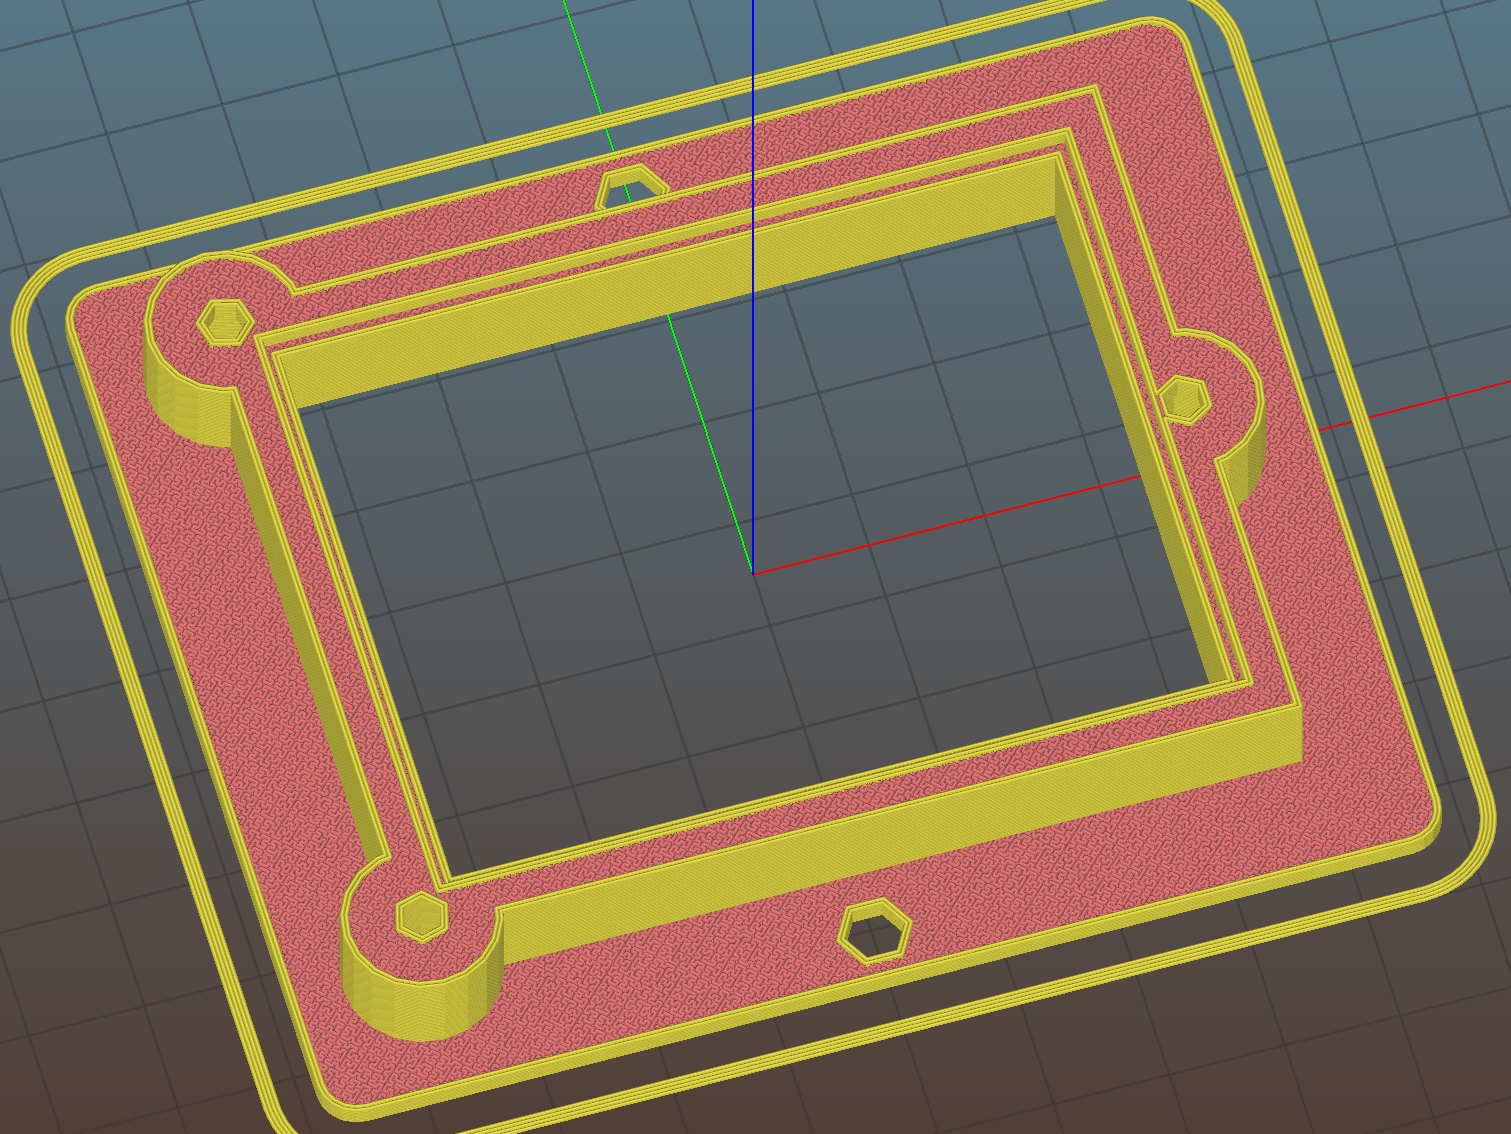
    // Test support frame for proto boards
    // Ed Nisley KE4ZNU – Jan 2017
    // June 2017 – Add side-mount bracket, inserts into bottom
    // 2017-11 – Selectable board sizes, chassis mounting holes
    /* [Options] */
    PCBSelect = "ArdUno"; // ["20×80","40×60","30×70","50×70","70×90","80×120","ArdDuemil","ArdMega","ArdPro","ArdUno","ProtoneerCNC"]
    Layout = "Frame"; // [Frame, Bracket]
    ClampFlange = true; // external flange
    Mounts = true; // frame to chassis screw holes
    Channel = false; // wiring channel cutout
    WasherRecess = false; // cutout around screw head
    /* [Extrusion parameters] */
    ThreadThick = 0.25; // [0.15, 0.20, 0.25]
    ThreadWidth = 0.40;
    function IntegerMultiple(Size,Unit) = Unit * ceil(Size / Unit);
    /* [Hidden] */
    Protrusion = 0.1;
    HoleWindage = 0.2;
    inch = 25.4;
    Tap4_40 = 0.089 * inch;
    Clear4_40 = 0.110 * inch;
    Head4_40 = 0.211 * inch;
    Head4_40Thick = 0.065 * inch;
    Nut4_40Dia = 0.228 * inch;
    Nut4_40Thick = 0.086 * inch;
    Washer4_40OD = 0.270 * inch;
    Washer4_40ID = 0.123 * inch;
    Tap6_32 = 0.106 * inch;
    Clear6_32 = 0.166 * inch;
    Head6_32 = 0.251 * inch;
    Head6_32Thick = 0.097 * inch;
    Nut6_32Dia = 0.312 * inch;
    Nut6_32Thick = 0.109 * inch;
    Washer6_32OD = 0.361 * inch;
    Washer6_32ID = 0.156 * inch;
    ID = 0;
    OD = 1;
    LENGTH = 2;
    //- PCB sizes
    // the list must contain all the selection names as above
    //* [Hidden] */
    PCB_NAME = 0;
    PCB_DIMENSION = 1;
    PCBSizes = [
    ["40×60",[40,60,1.6]],
    ["30×70",[30,70,1.6]],
    ["50×70",[50,70,1.6]],
    ["20×80",[20,80,1.6]],
    ["70×90",[70,90,1.6]],
    ["80×120",[80,120,1.6]],
    ["ArdDuemil",[69,84,1.6]],
    ["ArdMega",[102,53.5,1.6]],
    ["ArdPro",[53,53.5,1.6]],
    ["ArdUno",[69,53.1,1.6]],
    ["ProtoneerCNC",[69,53.1,1.6]],
    ];
    PCBIndex = search([PCBSelect],PCBSizes)[0];
    PCBSize = PCBSizes[PCBIndex][PCB_DIMENSION];
    //echo(str("PCB Size Table: ",PCBSizes));
    //echo(str("PCB Select: ",PCBSelect));
    //echo(str("PCB Index: ",PCBIndex));
    echo(str("PCB Size: ",PCBSize));
    /* [Sizes] */
    WallThick = 4.0; // basic frame structure
    FrameHeight = 10.0;
    /* [Hidden] */
    Insert = [3.9,4.6,5.8];
    PCBShelf = 1.0; // width of support rim under PCB
    Clearance = 1*[ThreadWidth,ThreadWidth,0]; // around PCB on all sides
    ScrewOffset = ThreadWidth + Insert[OD]/2; // beyond PCB edges
    echo(str("Screw offset: ",ScrewOffset));
    /* [Screw Selectors] */
    // ij selectors for PCB clamp screw holes: -1/0/1 = left/center/right , bottom/center/top
    ScrewSites = [
    // [-1,1],[1,1],[1,-1],[-1,-1], // corners
    // [-1,0],[1,0],[0,1],[0,-1] // middles
    [-1,1],[-1,-1],[1,0] // Arduinos
    ];
    // ij selectors for frame mounting holes
    MountSites = [
    [0,-1],[0,1],
    // [-1,0],[1,0]
    ];
    function ScrewAngle(ij) = (ij[0]*ij[1]) ? ij[0]*ij[1]*15 : ((!ij[1]) ? 30 : 0); // align screw sides
    OAHeight = FrameHeight + Clearance[2] + PCBSize[2]; // total frame height
    echo(str("OAH: ",OAHeight));
    BossOD = 2*Washer4_40OD; // make bosses oversized for washers
    FlangeExtension = 4.0 + Washer6_32OD/2 – WallThick; // beyond frame structure
    FlangeThick = IntegerMultiple(2.0,ThreadThick); // plate under frame
    Flange = PCBSize
    + 2*[ScrewOffset,ScrewOffset,0]
    + [BossOD,BossOD,0]
    + [2*FlangeExtension,2*FlangeExtension,(FlangeThick – PCBSize[2])]
    ;
    FlangeRadius = BossOD/4;
    echo(str("Flange: ",Flange));
    NumSides = 4*5;
    WireChannel = [Flange[0],15.0,3.0 + PCBSize[2]]; // ad-hoc wiring cutout
    WireChannelOffset = [
    Flange[0]/2,0,(FrameHeight + PCBSize[2] – WireChannel[2]/2)
    ];
    //- Adjust hole diameter to make the size come out right
    module PolyCyl(Dia,Height,ForceSides=0) { // based on nophead's polyholes
    Sides = (ForceSides != 0) ? ForceSides : (ceil(Dia) + 2);
    FiiDia = Dia / cos(180/Sides);
    cylinder(r=(FiiDia + HoleWindage)/2,h=Height,$fn=Sides);
    }
    //- Build things
    if (Layout == "Frame")
    difference() {
    union() { // body block
    translate([0,0,OAHeight/2])
    cube(PCBSize + Clearance + [2*WallThick,2*WallThick,FrameHeight],center=true);
    for (ij = ScrewSites) // screw bosses
    if (ij[0] != 0 || ij[1] != 0)
    translate([ij[0]*(PCBSize[0]/2 + ScrewOffset),
    ij[1]*(PCBSize[1]/2 + ScrewOffset),
    0])
    cylinder(d=BossOD,h=OAHeight,$fn=NumSides);
    if (ClampFlange) // flange for work holder & mounting screw holes
    linear_extrude(height=Flange[2])
    hull()
    for (i=[-1,1], j=[-1,1]) {
    translate([i*(Flange[0]/2 – FlangeRadius),j*(Flange[1]/2 – FlangeRadius)])
    circle(r=FlangeRadius,$fn=NumSides); // convenient rounding size
    }
    }
    for (ij = ScrewSites) { // screw position indeies
    if (ij[0] != 0 || ij[1] != 0) {
    translate([ij[0]*(PCBSize[0]/2 + ScrewOffset),
    ij[1]*(PCBSize[1]/2 + ScrewOffset),
    -Protrusion])
    rotate(ScrewAngle(ij))
    PolyCyl(Clear4_40,(OAHeight + 2*Protrusion),6); // screw clearance holes
    translate([ij[0]*(PCBSize[0]/2 + ScrewOffset),
    ij[1]*(PCBSize[1]/2 + ScrewOffset),
    -Protrusion])
    rotate(ScrewAngle(ij))
    PolyCyl(Insert[OD],OAHeight – PCBSize[2] – 3*ThreadThick + Protrusion,6); // inserts
    if (WasherRecess)
    translate([ij[0]*(PCBSize[0]/2 + ScrewOffset),
    ij[1]*(PCBSize[1]/2 + ScrewOffset),
    OAHeight – PCBSize[2]])
    PolyCyl(1.2*Washer4_40OD,(PCBSize[2] + Protrusion),NumSides); // optional washer recess
    }
    }
    if (Mounts)
    for (ij = MountSites)
    translate([ij[0]*(Flange[0]/2 – Washer6_32OD/2),ij[1]*(Flange[1]/2 – Washer6_32OD/2),-Protrusion])
    rotate(ScrewAngle(ij))
    PolyCyl(Clear6_32,(Flange[2] + 2*Protrusion),6);
    translate([0,0,OAHeight/2]) // through hole below PCB
    cube(PCBSize – 2*[PCBShelf,PCBShelf,0] + [0,0,2*OAHeight],center=true);
    translate([0,0,(OAHeight – (PCBSize[2] + Clearance[2])/2 + Protrusion/2)]) // PCB pocket on top
    cube(PCBSize + Clearance + [0,0,Protrusion],center=true);
    if (Channel)
    translate(WireChannelOffset) // opening for wires from bottom side
    cube(WireChannel + [0,0,Protrusion],center=true);
    }
    // Add-on bracket to hold smaller PCB upright at edge
    PCB2Insert = [3.0,4.9,4.1];
    PCB2OC = 45.0;
    if (Layout == "Bracket")
    difference() {
    hull() // frame body block
    for (i=[-1,1]) // bosses around screws
    translate([i*(PCBSize[0]/2 + ScrewOffset),0,0])
    cylinder(r=Washer4_40OD,h=OAHeight,$fn=NumSides);
    for (i=[-1,1]) // frame screw holes
    translate([i*(PCBSize[0]/2 + ScrewOffset),0,-Protrusion])
    rotate(i*180/(2*6))
    PolyCyl(Clear4_40,(OAHeight + 2*Protrusion),6);
    for (i=[-1,1]) // PCB insert holes
    translate([i*PCB2OC/2,(Washer4_40OD + Protrusion),OAHeight/2])
    rotate([90,0,0])
    cylinder(d=PCB2Insert[OD],h=2*(Washer4_40OD + Protrusion),$fn=6);
    }
  • Crispy Skin Slow Roasted Pork Shoulder: Whoops

    The previous times we slow-roasted a pork shoulder, the smoke alarm went off well before the skin crisped. We’d drained the drippings from the pan before crisping the skin, but the residue still smoked up a storm; this time we we left the pool in place to see if it kept the surface cooler and reduced the smoke.

    Well, no, it didn’t. This happened in the five minutes between one rotation and the next:

    Roast Pork Shoulder - Smoked Kitchen
    Roast Pork Shoulder – Smoked Kitchen

    Knowing things would get at least a little smoky, I’d closed the pocket door (on the left) and hung a beach towel across the opening into the laundry room (to the right), which kept most of the smoke out of the rest of the house. The smoke detector in the laundry room didn’t go off until I walked through the towel, so my precautions worked pretty well.

    Wow, was that skin crispy:

    Roast Pork Shoulder - Crispy Skin
    Roast Pork Shoulder – Crispy Skin

    Plenty of smoke and no fire; the roasting pan has narrow slits for that very reason. Took a couple of hours to vent the house, during which the yard smelled downright yummy.

    Next time, we’ll plunk the roast on a lined cookie sheet (with a rim!) and see what happens.

  • Ham-It-Up Test Signal Source: Simulation

    Rather than bestir myself to measure the Test Signal Source on the Ham-It-Up upconverter:

    Ham-It-Up Test Signal source - LTSpice schematic
    Ham-It-Up Test Signal source – LTSpice schematic

    The 74LVC2G14 Schmitt-Trigger Inverter datasheet supplies useful parameters:

    Ham-It-Up Test Signal source - LTSpice Schmitt params
    Ham-It-Up Test Signal source – LTSpice Schmitt params

    All of which come together and produce a waveform (clicky for more dots):

    Ham-It-Up Test Signal source - LTSpice waveform
    Ham-It-Up Test Signal source – LTSpice waveform

    Which suggests the Test Signal ticks along at tens-of-MHz, rather than the tens-of-kHz I expected from the birdies in the filtered 60 kHz preamp response.

    Of course, hell hath no fury like that of an unjustified assumption, so actually measuring the waveform would verify the cap value and similar details.

  • WWVB Reception: 60 kHz Tuning Fork Resonator Filter

    Some early morning data from the WWVB preamp with the 60 kHz tuning fork resonator filter in full effect (clicky for more dots):

    WWVB - xtal filter - waterfall 5 fps RBW 109.9 Hz Res 0.02 s - gqrx window - 20171116_103542
    WWVB – xtal filter – waterfall 5 fps RBW 109.9 Hz Res 0.02 s – gqrx window – 20171116_103542

    The dotted line comes from WWVB’s 1 Hz PWM (-ish) modulation: yeah, it works!

    The filter cuts out the extraneous RF around the WWVB signal, as compared with a previous waterfall and some truly ugly hash:

    WWVB - 24 hr reception AGC - 2017-01-16 to 17 - cropped
    WWVB – 24 hr reception AGC – 2017-01-16 to 17 – cropped

    Well, not quite all the hash. Enabling the SDR’s hardware AGC and zooming out a bit reveals some strong birdies:

    WWVB - xtal filter - waterfall - hardware AGC - 2017-11-16 0612 EST
    WWVB – xtal filter – waterfall – hardware AGC – 2017-11-16 0612 EST

    The big spike over on the left at 125.000 MHz comes from the Ham-It-Up local oscillator. A series of harmonics starting suspiciously close to 125.032768 kHz produces the one at 125.066 MHz, just to the right of the WWVB signal, which leads me to suspect a rogue RTC in the attic.

    There is, in fact, a free running “Test Signal Source” on the Ham-It-Up board:

    Ham-It-Up Test Signal source - schematic
    Ham-It-Up Test Signal source – schematic

    Although I have nary a clue about that bad boy’s frequency, measuring it and cutting the inverter’s power trace / grounding the cap may be in order.

    The SDR’s AGC contributes about 30 dB of gain, compresses the hottest signals at -25 dB, and raises those harmonics out of the grass, so it’s not an unalloyed benefit. Manually cranking on 10 dB seems better:

    WWVB - xtal filter - waterfall - 10 dB hardware preamp - 2017-11-16 0630 EST
    WWVB – xtal filter – waterfall – 10 dB hardware preamp – 2017-11-16 0630 EST

    The bump in the middle shows the WWVB preamp’s 2 kHz bandwidth around the 60 kHz filter output, so the receiver isn’t horribly compressed. The carrier rises 30 dB over that lump, in reasonable agreement with the manual measurements over a much narrower bandwidth:

    60 kHz Preamp - Bandwidth - 1 Hz steps
    60 kHz Preamp – Bandwidth – 1 Hz steps

    With all that in mind, a bit of careful tweaking produces a nice picture:

    WWVB - xtal filter - waterfall - 10 dB hardware preamp - 2017-11-16 0713 EST
    WWVB – xtal filter – waterfall – 10 dB hardware preamp – 2017-11-16 0713 EST

    I love it when a plan comes together …

  • Raspberry Pi USB vs. Arduino

    Plugging an Arduino with GRBL into a USB port on a Raspberry Pi 3 with bCNC causes an immediate crash: the Arduino doesn’t power up and the Raspberry Pi stops responding. A hardware reset / power cycle with the Arduino plugged in doesn’t improve the situation, so it seems the Arduino draws more current from the USB port than the default setup will allow.

    Most likely, the Arduino’s 47 μF power supply caps draw too much current while charging, as the steady-state current seems to be around 40 mA:

    RPi vs Arduino - USB current
    RPi vs Arduino – USB current

    The solution / workaround requires a tweak to /boot/config.txt:

    #-- boost USB current for Arduino CNC
    
    max_usb_current=1
    
    # blank line above to reveal underscores
    

    Update: As mentioned in the comments, the max_usb_current option doesn’t apply to the Pi 3 you see in the picture and, thus, shouldn’t have changed anything. Your guess is as good as mine.

    I’d be more comfortable with a separate power supply plugged into the Arduino’s coaxial power jack, but that’s just me.

  • Monthly Image: I’m So Poughkeepsie

    This example of the City of Poughkeepsie’s branding seems poorly thought out:

    I'm So Poughkeepsie
    I’m So Poughkeepsie

    Maybe not quite as bad as the “Too Cool to Do Drugs” pencil, but …

    Selah.