The Smell of Molten Projects in the Morning

Ed Nisley's Blog: Shop notes, electronics, firmware, machinery, 3D printing, laser cuttery, and curiosities. Contents: 100% human thinking, 0% AI slop.

Author: Ed

  • Raspberry Pi vs. MicroSD: Another One Bites the Dust

    The Raspberry Pi running the MPCNC recently seized up with baffling symptoms, which generally indicates the poor little MicroSD card serving as a “hard disk” has failed:

    Defunct Sandisk Ultra 32 GB MicroSD
    Defunct Sandisk Ultra 32 GB MicroSD

    I managed to open a terminal emulator, whereupon all of the non-built-in shell commands couldn’t be found.

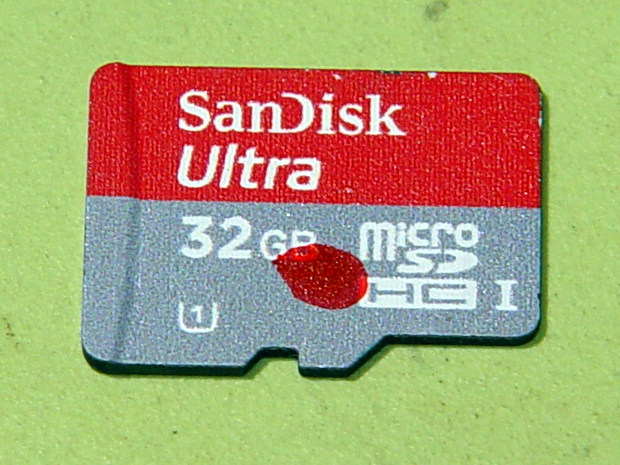
    Proceed as before: binary-copy the entire MicroSD card to another one, pop it in the RPi, and it’s all good again.

    For the record, the new card is an unused Samsung Evo Plus. I do not understand the difference between the “Evo Plus” and “Evo+” branding, other than to suspect one of being a very good fake.

    In round numbers, MicroSD cards seem to last a year under what seems like not-too-demanding service; I’m not running the MPCNC all day, every day.

  • Alligator Clip Lead Refurbishing

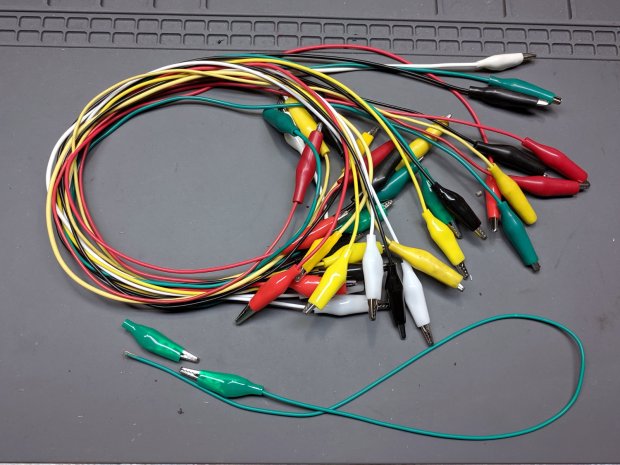
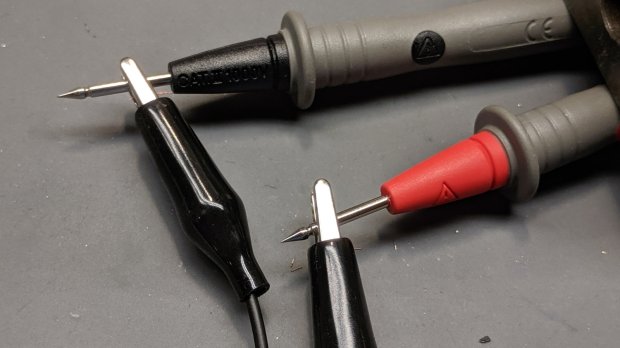
    So this happened when I grabbed an alligator clip lead:

    Dual Alligator Clip Collection
    Dual Alligator Clip Collection

    My coax cable and clip lead collection includes everything from “I’ve had it forever” to “Recent cheap crap”, including much of Mad Phil’s collection. Some of the recent crap included Chinese clip leads with what can charitably be described as marginal connections:

    Alligator clips - bent wire
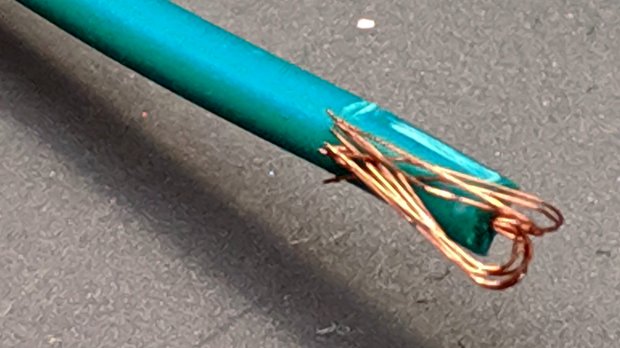
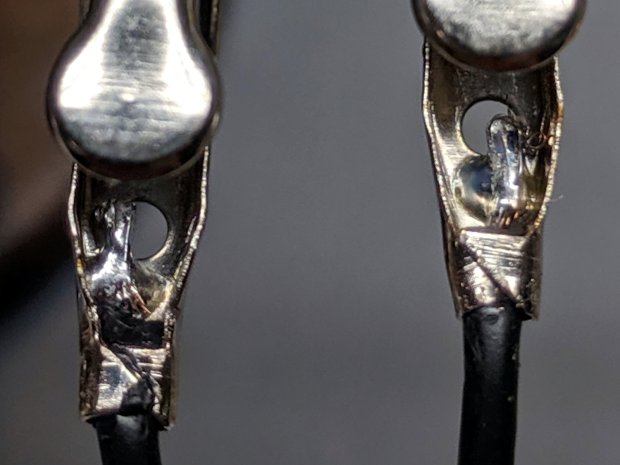
    Alligator clips – bent wire

    The insulation may provide some compliance in the crimp, but the alligator clip itself consists of cheap steel which won’t hold a crimp, even if it was crimped firmly to start with.

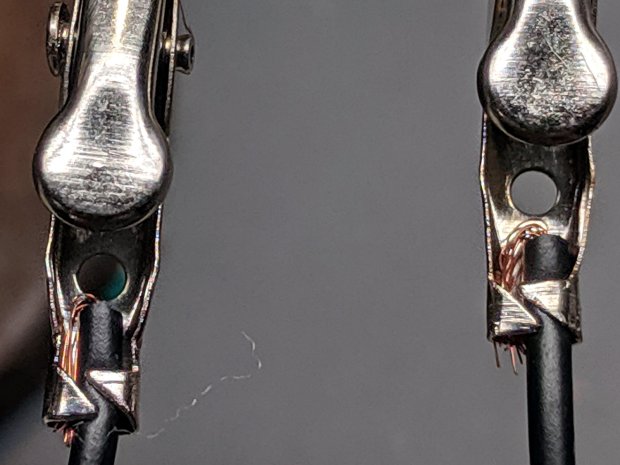
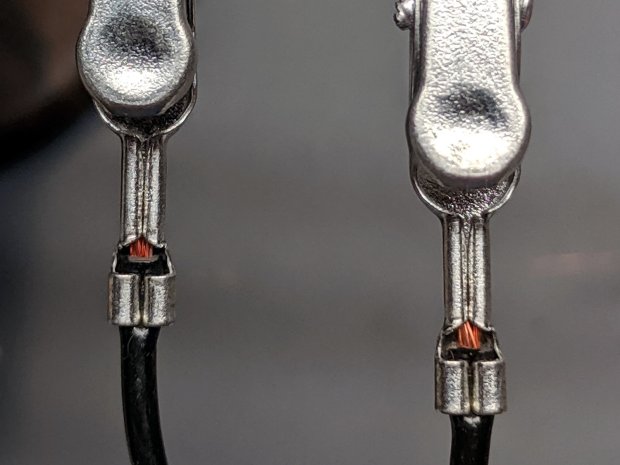
    As a rule, the crimps aren’t particularly good:

    Black Dual Alligator - as manufactured
    Black Dual Alligator – as manufactured

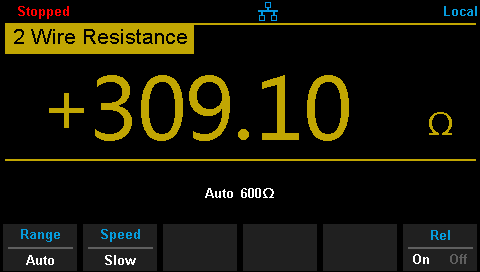
    The most obvious effect is high end-to-end resistance:

    Black Dual Alligator - before - A
    Black Dual Alligator – before – A

    Yes, yes, 122 Ω in an alligator clip lead is high.

    The test setup isn’t particularly intricate:

    Black Dual Alligator - test setup
    Black Dual Alligator – test setup

    The lackadaisical crimps also have unstable resistances:

    Black Dual Alligator - before - B
    Black Dual Alligator – before – B

    So I figured I may as well repair the lot of ’em.

    I stripped the lead back to expose fresh copper, soldered it to the clip, then re-crimped the clip around the insulation for some token strain relief:

    Black Dual Alligator - soldered
    Black Dual Alligator – soldered

    I won’t win any soldering awards, but the resistance is way better than before:

    Black Dual Alligator - after
    Black Dual Alligator – after

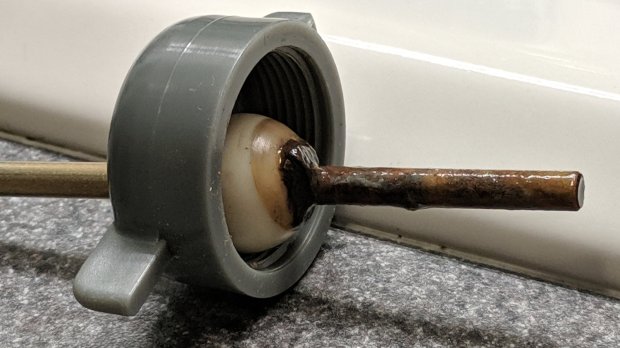
    If more than half an ohm seems a tad high for a foot of copper wire, you’re right. My slightly magnetized bench screwdriver shows it’s not copper wire:

    Copper-plated steel wire
    Copper-plated steel wire

    I’d say it’s copper-plated steel, wouldn’t you?

    Those of long memory will recall the non-standard ribbon cable I used as a 60 kHz loop antenna. In this case, the Chinese manufacturer figured nobody would notice or, likely, care. Given the crappy overall quality of the end product, it’s a fair assumption.

    I was mildly tempted to replace the wire with good silicone-insulated copper, but came to my senses; those “high voltage” silicone test leads will be Good Enough for higher-current connections.

    While I was at it, I pulled apart my entire collection just to see what was inside and fix the ailing ones. These clips date back to the dawn of time, with what started as excellent crimps:

    Crimped Alligator Clips - as manufactured
    Crimped Alligator Clips – as manufactured

    Alas, after I-don’t-know-how-many decades, they’re not longer gas-tight, so I soaked a dollop of solder into each one:

    Crimped Alligator Clips - soldered - Made In Japan
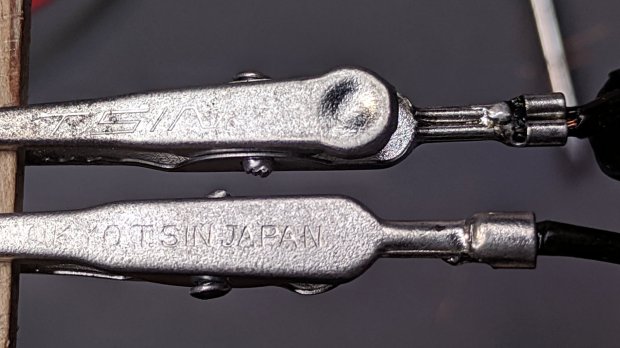
    Crimped Alligator Clips – soldered – Made In Japan

    Chekkitout: “Made In Japan”.

    Someone, perhaps me wearing a younger man’s clothes or, less likely, Mad Phil in a hurry, solved a similar problem with bigger blobs and no strain relief:

    Crimped Alligator Clips - cut and soldered
    Crimped Alligator Clips – cut and soldered

    So, now I have a slightly better collection of crappy alligator clip leads. The copper-plated steel wires will eventually fail, but it should become obvious when they do.

    Test your clip leads today!

  • Bathroom Drain Rod Status

    The bathroom drain rod slipped out of the pop-up stopper, giving me the opportunity to see how well it’s surviving:

    Bathroom drain lever - 2019-08-03
    Bathroom drain lever – 2019-08-03

    After not quite two years, it’s not obviously rotting away.

    Life is good …

  • City of Poughkeepsie Police Armor

    Returning from a long ride, we spotted an unusual sign at the Vassar Farm entrance (clicky for more dots):

    Vassar Farm - Poughkeepsie Police Training sign - 2019-08-12
    Vassar Farm – Poughkeepsie Police Training sign – 2019-08-12

    Even more unusual was the sight of a matte black MRAP jouncing across the field:

    Vassar Farm - Poughkeepsie Police MRAP - 2019-08-12
    Vassar Farm – Poughkeepsie Police MRAP – 2019-08-12

    I hadn’t noticed an uptick of the insurgency around here, but I suppose it could happen.

    It looks like a Cougar HE 6×6 MRAP on loan from the DLA 1033 Program to the City of Poughkeepsie Police Department. The flat top suggests they dismounted the CROWS gun, which seems a definite step down in no-knock capability.

    Some poking around showed the Poughkeepsie Police Department acquired a 107 mm Mortar Carrier some years ago:

    Marshall Project - Poughkeepsie 107 mm Mortar Carrier
    Marshall Project – Poughkeepsie 107 mm Mortar Carrier

    The M106 is an impressive hunk of tracked armor, although it seems unsuited for urban warfare and would certainly scuff up the streets pretty badly. I don’t know if they scrapped the M106 in favor of the MRAP.

    I’m hoping they don’t collaborate with the Dutchess County Sheriff’s Department to patrol the Rail Trail, even within the City limits.

  • Logitech “QuickCam Pro 5000” Ball Camera Disassembly

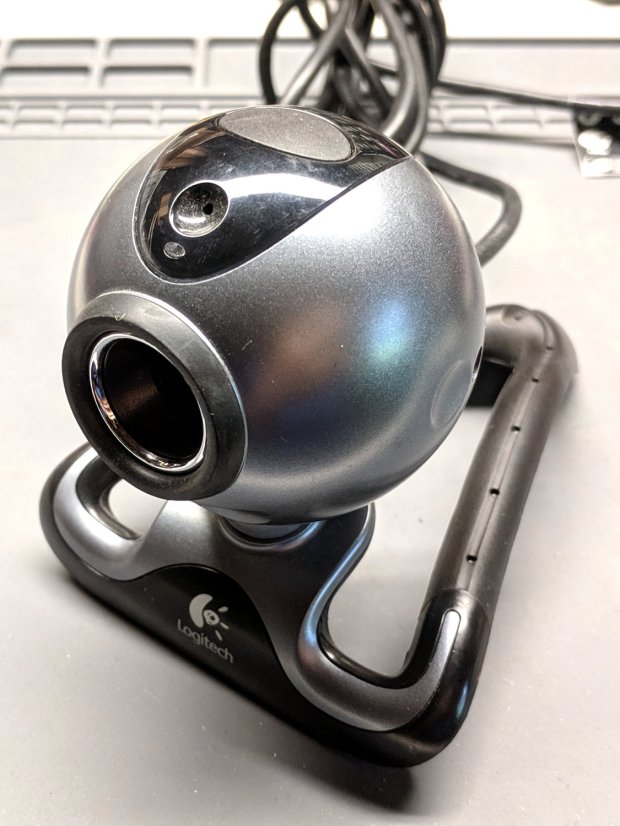
    Another alignment camera contestant from the Big Box o’ Junk Cameras:

    Logitech Pro 5000 Ball Camera - overview
    Logitech Pro 5000 Ball Camera – overview

    It’s a Logitech QuickCam Pro 5000 with a native 640×480 resolution. For no obvious reason, it seems to work better on a Raspberry Pi than the Logitech QuickCam for Notebooks Deluxe I ripped apart a few weeks ago, where “better” is defined as “shows a stable image”. I have no explanation for anything.

    Remove the weird bendy foot-like object by pulling straight out, then remove the single screw from the deep hole visible just behind the dent in the top picture:

    Logitech Pro 5000 Ball Camera - disassembled
    Logitech Pro 5000 Ball Camera – disassembled

    The stylin’ curved plate on the top holds the microphone and a button, neither of which will be of use in its future life. Unplug and discard, leaving the USB cable as the only remaining connection:

    Logitech Pro 5000 Ball Camera - USB connector
    Logitech Pro 5000 Ball Camera – USB connector

    Inexplicably, the cable shield is soldered to the PCB, so the connector doesn’t do much good. Hack the molded ball off of the cable with a diagonal cutter & razor knife, taking more care than I did to not gouge the cable insulation.

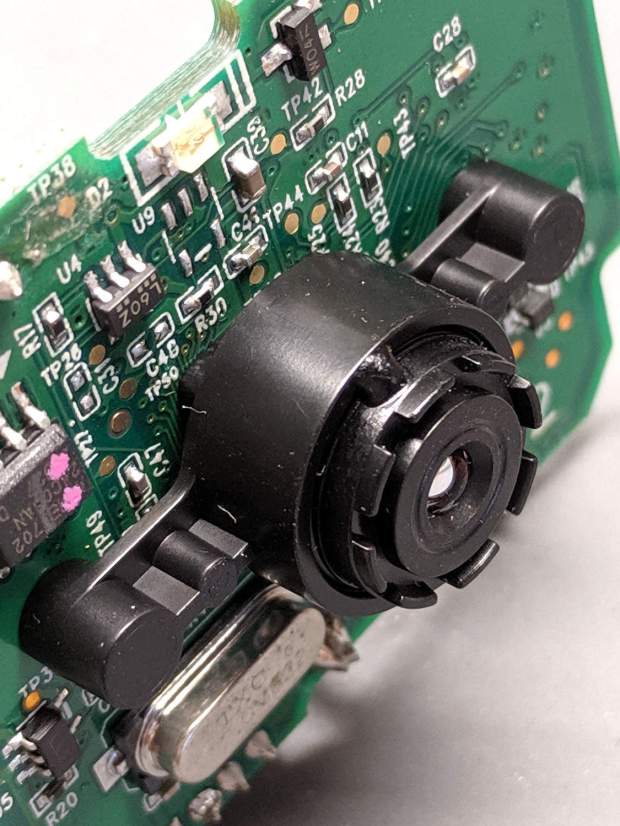
    A glue dot locks the focusing threads:

    Logitech Pro 5000 Ball Camera - focus glue
    Logitech Pro 5000 Ball Camera – focus glue

    Gentle suasion with a needle nose pliers pops the dot, leaving the lens free to focus on objects much closer than infinity:

    Logitech QuickCam Pro 5000 - short focus
    Logitech QuickCam Pro 5000 – short focus

    Now, to conjure a simpleminded mount …

  • Monthly Image: A Tree Full of Turtles

    Spotted along Robinson Lane:

    Tree full of turtles
    Tree full of turtles

    A closer look at the same number of pixels:

    Tree full of turtles - detail
    Tree full of turtles – detail

    The little one way over on the left is definitely having an adventure!

    I’d read of goats climbing trees, but never turtles.

  • CNC 3018-Pro: Home Switches

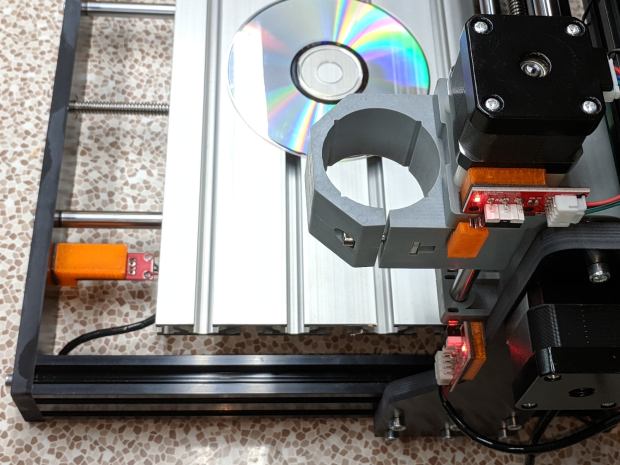
    The CNC 3018-Pro doesn’t absolutely need home switches, but (in principle) they let you install a workholding fixture at a known position, home the axes, pick a preset coordinate system for the fixture, and not have to touch off the axes before making parts.

    Having used Makerbot-style endstop switch PCBs for the MPCNC, this was straightforward:

    3018 CNC - Endstop switches - overview
    3018 CNC – Endstop switches – overview

    The X and Z axis switches simply press against the appropriate moving parts:

    3018 CNC - X and Z Endstops
    3018 CNC – X and Z Endstops

    The little tab stuck on the tool clamp provides a bit of clearance around the upper part of the X axis assembly.

    The Y axis switch needed a slightly tapered tab to extend the bearing holder:

    3018 CNC - Y axis endstop
    3018 CNC – Y axis endstop

    It’s made from a random scrap of clear plastic, hand-filed to suit, and stuck on the bearing to trigger the switch in exactly the right spot.

    You can find elaborate switch mounts on Thingiverse, but I’ve become a big fan of genuine 3M outdoor-rated foam tape for this sort of thing: aggressive stickiness, no deterioration, possible-but-not-easy removal.

    The switches need +5 V power, so add a small hack to the CAMTool V3.3 control board to let the connectors plug right in:

    3018 CNC CAMTool - Endstop power mod - installed
    3018 CNC CAMTool – Endstop power mod – installed

    The solid models borrow their central depression around the switch terminals from the MPCNC blocks:

    3018 Home Switch Mounts - Slic3r preview
    3018 Home Switch Mounts – Slic3r preview

    The OpenSCAD source code as a GitHub Gist:

    // 3018-Pro Mount for Makerbot Endstop PCB
    // Ed Nisley KE4ZNU – 2019-07
    /* [Build Options] */
    Layout = "Show"; // [Build, Show]
    /* [Hidden] */
    ThreadThick = 0.25; // [0.20, 0.25]
    ThreadWidth = 0.40; // [0.40]
    function IntegerMultiple(Size,Unit) = Unit * ceil(Size / Unit);
    Protrusion = 0.01; // [0.01, 0.1]
    HoleWindage = 0.2;
    ID = 0;
    OD = 1;
    LENGTH = 2;
    //- Shapes
    // Basic PCB with hole for switch pins
    // origin at switch actuator corner, as seen looking at component side
    SwitchClear = [15.0,5.0,2.0]; // clearance around switch pins
    SwitchOffset = [12.5,9.0,0.0]; // center of switch pins from actuator corner
    PCB = [26.0,16.4,2*SwitchClear.z]; // switch PCB beyond connector, pin height
    XBlock = [PCB.x,PCB.y,5.0];
    module XMount() {
    difference() {
    cube(XBlock,center=false);
    translate(SwitchOffset + [0,0,XBlock.z – SwitchClear.z/2])
    cube(SwitchClear + [0,0,Protrusion],center=true);
    }
    }
    YBlock = [PCB.x + 10.0,PCB.y,20.0];
    module YMount() {
    difference() {
    translate([-10.0,0,0])
    cube(YBlock,center=false);
    translate([0,-Protrusion,10.0])
    cube(YBlock + [0,2*Protrusion,0],center=false);
    translate(SwitchOffset + [0,0,10.0 – SwitchClear.z/2])
    cube(SwitchClear + [0,0,Protrusion],center=true);
    }
    }
    ZBlock = [PCB.x,PCB.y,6.0];
    ZPin = [20.0,10.0,5.5];
    module ZMount() {
    difference() {
    cube(ZBlock,center=false);
    translate(SwitchOffset + [0,0,ZBlock.z – SwitchClear.z/2])
    cube(SwitchClear + [0,0,Protrusion],center=true);
    }
    translate([0,-ZBlock.y,0])
    difference() {
    cube(ZPin,center=false);
    translate([ZPin.x/2,-Protrusion,4.0])
    cube(ZPin + [0,2*Protrusion,0],center=false);
    }
    }
    //- Build things
    if (Layout == "Show") {
    translate([0,YBlock.y,0])
    XMount();
    translate([0,-YBlock.y/2])
    YMount();
    translate([0,-(ZBlock.y + YBlock.y)])
    ZMount();
    }

    The dimension doodles:

    3018 Home Switch Mounts - Dimension Doodles
    3018 Home Switch Mounts – Dimension Doodles