A view of the middle of the Very Large Array of the National Radio Astronomy Observatory:

A view of our back yard, one foggy morning:

Coincidence? Ha!
The Smell of Molten Projects in the Morning
Ed Nisley's Blog: Shop notes, electronics, firmware, machinery, 3D printing, laser cuttery, and curiosities. Contents: 100% human thinking, 0% AI slop.

A view of the middle of the Very Large Array of the National Radio Astronomy Observatory:
A view of our back yard, one foggy morning:
Coincidence? Ha!

After three years, the retainer holding the front bathroom door open against winds blowing through the house on stormy days finally fractured, right at the top of the towel rack where you’d expect it:
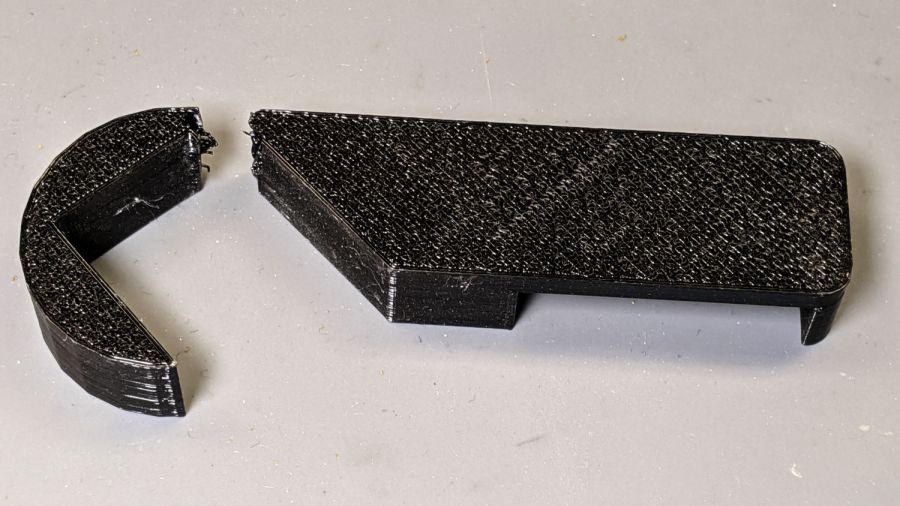
I was all set to add reinforcing pins and whatnot, then came to my senses and just made the whole thing a few millimeters larger:
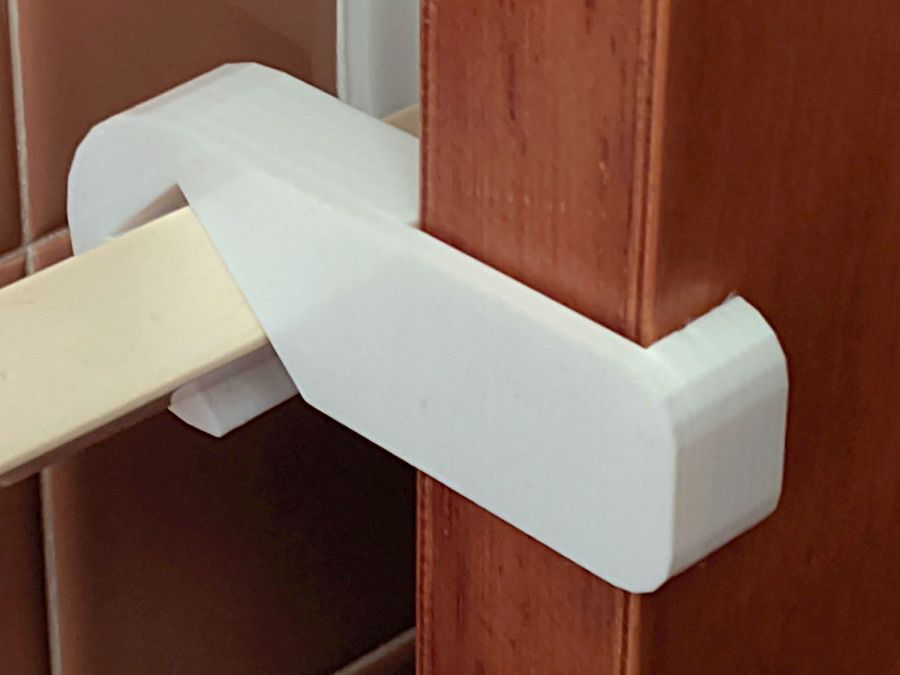
Customer feedback indicates white blends better with the background.
I made a few minor tweaks to the original design, including slightly larger bumps to hold it against the towel bar that, regrettably, put corresponding gouges into the bar. Who knew they used such soft plastic back in the day?
The OpenSCAD source code as a GitHub Gist:
| // Bathroom Door Retainer | |
| // Ed Nisley KE4ZNU – May 2017 | |
| // 2020-07 beef up, particularly at top of bar | |
| Layout = "Show"; // [Show, Build] | |
| //——- | |
| //- Extrusion parameters must match reality! | |
| /* [Hidden] */ | |
| ThreadThick = 0.20; | |
| ThreadWidth = 0.40; | |
| HoleWindage = 0.2; | |
| Protrusion = 0.1; // make holes end cleanly | |
| function IntegerMultiple(Size,Unit) = Unit * ceil(Size / Unit); | |
| //——- | |
| // Dimensions | |
| /* [Dimensions] */ | |
| TowelBarSide = 20.5; // towel bar across flat side | |
| TowelBarAngle = 45; // rotation of top flat from horizontal | |
| BumpOD = 2.0; // retaining ball | |
| DoorOffset = 14.0; // from towel bar to door | |
| DoorThick = 37.0; | |
| WallThick = 8.0; // minimum wall thickness | |
| PlateThick = 4.0; // … slab | |
| RetainerDepth = 15.0; // thickness of retaining notch | |
| NumSides = 6*4; | |
| CornerRad = WallThick; | |
| BarClipOD = TowelBarSide*sqrt(2) + 2*WallThick; | |
| BarClipRad = BarClipOD/2; | |
| OAH = RetainerDepth + PlateThick; | |
| module LatchPlan() { | |
| union() { | |
| linear_extrude(height=OAH,convexity=4) | |
| difference() { | |
| union() { | |
| circle(d=BarClipOD,$fn=NumSides); | |
| hull() | |
| for (i=[0,1], j=[0,1]) | |
| translate([i*(BarClipRad + DoorOffset + DoorThick + WallThick – CornerRad),j*(BarClipRad – CornerRad)]) | |
| circle(r=CornerRad,$fn=4*4); | |
| } | |
| rotate(TowelBarAngle) // towel bar shape | |
| square(size=TowelBarSide,center=true); | |
| translate([0,-TowelBarSide/sqrt(2)]) // make access slot | |
| rotate(-TowelBarAngle) | |
| square(size=[2*TowelBarSide,TowelBarSide],center=false); | |
| } | |
| for (a=[0:180:360]) | |
| rotate(a + TowelBarAngle) | |
| translate([TowelBarSide/2,0,OAH/2]) | |
| rotate([90,0,45]) | |
| sphere(d=BumpOD,$fn=4*3); | |
| } | |
| } | |
| module Latch() { | |
| difference() { | |
| LatchPlan(); | |
| translate([BarClipRad + DoorOffset,-BarClipRad/2,-Protrusion]) | |
| cube([DoorThick,BarClipOD,RetainerDepth + Protrusion],center=false); | |
| } | |
| } | |
| //——- | |
| // Build it! | |
| if (Layout == "Show") { | |
| Latch(); | |
| } | |
| if (Layout == "Build") { | |
| translate([0,0,OAH]) | |
| rotate([180,0,0]) | |
| Latch(); | |
| } |
Done!

While sorting out an extrusion problem on the Makergear forum, I suggested marking the motor shaft and the filament drive shaft to see if the motor pinion inside the gearbox had worn out: if the motor turns and the filament gear doesn’t, then it’s dead inside.
For future reference, you mark the motor shaft thusly:
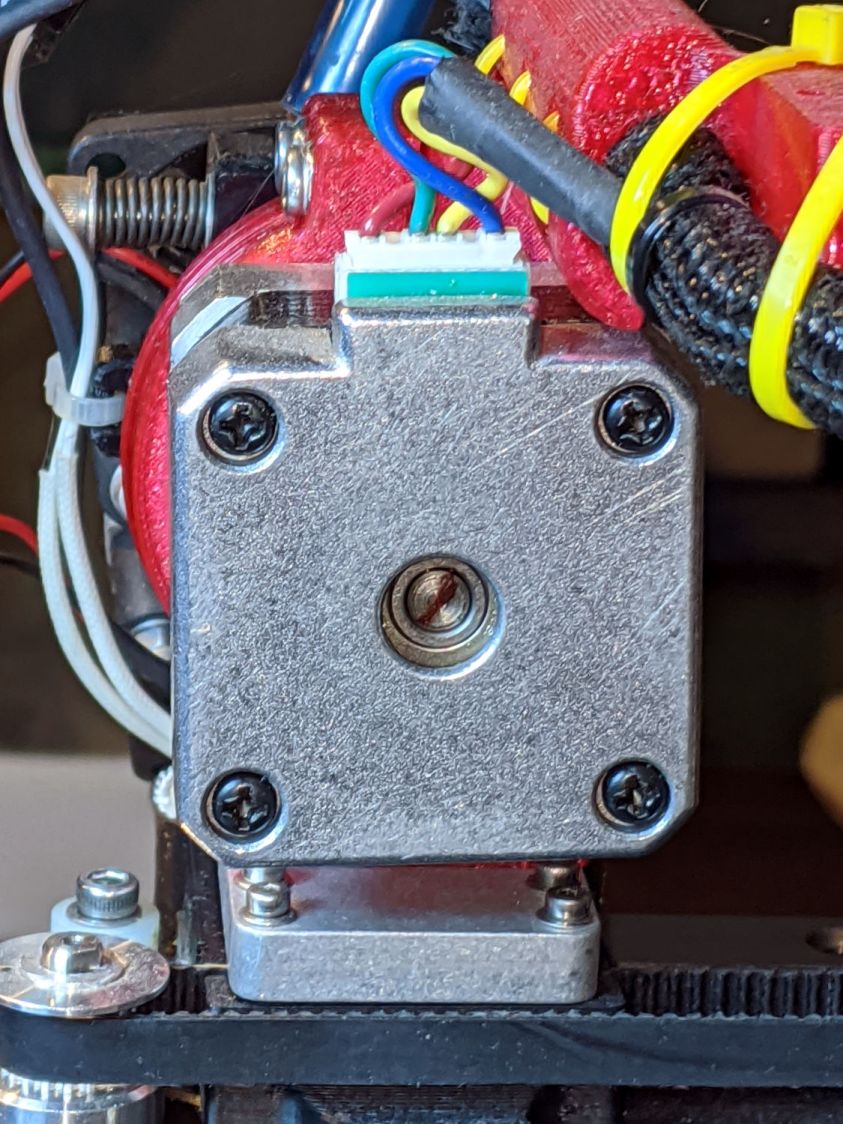
Two marks on the filament drive gear tell you if the shaft is turning and if the gear is slipping on the shaft:

A closeup of an earlier, much coarser, drive gear:

It all worked out well in the end!

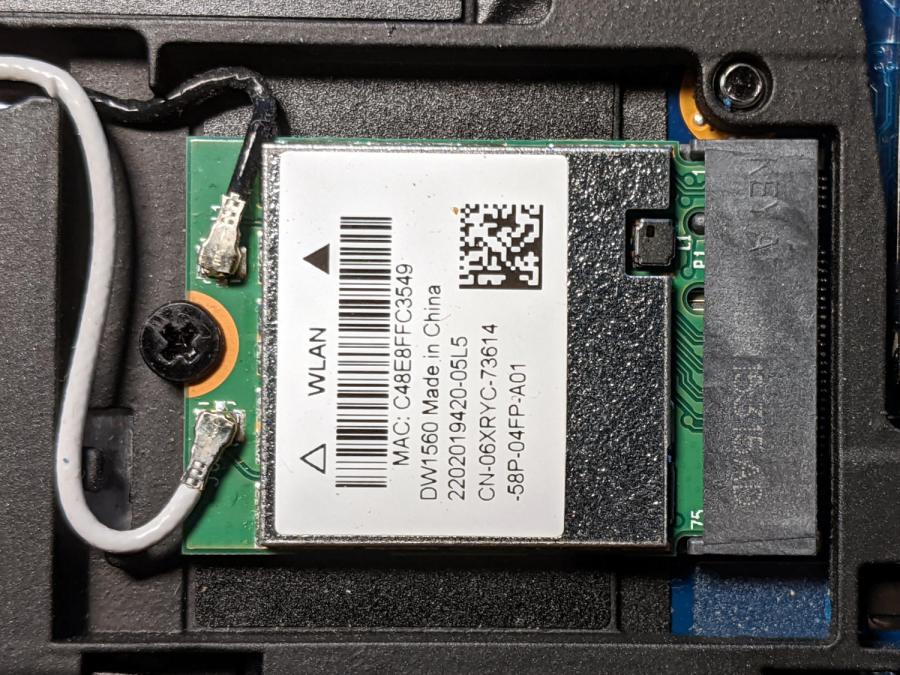
Although the Dell Latitude E7250 allegedly had Bluetooth capability and the Blueman applet tried connecting to my Bluetooth headsets, the connection aways failed and nothing worked. There’s a WLAN module stuck in an M.2 socket inside the laptop providing both WiFi and Bluetooth:
A bit of searching suggested the driver wasn’t loading properly, which became obvious after I knew where to look:
dmesg | grep -i blue
… snippage …
[    5.678610] Bluetooth: hci0: BCM20702A1 (001.002.014) build 1572
[    5.678851] bluetooth hci0: Direct firmware load for brcm/BCM20702A1-0a5c-216f.hcd failed with error -2
[    5.678853] Bluetooth: hci0: BCM: Patch brcm/BCM20702A1-0a5c-216f.hcd not found
[   10.854607] Bluetooth: RFCOMM TTY layer initialized
[   10.854613] Bluetooth: RFCOMM socket layer initialized
[   10.854619] Bluetooth: RFCOMM ver 1.11
Without having the proper firmware / patch loaded, the module won’t work, even though the TTY / socket layers know it’s present, which explains why Blueman did everything except actually connect to the headsets.
More searching suggested you must extract the firmware HEX file from the Windows driver. Feeding the Service Tag into the Dell support site, then feeding “Bluetooth” and “Windows 8.1, 64-bit” (preinstalled on the laptop) into the Drivers & Downloads tab gets you the relevant EXE file: Dell Wireless 1550/1560 Wi-Fi and Bluetooth Driver. It turns out to be a self-extracting ZIP file (in Windows, anyway), so unzip it all by yourself:
unzip Network_Driver_5DFVH_WN32_6.30.223.262_A03.EXEThis produces a blizzard of HEX files in the newly created Drivers/production/Windows8.1-x64 directory. Each firmware HEX file is keyed to the USB Product Code identifying the unique USB gadget, found with lsusb:
lsusb
… snippage …
Bus 002 Device 003: ID 0a5c:216f Broadcom Corp. BCM20702A0 Bluetooth
… snippage …
The DW1560 apparently has a USB RAM interface, with the specific HEX file identified in the CopyList stanza of the INF file corresponding to that USB Product Code:
grep -i -A 5  ramusb216f.copylist Drivers/production/Windows8.1-x64/bcbtums-win8x64-brcm.inf
[RAMUSB216F.CopyList]
bcbtums.sys
btwampfl.sys
BCM20702A1_001.002.014.1443.1572.hex
… snippage …
However, the Linux firmware loader needs a different file format with a different name, mashed together from the HEX file, USB Vendor, and USB Product codes:
hex2hcd -o BCM20702A1-0a5c-216f.hcd BCM20702A1_001.002.014.1443.1572.hexThe converted firmware file goes where the loader expected to find it:
sudo cp BCM20702A1-0a5c-216f.hcd /lib/firmware/brcm/Whereupon next reboot sorted things out:
dmesg | grep -i blue
[    6.024838] Bluetooth: Core ver 2.22
[    6.024868] Bluetooth: HCI device and connection manager initialized
[    6.024872] Bluetooth: HCI socket layer initialized
[    6.024874] Bluetooth: L2CAP socket layer initialized
[    6.024881] Bluetooth: SCO socket layer initialized
[    6.100796] Bluetooth: BNEP (Ethernet Emulation) ver 1.3
[    6.100800] Bluetooth: BNEP filters: protocol multicast
[    6.100804] Bluetooth: BNEP socket layer initialized
[    6.157114] Bluetooth: hci0: BCM: chip id 63
[    6.158125] Bluetooth: hci0: BCM: features 0x07
[    6.176119] Bluetooth: hci0: BCM20702A
[    6.177114] Bluetooth: hci0: BCM20702A1 (001.002.014) build 0000
[    7.031228] Bluetooth: hci0: BCM20702A1 (001.002.014) build 1572
[    7.047177] Bluetooth: hci0: DW1560 Bluetooth 4.0 LE
[   13.141854] Bluetooth: RFCOMM TTY layer initialized
[   13.141865] Bluetooth: RFCOMM socket layer initialized
[   13.141872] Bluetooth: RFCOMM ver 1.11
The firmware may be in one of the myriad Bluetooth packages not installed by default, so perhaps identifying & installing the proper package would sidestep the hocus-pocus.
Maybe next time?
Now I can wear my Bose Hearphones in Zoom sessions with the E7250, because my Pixel 3a phone heats up almost to the gets-bendy level while thrashing its battery to death.
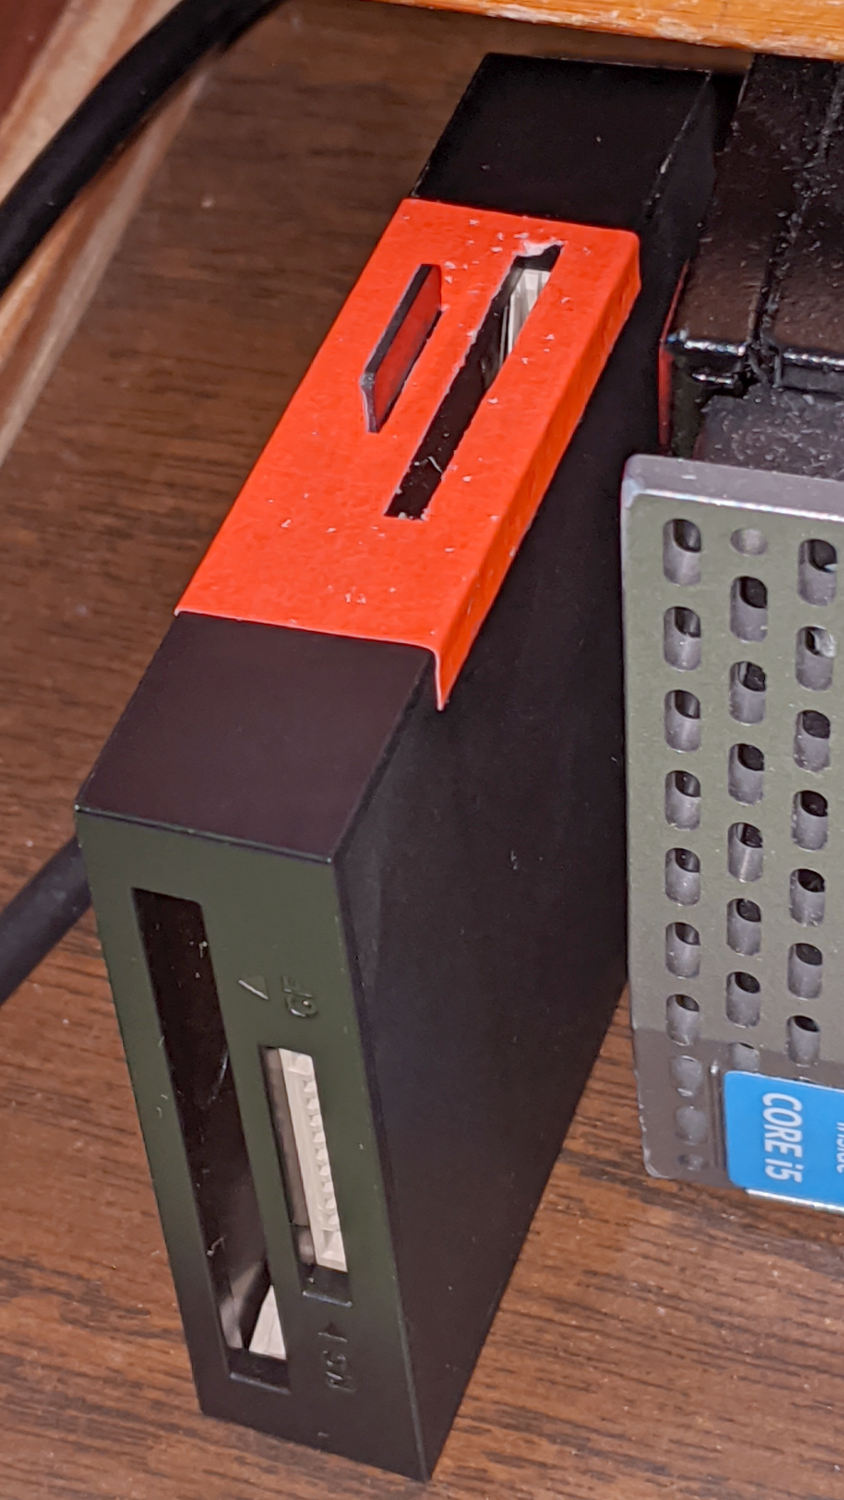
Consumer electronics designers seem to favor low- or no-contrast markings, with this USB reader falling on the vanishing end of the spectrum:
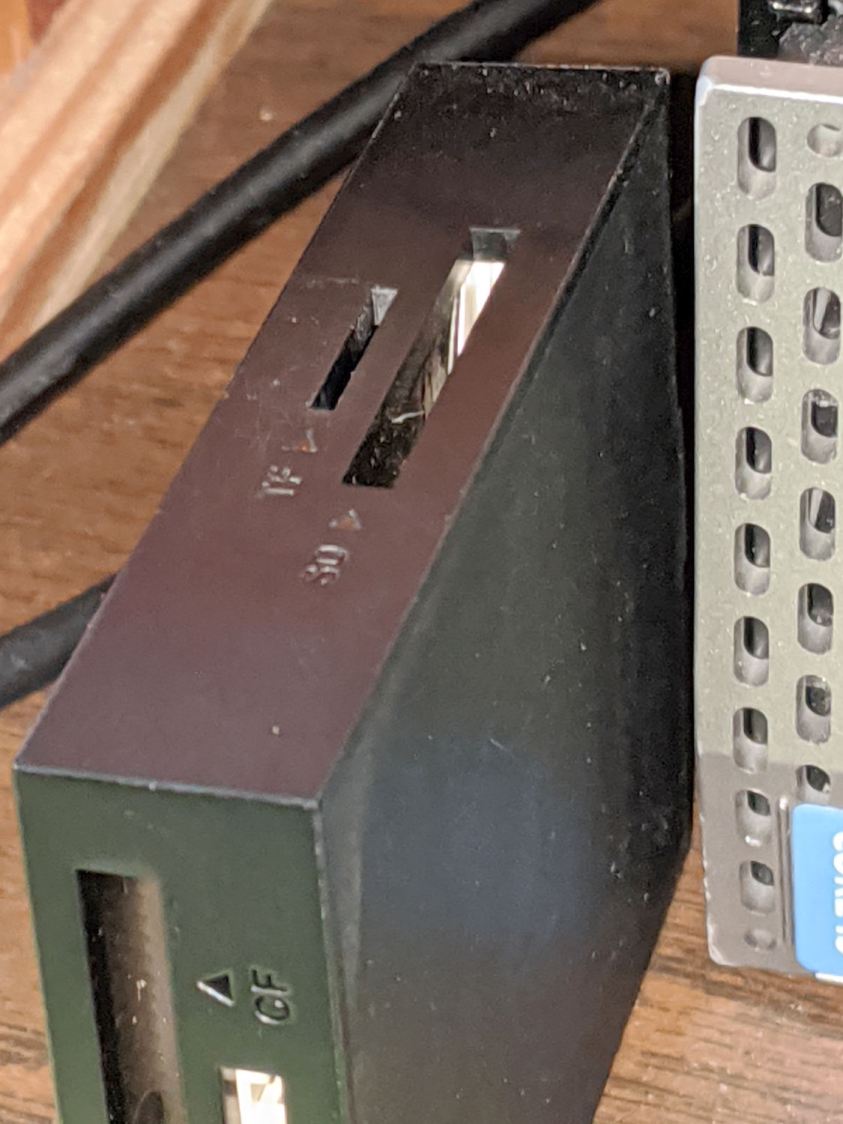
I poke the MicroSD card from the AS30V helmet camera into the smaller slot on the top surface, but, contrary to what’s revealed by the camera’s flash, the slot is a black-on-black target.
Well, I finally fixed that:
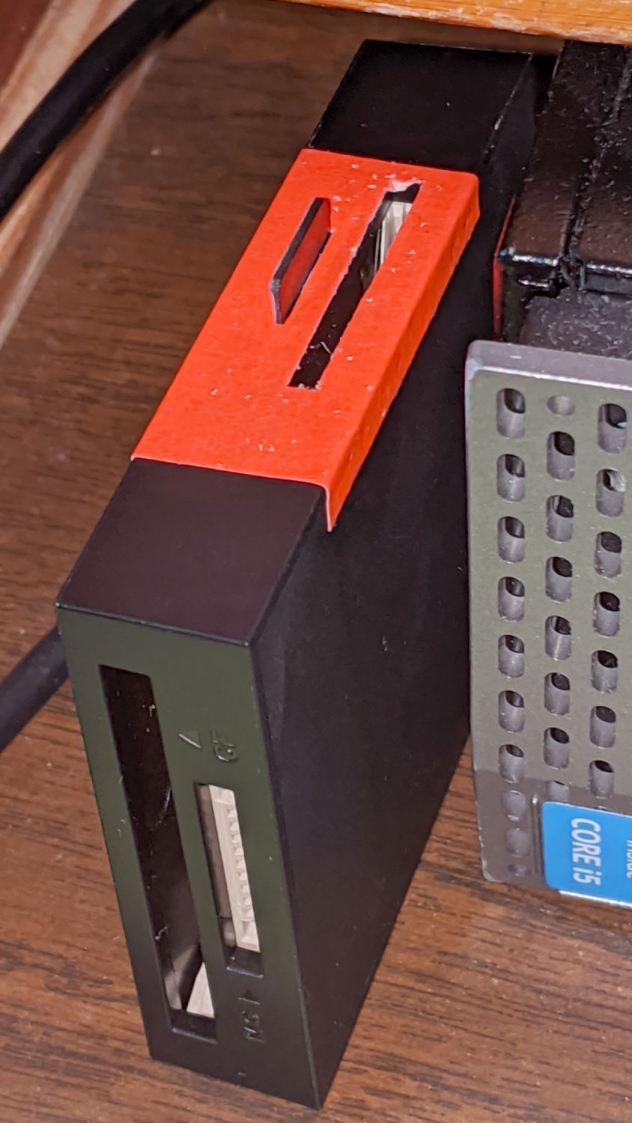
Although white tape surely would have sufficed, the roll of fluorescent red came to hand and that’s what it’ll be. The CompactFlash and Memory Stick slots on the front don’t see much traffic and have better access.
I slapped tape on case, trimmed the slots with a razor knife, and declared victory.
Much better!

A Round Tuit™ finally arrived for this long-delayed project:

They’re bandsawed from an impossibly heavy-duty U-shaped aluminum extrusion salvaged from a scrap pile; the flanges are 6 and 7 mm thick. I’ll put in a good word for the Proxxon 10/14 TPI blade, because it goes through aluminum plate like butter.
The wood strip under the top flange raises the fillet on the interior angle enough to let the extrusion sit flat on the top vise jaw and square against the gripping side. It’s held in place with double-sided carpet tape.
They’re faced with a rubber sheet I thought was twice as thick when I picked it out of the Big Box o’ Squishy Sheets, but turned out to be two thinner sheets invisibly stuck together. Carpet tape holds one of the sheets to the jaw; I expect the other sheet to fall off in short order.
You’re supposed to embed neodymium magnets in the jaws to hold them to the vise. As far as I can tell, they’re perfectly happy to just sit there all by themselves and, anyway, magnets would grow lethally sharp and bulky steel fur coats in short order.
Squaring the long edge didn’t pose much of a problem:

Tidying the ends, however, required more setup:

That’s the Sherline Tilting Angle Plate at 90°, with barely enough room on the far side for the base of a Starrett Double Square to set the extrusion vertical; the hand clamp holds it in place while tightening the step clamps. It sits on an aluminum sheet to put its upper end three smidgens over the angle plate, letting me flycut one smidgen for a clean edge.
Now I can retire the old soft jaws, which have served for too many decades and are far too ugly to show; improvised from weatherstripping glued to bent-square copper pipe and intended as a quick fix. You know how that goes …

Just for completeness, here’s what the various soaker hose clamps look like in the garden, as solid models only let you visualize the ideal situation:

This one prevents a puddle in the path to the right:

Bending the hoses around the end of a bed puts them on edge, with this clamp suppressing a shin-soaking spray to the left:

The clamp at the connector closes a leak around the crimped brass fitting, with the other two preventing gouges from direct sprays into the path along the bottom of the picture:

All in all, a definite UI improvement!
As far as I can tell, we have the only soaker hose repairs & spritz stoppers in existence. Hooray for 3D printing!
