The Smell of Molten Projects in the Morning

Ed Nisley's Blog: Shop notes, electronics, firmware, machinery, 3D printing, laser cuttery, and curiosities. Contents: 100% human thinking, 0% AI slop.

Month: February 2017

  • Screw Cutting Fixture: Full-thread Aluminum

    By and large, when you follow the recipe, you get the expected result:

    Screw cutting fixture - M3x0.5 aluminum - side view
    Screw cutting fixture – M3x0.5 aluminum – side view

    That’s another length of the same aluminum rod, this time with a full-length M3x0.5 thread down the middle, and a screw with a neatly trimmed end.

    Running the lathe spindle in reverse prevents the screw from loosening the jam nuts on the left:

    Screw cutting fixture - M3x0.5 aluminum - in lathe chuck
    Screw cutting fixture – M3x0.5 aluminum – in lathe chuck

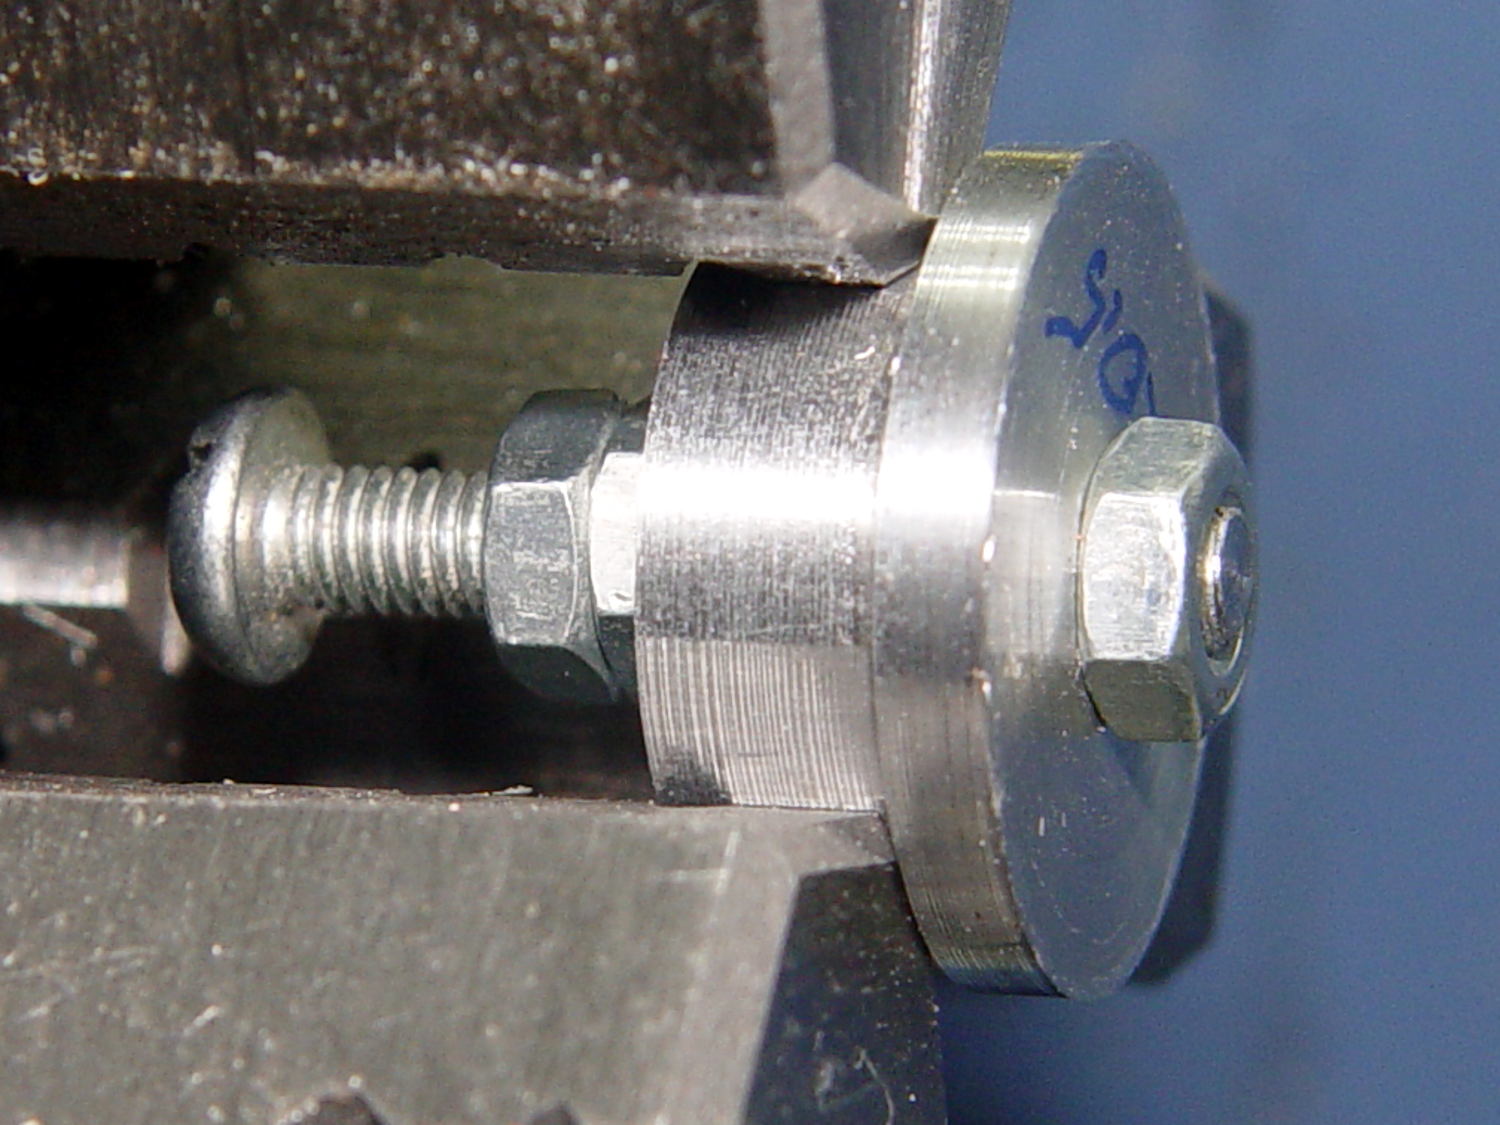
    Running the spindle forward does move the screw enough to loosen the nuts. Perhaps I should put wrench flats on the big end of the fixture so I can really torque the nuts.

    That front nut was mostly decorative, rather than tight, because I didn’t expect the first attempt to work nearly as well as it did. A bit of filing to taper the end of the thread and it was all good.

    That was easy…


  • Cheap WS2812 RGB LEDs: Continuing Failures

    Three more knockoff Neopixels failed in the last few weeks, including one that can’t possibly suffer any thermal stress:

    Halogen bulb brass cap - overview
    Halogen bulb brass cap – overview

    I wrapped the halogen bulb in a shop towel, laid the ersatz heatsink against an anvil (actually, it was a microwave transformer on the Squidwrench operating table), whacked a chisel into the epoxy joint, and met with complete success:

    Failed WS2812 LED - ersatz heatsink
    Failed WS2812 LED – ersatz heatsink

    Having epoxied the PCB and braid in place, there was nothing for it but to drill the guts out of the brass cap:

    Failed WS2812 LED - drilling
    Failed WS2812 LED – drilling

    Which produced a pile of debris in addition to the swarf:

    Failed WS2812 LED - debris
    Failed WS2812 LED – debris

    The brass cap emerged unscathed, which was just about as good as I could possibly hope for.

    The base LED in this 21HB5A also failed:

    21HB5A on platter - orange green
    21HB5A on platter – orange green

    Soooo I had to unsolder the plate lead and Arduino connections to extract the bottom PCB; fortunately, that was just a press-fit into the base.

    I should mount a 3.5 mm stereo jack on the platter and run the plate lead into a nice, albeit cheap, knurled metal plug, so I can dismount both the tube and the plate lead without any hassle. Right now, the tube can come out of the socket, but the plate lead passes through the platter.

    For whatever it’s worth, all of the dead WS2812 LEDs pass the Josh Sharpie Test, so these failures don’t (seem to) involve poor encapsulation.

  • X10 Transceiver Case Plastic: End Of Life, Redux

    Another X10 RF transciever, this one made for IBM (!) a long time ago, emerged from the heap with its case falling apart: the plastic bosses that should anchor the screws had broken off, then cracked radially. Given that I was probably going to toss it anyway, for reasons that will soon be obvious, I tried repairing the bosses just for practice.

    Stuffing the boss fragments into close-fitting brass tubes, with a dash of IPS #3 on the broken faces, put them back together reasonably well:

    HD501 X10 Transceiver - plastic boss gluing
    HD501 X10 Transceiver – plastic boss gluing

    More IPS #3 and a pair of clamps stuck the bosses back on the case:

    HD501 X10 Transceiver - plastic boss assembly
    HD501 X10 Transceiver – plastic boss assembly

    Note the dark smudge on the inside of the case. Even though nothing on the PCB looked particularly overheated, Soot Is Sign of Bad Electrical Health.

    And it turned out neither the bonds nor the plastic were up to the task. A day after successfully reassembling the transceiver, the bosses failed along new cracks and crumbled into different fragments.

    I applied a Kapton tape belly band around the case halves, verified that the transceiver no longer produced reliable X10 commands, and executed ++recycle_pile.

    So it goes.

  • Blog Backup: Incremental Media

    The recipe for incrementally copying media files since the previous blog backup works like this:

    grep attachment_url *xml > attach.txt
    sed 's/^.*http/http/' attach.txt | sed 's/<\/wp.*//' > download.txt
    wget -nc -w 2 --no-verbose --random-wait --force-directories --directory-prefix=Media/ -i download.txt
    

    The -nc sets the “no clobber” option, which (paradoxically) simply avoids downloading a duplicate of an existing file. Otherwise, it’d download the file and glue on a *.1 suffix, which isn’t a desirable outcome. The myriad (thus far, 0.6 myriad) already-copied files generate a massive stream of messages along the lines of File ‘mumble’ already there; not retrieving.

    Adding --no-verbose will cut the clutter and emit some comfort messages.

    There seems no way to recursively fetch only newer media files directly from the WordPress file URL with -r -N; the site redirects the http:// requests to the base URL, which doesn’t know about bare media files and coughs up a “not found” error.

  • MicroMark Bandsaw: Blackened Table

    The really bright LED worklights I added to the MicroMark bandsaw produced plenty of glare from the raw aluminum table top:

    USB Gooseneck Mount - on bandsaw
    USB Gooseneck Mount – on bandsaw

    No good deed goes unpunished, I suppose.

    While rooting around for something else, I rediscovered my bottle of Birchwood Casey Aluminum Black (basically selenium dioxide) that’s intended for touchup work on small parts, not blackening an entire aluminum plate. Well, having had that bottle forever, it’s not like I’ll miss a few milliliters.

    If this didn’t work, I could always sand the table down to the original aluminum finish.

    So I applied a sanding block in hopes of smoothing the tooling marks:

    MicroMark Bandsaw - sanded table
    MicroMark Bandsaw – sanded table

    Looked pretty good, I thought, so:

    • Wipe it down with alcohol (per the bottle instructions)
    • Slather on a generous dose of Aluminum Black
    • Let that chew on the table for a minute
    • Rinse off with water, wipe dry
    • Perch atop the furnace for thorough drying
    • Spray with Topsaver oil, wipe down
    • Put it back on the bandsaw

    Aaaaand it looks great:

    MicroMark Bandsaw - blackened table
    MicroMark Bandsaw – blackened table

    Well, in terms of metal finishing, that blackening job looks downright crappy. Aluminium Black is intended for decorative work and will surely wear quickly on the bandsaw table, but it’s entirely good enough for my simple needs: the glare from those lights is gone.

    After I took the picture, I blackened the brass screw in the slot. Came out a weird mottled green-bronze, might look antique in a different context, suits me just fine.

    Done!

  • Kenmore Progressive Vacuum Cleaner Carpet Brush Disassembly

    The beater bar found and ingested a remarkably long strip of carpet yarn, resulting in a sudden stop and an acute need for disassembly. In the unlikely event that happens again:

    • Remove hose
    • Release latch to lay hose fitting flat
    • Remove two obvious screws
    • Pry rear latches adjacent to hose fitting to release rear of top cover
    • Pry side latches to release middle of top cover
    • Pull rear of top cover away from base
    • Disengage latches along front of beater bar

    Those places, neatly marked for future reference, with the top cover against the floor:

    Kenmore Progressive vacuum - carpet brush - disassembly latches
    Kenmore Progressive vacuum – carpet brush – disassembly latches

    With the cover off, the beater bar lifts out and you can easily unwind the mess.

  • Forester: TPMS FTW, Redux

    Now I know the Forester’s TPMS icon blinks on 1000 feet from a cold start with 12 psi in the offending tire. I returned home and pulled this from a sipe in the left rear tire:

    Road debris - blade fragment
    Road debris – blade fragment

    It’s atop a 0.1 inch grid.

    The flat side on the right rode tangent to the tire surface, recessed slightly below the tread, and pretty much invisible inside the sipe. Of course, the point punched through the tire’s steel belt and let the wind out, ever so slowly.

    I initially thought it was a utility knife blade fragment, but under the microscope it looks more like a saw blade tooth. It’s obviously been kicking around on the road for quite a while; back in the day, they occasionally swept the roads, but that was then and this is now.

    Makes me glad I didn’t buy four new tires after the last flat. I suppose installing two plugs in the same tire counts as a net loss, but they’re small, widely separated injuries and that’s how it’ll roll.

    For the record: with 14 k miles on the tires, tread wear = 2/32 inch of the original 6/32 inch depth.

    Those tires should last another 30 k miles at our current pace, although I expect more random debris will kill one stone cold dead before that.