Although chain mail provides a good test of the M2’s setup and slicing parameters, it doesn’t offer much in the way of infill. To test that, I designed a holder for the cap of the bulk laundry detergent container:
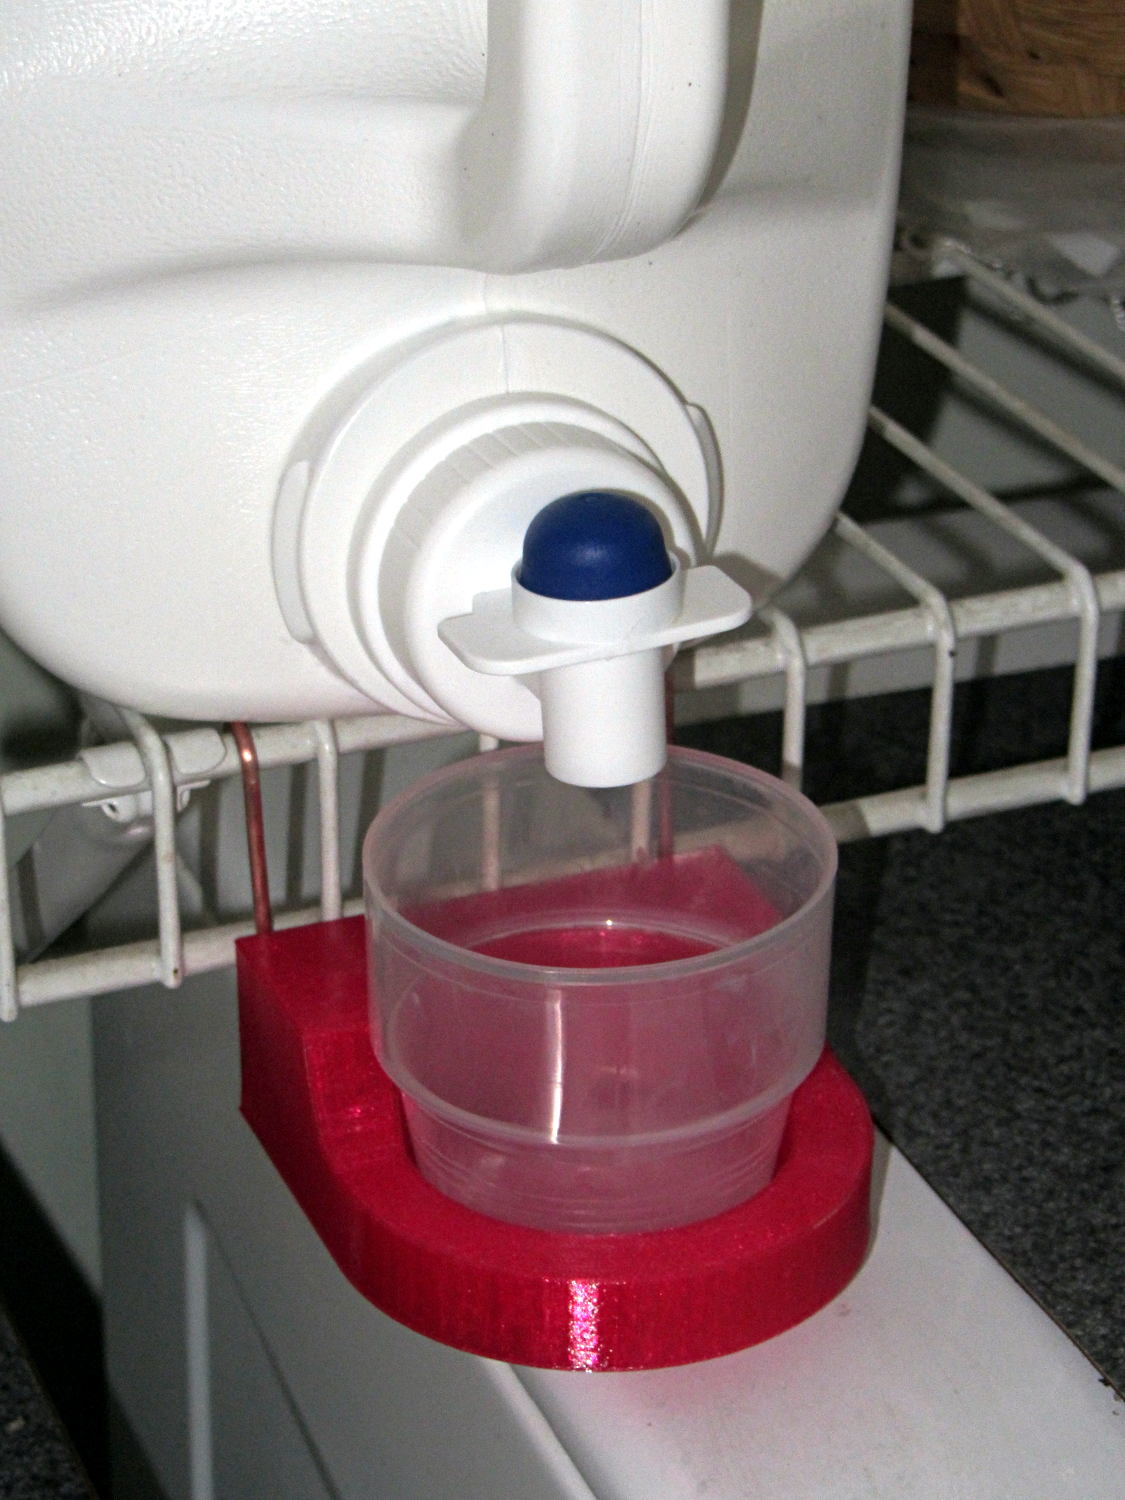
The container must rest on its side, but if you snap the cap back in place, detergent will ooze out between the cap and the container and drip on whatever’s below. The never-sufficiently-to-be-damned Whirlpool high-efficiency front loading washer vibrates like crazy during the spin cycle, shaking anything from its top to the floor. The cap must sit in a cup to catch the inevitable ooze down its side, the wire shelf already has a bunch of other crap on it, and I needed a bulky test object, soooo ….
We regard that detergent container and its cap as a botched design.
Anyhow.
The holder has pair of holes in its back surface for the copper (!) hangers:

I stripped a length of 10 AWG wire, straightened & annealed it, bent up a pair of hooks, then hammered them just flat enough to work-harden the copper, and they were all good.
Printing that massive block with 20% infill showed that the nozzle collected enough PETG during the first few layers to leave a substantial booger behind:
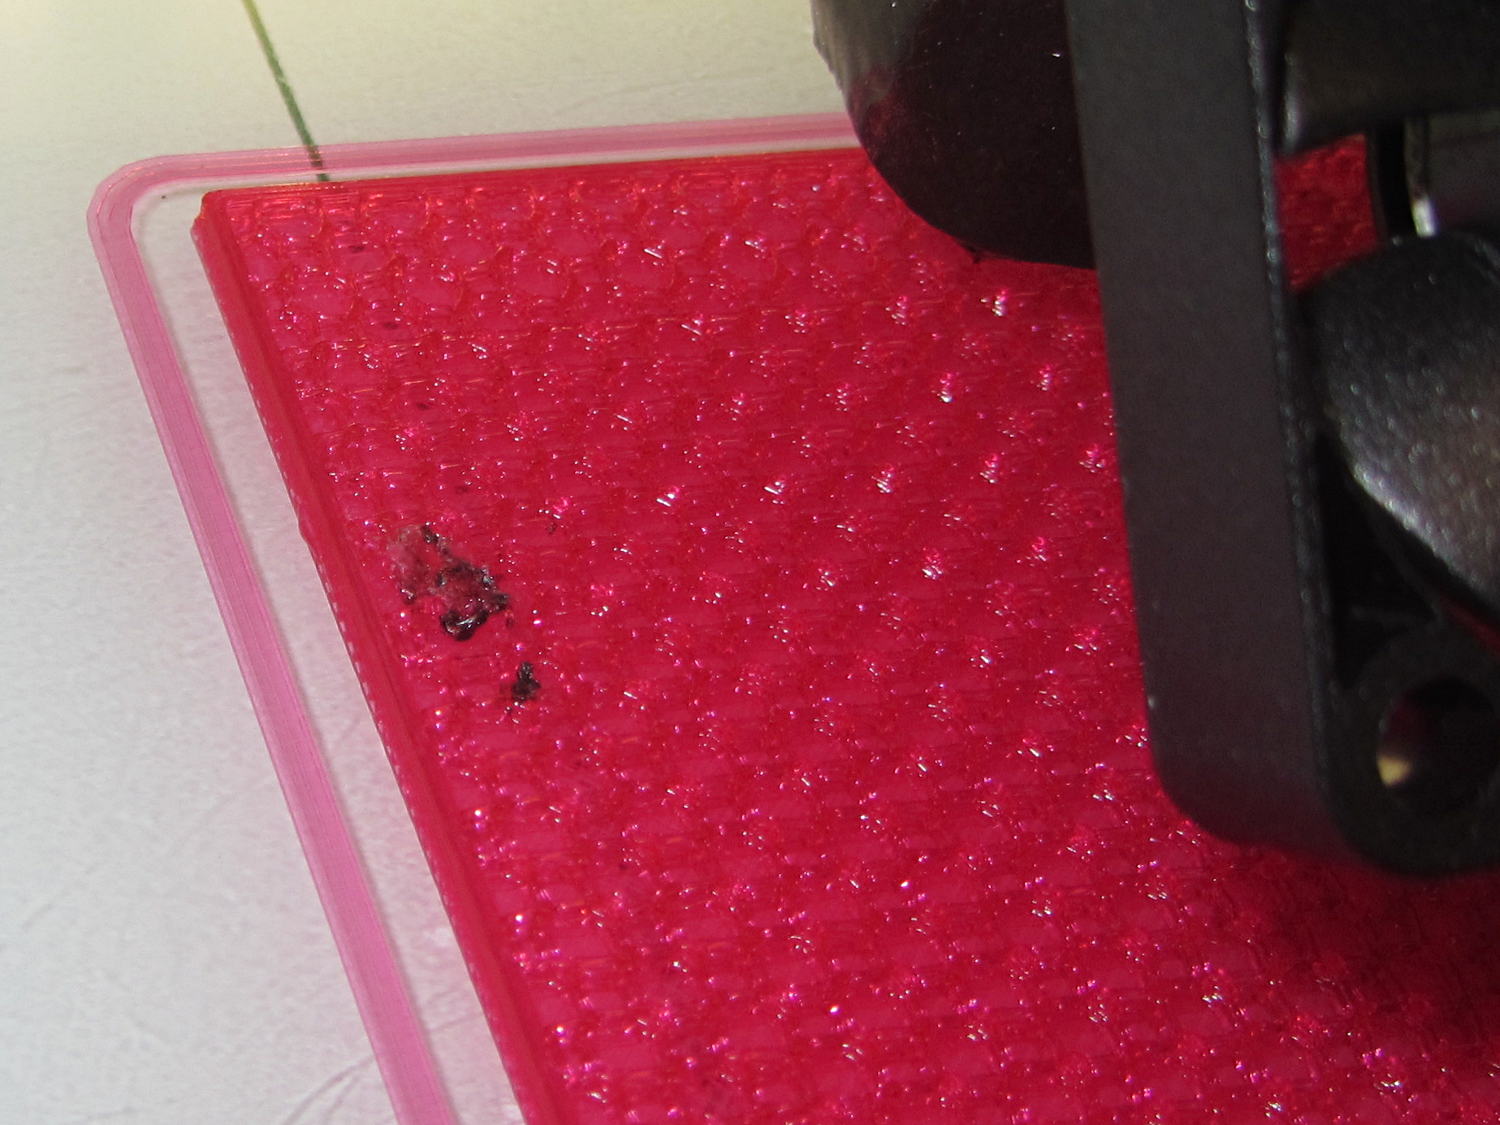
Fortunately, that was the only one and it ended up on the inside, tucked out of sight.
The PETG deposit on the outside of the nozzle gradually darkens from the original magenta to brown, which I’m pretty sure means that it’s oxidizing / decomposing / going bad. There’s no obvious way to remove the booger during the print; I’ve taken to wiping the nozzle after each object, while it’s still hot and the PETG remains flexible.
Because the nozzle didn’t accumulate any more PETG during the rest of the print, it’s not a constant problem, but I have seen boogers several times so far.
Perhaps continued refinement of the slicing parameters will help? One can always hope…
The OpenSCAD source code:
// Detergent Cap Holder
// Ed Nisley KE4ZNU - March 2015

Layout = "Show";			// Show Build

//-------
//- Extrusion parameters must match reality!

ThreadThick = 0.20;
ThreadWidth = 0.40;

HoleWindage = 0.2;

Protrusion = 0.1; 				// make holes end cleanly

function IntegerMultiple(Size,Unit) = Unit * ceil(Size / Unit);

//-------
// Dimensions

RecessX = 45.0;								// cap recess
RecessDia = 55.0;
RecessDepth = 10.0;
RecessSides = 16*4;

BaseThick = 5.0;							// block thickness below cap

PinDia = 2.5;
PinLength = 20.0;
PinOC = 65.0;
PinInset = 7.0;
PinZ = BaseThick;

Block = [RecessX,PinOC + 2*PinInset,30.0];	// overall block size (X to cap center)

FairingRadius = Block[2] - RecessDepth - BaseThick;

//-------

module ShowPegGrid(Space = 10.0,Size = 1.0) {

  RangeX = floor(95 / Space);
  RangeY = floor(125 / Space);

	for (x=[-RangeX:RangeX])
	  for (y=[-RangeY:RangeY])
		translate([x*Space,y*Space,Size/2])
		  %cube(Size,center=true);

}

module PolyCyl(Dia,Height,ForceSides=0) {			// based on nophead's polyholes
  Sides = (ForceSides != 0) ? ForceSides : (ceil(Dia) + 2);
  FixDia = Dia / cos(180/Sides);
  cylinder(r=(FixDia + HoleWindage)/2,h=Height,$fn=Sides);
}

module Holder() {
	difference() {
		union() {									// main shape
			translate([-Block[0]/2,0,Block[2]/2])
			cube(Block,center=true);
			cylinder(d=Block[1],h=Block[2],$fn=RecessSides);
		}
		for (j=[-1,1])								// mounting pin holes
			translate([-(Block[0] + Protrusion),j*PinOC/2,PinZ])
				rotate([0,90,0]) rotate(180/6)
					PolyCyl(PinDia,PinLength + Protrusion,6);
		translate([0,0,Block[2]])					// fairing arc
			rotate([90,0,0])
				cylinder(r=FairingRadius,h=2*Block[1],center=true);
		translate([Block[0]/2,0,Block[2]/2 + RecessDepth + BaseThick])	// flat top
			scale([1,2,1])
				cube(Block,center=true);
		translate([0,0,BaseThick])
			cylinder(d1=RecessDia,d2=1.1*RecessDia,h=Block[2]);
	}
}

//-------
// Build it!

//ShowPegGrid();

if (Layout == "Show") {
	Holder();
}

if (Layout == "Build") {
	translate([0,0,0])
	rotate([0,0,0])
	Holder();
}

Comments
6 responses to “Detergent Cap Holder”
When Julie got fed up with the slime residue from our Kenmore front loader, we dumped it before it died. (Our well water allows some interesting growth…) The Sears affiliate built a “stay away!” reputation, so we got a top-loading no-agitator LG machine from Home Depot on sale. It cleans 1.5 to 2X the amount of clothing per load, is much easier on the back and the clothing, and responds well to quarterly washer-cleaning-compound runs.
We use the bulk containers as backstock, with smaller detergent bottles as working stock. Julie likes it that way.
Which will happen here, too, after putzing with that bulk container.
The Competitive Product we’ve been using has a well-designed cap that drains inside the threaded rim. The last jug sits on the dryer, pending a rinse & refill; the labels won’t match, but that doesn’t matter to us.
That none of this should be necessary goes without saying…
I’ll get a new show-n-tell object for my presentations out of it, though.
My old Asko front-loader is at its third house now and still going strong. I’m beginning to suspect they dodged the design issues that plague other front loaders. Then again, the only other brands I was considering were Miele (expensive) and Wascomat (would need 3-phase power and a steel I-beam base).
Well, there’s a lally column right underneath ours helping damp the vibration: those big concrete weights put a real shimmy in the floor during the high-speed spin cycle.
Our next washer won’t be one of these, that’s for damn sure…
Your mastery of the 3-D printer is impressive. Okay, you wanted a test case… but sometimes you are observed doing easy things the hard way.
You could take any cup-shaped object (such as a PVC plumbing end cap) and secure it in place with a gob of RTV. Small cost, little time invested, function fulfilled, case closed.
There was a time in your life (~1977) when you were an expert with the glass bottle cutter. Where is that cutter today? This was an application for it!
When you have a 3D printer, everything looks like a 3D printer project… [grin]
That said, being able to go from “I need an X-shaped thing” to having an X-shaped thing, for nearly any value of X, is absolutely wonderful, even granting the weakness of my surface finishing game.
Haven’t had to cut a bottle in years, but it’s apparently a genetic thing:
Perhaps every college student goes through that phase.
My bottle cutter sits in the lower middle drawer of the tool chest atop the right rolling cabinet, just in case it ever comes in handy again…