During one of my recent presentations, somebody asked about the accuracy of 3D printed parts, which reminded me of another member of Coasterman’s Essential Calibration Set: the perimeter width/thickness test block. Back in the day, calibrating the extruder meant getting the actual ratio of the thread width to its thickness to match the ideal value you told Skeinforge to use; being a bit off meant that the final dimensions weren’t quite right.
But when I got it right, the Thing-O-Matic printed a test block with considerable success, despite the horrible retraction zittage:
Alas, feeding the STL to Slic3r showed that it was grossly non-manifold, and none of the automated repair programs produced good results. Turns out it’s an STL created from a Sketchup model, no surprise there, and the newer slicers seem less tolerant of crappy models.
Sooo, here’s a new version built with OpenSCAD:

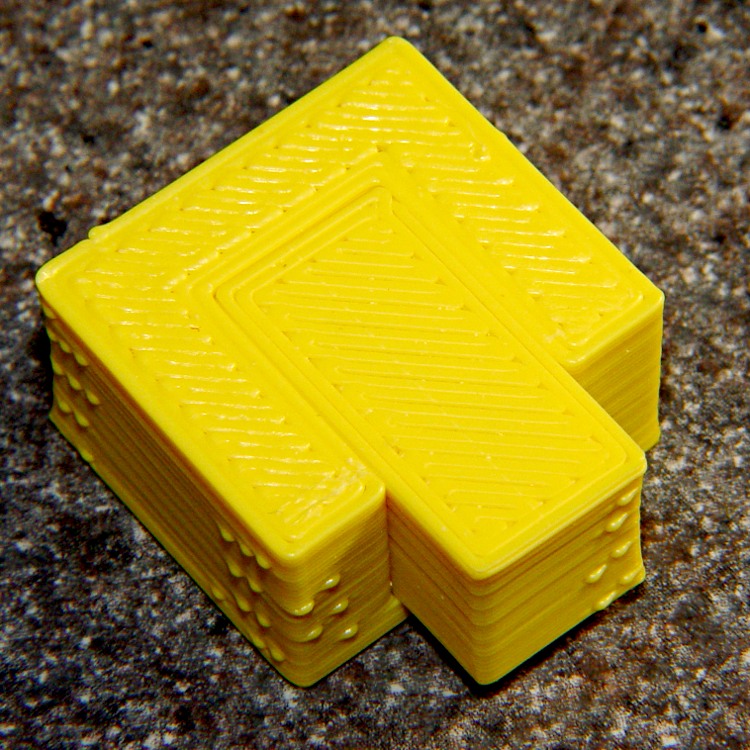
You get three blocks-and-plugs at once, arranged in all the useful orientations, so you can test all the fits at the same time. They come off the platform about like you’d expect:

I tweaked the code to make the plugs longer than you see there; the short ones were mighty tough to pry out of those slots.
I ran the plugs across a fine file to clean the sides, without removing any base material, and the plugs fit into the slots with a firm push. I’d do exactly the same thing for a CNC milled part from the Sherline, plus breaking the edges & corners.
The plugs doesn’t fit exactly flush in the recesses for the two models on the right side of that first image, because the edges and corners aren’t beveled to match each other. It’s pretty close and, if it had to fit exactly, you could make it work with a few more licks of the file. The left one, printed with the slot on the top surface, fits exactly as flush as the one from the Thing-O-Matic.
Of course, there’s a cheat: the model allows 0.1 mm of internal clearance on all sides of the plug:
The outside dimensions of all the blocks and plugs are dead on, within ±0.1 mm of nominal. You’d want to knock off the slight flange at the base and bevel the corners a bit, but unless it must fit inside something else, each object comes off the platform ready to use.
Feel free to dial that clearance up or down to suit your printer’s tolerances.
The OpenSCAD source code:
// Fit test block based on Coasterman's perimeter-wt.stl
//	http://www.thingiverse.com/thing:5573
//	http://www.thingiverse.com/download:17277
// Ed Nisley - KE4ZNU - May 2014

Layout = "Show";

//- Extrusion parameters must match reality!
//  Print with 2 shells and 3 solid layers

ThreadThick = 0.20;
ThreadWidth = 0.40;

Protrusion = 0.1;			// make holes end cleanly

function IntegerMultiple(Size,Unit) = Unit * ceil(Size / Unit);

//----------------------
// Dimensions

Clearance = 0.1;

PlugSize = [10.0,10.0,25.0];
BlockSize = [25.0,13.0,20.0];

PlugOffset = 10.0;

//----------------------
// Useful routines

module ShowPegGrid(Space = 10.0,Size = 1.0) {

  RangeX = floor(100 / Space);
  RangeY = floor(125 / Space);

	for (x=[-RangeX:RangeX])
	  for (y=[-RangeY:RangeY])
		translate([x*Space,y*Space,Size/2])
		  %cube(Size,center=true);

}

module Block() {
	difference() {
		translate([0,0,BlockSize[2]/2])
			cube(BlockSize,center=true);
		translate([0,PlugSize[1] - PlugSize[1]/2 - BlockSize[1]/2,-PlugOffset])
			Plug(Clearance);
	}
}

module Plug(Clear = 0.0) {
	minkowski() {
		translate([0,0,PlugSize[2]/2])
			cube(PlugSize,center=true);
		if (Clear > 0.0)
			cube(Clear,center=true);
	}
}

//----------------------
// Build it

ShowPegGrid();

if (Layout == "Block")
	Block();

if (Layout == "Plug")
	Plug();

if (Layout == "Show") {
	Block();
	translate([0,PlugSize[1] - PlugSize[1]/2 - BlockSize[1]/2,-PlugOffset])
		Plug();
}

if (Layout == "Build") {
	Block();
	translate([0,-15,0])
		Plug();

	translate([-30,0,0]) {
		translate([0,-BlockSize[1]/2,BlockSize[1]/2])
			rotate([-90,0,0])
				Block();
		translate([-PlugSize[2]/2,-15,PlugSize[0]/2])
			rotate([0,90,0])
				Plug();
	}

	translate([30,0,0]) {
		translate([0,0,BlockSize[2]])
			rotate([180,0,180])
				Block();
		translate([-PlugSize[2]/2,-15,PlugSize[1]/2])
			rotate([90,0,90])
				Plug();
	}

}
