The Smell of Molten Projects in the Morning

Ed Nisley's Blog: Shop notes, electronics, firmware, machinery, 3D printing, laser cuttery, and curiosities. Contents: 100% human thinking, 0% AI slop.

Month: March 2013

  • Dayton 4X221 Snap-Around Volt-Amp-Ohm Meter

    Mad Phil forced me to take this little gem:

    Dayton 4X221 Snap-Around Ammeter
    Dayton 4X221 Snap-Around Ammeter

    Judging from the much-folded Dayton 4X221 Snap-Around Ammeter Operating Instructions (a scanned copy that I folded around the original and tucked inside the case), the ammeter dates back to 1979, which says Mad Phil probably used it in the early 80s, when he was repairing AV equipment. Unlike most vintage clamp-on ammeters, this one can also measure voltage and resistance:

    Dayton 4X221 Snap-Around Ammeter - Specifications
    Dayton 4X221 Snap-Around Ammeter – Specifications

    The resistance function requires a single AAA alkaline cell in the bulky probe, so this should come as no surprise:

    Dayton 4X221 Resistance Probe - battery contact corrosion
    Dayton 4X221 Resistance Probe – battery contact corrosion

    The probe housing contains a 1 A fast-blow fuse, which blocked the corrosion from getting deeper into the probe tip:

    Dayton 4X221 Resistance Probe - battery and fuse
    Dayton 4X221 Resistance Probe – battery and fuse

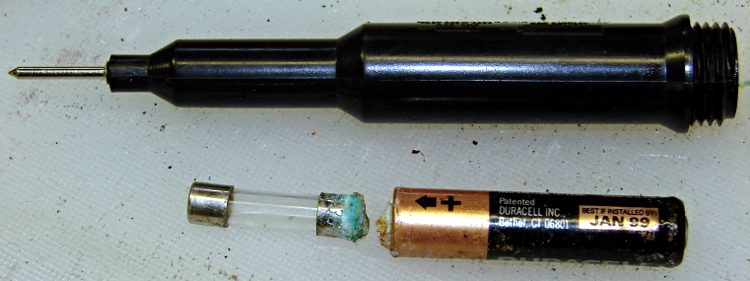
    The AAA cell was “Best if installed by Jan 1999”, which I’m sure was true. Somehow, you never recognize the last time you use something; I suppose old instruments get used to not seeing the light over the workbench after a while.

    Anyhow.

    Douse the corrosion with vinegar to neutralize the potassium hydroxide, rinse out the probe body, polish the top of the fuse, buff up the battery contact on the test lead, and it’s all good again.

  • Creeping Toward Metrication

    Spotted this in a Lowe’s sale circular:

    Granite Countertop - mixed units
    Granite Countertop – mixed units

    The thickness comes from the manufacturer and the area from the installer, so it all makes perfect sense…

    Besides, 3 cm sounds much fancier than 1-3/16 inch, doesn’t it?

  • Signs of an Early Spring: Sapcicles

    Maple Tree - sapcicles
    Maple Tree – sapcicles

    The maple at the far end of the driveway sprouted sapcicles (or maybe sapsicles) after a brief warm spell woke it up in early March:

    You can break them off and eat them like Popsicles, but they’re not nearly as sweet as you’d imagine. We’ve boiled sap into syrup and can report from personal experience that the 40:1 boildown ratio is no myth…

  • 6C21 Triode

    Aitch bestowed this gem on me while cleaning out his collection:

    6C21 Triode
    6C21 Triode

    It’s a 6C21 triode, originally used as a radar modulator, atop a letter-size sheet of graph paper. The plate terminal is on top, the grid sticks out to the side, and the filament is common with the cathode through the base pins.

    It has impressive specs (datasheet and pictures):

    • 30 kV plate voltage
    • 15 A pulsed plate current, 100 ms max
    • 7.5 V filament at 15 A = 112 W (!)
    • Pulse duty cycle 0.2%

    The gray film inside the bulb shows that it’s been used, but the filament still has continuity. Ordinarily, you could turn something like this into a night light by running the filament at a voltage somewhat under its rating, but my bench supply maxed out at @ 3 A without even warming it up; a dim orange night light that burns maybe 75 W is Not A Good Idea.

    The base has some intriguing holes, originally used for forced-air cooling, that lead directly to the glass envelope:

    6C21 Triode - base
    6C21 Triode – base

    One could mount discrete LEDs in those holes, maybe a slightly turned-down 10 mm cool-white LED in the middle flanked by red and blue, and run a low-power Arduino-based mood light; by some cosmic coincidence, the hole spacing matches up almost perfectly with those LED strips. Or one could go full analog with three red LEDs driven by the WWVB signal.

    I’m thinking a plain black acrylic case, with the tube base sunk into the middle, would be about right. No readouts, no dials, no buttons, just a gently glowing tube.

    Maybe a 3D printed socket holding everything in place?

  • Reflectorized USB Flash Drives

    It turns out that dropping a dark-gray USB flash drive on a dark carpet under a table in a dimly lit room doesn’t produce a net increase in happiness. The next time that happens, we’ll be able to find the thing:

    Centon 4 GB USB Flash Drives - reflectorized
    Centon 4 GB USB Flash Drives – reflectorized

    Each side has a snippet of retroreflective orange tape; the tenth drive lives with the Token Windows Laptop. Done!

    In related news, the Dremel Wrench went missing despite its high-viz tape. I vaguely recalled tucking it into a tool bag for a remote house-call repair jog, but a week later it turned up in the breast pocket of my demin jacket. Maybe it needs a bulky lanyard?

  • Skeinforge: First Layer Thickness

    Somewhere along the way, I lost part of the constellation of settings that produce a properly sized first layer. While looking for something else, I discovered that the Z-axis level started at half the expected 0.25 mm:

    (<layer> 0.125 )
    (<skirt>)
    G1 X-13.25 Y29.2675 Z0.125 F15000.0
    

    The key turned out to be (re?)enabling the Skeinforge Bottom setting:

    • Additional Height over Layer Thickness: 1.0
    • Altitude: 0.0

    Then it comes out right:

    (<layer> 0.25 )
    (<skirt>)
    G1 X-13.25 Y29.2675 Z0.25 F15000.0
    

    The excellent illustrations at the bottom of the Official Documentation (which I don’t recall seeing before) show you what’s going on; you really can’t deduce the geometry from the parameter names alone.

    The first layers were still within ±0.05 mm of 0.25 mm, which suggests the plastic squooshes out around the nozzle and rebounds to nearly the correct thickness, but they tended toward consistently too thin rather than OK-on-average. The first trial with the proper Bottom setting came out spot on at 0.25 mm around the Skirt thread, so it’s back on track.

    The first layer comes out at 20 mm/s and sticks like glue to the Kapton tape. The remaining layers run at 40 mm/s for infill and 20 mm/s for perimeters, producing spot-on dimensions, with 250 mm/s traverses between printed sections. It’d be nice to run faster, but accuracy has its benefits for mechanical parts.

    That’s with a 2.95 mm Filament Diameter setting closely matching the average actual diameter and a 0.95 Filament Packing Density. I think the Density is slightly too low, so I’ll bump that to 1.0 for the next object.

  • Kensington Expert Mouse Trackball: Scroll Ring Aperture Alignment

    That comment suggested scroll ring failures on a Kensington Expert Mouse (it’s a trackball) might occur when the apertures become misaligned from the IR emitter-detector pair, although later results were equivocal. I tore apart a failed unit to see what the alignment looked like for a known-bad scroll ring.

    The right side view shows the receiver roughly centered in an aperture:

    Kensington Expert Mouse - Scroll Ring aperture - right
    Kensington Expert Mouse – Scroll Ring aperture – right

    The left side view shows that the ring is almost flush against the circuit board, with the isolating cutout just in front, and it’s not obvious how to lower it any further:

    Kensington Expert Mouse - Scroll Ring aperture - left
    Kensington Expert Mouse – Scroll Ring aperture – left

    So I think there’s no way to realign this one, other than to raise the aperture ring a bit, but that doesn’t seem like it would make any difference: the detector already has a good view of the emitter.

    If your trackball has a failed scroll ring, tweaking the aperture ring’s alignment certainly can’t hurt: try it and report back.

    If you don’t expect a miracle, you probably won’t be disappointed, alas.

    The pix come from the Canon pocket camera mounted on the macro lens / illuminator, handheld with manual focus. The dust speck on the detector is just slightly out of focus, but you get the general idea.

    Update: 2015-07-29 – A success story from Tom:

    Hi, I wanted to leave a comment for your page here: [this url]

    I’ve got an expert mouse trackball that was having intermittent scroll ring problems, then finally quit working altogether. Dismantled it easily using the instructions on this site.

    Cleaned it and it still wasn’t working. Tried changing the alignment of the IR emitter/detectors and it still wasn’t working. Then we kept on fiddling with the alignment and voilà.

    Like others have said, the alignment seems to be SUPER sensitive. So if any others are reading this with the same problem, keep persevering.

    Thanks to everyone who has posted to help find solutions!

    Another update: Seven years in the future, a real fix appears!