The Smell of Molten Projects in the Morning

Ed Nisley's Blog: Shop notes, electronics, firmware, machinery, 3D printing, laser cuttery, and curiosities. Contents: 100% human thinking, 0% AI slop.

Tag: Improvements

Making the world a better place, one piece at a time

  • Kenmore Vacuum Cleaner Tool Adapters

    After donating the neversufficiently-to-be-damned Samsung vacuum cleaner (and all its remaining bags & doodads) to a nonprofit’s tag sale, we picked up a Sears Kenmore Progressive vacuum cleaner that seemed to be the least awful of the current offerings. Unlike all previous vacuum cleaners, its tools & doodads have complex plastic fittings with latches and keyways and all manner of gimcrackery. The designers seem to have hands and legs of far-above-average size, but that’s another rant.

    All this came to a head when I attempted to vacuum the fuzz out of the refrigerator’s evaporator coils, because the long snout that reaches the back of the refrigerator doesn’t fit the aperture in the giant handle.

    Well, at least I can fix that

    The first step involved modeling the plastic fitting that snaps into the handle:

    Kenmore Male Fitting - Solid model
    Kenmore Male Fitting – Solid model

    The latch on the handle snaps into an opening that took some tinkering to reproduce. Stand back, I’m going to use trigonometry:

                translate([0,-11.5/2,23.0 - 5.0])                                    // latch opening
                    cube(Latch);
                    
                translate([OEMTube[ID1]/2 + EntryHeight/tan(90-EntryAngle),0,0])    // latch ramp
                    translate([(Latch[1]/cos(180/EntrySides))*cos(EntryAngle)/2,0,(Latch[1]/cos(180/EntrySides))*sin(EntryAngle)/2])
                        rotate([0,-EntryAngle,0])
                            intersection() {
                                rotate(180/EntrySides)
                                    PolyCyl(Latch[1],Latch[0],EntrySides);
                                translate([-(2*Latch[0])/2,0,-Protrusion])
                                    cube(2*Latch[0],center=true);
                            }
    

    Which spits out two suitable shapes with the proper positions and alignments:

    Kenmore Male Fitting - Latch detail - Solid model
    Kenmore Male Fitting – Latch detail – Solid model

    The magic wand for the refrigerator originally slid into the Samsung’s metal pipe, so I put a slightly tapered cylinder inside a somewhat more tapered exterior (which seems chunky enough to withstand my flailing around under the refrigerator), then topped it off with the male fitting:

    Refrigerator Coil Wand Adapter
    Refrigerator Coil Wand Adapter

    The Kenmore crevice tool snaps under the gargantuan plastic handle, which limits it to being 6.5 inches long, totally unable to reach into any of the nontrivial crevices around here, and in the way when it’s not being used. Some rummaging turned up a longer crevice tool from the Electrolux That Came With The House™, an old-school tool that slipped over its pipe. Modeling a straight cylinder inside a tapered cylinder that fits the tool didn’t take long:

    Crevice Tool Adapter
    Crevice Tool Adapter

    Flushed with success, I found a smaller floor brush than the new Kenmore, with dimensions similar to the Electrolux snout, so another module appeared:

    Floor Brush Adapter
    Floor Brush Adapter

    All of them build with the latch end upward to avoid needing support structure, with a 5 mm brim for good platform adhesion:

    Floor Brush Adapter - Slic3r preview
    Floor Brush Adapter – Slic3r preview

    I printed them during the PDS Mini Maker Faire as examples of Useful Things You Can Do With a 3D Printer:

    Kenmore Vacuum Cleaner - Tool Adapters
    Kenmore Vacuum Cleaner – Tool Adapters

    As I pointed out to nearly everybody, the Big Lie about 3D printing is that you’ll just download somebody else’s model to solve your problem. In general, that won’t work, because nobody else has your problem; if you can’t do solid modeling, there’s no point in you having a 3D printer. There’s also no point in going to Kinko’s to get a standardized 3D printed doodad, because you can just order a better-looking injection-molded part directly from Sears (or an aftermarket source) and be done with it.

    I loves me some good OpenSCAD action on my Makergear M2, though…

    The OpenSCAD source code:

    // Kenmore vacuum cleaner nozzle adapters
    // Ed Nisley KE4ZNU November 2015
    
    // Layout options
    
    Layout = "CreviceTool";        // MaleFitting CoilWand FloorBrush CreviceTool
    
    //- Extrusion parameters must match reality!
    //  Print with +1 shells and 3 solid layers
    
    ThreadThick = 0.25;
    ThreadWidth = 0.40;
    
    HoleWindage = 0.2;
    
    function IntegerMultiple(Size,Unit) = Unit * ceil(Size / Unit);
    
    Protrusion = 0.1;           // make holes end cleanly
    
    //----------------------
    // Dimensions
    
    ID1 = 0;                                                // for tapered tubes
    ID2 = 1;
    OD1 = 2;
    OD2 = 3;
    LENGTH = 4;
    
    OEMTube = [35.0,35.0,41.7,40.5,30.0];                    // main fitting tube
    EndStop = [OEMTube[ID1],OEMTube[ID2],47.5,47.5,6.5];    // flange at end of main tube
    
    FittingOAL = OEMTube[LENGTH] + EndStop[LENGTH];
    
    $fn = 12*4;
    
    //----------------------
    // Useful routines
    
    module PolyCyl(Dia,Height,ForceSides=0) {           // based on nophead's polyholes
    
    Sides = (ForceSides != 0) ? ForceSides : (ceil(Dia) + 2);
    
    FixDia = Dia / cos(180/Sides);
    
    cylinder(r=(FixDia + HoleWindage)/2,
             h=Height,
             $fn=Sides);
    }
    
    
    //-------------------
    // Male fitting on end of Kenmore tools
    // This slides into the end of the handle or wand and latches firmly in place
    
    module MaleFitting() {
        
    Latch = [40,11.5,5.0];                    // rectangle latch opening
    EntryAngle = 45;                        // latch entry ramp
    EntrySides = 16;
    EntryHeight = 15.0;                        // lower edge on *inside* of fitting
    
    KeyRadius = 1.0;
            
        translate([0,0,6.5])
            difference() {
                union() {
                    cylinder(d1=OEMTube[OD1],d2=OEMTube[OD2],h=OEMTube[LENGTH]);            // main tube
                    
                    hull()                                                                    // insertion guide
                        for (i=[-(6.0/2 - KeyRadius),(6.0/2 - KeyRadius)], 
                            j=[-(28.0/2 - KeyRadius),(28.0/2 - KeyRadius)], 
                            k=[-(26.0/2 - KeyRadius),(26.0/2 - KeyRadius)])
                            translate([(i - (OEMTube[ID1]/2 + OEMTube[OD1]/2)/2 + 6.0/2),j,(k + 26.0/2 - 1.0)])
                                sphere(r=KeyRadius,$fn=8);
                    
                    translate([0,0,-EndStop[LENGTH]])                                // wand tube butts against this
                        cylinder(d=EndStop[OD1],h=EndStop[LENGTH] + Protrusion);
                }
                
                translate([0,0,-OEMTube[LENGTH]])                                    // main bore
                    cylinder(d=OEMTube[ID1],h=2*OEMTube[LENGTH] + 2*Protrusion);
                    
                translate([0,-11.5/2,23.0 - 5.0])                                    // latch opening
                    cube(Latch);
                    
                translate([OEMTube[ID1]/2 + EntryHeight/tan(90-EntryAngle),0,0])    // latch ramp
                    translate([(Latch[1]/cos(180/EntrySides))*cos(EntryAngle)/2,0,(Latch[1]/cos(180/EntrySides))*sin(EntryAngle)/2])
                        rotate([0,-EntryAngle,0])
                            intersection() {
                                rotate(180/EntrySides)
                                    PolyCyl(Latch[1],Latch[0],EntrySides);
                                translate([-(2*Latch[0])/2,0,-Protrusion])
                                    cube(2*Latch[0],center=true);
                            }
            }
    }
    
    //-------------------
    // Refrigerator evaporator coil wand
    
    module CoilWand() {
        
        union() {
            translate([0,0,50.0])
                rotate([180,0,0])
                    difference() {
                        cylinder(d1=EndStop[OD1],d2=42.0,h=50.0);
                        translate([0,0,-Protrusion])
                            cylinder(d1=35.0,d2=35.8,h=100);
                    }
            translate([0,0,50.0 - Protrusion])
                MaleFitting();
        }
    }
    
    
    //-------------------
    // Refrigerator evaporator coil wand
    
    module FloorBrush() {
        
        union() {
            translate([0,0,60.0])
                rotate([180,0,0])
                    difference() {
                        union() {
                            cylinder(d1=EndStop[OD1],d2=32.4,h=10.0);
                            translate([0,0,10.0 - Protrusion])
                                cylinder(d1=32.4,d2=30.7,h=50.0 + Protrusion);
                        }
                        translate([0,0,-Protrusion])
                            cylinder(d1=28.0,d2=24.0,h=100);
                    }
            translate([0,0,60.0 - Protrusion])
                MaleFitting();
        }
    }
    
    
    //-------------------
    // Crevice tool
    
    module CreviceTool() {
        
        union() {
            translate([0,0,60.0])
                rotate([180,0,0])
                    difference() {
                        union() {
                            cylinder(d1=EndStop[OD1],d2=32.0,h=10.0);
                            translate([0,0,10.0 - Protrusion])
                                cylinder(d1=32.0,d2=30.4,h=50.0 + Protrusion);
                        }
                        translate([0,0,-Protrusion])
                            cylinder(d1=28.0,d2=24.0,h=100);
                    }
            translate([0,0,60.0 - Protrusion])
                MaleFitting();
        }
    }


    //----------------------
    // Build it!
    
    if (Layout == "MaleFitting")
        MaleFitting();
    
    if (Layout == "CoilWand")
        CoilWand();
    
    if (Layout == "FloorBrush")
        FloorBrush();
    
    if (Layout == "CreviceTool")
        CreviceTool();
    
    
  • Ed’s Fireball Hot Cocoa Recipe

    The hot chocolate recipe on the back of the cocoa container tastes like bland liquid candy.

    This tastes the way hot cocoa should:

    Ingredients

    • 1 generous cup milk (full-fat is where it’s at)
    • 1 tbsp white sugar (just do it)
    • 3 tbsp cocoa powder (not chocolate drink mix)
    • 1/4 tsp Vietnamese cinnamon
    • 1 tbsp milk for mixing
    • few drops peppermint extract
    • 1/4 tsp vanilla extract
    • 20 oz Starbucks City Mug (got ’em cheap at a tag sale)

    Preparation

    • Microwave the generous cup o’ milk for 1 minute
    • Mix dry ingredients in the giant mug
    • Stir in just enough cold milk to make a thick mud (*)
    • Add peppermint drops using 1/4 tsp measure
    • Rinse 1/4 tsp measure with vanilla
    • Blend the extracts into the mud (*)
    • Stir in warm milk, scraping mud off the mug
    • Microwave for another 45 s or so
    • Stir to blend

    What’s going on:

    • More cocoa = more flavor, pure & simple
    • Less sugar = more cocoa bite
    • Vietnamese cinnamon adds the aroma & zip of those old Atomic Fireballs
    • Vanilla smooths the taste
    • Peppermint reminds you it’s winter

    Sipping a cup in the afternoon banishes the urge to power-nosh anything else until suppertime…

    * Update: non-alkalized / non-Dutch-process cocoa doesn’t blend well. Mix up the mud, let it set for 15 minutes, blend again, pause for 5 minutes, then proceed. Wonderfully smooth with no powder bombs.

  • Tecumseh 36638 Throttle Knob

    The upper-left tab broke off this “knob” shortly after we got the leaf shredder:

    Throttle knob - broken original
    Throttle knob – broken original

    But it worked well enough that, following my usual course of action, I could ignore the problem. Until a few days ago, that is, when the remaining tab on that end pulled out of the slot on the engine and the whole affair bent into uselessness.

    It’s a $10 item from eBay (with free shipping), $8 from Amazon ($4, not eligible for Prime, so plus $4 shipping), out of stock at my usual online small engine source, and not worth biking a few dozen miles here & there to see if anybody has one. I know better than to look for repair parts at Lowe’s / Home Depot. It’s Tecumseh Part 36638, which may come in handy some day.

    So, we begin…

    It’s one of those pesky injection-molded miracle plastic doodads that can’t be printed in one piece, so I designed the tabs as separate parts and glued them in place. The solid model shows the intended assembly, with a bit of clearance around the tabs for tolerance and glue slop:

    Tecumseh Throttle Knob - solid model - show view
    Tecumseh Throttle Knob – solid model – show view

    External clearances aren’t an issue, so I made the base plate longer, wider, and thicker, which gave the tabs something to grab onto. The half-round knob is bigger, more angular, and uglier than the OEM knob, because I had trouble holding onto the original while wearing work gloves.

    Printing a few extra tabs allows the inevitable finger fumble:

    Throttle knob - on platform
    Throttle knob – on platform

    The tabs stand on edge to properly orient the printed threads around the perimeter: a great force will try to rip that triangular feature right off the tab, so wrapping the thread as shown maximizes the strength. Laying them flat on their backs would put the force in shear, exactly parallel to thread-to-thread bonds; I wouldn’t bet on the strength of those layers.

    The brim provides enough platform footprint around the tabs to keep them upright, but obviously isn’t needed around the knob. Although you could wrap a modifier mesh around one or the other, trimming the brim off the knob with a precision scissors seemed more straightforward.

    Slobbering generous drops of of IPS #4 solvent adhesive into the slots and over the tabs softened the PETG enough that I could ram the tabs into place, using a big pliers to overcome their feeble resistance:

    Throttle knob - glued latches
    Throttle knob – glued latches

    With the plastic still dazed from the fumes, I force-fit the knob into the slot on the engine:

    Throttle knob - installed
    Throttle knob – installed

    The tabs eased back into position and seem to be holding the knob in place. Worst case: make a new knob, butter up the tabs with slow epoxy, ram knob into slot, then poke a screwdriver inside to realign the tabs against the slot edges.

    The solvent had a few cloudy days to evaporate before the next shredding session, whereupon the throttle once again worked exactly the way it should.

    The OpenSCAD source code:

    // Tecumseh 36638 Throttle Knob
    // Ed Nisley KE4ZNU November 2015
    
    Layout = "Build";					// Build Show Tab Base
    
    //- Extrusion parameters must match reality!
    
    ThreadThick = 0.25;
    ThreadWidth = 0.40;
    
    HoleWindage = 0.2;
    
    Protrusion = 0.1;			// make holes end cleanly
    
    inch = 25.4;
    
    function IntegerMultiple(Size,Unit) = Unit * ceil(Size / Unit);
    
    //----------------------
    // Dimensions
    
    BaseSize = [40,14,3.0];							// overall base plate outside engine controller slot
    
    Knob = [18,BaseSize[1],17];
    
    TabSize = [7.5,1.6,6.0];						// ovarall length, minimum width, overall height
    TabSocket = [8.0,2.0,BaseSize[2] - 2*ThreadThick];				// recess in base plate for tab 
    
    TabOuterSpace = 30.0;							// end-to-end length over tabs - sets travel distance
    SlotWidth = 7.75;								// engine controller slot width
    SlotThick = 1.5;								// engine controller slot thickness
    
    TabShape = [
    	[0,0],
    	[BaseSize[2] + TabSize[2],0],
    	[BaseSize[2] + TabSize[2],ThreadWidth],
    	[BaseSize[2] + SlotThick,2*TabSize[1]],
    	[BaseSize[2] + SlotThick,TabSize[1]],
    	[0,TabSize[1]]
    ];
    
    CapBaseOpening = [11,7.5,15];			// opening in base plate, Z = clearance from controller plate
    
    //----------------------
    // Useful routines
    
    module PolyCyl(Dia,Height,ForceSides=0) {			// based on nophead's polyholes
    
      Sides = (ForceSides != 0) ? ForceSides : (ceil(Dia) + 2);
    
      FixDia = Dia / cos(180/Sides);
    
      cylinder(r=(FixDia + HoleWindage)/2,
    		h=Height,
    	$fn=Sides);
    }
    
    //----------------------
    // Pieces
    
    module Tab() {
    	
    	linear_extrude(height=TabSize[0]) {
    		polygon(points=TabShape);
    	}
    }
    
    
    module Base() {
    	
    	CornerRad = BaseSize[1]/8;
    
    	difference() {
    		union() {
    			linear_extrude(height=BaseSize[2])
    				hull()
    					for (i=[-1,1], j=[-1,1]) 
    						translate([i*(BaseSize[0]/2- CornerRad),j*(BaseSize[1]/2 - CornerRad)])
    							circle(r=CornerRad,$fn=4*4);
    			translate([Knob[0]/2,0,BaseSize[2] - Protrusion])
    				rotate([0,-90,0])
    					linear_extrude(height=Knob[0])
    						hull() {
    							translate([Knob[2] - Knob[1]/2,0])
    								circle(d=Knob[1],$fn=8*4);
    							translate([0,-Knob[1]/2,0])
    								square([Protrusion,Knob[1]]);
    						}
    		}
    		
    		translate([-CapBaseOpening[0]/2,-CapBaseOpening[1]/2,-Protrusion])
    			cube(CapBaseOpening + [0,0,-CapBaseOpening[1]/2 + Protrusion],center=false);
    			
    		translate([0,0,CapBaseOpening[2] - CapBaseOpening[1]/2])
    			rotate([0,90,0]) rotate(180/8)
    				cylinder(d=CapBaseOpening[1]/cos(180/8),h=CapBaseOpening[0],center=true,$fn=8);
    				
    		for (i=[-1,1], j=[-1,1])
    			translate([i*(TabOuterSpace/2 - TabSocket[0]/2),j*(SlotWidth/2 - TabSocket[1]/2),TabSocket[2]/2 - Protrusion])
    				cube(TabSocket + [0,0,Protrusion],center=true);
    	}
    }
    
    
    //----------------------
    // Build it
    
    if (Layout == "Base")
    	Base();
    	
    if (Layout == "Tab")
    	Tab();
    	
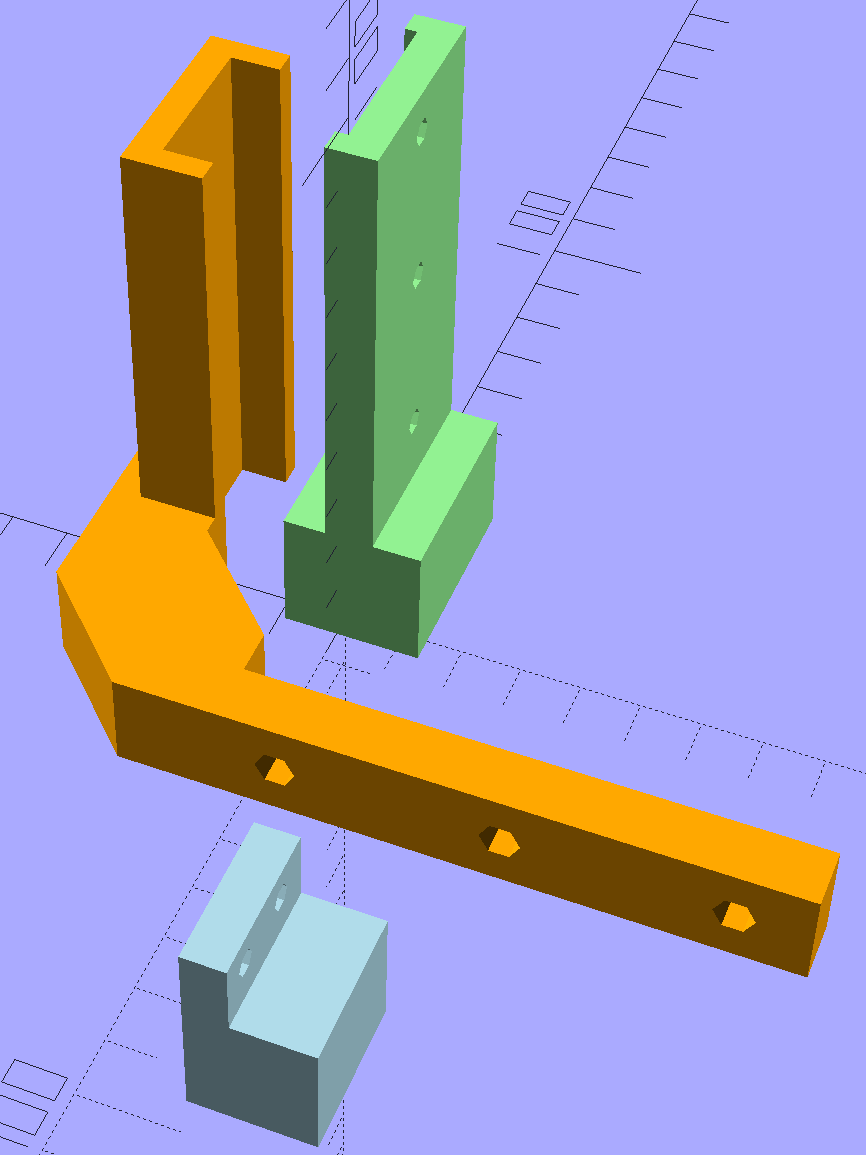
    if (Layout == "Show") {
    	Base();
    	
    		for (i=[-1,1], j=[-1,1])
    			translate([i*(TabOuterSpace/2 - TabSocket[0]/2),j*(SlotWidth/2 - TabSocket[1]/2),0])
    				translate([j < 0 ? TabSize[0]/2 : -TabSize[0]/2,j < 0 ? TabSize[1]/2 : -TabSize[1]/2,BaseSize[2] - 2*ThreadThick])
    					rotate([0,90,j < 0 ? -180 : 0])
    					Tab();
    }
    
    if (Layout == "Build") {
    	Base();
    	
    	for (i=[0:5])					// build a few spares
    		translate([-7*TabSocket[1] + i*3*TabSocket[1],BaseSize[1],0])
    			rotate(90)
    				Tab();
    }
    

    The original doodle showing the OEM knob dimensions and some failed attempts at fancy features:

    Tecumseh Throttle Knob - doodles
    Tecumseh Throttle Knob – doodles
  • HP 7475A Plotter: One-Button Demo Madness

    Back in the day, you could install a Genuine HP 09872-60066 Digitizing Sight in your Genuine HP 7475A plotter, maneuver the sight to an interesting point on the paper, press the Enter button, send the point’s coordinates through the serial port to the computer, then do whatever you like with the numbers.

    Here in the future, I twiddled the demo code that draws Superformula patterns to send a digitization command and await the response at the end of each plot. I can then change the paper, press the Enter button, and get the next plot: exactly what I need for the upcoming Poughkeepsie Mini Maker Faire.

    The only gotcha turns out to be that, having hacked the Chiplotle interface to use hardware handshaking, there’s no way to tell when the outgoing buffer has drained. Until that happens, the plotter can’t respond to the digitizing command and, eventually, Chiplotle kvetches about not hearing anything.

    The least awful solution seems to be sleeping for 40 seconds (!) while the plotter trudges through the last line of the legend (!!), then continuing apace:

            print "Waiting for plotter... ignore timeout errors!"
            sleep(40)
            while NoneType is type(plt.status):
                sleep(5)
    
            print "Load more paper, then ..."
            print "  ... Press ENTER on the plotter to continue"
            plt.clear_digitizer()
            plt.digitize_point()
            
            plotstatus = plt.status
            while (NoneType is type(plotstatus)) or (0 == int(plotstatus) & 0x04):
                plotstatus = plt.status
                
            print "Digitized: " + str(plt.digitized_point)
    

    When the interface times out, Chiplotle doesn’t set the status code to anything in particular (which makes sense), so you can’t do anything useful with it. Therefore, the operand order in the last while statement matters: you can’t convert a value of type NoneType into anything else.

    The other change wraps the entire plotting loop with an always-and-forever loop: hit Ctrl-C to break out at the end of the day.

    You can’t change the new plot’s paper size, because the digitizing command preempts the Enter button that’s part of the Enter+Size combination. That makes perfect sense, even in retrospect.

    Testing that gave me the opportunity to run all the pens, refilled and OEM, through their paces:

    HP 7475A - Superformula demo
    HP 7475A – Superformula demo

    The Sakura pens in their adapters continue to work well:

    HP 7475A - Superformula - Sakura pens
    HP 7475A – Superformula – Sakura pens

    They’re such unique snowflakes…

    The complete Python source code:

    from chiplotle import *
    from math import *
    from datetime import *
    from time import *
    from types import *
    import random
    
    
    def superformula_polar(a, b, m, n1, n2, n3, phi):
        ''' Computes the position of the point on a
        superformula curve.
        Superformula has first been proposed by Johan Gielis
        and is a generalization of superellipse.
        see: http://en.wikipedia.org/wiki/Superformula
        Tweaked to return polar coordinates
        '''
    
        t1 = cos(m * phi / 4.0) / a
        t1 = abs(t1)
        t1 = pow(t1, n2)
    
        t2 = sin(m * phi / 4.0) / b
        t2 = abs(t2)
        t2 = pow(t2, n3)
    
        t3 = -1 / float(n1)
        r = pow(t1 + t2, t3)
        if abs(r) == 0:
            return (0, 0)
        else:
          #     return (r * cos(phi), r * sin(phi))
            return (r, phi)
    
    
    def supershape(width, height, m, n1, n2, n3,
                   point_count=10 * 1000, percentage=1.0, a=1.0, b=1.0, travel=None):
        '''Supershape, generated using the superformula first proposed 
        by Johan Gielis.
    
        - `points_count` is the total number of points to compute.
        - `travel` is the length of the outline drawn in radians. 
           3.1416 * 2 is a complete cycle.
        '''
        travel = travel or (10 * 2 * pi)
    
        # compute points...
        phis = [i * travel / point_count
                for i in range(1 + int(point_count * percentage))]
        points = [superformula_polar(a, b, m, n1, n2, n3, x) for x in phis]
    
        # scale and transpose...
        path = []
        for r, a in points:
            x = width * r * cos(a)
            y = height * r * sin(a)
            path.append(Coordinate(x, y))
    
        return Path(path)
    
    
    # RUN DEMO CODE
    
    if __name__ == '__main__':
    
        override = False
    
        plt = instantiate_plotters()[0]
    #   plt.write('IN;')
    
        if plt.margins.soft.width < 11000:               # A=10365 B=16640
            maxplotx = (plt.margins.soft.width / 2) - 100
            maxploty = (plt.margins.soft.height / 2) - 150
            legendx = maxplotx - 2600
            legendy = -(maxploty - 650)
            tscale = 0.45
            numpens = 4
            # prime/10 = number of spikes
            m_values = [n / 10.0 for n in [11, 13, 17, 19, 23]]
            # ring-ness 0.1 to 2.0, higher is larger
            n1_values = [
                n / 100.0 for n in range(55, 75, 2) + range(80, 120, 5) + range(120, 200, 10)]
        else:
            maxplotx = plt.margins.soft.width / 2
            maxploty = plt.margins.soft.height / 2
            legendx = maxplotx - 3000
            legendy = -(maxploty - 700)
            tscale = 0.45
            numpens = 6
            m_values = [n / 10.0 for n in [11, 13, 17, 19, 23, 29, 31,
                                           37, 41, 43, 47, 53, 59]]   # prime/10 = number of spikes
            # ring-ness 0.1 to 2.0, higher is larger
            n1_values = [
                n / 100.0 for n in range(15, 75, 2) + range(80, 120, 5) + range(120, 200, 10)]
    
        print "   Max: ({},{})".format(maxplotx, maxploty)
    
        # spiky-ness 0.1 to 2.0, lower is spiky-er
        n2_values = [
            n / 100.0 for n in range(10, 60, 2) + range(65, 100, 5) + range(110, 200, 10)]
    
        plt.write(chr(27) + '.H200:')   # set hardware handshake block size
        plt.set_origin_center()
        # scale based on B size characters
        plt.write(hpgl.SI(tscale * 0.285, tscale * 0.375))
        # slow speed for those abrupt spikes
        plt.write(hpgl.VS(10))
        
        while True:
            
            # standard loadout has pen 1 = fine black
            plt.write(hpgl.PA([(legendx, legendy)]))
            plt.select_pen(1)
            plt.write(hpgl.LB("Started " + str(datetime.today())))
    
            if override:
                m = 4.1
                n1_list = [1.15, 0.90, 0.25, 0.59, 0.51, 0.23]
                n2_list = [0.70, 0.58, 0.32, 0.28, 0.56, 0.26]
            else:
                m = random.choice(m_values)
                n1_list = random.sample(n1_values, numpens)
                n2_list = random.sample(n2_values, numpens)
    
            pen = 1
            for n1, n2 in zip(n1_list, n2_list):
                n3 = n2
                print "{0} - m: {1:.1f}, n1: {2:.2f}, n2=n3: {3:.2f}".format(pen, m, n1, n2)
                plt.select_pen(pen)
                plt.write(hpgl.PA([(legendx, legendy - 100 * pen)]))
                plt.write(
                    hpgl.LB("Pen {0}: m={1:.1f} n1={2:.2f} n2=n3={3:.2f}".format(pen, m, n1, n2)))
                e = supershape(maxplotx, maxploty, m, n1, n2, n3)
                plt.write(e)
                pen = pen + 1 if (pen % numpens) else 1
    
            plt.select_pen(1)
            plt.write(hpgl.PA([(legendx, legendy - 100 * (numpens + 1))]))
            plt.write(hpgl.LB("Ended   " + str(datetime.today())))
            plt.select_pen(0)
            plt.write(hpgl.PA([(-maxplotx,maxploty)]))
            
            print "Waiting for plotter... ignore timeout errors!"
            sleep(40)
            while NoneType is type(plt.status):
                sleep(5)
    
            print "Load more paper, then ..."
            print "  ... Press ENTER on the plotter to continue"
            plt.clear_digitizer()
            plt.digitize_point()
            
            plotstatus = plt.status
            while (NoneType is type(plotstatus)) or (0 == int(plotstatus) & 0x04):
                plotstatus = plt.status
                
            print "Digitized: " + str(plt.digitized_point)
    
  • LED Ring Desk Lamp

    A defunct desk lamp emerged from the clutter and cried out for bright, new LEDs. This adapter puts a small LED ring and nine white LEDs on the original lamp head:

    Ring Light Mount - in operation
    Ring Light Mount – in operation

    Peering into the business end, before mounting it on the lamp, shows some abrasive adjustment on the inside layer:

    Ring Light Mount - LEDs installed
    Ring Light Mount – LEDs installed

    That layer printed over a quick-and-easy support spider:

    Ring Light Mount - solid model - bottom
    Ring Light Mount – solid model – bottom

    The Slic3r preview looking down through the layer just over the support shows that the perimeter of those LED holes doesn’t have much support:

    Ring Light Mount - Slic3r preview - bridge layer
    Ring Light Mount – Slic3r preview – bridge layer

    The obvious threads drooped in the predictable way, so I just clipped them off, sanded the high spots into submission, and epoxied everything in place:

    Ring Light Mount - LED wiring
    Ring Light Mount – LED wiring

    That nice Hilbert Curve infill is completely wasted inside the OEM shade, but the smooth curve around the rim had to be on the top surface.

    Rather than beefing up the support, you should print the bottom ring (or the top rim) separately, then glue it back on, but I wanted to see how well simple support worked with PETG.

    It came out reasonably well:

    Ring Light Mount - support spider
    Ring Light Mount – support spider

    That’s far more hair than usual, even for PETG, because I made the spider’s legs exactly three thread widths wide. Slic3r reduced the single infill thread to, literally, a hair that didn’t stick to the platform; the model now has four-thread-wide legs.

    Slic3r’s automatic support would do a better job of holding up the underside, albeit with more plastic and printing time:

    Ring Light Mount - Slic3r preview - auto support
    Ring Light Mount – Slic3r preview – auto support

    The top view looks about like you’d expect:

    Ring Light Mount - solid model - top
    Ring Light Mount – solid model – top

    Those two solid models show the small hole for the LED ring wiring, which I drilled into the as-printed plastic. The original layout included just the LED ring, with the wire through a big central hole, but then I realized the wall wart had enough moxie for a few more LEDs. So it goes.

    Anyhow, the lamp provides just enough illumination below my big monitors to suffice. The gooseneck might not be quite long enough, but that’ll be another project…

    The OpenSCAD source code:

    // LED Ring Light Mount
    // Ed Nisley KE4ZNU October 2015
    
    DoSupport = true;
    
    //- Extrusion parameters must match reality!
    
    ThreadThick = 0.25;
    ThreadWidth = 0.40;
    
    HoleWindage = 0.2;
    
    Protrusion = 0.1;			// make holes end cleanly
    
    inch = 25.4;
    
    function IntegerMultiple(Size,Unit) = Unit * ceil(Size / Unit);
    
    //----------------------
    // Dimensions
    
    NumSides = 8*4;						// number of sides on each "cylinder"
    
    LENGTH = 0;
    ID = 1;
    OD = 2;
    
    Shade = [6.0,45.2,47.5];			// threaded end of OEM lamp shade
    RingLED = [4.5,36.0,51.0];
    
    SpotLED = [2.0,0,5.0];				// discrete LEDs in center
    NumSpots = 8;						// discrete LEDs around the one in the middle
    
    Support = [(RingLED[LENGTH] - 1*ThreadThick),0,(RingLED[OD] - 4*ThreadWidth)];
    NumSupports = NumSides/2;
    
    ThreadBase = RingLED[LENGTH] + SpotLED[LENGTH];
    OAHeight = ThreadBase + Shade[LENGTH];
    
    //----------------------
    // Useful routines
    
    module PolyCyl(Dia,Height,ForceSides=0) {			// based on nophead's polyholes
    
      Sides = (ForceSides != 0) ? ForceSides : (ceil(Dia) + 2);
    
      FixDia = Dia / cos(180/Sides);
    
      cylinder(r=(FixDia + HoleWindage)/2,
               h=Height,
    	   $fn=Sides);
    }
    
    //----------------------
    // Build it
    
    	difference() {
    		union() {																				// overall shape
    			translate([0,0,ThreadBase])
    				rotate_extrude(convexity = 2, $fn=NumSides)
    					translate([Shade[OD]/2,0])
    						circle(r=Shade[LENGTH],$fn=NumSides);
    			cylinder(d=(Shade[OD] + 2*Shade[LENGTH]),h=ThreadBase,$fn=NumSides);
    			translate([0,0,ThreadBase])
    				cylinder(d=Shade[OD],h=Shade[LENGTH],$fn=NumSides);
    		}
    		
    		translate([0,0,ThreadBase - Protrusion])
    			cylinder(d=(Shade[ID] + HoleWindage),h=(Shade[LENGTH] + 2*Protrusion),$fn=NumSides);	// opening for shade thread
    			
    		translate([0,0,-Protrusion])
    			cylinder(d=(RingLED[OD] + HoleWindage),h=(RingLED[LENGTH] + Protrusion),$fn=NumSides);	// opening for LED ring
    			
    		rotate(180/NumSides)																		// LED ring power wire
    			translate([RingLED[ID]/2,0,0])
    				rotate(180/6)
    					PolyCyl(2.5,OAHeight,6);
    			
    		rotate(180/8  - 180/NumSides)
    			PolyCyl(SpotLED[OD],OAHeight,8);														// central LED SpotLED
    			
    		for (i=[0:NumSpots-1])																		// surrounding spots
    			rotate(i*360/NumSpots - 180/NumSides)
    				translate([(RingLED[ID] - 2*SpotLED[OD])/2,0,0])
    						rotate(180/8)
    							PolyCyl(SpotLED[OD],OAHeight,8);
    	}
    	
    //-- Support structure
    
    	if (DoSupport)
    		color("Yellow")
    		rotate(180/NumSides)													// align bars to flat internal faces
    			for (i=[0:NumSupports/2 - 1]) {
    				rotate(i * 360 / NumSupports)
    					translate([0,0,Support[LENGTH]/2])
    						cube([Support[OD],4*ThreadWidth,Support[LENGTH]],center=true);
    			}
    
    
  • Monthly Image: A Year in the Life of a Maple Twig, Resurrected

    In 1991 we lived in Tolland CT, where I took one picture of a maple twig every week:

    This slideshow requires JavaScript.

    That was with a film camera, of course, with negatives. I assembled the printed images into a poster and eventually (perhaps in 2001) scanned / digitally photographed them four-at-a-time, saved the result as a 330 MB Photoshop file with one 2×2 group in each of 13 layers (there are 50 images, probably because vacations), and burned that to a CD.

    All I can say: it must have made sense at the time.

    Anyhow, here in the future, I found that CD in a pile destined for the shredder, which shouldn’t ought to happen without some attention.

    Here’s how I extracted the separate images from that file into standalone JPEGs, cropped them to a uniform size, and smushed them to suitably low quality:

    convert A\ Year\ in\ the\ Life\ of\ Tolland\ CT\ -\ 1991.psd -quality 95 Tolland-1991-%02d.jpg
    for f in {01..13} ; do convert Tolland-1991-$f.jpg -crop "1212x1775+0+0" img-$f-0.jpg ; done
    for f in {01..13} ; do convert Tolland-1991-$f.jpg -crop "1212x1775+1212+0" img-$f-1.jpg ; done
    for f in {01..13} ; do convert Tolland-1991-$f.jpg -crop "1212x1775+0+1775" img-$f-2.jpg ; done
    for f in {01..13} ; do convert Tolland-1991-$f.jpg -crop "1212x1775+1212+1775" img-$f-3.jpg ; done
    for f in {01..13} ; do for g in {0..3} ; do convert img-$f-$g.jpg -crop "1100x1650+50+50" out-$f-$g.jpg ; done ; done
    sn=1 ; for f in {01..13} ; do for g in {0..3} ; do printf -v dn 'Tolland-1991-Maple-%02d.jpg' "$(( sn++ ))" ; convert img-$f-$g.jpg -crop "1100x1650+50+50" +repage -rotate 90 -define jpeg:extent=200KB $dn ; done ; done
    

    Then WordPress assembles the 50 images into a slide show.

    Of course, it didn’t go quite as smoothly as all that, but it took maybe half an hour of fiddling to get it right by iterating on the commands until I liked the results. One might tweak the exposures and suchlike, but that’s in the nature of fine tuning.

    Now I can shred the CD…

  • Beckman DM73 Circuitmate Multimeter: Ground Clip

    Among the many treasures Mad Phil left me was a Beckman DM73 CircuitMate multimeter (manual at the Boat Anchor Manual Archive):

    Beckman DM73 - new ground clip
    Beckman DM73 – new ground clip

    Although it’s rated to 500 V, it violates the fundamental principle of high-voltage electronics debugging:

    Always keep one hand in your pocket!

    The scorched and truncated probe tip on the “ground wire” shows Phil slipped at least once:

    Beckman DM73 - probe tip
    Beckman DM73 – probe tip

    After far too long, I sacrificed a black multimeter probe from the heap, soldered an alligator clip on the end, and, henceforth, will use it appropriately. Mostly, I never do any high-voltage work, but you never know.

    I suppose I should splice that nice black probe onto the end of the Beckman wire for low-voltage work…