The Smell of Molten Projects in the Morning

Ed Nisley's Blog: Shop notes, electronics, firmware, machinery, 3D printing, laser cuttery, and curiosities. Contents: 100% human thinking, 0% AI slop.

Tag: Gardening

Growing and sometimes fixing

  • Craft Stick Plant Markers: Layout Template and Text Alignment

    Craft Stick Plant Markers: Layout Template and Text Alignment

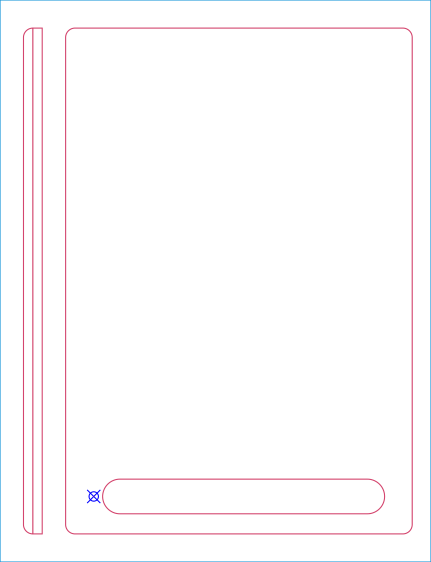
    Putting the entire fixture layout onto a tool layer produces a template to align the text on the sticks:

    Craft Stick Plant Markers - fixture layout
    Craft Stick Plant Markers – fixture layout

    The rectangles mark where you put cut layer rectangles around the text in each stick. The sticks are 18 mm wide, so a 10 mm cutout leaves what should be enough wood along the edges. The rectangle length is a serving suggestion, as you must adjust the cut rectangle to fit the text.

    Group everything except the four targets into a single object so you won’t inadvertently move only a part of it. The targets must remain separate to work with the Print-and-Cut alignment. With that set up, Lock the position of the entire layout to prevent you from moving any part of it.

    Starting with a blank tag in the template:

    Craft Stick Markers - LB template - base
    Craft Stick Markers – LB template – base

    Draw a rectangle in a cut layer to match the template, which is easy if you have Object Snap set up properly:

    Craft Stick Markers - LB template - rectangle
    Craft Stick Markers – LB template – rectangle

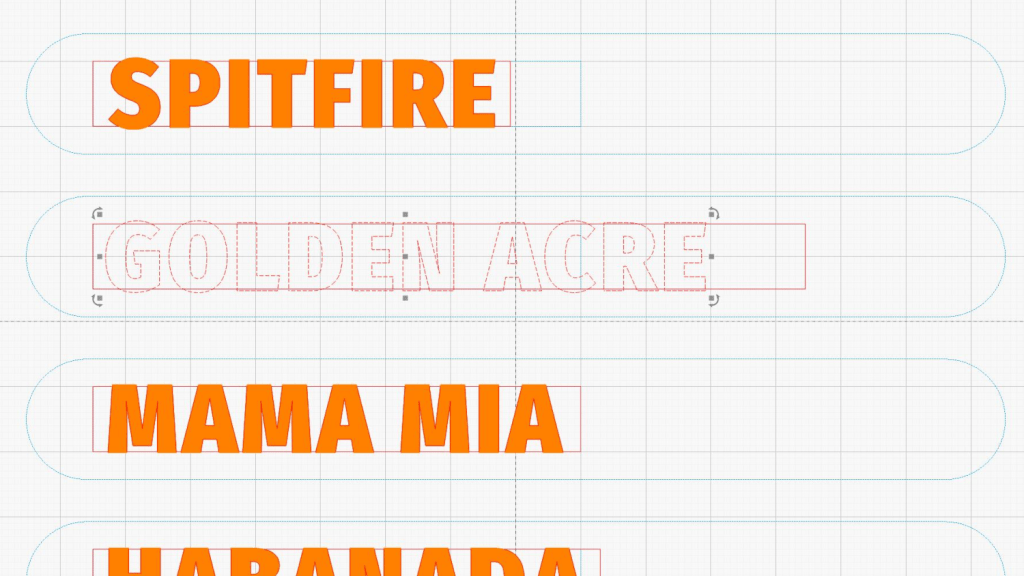
    Add your text in a chunky font like Fira Sans Condensed Heavy, set to 15 mm tall with 5 mm horizontal spacing:

    Craft Stick Markers - LB template - lowercase text
    Craft Stick Markers – LB template – lowercase text

    LightBurn aggressively snaps a new text cursor to the nearest pre-existing text, so you may be forced to click far away from where you want to place the text, type the text, then move the finished string. LightBurn will also snap the text to the display grid as you drag it around, so hold the Ctrl key down to disable snapping while you eyeball the proper alignment with the rectangle. Leave about 2 mm between the left edge of the rectangle and the first letter to make an easily visible space.

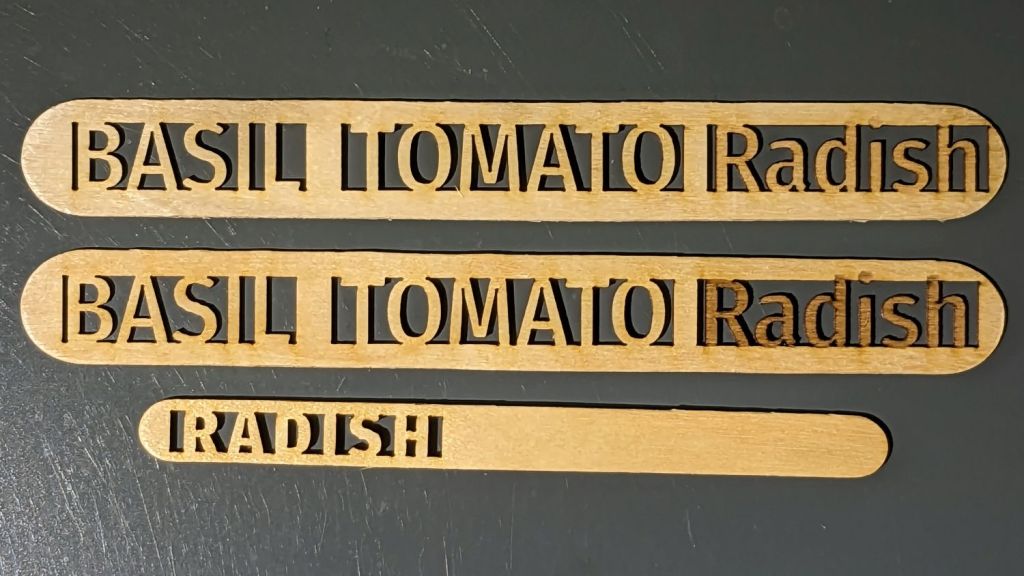
    Although you can use lowercase letters, uppercase letters have the compelling advantage of being attached both top and bottom, so retype the text if you forgot about the Caps Lock key:

    Craft Stick Markers - LB template - uppercase aligned
    Craft Stick Markers – LB template – uppercase aligned

    The 15 mm font height I’m using seems to be the overall maximum from the top of the tallest letter to the bottom of the lowest descender, not the height of any specific capital letter, all of which extend beyond the cut rectangle by about half a millimeter. That’s crucial to make this thing work, so tune the font and its height appropriately.

    Select the text string when you have it properly aligned:

    Craft Stick Markers - LB template - text selected
    Craft Stick Markers – LB template – text selected

    Hit Ctrl-D to duplicate the text, tap the ↑ (Up) arrow key to move the copy out of the way, and set it to the fill layer.

    Now the magic happens.

    Select the rectangle, Shift-select the text, and Boolean Subtract (Alt minus) the text from the rectangle:

    Craft Stick Markers - LB template - subtracted text
    Craft Stick Markers – LB template – subtracted text

    Realize that you have screwed up by not shortening the right side of the rectangle to leave about 2 mm of open space. Bang on Ctrl-Z to undo the last step, shorten the rectangle, Shift-select the text again, then subtract the text from the rectangle:

    Craft Stick Markers - LB template - properly subtracted text
    Craft Stick Markers – LB template – properly subtracted text

    Select the filled copy and whack the ↓ (Down) arrow key to move it back over the cut layer:

    Craft Stick Markers - LB template - overlaid text
    Craft Stick Markers – LB template – overlaid text

    Now the filled layer will toast the characters to a nice brown and the cut layer will remove the background rectangle.

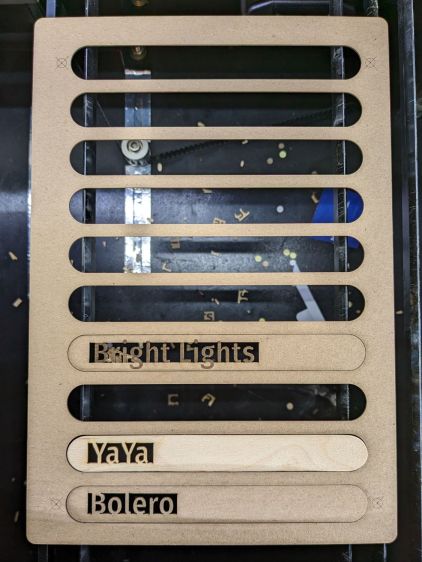
    After finishing the text dance for all the markers, the template should look something like this:

    Craft Stick Markers - LB PnC layout
    Craft Stick Markers – LB PnC layout

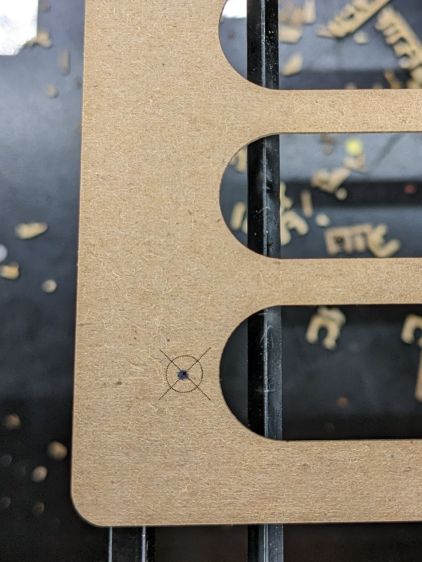
    The cheerful circles come from LightBurn’s Print-and-Cut Wizard aligning the template with the fixture holding the craft sticks on the laser platform, about which more tomorrow.

  • Craft Stick Plant Markers: Laser Fixture

    Craft Stick Plant Markers: Laser Fixture

    Converting craft sticks into plant markers should be a mass-production process, which means a fixture is in order:

    Craft Stick Markers - fixture first fill
    Craft Stick Markers – fixture first fill

    Admittedly, making ten markers at once barely qualifies as “mass production”, but you (well, I) can think of it a proof of concept.

    The basic shape comes from a 0.25 mm outset around the measured size of a craft stick (150×18 mm), plus an alignment target:

    Craft Stick Plant Markers - fixture cut layout - array base
    Craft Stick Plant Markers – fixture cut layout – array base

    A good rule of thumb says never do any more work than absolutely necessary, so the rest of the fixture comes from linear arrays replicating the stick slots and targets:

    Craft Stick Plant Markers - fixture cut layout - full
    Craft Stick Plant Markers – fixture cut layout – full

    The two strips over on the left (with a common cut down the middle) get glued to the underside of the fixture:

    Craft Stick Markers - fixture rail gluing
    Craft Stick Markers – fixture rail gluing

    They’re exactly 5 mm apart to bracket one of the knife-edge bars supporting the fixture. The bar is upside-down to put its flat side upward:

    Craft Stick Markers - fixture target detail
    Craft Stick Markers – fixture target detail

    Yes, the fixture is made of chipboard, mostly because it’s about the same thickness as a craft stick and it’s cheap & readily available. Each target gets an ink blot to make it more conspicuous; there is also a tiny hole burned through the chipboard at the center to mark the other side for the strips.

    Two knife-edge bars (sharp side up) support the sticks near their ends, well out of the cutting path, to prevent scorch marks:

    Craft Stick Markers - fixture overview
    Craft Stick Markers – fixture overview

    It’s worth noting the knife-edge bars are 5 mm wide and the platform spaces them on 3/8 inch = 9.525 mm centers. Not 10 mm, not 9.5 mm, exactly 3/8 inch. Kinda like the platform leadscrews: a 4 mm lead thread driven by a belt with 0.2 inch pitch. Only in America.

    This doodle captures the key dimensions down there in the corner to work out where the strips should go:

    Craft Stick Plant Markers - fixture vs laser bar spacing doodle
    Craft Stick Plant Markers – fixture vs laser bar spacing doodle

    Now, to convert names from a garden map into plant markers …

  • Plant Markers: Craft Stick Edition

    Plant Markers: Craft Stick Edition

    Inspired by a LightBurn forum post I can no longer find once again tracked down, I tried my hand at popsicle craft stick plant markers:

    Plant Markers - craft stick tests
    Plant Markers – craft stick tests

    You’d have only one name on the end of each stick, with the uncut section jammed into the ground: these are test pieces to demonstrate capability.

    Wood is better than acrylic because it checks all the eco-friendly attribute boxes. Admittedly, craft sticks don’t exactly grow on trees, but we seem to ignore such externalities in nominally eco-friendly products.

    Bonus: a recurring revenue stream from the replacement market!

    The design, such as it is, involves subtracting the letters from a rectangle maybe half a millimeter short of their top & bottom extents and a few millimeters longer than their length. Using a chonky font with generous letter spacing may prevent prompt disintegration by weathering:

    Plant Marker - craft sticks - LB layout
    Plant Marker – craft sticks – LB layout

    Engraving the letters marks their uncut sections outside the rectangle, although we know laser char on wood-ish materials fades in sunlight. The two big sticks have Radish engraved with varying density; the darker version looks better against a lighter background never found in an actual garden.

    Mary thinks they might be a nice fundraiser for the next Master Gardener Plant Sale.

    Outdoor field tests seem appropriate …

  • Please Close The Gate Signs: MDF Weathering

    Please Close The Gate Signs: MDF Weathering

    With the new signs in place, the old ones paused briefly for a photo op on their way to the trash:

    Please Close The Gate - weathered MDF
    Please Close The Gate – weathered MDF

    That’s eight months of weathering on MDF covered with indoor urethane sealant and it’s not as awful as I expected: the MDF didn’t actually disintegrate, it just collected some mold / mildew / crud.

    A closer look:

    Please Close The Gate - weathered MDF - detail
    Please Close The Gate – weathered MDF – detail

    The black paint survived surprisingly well.

    I hadn’t paid much any attention to the edges, so they got covered with random amounts of black paint and urethane. It seems that’s where the disintegration starts:

    Please Close The Gate - weathered MDF - side view
    Please Close The Gate – weathered MDF – side view

    MDF definitely isn’t the right material for an outdoor sign and I knew that going in, but it’s cheap and readily available, which makes up for a lot.

    For comparison, they looked nice right after installation:

    Please Close The Gate - fresh painted
    Please Close The Gate – fresh painted

    Ya learn something new every year around here!

  • Please Close The Gate Signs: Paint Masking FAIL

    Please Close The Gate Signs: Paint Masking FAIL

    A warm day let me shoot the engraved signs for the Vassar Community Garden gates with rattlecan black:

    Please Close The Gate - masking tape peeled
    Please Close The Gate – masking tape peeled

    The full sheet of orange acrylic arrived with plastic protective film on both sides, which I planned to use for paint masking. Alas, one side also had a wrinkle running its length that ended up on two signs, so I replaced that film with blue masking tape.

    As fate would have it, the first side of the first sign I peeled had masking tape and produced what you see above.

    Things went bad in a hurry. The paint had no adhesion whatsoever to the plastic film and fell off in flakes as I peeled the film away:

    Please Close The Gate - plastic peeled
    Please Close The Gate – plastic peeled

    I assumed the flakes would just fall off the signs, perhaps with a little persuasion, so I peeled and weeded all the signs before cleaning them up.

    Although the paint was fully dry, when the molecularly smooth surface of each paint flake touched the molecularly smooth surface of the newly exposed acrylic, the two instantly and permanently fused together.

    There were a lot of flakes:

    Please Close The Gate - plastic peeled - detail
    Please Close The Gate – plastic peeled – detail

    Removal techniques that did not work:

    • Vacuuming with a brush
    • Gentle rubbing with a soft cloth
    • Firm rubbing after spraying with acrylic cleaner
    • Scraping with a plastic razor blade

    So I deployed a P220 grit sanding block and wrecked the glossy surface of both sides of all six signs. I briefly considered trying to recover the finish by sanding them all up through about 2000 grit, then came to my senses: my sanding arm is weak.

    Careful examination of the last picture shows several places around edges of the circle where the plastic film melted into a blob that blocked the paint, rather than vaporizing. I used enough power to engrave only about 0.3 mm deep (because they’re engraved on both sides), but the transition wasn’t fast enough for a clean edge.

    They don’t look as nice as I’d like, but they’re good enough for the purpose:

    Please Close The Gate - installed
    Please Close The Gate – installed

    The acrylic sheet is more see-through than I expected, at least when backlit by bright sunlight.

    Please Close The Gate - seethrough
    Please Close The Gate – seethrough

    Next: we discover what happens to UV-stabilized orange acrylic and black outdoor paint over the course of a year in garden sunshine.

  • Refresh Tears Eye Lube Storage Boxes

    Refresh Tears Eye Lube Storage Boxes

    A recent Squidwrench meeting provided the opportunity to make a couple of racks for an assortment of Refresh Tears / Liquigel bottles:

    Refresh eye lube - storage cases
    Refresh eye lube – storage cases

    I used chipboard to find out if the cross plates would stiffen the floppy 1.1 mm sheets enough for this light duty. Indeed, the overall structure becomes a nice rigid box, even though the feet and corners can’t withstand much abuse.

    The finger joints use the default settings, which produce a lot of fingers along the edges. This turns out to be a Good Thing, as it gave the yellow wood glue plenty of opportunities to bond the sheets together.

    Combining the default 5° slope with nine bottles along each level wastes a tremendous amount of vertical space. The adjacent racks hold three much larger cans per level, so roughly the same space doesn’t look like much. In retrospect, a 3° slope should work for smaller bottles.

    And, yes, the squash on the lower shelf store nicely and become yummy meals all winter long.

    The overstuffed URL generating the patterns:

    http://festi.info/boxes.py/CanStorage?FingerJoint_angle=90.0&FingerJoint_style=rectangular&FingerJoint_surroundingspaces=0.0&FingerJoint_bottom_lip=0.0&FingerJoint_edge_width=1.0&FingerJoint_extra_length=0.0&FingerJoint_finger=2.0&FingerJoint_play=0.0&FingerJoint_space=2.0&FingerJoint_width=1.0&Stackable_angle=60&Stackable_bottom_stabilizers=0.0&Stackable_height=2.0&Stackable_holedistance=1.0&Stackable_width=4.0&fillHoles_bar_length=50&fillHoles_fill_pattern=no+fill&fillHoles_hole_max_radius=3.0&fillHoles_hole_min_radius=0.5&fillHoles_hole_style=round&fillHoles_max_random=1000&fillHoles_space_between_holes=4.0&fillHoles_space_to_border=4.0&top_edge=%C5%A0&bottom_edge=%C5%A1&canDiameter=30&canHeight=75&canNum=18&chuteAngle=5.0&thickness=1.15&format=lbrn2&tabs=0.0&qr_code=0&debug=0&labels=0&reference=0&inner_corners=corner&burn=0.04&language=en

    And the eyeburning QR code:

    Refresh Eye Lube - chipboard QR code
    Refresh Eye Lube – chipboard QR code
  • Onion Maggot Flies vs. Sticky Traps: Season Finale

    Onion Maggot Flies vs. Sticky Traps: Season Finale

    Mary left the sticky card traps in the onion patch until the last onions came out, clustered them around the leeks, and collected them long after the season was over.

    I count maybe twenty flies that might be onion maggot flies or cabbage maggot flies.

    The cards protected the onion crop, failed miserably for the leeks, and did nothing for the nearby cabbages. Deploying the cards while planting worked very well, refreshing them after a month continued the protection, but the main fly season seems to end shortly thereafter.

    All the sticky cards as a slideshow, starting with the three along the border fence:

    • VCCG Onion Card - fence A - 2022-11
    • VCCG Onion Card - fence B - 2022-11
    • VCCG Onion Card - fence C - 2022-11
    • VCCG Onion Card - plot A - 2022-11
    • VCCG Onion Card - plot B - 2022-11
    • VCCG Onion Card - plot C - 2022-11
    • VCCG Onion Card - plot D - 2022-11

    The cards remain sticky to my fingers, but an adroit fly could skate over the debris field and emerge unscathed.