The Smell of Molten Projects in the Morning

Ed Nisley's Blog: Shop notes, electronics, firmware, machinery, 3D printing, laser cuttery, and curiosities. Contents: 100% human thinking, 0% AI slop.

Tag: CNC-3018XL

Small gantry router

  • Raspberry Pi: WLAN to Wired Network

    Raspberry Pi: WLAN to Wired Network

    The CNC-3018XL and MPCNC machines each have a Raspberry Pi feeding G-Code into an Arduino clone controlling the stepper motors. The former grew a USB WiFi interface in place of its internal WiFi hardware when it seemed to have difficulty connecting to the house router, while the latter pretty much worked. Of late, however, I’ve been trying to reduce the number of WiFi devices cluttering the airwaves, with the result of wiring both machines to an old Ethernet switch from the Box o’ Network Stuff:

    LinkSys Switch for CNC machines
    LinkSys Switch for CNC machines

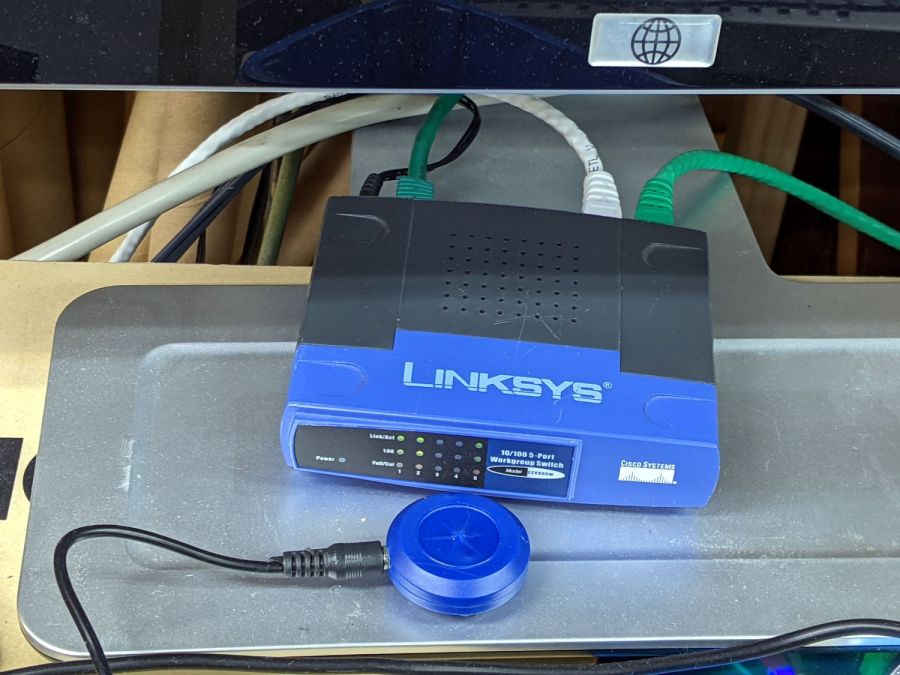
    The blue puck is the KVM button to select one of the machines for the keyboard / mouse / monitor on the bench.

    One key point I generally screw up: the WiFi IP address cannot become the wired IP address without rebooting everything else on the network. Instead, just change the IP addresses and be done with it.

    Collecting all the pieces in one place:

    Disable the both internal WiFi hardware and Bluetooth in /boot/config.txt, thereby eliminating the need to force the WiFi down in /etc/rc.local:

    dtoverlay=pi3-disable-wifi
    dtoverlay=pi3-disable-bt
    

    Define the static IP address in /etc/dhcpcd.conf:

    interface eth0
    static ip_address=192.168.1.34/24
    static routers=192.168.1.1
    static domain_name_servers=192.168.1.2
    

    Kill IPV6 activity in /etc/sysctl.conf:

    net.ipv6.conf.all.disable_ipv6=1
    

    I very much doubt this information is either complete or correct, but it serves the purpose as of early 2022.

  • CNC 3018 Tool Clamp Rehabilitation

    CNC 3018 Tool Clamp Rehabilitation

    The CNC 3018 Z-axis stage has a plastic clamp holding the spindle motor, so I just duplicated the motor diameter in the mounts for my diamond drag bit, cheap pen, and fancy pen holders. For obvious reasons, I tend to err on the small side for anything intended to fit into anything else, which led to each of the holders sporting a small strip of tape to soak up the difference.

    While poking around the 3018, I once again noticed the clamp’s crappy fit around the holder:

    CNC3018 tool clamp - top
    CNC3018 tool clamp – top

    The inside should be circular, but it’s definitely not:

    CNC3018 tool clamp - top detail
    CNC3018 tool clamp – top detail

    The end of the 30 mm M3 SHCS bottoms out before the clamp closes, although I’ve managed to crank the screw tight enough to put enough of a dent in there to snug the clamp:

    CNC3018 tool clamp - side
    CNC3018 tool clamp – side

    Some awkward scraping and filing eroded enough of the plastic to let a 25 mm SHCS close the clamp firmly around the holder:

    CNC3018 tool clamp - revised
    CNC3018 tool clamp – revised

    The tool holders now slide in easily with the screw released and fit firmly with the screw tightened a reasonable amount, minus the tape snippets shimming the difference.

    If I had the courage of my convictions, I’d take it all apart, bore the clamp out to a circular profile, realign the clamp screw passage to suit, then rebuild all those tool holders for the new diameter; it now works well enough to tamp that project down.

  • Tek Circuit Computer: Paper Matters, Redux

    Tek Circuit Computer: Paper Matters, Redux

    The back of a Tektronix Circuit Computer’s bottom deck carries instructions and information:

    Tektronix Circuit Computer - rear
    Tektronix Circuit Computer – rear

    A separate instruction manual told you how to use the thing, under the reasonable assumption you’d be intimately familiar with slide rules.

    In this day and age, the back should carry how-to-use instructions, so I summarized the manual into half a dozen lists:

    Tek CC - instructions - first pass
    Tek CC – instructions – first pass

    Which looked fine & dandy & ready to print, thereby exposing various typos / inconsistencies / misalignments:

    Tek CC - test print - HP Brochure vs ordinary copy paper
    Tek CC – test print – HP Brochure vs ordinary copy paper

    Whereupon I (re)discovered just how much paper matters.

    The HP Brochure Glossy inkjet paper on the left produces wonderful results with a 0.5 mm Pilot V5RT ball point pen and has coating on both sides. It’s intended for handouts, brochures, and suchlike; the Pilot pens produce identical results on either side.

    The same text, printed on plain old 22 pound “multipurpose” paper on the right, looks much better and makes the HP paper looks like something done with crayon on paper towel.

    I could try a font with finer strokes, but … ick.

    It’s unclear whether Brochure Matte paper would make any difference, nor whether running coated “inkjet” paper through a laser printer would have an … infelicitous … outcome.

    Past experience shows the unsteady ziggurat of Linux printing doesn’t respond well to tweakage: when the default settings don’t work, there’s no easy / predictable way to change any particular setting.

    For future reference, print the instruction on what will become the back of the bottom deck, mark the center point, tape it to the CNC 3018 platform, touch off XY = 0 at the center, and draw the front scales: everything lines up perfectly without extra fuss & bother.

  • Drag Knife Blade Lengths

    Drag Knife Blade Lengths

    The distances from the sharp tip to the top end of the edge, measured parallel to the shank axis:

    • 60° = 1.3 mm
    • 45° = 0.7 mm
    • 30° = 0.6 mm

    Here, the angle goes upward from the paper / Tek CC deck / whatever to the shank axis, so the 60° blade at the top of the picture has the longest blade edge.

    Drag Knife Blades - unused 60 45 30 degree
    Drag Knife Blades – unused 60 45 30 degree

    That’s for one trio of blades from a single eBay seller. I expected no consistency between sellers and that’s exactly what I got when I sorted my collection by peering through the microscope:

    Drag Knife Blades - inconsistent cap colors
    Drag Knife Blades – inconsistent cap colors

    Red seems consistently 45°, but blue & yellow caps can cover either 30° or 60° blades. The actual blade angle lies mostly within ±5° of the nominal value, with 45° between 40° and 50°, but I doubt my few samples span the QA space.

    The flat shaping the backside of the blade should put the point 0.25 mm from the shank axis and, because the blades are 1.0 mm ⌀, also 0.25 mm from the OD. A few spot measurements suggest the point offset can be up to 0.4 mm from the axis, so any fancy calculations you might think of making seem pretty much irrelevant.

    There’s not much practical difference between the 30° (“window tint”) and 45° (“vinyl”) blades, particularly given the angle and offset tolerances, but 60° blades (“card stock”) seem better suited to cutting the 0.3 mm to 0.4 mm thick laminated Tek Circuit Computer decks than the 45° blades I’ve been using.

  • GRBL Error 33: Arc Coordinates vs. Decimal Places

    GRBL Error 33: Arc Coordinates vs. Decimal Places

    The LinuxCNC G2/G3 arc command doc has this to say about numerical precision:

    When programming arcs an error due to rounding can result from using a precision of less than 4 decimal places (0.0000) for inch and less than 3 decimal places (0.000) for millimeters.

    So I normally set GCMC to produce three decimal digits, because its default of eight digits seems excessive for my usual millimeter measurements, and assume whatever G-Code sender I use won’t chop digits off the end in passing. Mistakenly setting bCNC to round at two decimal places showed what happens with fewer digits, as bCNC’s default is four decimal digits.

    A closer look at the coordinates in the lower right part of the spreadsheets (from yesterday) shows the limited accuracy with two decimal digits:

    Spreadsheet - GCMC 2 digit - full path - detail
    Spreadsheet – GCMC 2 digit – full path – detail

    The red blocks mark the first failing arc, where the relative error falls out of tolerance. If GRBL were less fussy (which it should not be), then the next arcs would proceed as shown.

    Rounding to three decimal digits pushes the errors into to the third place, with the yellow highlight marking the worst errors:

    Spreadsheet - GCMC 3 digit - detail
    Spreadsheet – GCMC 3 digit – detail

    As you should expect, the smallest arcs have the largest relative errors, although they’re now well within GRBL’s (and LinuxCNC’s, for that matter) limits.

    Rounding to four decimal digits makes the errors vanishingly small:

    Spreadsheet - GCMC 4 digit - detail
    Spreadsheet – GCMC 4 digit – detail

    So, by and large, don’t scrimp on the decimal digits … but we knew that already.

    I’d been setting GRBL to produce three decimal places, but now I’m using four. Adding a few characters to each G-Code command reduces the number of commands fitting into GRBL’s buffer space, but bCNC normally keeps it around 90% full, so the path planner should remain perfectly happy.

  • Homage Tek Circuit Computer: Yellow Variation

    Homage Tek Circuit Computer: Yellow Variation

    An on-sale pack of yellow Astrobrights card stock tempted me:

    Homage Tek CC - Yellow Astrobrights paper
    Homage Tek CC – Yellow Astrobrights paper

    The somewhat wrecked cursor comes from my collection of discards, because I haven’t yet figured out how to mill the outline and engrave the hairline on raw stock.

    The paper isn’t quite the same color as my Genuine Pickett Model 110-ES circular slide rule:

    Homage Tek CC vs Pickett 110ES colors
    Homage Tek CC vs Pickett 110ES colors

    Nor, of course, are the ticks and legends nearly as fine as you get with real engraving, but it’s probably Close Enough™ for anybody other than a Real Collector™.

    The Pilot V5RT ink bleeds less on Astrobrights card stock than on the previous, somewhat coarser, card stock:

    Tek CC - Yellow Astrobrights paper - bare
    Tek CC – Yellow Astrobrights paper – bare

    An automagic color adjustment bleaches the yellow and makes the black ink much more visible.

    Laminating the paper crisps the contrast a bit, although it’s more obvious in person:

    Tek CC - Yellow Astrobrights paper - laminated
    Tek CC – Yellow Astrobrights paper – laminated

    You can see tiny air bubbles over the darkest part of the ticks and letters.

  • Diamond-Drag Styrene Engraving: Scraped Enamel

    Diamond-Drag Styrene Engraving: Scraped Enamel

    For the first time in a loooong time, I applied Testors Gloss Enamel paint to styrene plastic:

    Engraving Testpiece D - Testors Enamel - red
    Engraving Testpiece D – Testors Enamel – red

    Two coats of black paint produced the larger areas along the inner scales and completely filled those engraved lines:

    Engraving Testpiece D - Testors Enamel - red black applied
    Engraving Testpiece D – Testors Enamel – red black applied

    With exactly the correct paint on exactly the correct material, it cured into a non-removable layer. Being enamel, however, the last coat requires two or three days for a full cure, so this isn’t a short-attention-span project.

    It’s “non-removable” unless you’re willing to abrade the surface:

    Engraving Testpiece D - Testors Enamel - scrape sand - overview
    Engraving Testpiece D – Testors Enamel – scrape sand – overview

    Sanding tends to remove too much plastic, particularly when confronted with raised walls & suchlike along the grooves. The darkest scale down the middle was engraved with 300 g downforce and is deep enough to retain all its paint:

    Engraving Testpiece D - Testors Enamel - sanded - 250 300 g - detail
    Engraving Testpiece D – Testors Enamel – sanded – 250 300 g – detail

    As expected, paint scrapers produce better results:

    Engraving Testpiece D - Testors Enamel - scrape - 250 300 g - detail
    Engraving Testpiece D – Testors Enamel – scrape – 250 300 g – detail

    There’s not much visible difference between the 250 g and 300 g scales.

    All the scraped lines are over 0.1 mm wide, with the heavier downforce producing maybe 0.12 mm.

    The double-coated lines are flush with the (scraped) surface and visibly matte. The single-coated regions have the usual glossy enamel finish remaining deep in the lines & numbers, with a thin matte outline flush with the surrounding surface. It’s basically impossible to photograph those features, at least for me.

    The colors are crisp & vivid: enamel paint is the way to go!

    The next testpiece should run downforce variations from 300 through 500 g and speeds from 1000 to 2400 mm/min. Scraping off the raised plastic before painting should deliver a better ahem painting experience without much surface damage; the trick will be clearing all the debris from the engraved lines.