The Smell of Molten Projects in the Morning

Ed Nisley's Blog: Shop notes, electronics, firmware, machinery, 3D printing, laser cuttery, and curiosities. Contents: 100% human thinking, 0% AI slop.

Tag: Art-ish

They might be Art

  • High-Impact Art: Smashed Glass Earrings, Proof of Concept

    High-Impact Art: Smashed Glass Earrings, Proof of Concept

    If you’re a particularly sharp person, these may accentuate your wardrobe:

    Earrings - 12mm - finished
    Earrings – 12mm – finished

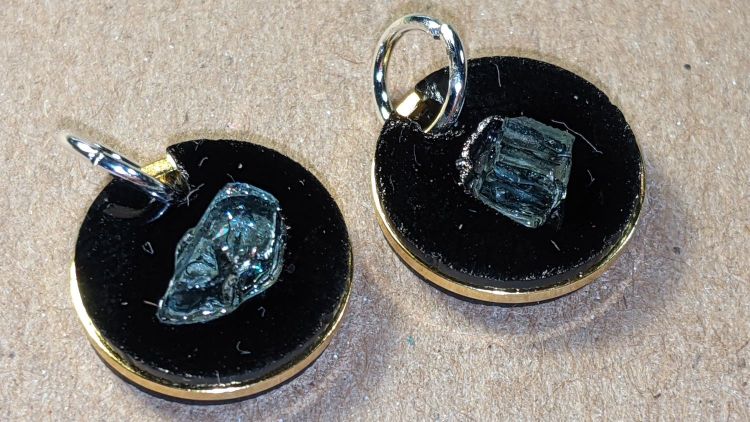
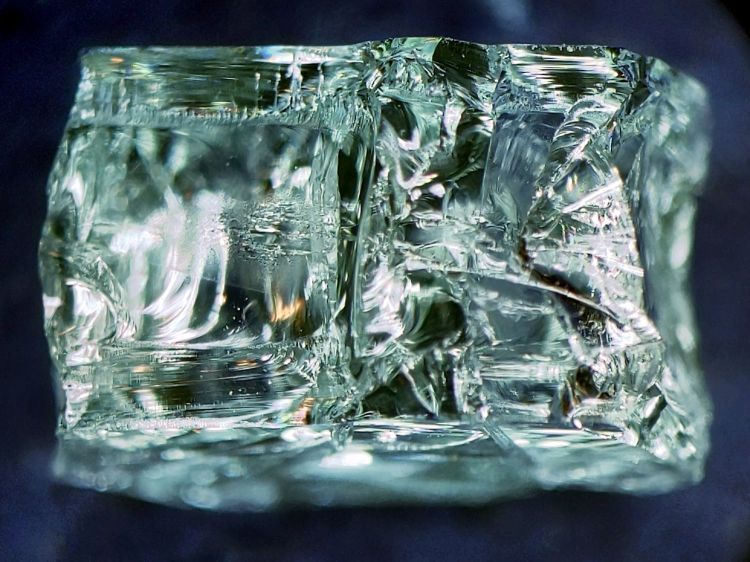
    They’re fragments of smashed tempered glass, epoxied into laser-cut disks, with a ring providing some structural support. Although it’s hard to tell from the photos, the fragments sit flush with one side of the disk, which is likely the side you want closest to your carotid artery:

    Earrings - 12mm - finished
    Earrings – 12mm – finished

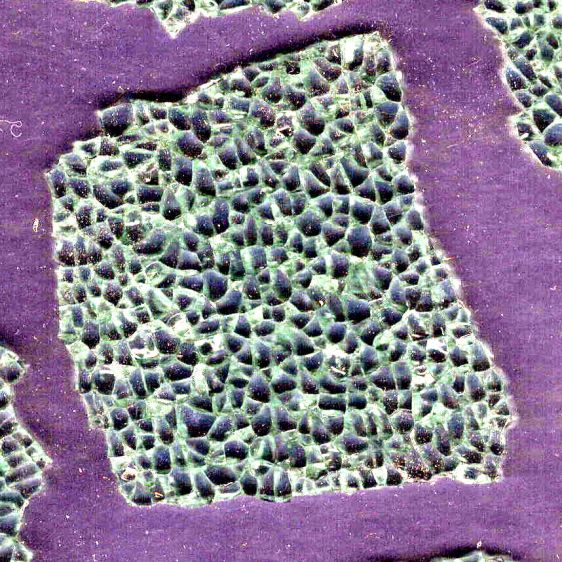
    Each chunk consists of a few smaller cuboids, so you get internal reflections from the minute air gaps between them. They’re not diamonds, but they’re surprisingly glittery in the proper light. Bonus: you can see right through!

    The “gold” band around the disk is a beading ring held in a notch engraved around both disks:

    Earrings - rings
    Earrings – rings

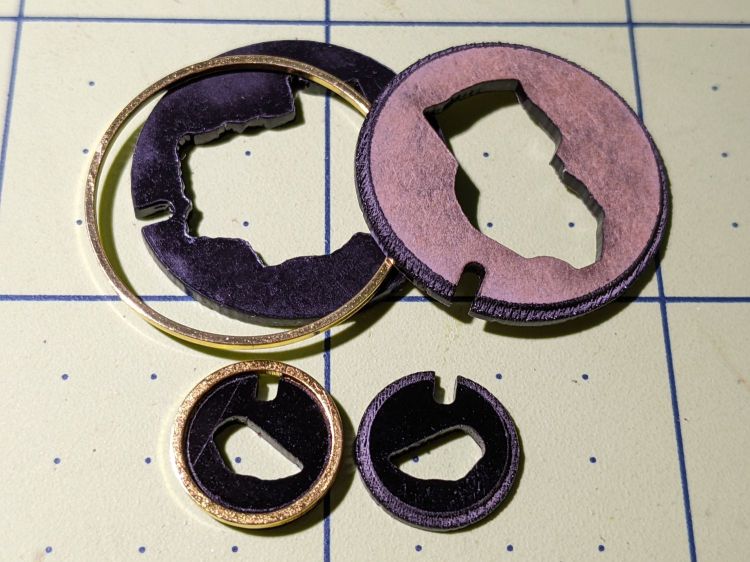
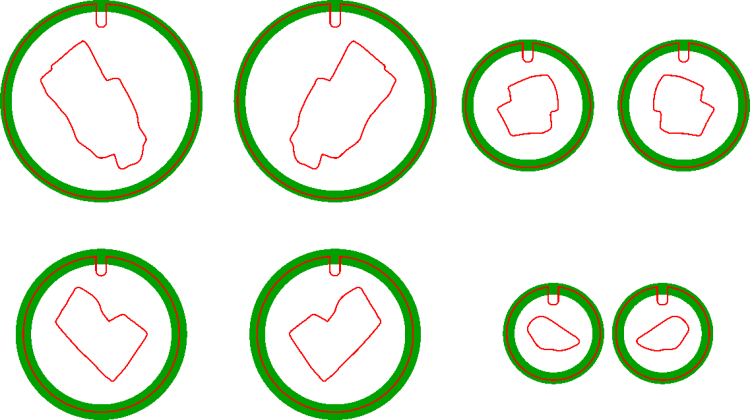
    The smaller ring is 12 mm OD, the larger is 25 mm, with 16 mm (the descriptions says 15, but ya get what ya get) and 20 mm available for other glass fragment sizes.

    The engraved recess (green) is slightly larger than the OD to allow the perimeter cut to proceed through a thinner section:

    Earring templates - 25 20 16 12 mm
    Earring templates – 25 20 16 12 mm

    Cross-hatch engraving puts a steep edge all around the recess, so the ring fits with just a little slack and turns freely around the disks.

    You will, of course, have different glass fragments requiring different shapes, but the outlines came from the same process I used to make the palette organizing the fragments:

    Smashed glass palette - fresh cut
    Smashed glass palette – fresh cut

    You (well, I) can just import that layout, copy the outline of the chunk to be used, then delete the rest. Mirror the outline so the engraved sides of the disks fit together around the chunk, position symmetrically in the template halves, and fire the laser.

    Affixing the fresh-cut disk and its glass chunk to a strip of Kapton tape (sticky side up) holds them in proper alignment and prevents the epoxy from leaking out the bottom:

    Earrings - 12mm - taped
    Earrings – 12mm – taped

    With everything lined up, run a small bead of epoxy around the chunk, squish the top disk in place, and line up the notches. When the epoxy cures, peel the earring off the tape and slide a jump ring into the notch.

    As a finishing touch, you’d add a suitable ear hook or stud, but I think it’s fair to assume anything from Amazon would consist of the finest arsenic-plated plutonium and be completely unsuitable for skin contact. Neither of us have any piercings, so I cannot provide enticing action photos.

    The 25 mm versions failed because I made the outlines such a snug fit around the chunks they didn’t quite fit:

    Earrings - 25mm - failed
    Earrings – 25mm – failed

    Protip: do not attempt to coerce two rigid bodies into alignment by applying firm pressure, particularly when one of them is already-broken glass.

    The small earrings weigh 0.7 g each and a 25 mm one (well, the parts for a large one) comes in a bit over 3 g, plus whatever hardware goes in / on / around your ear.

    This was (obviously) an exercise in small-scale laser machining, rather than a venture into haute couture. In the highly unlikely event you can’t live without a pair of custom-designed high-impact earrings, I’ll shut up and take your money … let me know if you want little or big. Black is the new black; I do have other colors, but who are you kidding?

    The SVG images as a GitHub Gist:

    Loading
    Sorry, something went wrong. Reload?
    Sorry, we cannot display this file.
    Sorry, this file is invalid so it cannot be displayed.

  • Smashed Glass Work Palette

    Smashed Glass Work Palette

    Having a myriad small glass fragments and an idea for their use created the problems of organizing the pieces while not losing them under the bench.

    As with the shattered shot-glass coaster, start by lining up the suspects on the scanner:

    Small fragments
    Small fragments

    Blow out the contrast, flip right-to-left, then mask them en masse:

    Small fragments - masked
    Small fragments – masked

    Delete the images (inside their selection masks) to create a binary mask:

    Small fragments - masks
    Small fragments – masks

    Have LightBurn trace the binary images, wrap a rounded rectangle around the lot of them, duplicate the rectangle as a base plate, then fire the laser:

    Smashed glass palette - fresh cut
    Smashed glass palette – fresh cut

    They’re not secured in their sockets, but they won’t fall out unless I fat-finger the whole affair:

    Smashed glass palette - loaded
    Smashed glass palette – loaded

    The thing that takes getting used to: the whole process was about two hours of wall clock time from start to finish, with a leisurely breakfast and KP in the middle.

  • High Impact Art: Smashed Glass Coaster

    High Impact Art: Smashed Glass Coaster

    Given a few pounds of smashed tempered glass:

    NHR Crash - tempered glass
    NHR Crash – tempered glass

    Lay some pieces atop an acetate sheet (to prevent scratching) on the scanner, grab the whole thing, then isolate an interesting chunk:

    Smashed Glass - dark - piece 1
    Smashed Glass – dark – piece 1

    Next time: flip the image left-to-right to match the glass piece as seen from the top, because the scanner was looking at the bottom.

    The weird purple background started as black, but blowing out the contrast while ignoring the color mis-correction makes the next step easier.

    Trace around the perimeter with Scissors Select, clean up the result in Quick Mask mode, expand the selection by a few pixels to improve clearance, then turn it into a two-color image mask:

    Smashed Glass - piece 1 - outline
    Smashed Glass – piece 1 – outline

    Import the mask into Lightburn, trace it into vector paths (which is trivially easy and accurate given such a high-contrast image), then cut a chipboard prototype to make sure it fits:

    Smashed Glass - piece 1 - acrylic mount
    Smashed Glass – piece 1 – acrylic mount

    Clean up any misfits, test as needed, cut the inner shape and outer perimeter from 1.5 mm black acrylic, cut just the outer perimeter from 3 mm clear acrylic. Put the piece of black acrylic matching the glass shape into the scrap box.

    Mix up a few milliliters of clear pourable epoxy, butter up the clear acrylic, lay the black acrylic on top, line up the edges, then gently place the shattered glass into the cutout:

    Smashed Glass - piece 1 - acrylic top
    Smashed Glass – piece 1 – acrylic top

    Next time: apply gentle pressure, perhaps through a flexy sheet, to ensure the entire glass surface contacts the epoxy layer while squeezing out the bubbles. This will surely skate the glass across the acrylic, so don’t leave it unsupervised.

    The relatively clear areas show where epoxy eased its way into the cracks between the granules; there is no correlation between the air bubbles and unfilled cracks. The epoxy had the viscosity of warm honey and I didn’t expect it to flow so easily, but it doesn’t affect the outcome.

    Wait for a day, no matter how hard that may seem, for the epoxy to cure. Leave the small cup holding the remnants of the mixed epoxy nearby so you can test the cure without disturbing the Main Event.

    The bottom looks pretty much like the top:

    Smashed Glass - piece 1 - acrylic bottom
    Smashed Glass – piece 1 – acrylic bottom

    The shattered edge reflects off the bottom of the clear acrylic, as seen through the side:

    Smashed Glass - piece 1 - acrylic side
    Smashed Glass – piece 1 – acrylic side

    Matching the perimeter to the fragment would be interesting, despite my low-vertex-polygon fixation.

    It could become a paperweight or a (shot glass) coaster.

  • High Impact Art(ifact)

    High Impact Art(ifact)

    At first we thought a mighty crunch in the morning meant the trash collection truck had dropped a garbage bin from a great height, but the sound of sirens and a myriad flashing lights revealed the true cause in our neighbor’s front yard:

    NHR Crash - frontal view
    NHR Crash – frontal view

    The extent of the damage was more apparent from the road side:

    NHR Crash - passenger side
    NHR Crash – passenger side

    Another one that ain’t gonna buff right out.

    The driver was walking around uninjured and the ambulance left quietly.

    A day later, the trajectory became apparent:

    NHR Crash - trajectory
    NHR Crash – trajectory

    The right side barely kissed the tree on the right, but the front wheel hooked the utility pole (that’s the new pole in the picture), snapped it off at ground level in addition to the usual break maybe ten feet up, and bounced a piece off the other tree:

    NHR Crash - utility pole
    NHR Crash – utility pole

    I didn’t know you could shatter a cast aluminum alloy wheel, but the missing half of the outer face was lying amid the rather scrambled stone wall along driveway.

    We’re reasonably sure we know the cause. Feel free to draw your own conclusions.

    After the flatbed hauled away the car and everybody left, I harvested a few pounds of interesting debris from the lawn:

    NHR Crash - tempered glass
    NHR Crash – tempered glass

    It’s tempered glass from the driver-side windows, shattered into small chunks and barely hanging together in those sheets. Laminated windshield glass is entirely different stuff.

    The smaller chunks glitter like jewels:

    NHR Crash - tempered glass fragments
    NHR Crash – tempered glass fragments

    Obviously, the window had a bit of tint.

    The smallest chunk, seen from its flat surface, shows the cuboid fragments:

    NHR Crash - tempered glass fragment - front
    NHR Crash – tempered glass fragment – front

    A side view shows more complexity:

    NHR Crash - tempered glass fragment - side
    NHR Crash – tempered glass fragment – side

    Tempering prevents a glass sheet from shattering into long knife-blade shards. Although the edges of the fragments are not keen, we are dealing with broken glass: they are sharp.

    How sharp? They make glass knives for slicing eyes and cells.

    Broken tempered glass also sheds razor-edged flakes perfectly shaped to penetrate bike tires, although most roadside glass comes from ordinary beverage bottles. The tiniest flakes can make a mess of your eyes, so exercise at least some rudimentary shop safety practices.

    Those slabs ought to be good for something, even if they fall apart at the slightest touch …

  • Vacuum Tube Lights: Urethane Coated Plate Cap

    Vacuum Tube Lights: Urethane Coated Plate Cap

    With a generous dollop of JB Plastic Bonder left over from a set of Bafang brake sensor magnets, I tried coating the ersatz plate cap of a triode tube:

    Triode - urethane coated plate cap
    Triode – urethane coated plate cap

    That’s the result after leaving it hanging upside-down while it cured to push all the drips to the top.

    For comparison, the uncoated cap back in the day:

    Triode - plate cap plug
    Triode – plate cap plug

    Seeing as how the urethane is an adhesive, not a coating, I’d say it looks about as bad as expected.

    As with all 3D printed things, one must embrace imperfections and striations, rather than endlessly strive for perfection.

    Now, if I had a resin printer …

  • Discrete LM3909: Blue LED

    Discrete LM3909: Blue LED

    Once again, the discrete LM3909 circuitry can blink a blue LED while running a pair of alkaline cells all the way down to about 1 V, with one cell ending at 0.2 V and the other at 0.8 V. They started out discharged to 1.2 V each during their useful life, then blinked for a month; it’s as good a use for dead cells as I can think of.

    With another pair of not-dead-yet cells providing 2.4 V, it started up again:

    Blue LM3909 2.4V alkaline - 042
    Blue LM3909 2.4V alkaline – 042

    That’s a frame from a short video taken in subdued light, just to show it really does work.

  • Astable Multivibrator: Red RGB Piranha

    Astable Multivibrator: Red RGB Piranha

    A red LED has a sufficiently low forward voltage to run with a MOSFET astable multivibrator and a pair of run-down AA alkaline cells:

    Astable AA Alkaline - red
    Astable AA Alkaline – red

    The red LED is actually part of an RGB Piranha, just to see how it compares to an as-yet-unbuilt version with a single red LED in the same package.

    The LED drops 1.9 V of the 2.75 V from the mostly used-up AA cells:

    Astable Piranha Red - 2.75 alkaline - V LED
    Astable Piranha Red – 2.75 alkaline – V LED

    The original 33 Ω ballast resistor showed a peak current of 11 mA in a 30 ms pulse:

    Astable Piranha Red - 2.75 alkaline - V 33 ohm
    Astable Piranha Red – 2.75 alkaline – V 33 ohm

    Replacing it with a 12 Ω resistor boosts the current all the way to 12 mA:

    Astable Piranha Red - 2.75 alkaline - V 12 ohm
    Astable Piranha Red – 2.75 alkaline – V 12 ohm

    The 2N7000 gate sees a just bit more than 2 V, barely enough to get the poor thing conducting, which makes the ballast resistor mostly decorative. The MOSFET datasheet puts its 1 mA threshold somewhere between 0.8 and 3 V, so it could be worse.

    Keep in mind the DSO150’s 1 MΩ input impedance sat in parallel with the 1 MΩ gate pulldown resistor forming the RC differentiator when I measured the gate voltage; I’ll leave the simulation as an exercise for the interested reader. The blinks were noticeably dimmer and perhaps a bit shorter, although eyeballometric calibration is notoriously hard.

    The slightly revised schematic-layout doodle stacks the transistors along the negative bus bar:

    Astable wiring layout - stacked 2N7000
    Astable wiring layout – stacked 2N7000

    Flipping the bottom transistor over to snuggle the two timing caps next to each other would eliminate the long jumper wire and probably look better.