The Smell of Molten Projects in the Morning

Ed Nisley's Blog: Shop notes, electronics, firmware, machinery, 3D printing, laser cuttery, and curiosities. Contents: 100% human thinking, 0% AI slop.

Category: Science

If you measure something often enough, it becomes science

  • Laser Cutter: Print-and-Cut Alignment Accuracy

    Laser Cutter: Print-and-Cut Alignment Accuracy

    Up to this point I’ve been making mirror alignment targets entirely on the laser cutter to ensure accurate alignment:

    OMTech 60W laser - beam alignment - focus detail - 2022-03-22
    OMTech 60W laser – beam alignment – focus detail – 2022-03-22

    While that works fine, using Dot Mode takes basically forever to chew its way through any nontrivial number of targets.

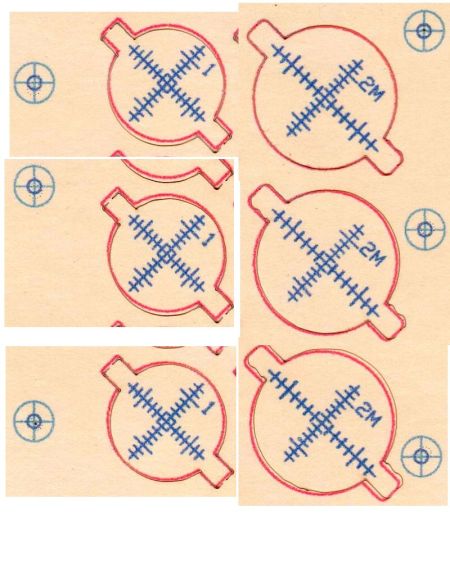
    Now that I have more familiarity with LightBurn’s Print-and-Cut feature, I tried printing the graticules, aligning the sheet, then laser-cutting just the perimeters:

    Laser Beam Alignment Targets - cut tabs - smoothed
    Laser Beam Alignment Targets – cut tabs – smoothed

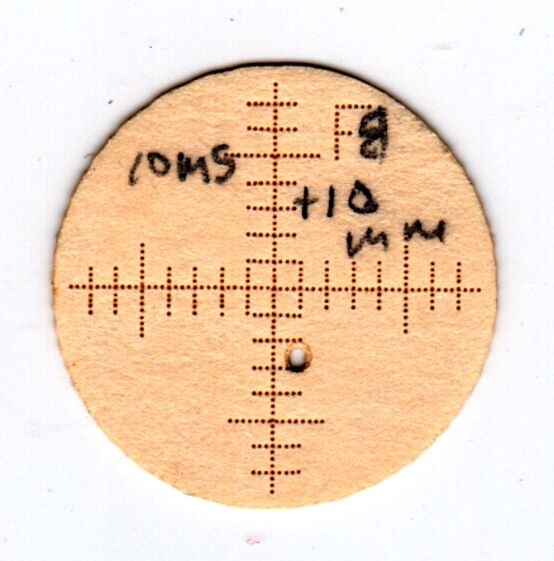
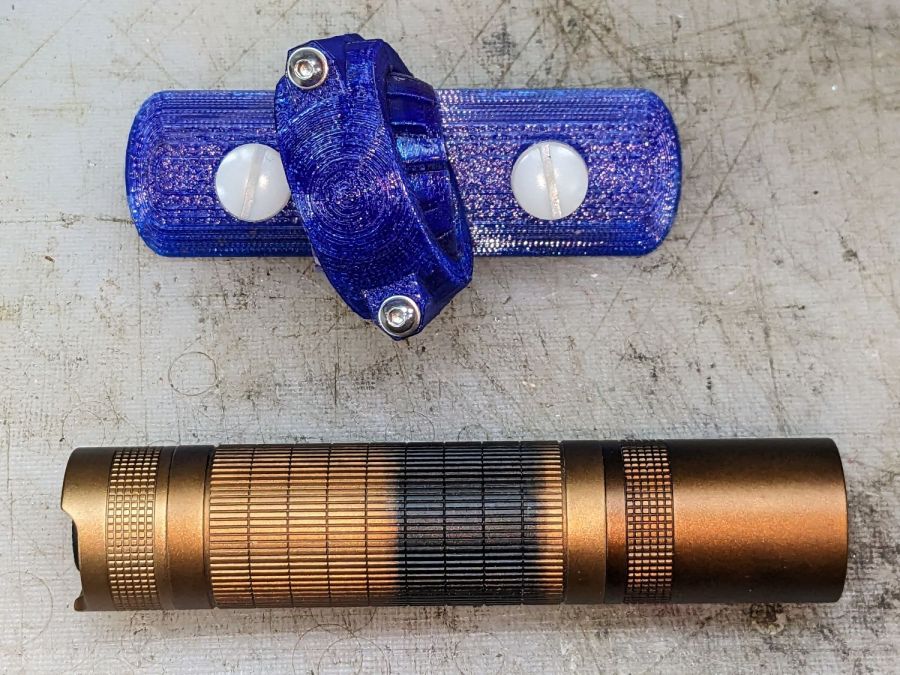
    The smaller targets fit neatly into the hole perpendicular to the beam:

    OMTech CO2 Mirror 2 mount - Y Z screws
    OMTech CO2 Mirror 2 mount – Y Z screws

    The larger ones sit flush on the mirrors at 45° to the beam, so stretching the horizontal scale by 1.414 = √2 makes each tick mark correspond to 1 mm of perpendicular beam offset.

    All of which worked surprisingly well, with some caveats.

    The first gotcha: ordinary consumer-grade inkjet printers do not have CNC accuracy. The corner targets are on 150 mm horizontal centers and 240 mm vertical centers in the LightBurn layout, but my Epson ET-3830 printer put them on 150×241.3 mm centers. This isn’t unexpected, particularly for laser printers, but it means you must use LightBurn’s scaled version of the P-n-Cut alignment.

    I used the upper-right and lower-left targets for the P-n-Cut alignment step, confirming the positioning with a laser pulse putting a tiny hole in the paper:

    Print-and-Cut - target accuracy
    Print-and-Cut – target accuracy

    The lines are 0.5 mm wide and the inner circle is 2 mm in diameter, so my alignment at the upper right is as good as it’s gonna get and the lower left is off by maybe 0.3 mm. While it may be possible to be more accurate, I think half a millimeter is a reasonable error budget for targeting accuracy.

    The laser-perforated circles should overlay the inner printed circles after LightBurn applies the P-n-C corrections. That they obviously do not indicates the effect of the small target errors. In any event, the maximum error seems to be 1 mm, which gives you an idea of just how precise P-n-C might be.

    The perimeter laser cuts are off by about the same amount & direction as the dotted circle in the adjacent target:

    Print-and-Cut - perimeter matching
    Print-and-Cut – perimeter matching

    Overall, errors around 1 mm seem possible with careful attention to detail, but expecting anything better than a few millimeters is probably unreasonable, particularly for layouts larger than a Letter size page.

    Works for me, though!

    The LightBurn SVG layout as a GitHub Gist:

    Loading
    Sorry, something went wrong. Reload?
    Sorry, we cannot display this file.
    Sorry, this file is invalid so it cannot be displayed.
    Loading
    Sorry, something went wrong. Reload?
    Sorry, we cannot display this file.
    Sorry, this file is invalid so it cannot be displayed.

  • Laser Cutter: Assist Air Flow vs. Pressure

    Laser Cutter: Assist Air Flow vs. Pressure

    A question on the LightBurn forum prompted a quick-n-dirty measurement of the assist flow rate vs. inlet air pressure, which required a bit more oomph than the laser’s air pump can provide.

    So a small air compressor with a buffer tank on a T fitting in the Basement Shop provides the air:

    Laser assist air flow test - compressor
    Laser assist air flow test – compressor

    The far end of the green 50 ft hose has a horrific quick-disconnect 1/4 inch NPT to 6 mm tube adapter replacing the laser cutter’s air pump:

    Laser assist air flow test - inlet adapter
    Laser assist air flow test – inlet adapter

    Protip: If you’re trying to run an actual air tool at the end of fifty feet of 1/4 inch ID hose, you’re doing it wrong.

    Flow measurements come from the flowmeter inside the cabinet:

    OMTech Laser - air flowmeter installed
    OMTech Laser – air flowmeter installed

    The normal dual-flow assist air setup has a flow control valve (the knob sticking up on the right) normally set for 2 l/min from the air pump:

    OMTech Laser - air assist - plumbing
    OMTech Laser – air assist – plumbing

    I cranked that valve completely open to allow unrestricted flow with the solenoid (block in the middle) closed and varied the compressor’s output pressure while measuring the air flow.

    Without further ado, the assist air flow rate as a function of the inlet air pressure just upstream of the Y fitting on the left:

    Assist Air flow vs inlet pressure
    Assist Air flow vs inlet pressure

    Fairly obviously, the flow is not 5.5 l/min at 0 psi inlet pressure and the long & skinny air hose limits the flow above 15 l/min. The eyeballometric line looks pretty good in the middle, though.

    Other measurements not shown here suggested the outlet pressure, as measured just downstream of all the plumbing / upstream of the flowmeter & hose to the laser head, is about 1 psi at 10 to 12 l/min flow, with 0.2 psi at 8 l/min. My pressure gauges have terrible accuracy at such low pressures, so I don’t trust those numbers, but the plumbing definitely accounts for most of the inlet-to-outlet pressure drop.

    The nozzle on the laser head is 4.1 mm ID → 13.2 mm²:

    Magnetic Honeycomb Spikes - MDF
    Magnetic Honeycomb Spikes – MDF

    A flow of 10 l/min produces a 13 m/s = 28 mile/hr wind through the nozzle, which seems adequate to blow the fumes out of the kerf, and the low-flow default of 2 l/min might be a 5 mph breeze.

    More air pressure would produce more wind, but it’s not clear how much better the resulting cuts would be.

  • Tour Easy Running Lights: Anodizing Sun Fade

    Tour Easy Running Lights: Anodizing Sun Fade

    After six years, the anodizing on the Anker LC40 flashlights I repurposed as daytime running lights shows some radiation damage:

    Tour Easy Running Lights fading - mount top view
    Tour Easy Running Lights fading – mount top view

    The bottom side looks pristine:

    Tour Easy Running Lights fading - mount bottom view
    Tour Easy Running Lights fading – mount bottom view

    It turns out they were clamped in slightly different positions on our two bikes:

    Tour Easy Running Lights fading - top view
    Tour Easy Running Lights fading – top view

    The side view shows a gentle color transition:

    Tour Easy Running Lights fading - bottom view
    Tour Easy Running Lights fading – bottom view

    Apparently I had swapped the caps from the two lights when I noticed the fading after only the first year.

  • Garter Snake: Garbage Can Guardian

    Garter Snake: Garbage Can Guardian

    A garter snake has taken up residence under our garbage can and is startled when I wheel it away:

    Garter snake on the alert
    Garter snake on the alert

    This week it was curled into a compact bundle:

    Garter snake in compact mode
    Garter snake in compact mode

    The blue eyes indicate it’s in the process of shedding its skin, so next week we’ll have an even bigger and shinier guardian.

    Shedding one’s skin apparently requires a great deal of thought, as it remained in that pose while I fetched Mary, then moved deliberately off into the leaf litter behind the can.

    The small rodent population around here has definitely declined: garter snakes are murder on field mice and the hawks are taking out the chipmunks.

    Go, snake, go!

  • Onion Maggot Fly vs. Sticky Traps: Season 3 Finale

    Onion Maggot Fly vs. Sticky Traps: Season 3 Finale

    The six sticky traps guarding Mary’s onion beds in her Vassar Community Gardens plots collected this assortment of critter and mulch from mid-July through mid-August, when she harvested the last of the crop:

    • VCCG Onion Maggot Trap A
    • VCCG Onion Maggot Trap B
    • VCCG Onion Maggot Trap C
    • VCCG Onion Maggot Trap D
    • VCCG Onion Maggot Trap E
    • VCCG Onion Maggot Trap F

    The labels do not match those on the first set through mid-July, because I don’t care quite enough to keep track of them.

    The traps don’t collect many onion maggot flies, which suggests that a little control goes a long way. As far as she’s concerned, these traps work very well, because the crop has very little maggot damage.

    Searching for onion sticky traps will produce the rest of the collection. Contact me for the full resolution images, should you need to ID all the critters.

  • Magnetic Stirrer Resurfacing & Mug Decoration

    Magnetic Stirrer Resurfacing & Mug Decoration

    Half a year of plunking my morning cocoa mug on the magnetic stirrer had pretty well scuffed up its platform, so this seemed like a good idea:

    Magnetic stirrer - vinyl surface
    Magnetic stirrer – vinyl surface

    Rather than add the blue disk to the small-scraps collection, I converted the Squidwrench logo into a LightBurn layout:

    Squidwrench logo - laser cut layout
    Squidwrench logo – laser cut layout

    The roll of transfer tape I have on hand doesn’t stick well to the polyurethane sheet, so easing the vinyl onto the mug required careful tweezer work:

    Squidwrench logo on mug
    Squidwrench logo on mug

    It’s on the other side of the mug from the original, somewhat battered, logo.

    Now we can learn how long polyurethane sheets survive under the same conditions.

  • Newmowa NP-BX1

    Newmowa NP-BX1

    After a year’s service in my Sony AS-30V helmet camera, the Newmowa NP-BX1 lithium cells perform pretty nearly as well as they started out:

    NP-BX1 - Newmowa 2022 - 2023-08
    NP-BX1 – Newmowa 2022 – 2023-08

    Recharging the cells after that test averaged 907 mA·hr within 2%, so they’re still reasonably well grouped.

    The camera burns 1.9 W, so the worst of the cells has a 100 minute runtime = 3.3 W·hr/1.9 W × 60 min/hr,.

    Our usual weekday rides run a little over an hour and I change the batteries during our longer weekend rides, so they rarely see more than an hour’s use.

    A recent 1-¼ hour = 75 minute ride soaked up 687 mA·hr, just about exactly 75% of 907 mA·hr. Gotta love it when the numbers work.

    Surprisingly good performance, given the drama involved in finding those cells. I wonder if that will hold next year when I buy another set?