Ed Nisley's Blog: Shop notes, electronics, firmware, machinery, 3D printing, laser cuttery, and curiosities. Contents: 100% human thinking, 0% AI slop.
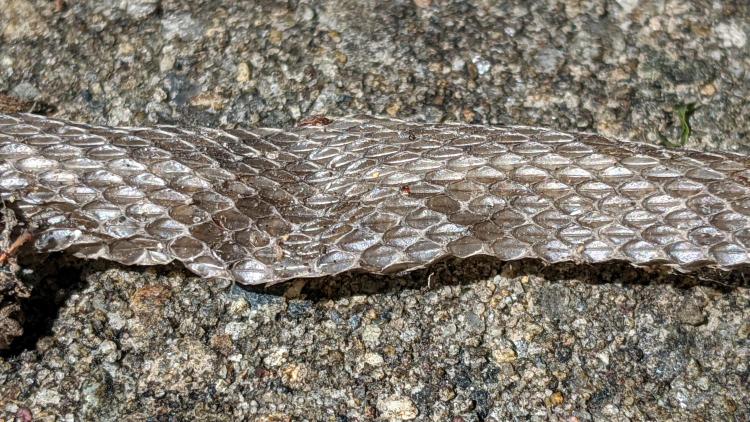
So the question came up: “Exactly what happens when one of those things gets wet?”
Which obviously requires an experiment:
Laminated Tek CC vs Water – start
That’s the mis-cut top deck revealing why GRBL really needs four digits after the decimal point, but, other than that, it’s perfectly representative of the genre: heavy paper, good ink, nicely laminated in plastic.
Prediction: water should seep into the paper, dissolve the ink, maybe delaminate the plastic, and generally make a mess.
The debris field from a recent high-energy collision with a utility pole just north of Red Oaks Mill included another attractive hunk of jewelry:
Nissan Fog Lamp – as found
I asked the guy who runs the towing service across the intersection if this was a “high-performance car / low-performance driver” situation. He said “Nah, the car was a piece of crap.” It apparently collided with the pole after pulling out of the adjacent gas station with entirely too much foot on the throttle; the young driver was last seen having considerable difficulty with a field sobriety test.
Anyhow, the labeling suggests it’s the right-side fog light from a Nissan car.
After removing various shattered plastic mounts and scrubbing off the obvious dirt, the lens didn’t look much better:
Nissan Fog Lamp – as-found lens
The bright triangle is one facet of the hood over the 55 W halogen bulb. The lens seems to be covered with a scattershot coat of gray spray paint or primer, rather than ordinary road grime, applied with surprising uniformity over the entire surface.
A quick wet-sand operation with 400 through 3000 grit paper, then some Simichrome, cleaned it up pretty well:
It’s definitely got a used-car finish: nice polish over deep gouges.
Look closely to see 400 grit diagonal scratches headed upward to the right; I must use 600 or 800 grit paper between the 400 and 1000. I don’t care about optical clarity, just knocking back the worst of the damage will suffice.
Methinks it would look pretty with internal RGB LED lighting, although the optics are obviously set up for a halogen filament just under the edge of the internal hood. If I get it just right, the thing could project a beam across the room …
After four years, I finally had occasion to use the blue label cartridge, only to have the tape refuse to feed. The mess on the tongue sticking out shows the result after I forcibly pulled the tape from the cartridge:
Cheapnified Brother Label Cartridge – exterior
The proximate cause was a fold in the imaging tape takeup path causing the driven spool to stop turning:
In the genuine cartridge, the base tape (with the sticky side and the colored side) feeds from the lower right directly into the assembly pressure roller. The transparent cover tape feeds from the spool in the lower left, up around the imaging tape supply spool, has the image fused to it, and is then pressed against the base tape on the assembly roller.
Update: Per david’s comment, the cartridges are even more complex than I thought! The printer has sense pins matching a group of cartridge holes to determine (at least) the tape size & orientation. See the pix added below.
Despite using the same cartridge body, the cheapnified tape path is entirely different. The base tape now feeds from the spool in the lower right through what should be the cover tape supply reel, around the imaging film supply spool, has the image fused directly to it, then passes out through the assembly pressure roller.
The cover tape is completely missing!
It turns out the cheapnified cartridges don’t bother with lamination. Instead, the printhead presses the imaging film against the top of the base tape, leaving the black image exposed to the elements. The assembly roller does nothing, apart from pulling the base tape through the cartridge.
Now that I know what to look for, the visible difference is the orientation of the base tape. A cartridge with the correct innards feeds the base tape with the colored side + image facing away from the long side of the cartridge. A cheapnified cartridge has the color + image facing the long side, with the major benefit of making the advertising look more appealing:
Fake Brother TZ cartridge – Amazon image
A genuine Brother cartridge would print the image on the bottom of the tape in that picture, so you’d see the blank side of the tape in that picture.
The “Amazon Marketplace” being what it is, I assume any pictures will not, in general, have much in common with what you actually receive, but at least I now know which ones to reject out of hand.
Update: The PT-1090 label printer has cartridge sensing pins:
Brother PT-1090 Labelmaker – sense pins
And the cartridges have corresponding holes, although the printer doesn’t sense all of them:
Brother PT-1090 Labelmaker – cartridge ID holes
Despite that, cheapnified cartridges are still cheapnified.
I learn something new every day around here! Thanks!
I gimmicked a scanner fixture to align a pair of pages:
Pickett 110-ES Scanning Fixture
Yes, I destroyed the collectible value of my manual by removing two slightly rusted staples.
The black paper taped to the scanner lid prevents the type on the upper surface of the paper from producing dark blurs.
Set up XSane for batch scanning (one selection over each two-page spread), get a pipeline going (disassembly → face up → face down → reassembly), and eventually create 34 images named Scan-??.jpg. They’re in color, although it matters only for the rust stains around the staple holes, with the contrast stretched enough to make them mostly B&W.
Somehow, Pickett printed / cut half the sheets slightly off-kilter, so I rotated them -1° rotation to re-align the text. To simplify plucking the rotated pages out of the image, composite the spread atop a blank white background:
for i in $(seq -w 3 2 33) ; do composite -compose atop Scan-$i.jpg -size 2200x1400 -geometry +100+100 canvas:white -rotate -1 Comp-$i.jpg ; done
Rather than thinking too hard, do exactly the same thing to the other pages without rotation:
for i in $(seq -w 2 2 34) ; do composite -compose atop Scan-$i.jpg -size 2200x1400 -geometry +100+100 canvas:white -rotate 0 Comp-$i.jpg ; done
Each scanned image has two pages, so crop it into two files with names corresponding to the actual page numbers:
for i in $(seq 2 2 34) ; do convert -crop 960x1240+1050+110 Comp-$i.jpg Crop-$(( $i - 1 )).jpg ; done
for i in $(seq 3 2 34) ; do convert -crop 960x1240+130+110 Comp-$i.jpg Crop-$(( $i - 1 )).jpg ; done
for i in $(seq 3 2 33) ; do convert -crop 960x1240+1050+110 Comp-$i.jpg Crop-$(( 66 - $i )).jpg ; done
for i in $(seq 2 2 32) ; do convert -crop 960x1240+110+110 Comp-$i.jpg Crop-$(( 66 - $i )).jpg ; done
Fix the single-digit pages to simplify globbing later on:
rename 's/-/-0/' Crop-[1-9].jpg
A bit of tedious fixup for some truly misaligned sheets produced images with slightly different sizes, so composite all of them onto slightly larger backgrounds to avoid screwing up the PDF conversion:
mkdir Final
for f in Crop* ; do composite -compose atop $f -size 1000x1300 -geometry +10+10 canvas:white -Final/$f ; done
Then jam them into a PDF for convenience:
cd Final
convert Crop-C[12].jpg Crop-[0-6]*.jpg Crop-C[34].jpg "Pickett 110-ES Circular Slide Rule Manual.pdf"
You can print it six-up to a sheet to produce text just about the same size as the original manual. If you omit (blank) cover pages 2, 67, and 68, the whole thing fits neatly on 11 sheets of paper.
Someone with better facilities and more attention to detail can surely produce a better-looking result, but this will be better than nothing.
This appeared while we uprooted a row of forsythia along the north border:
Brass hose fitting vs lawnmower
Although FOD has killed a good share of my lawn mowers and blades over the decades, this happened long before my administration and I can’t take credit for the precision targeting.
One of the moles aerating the ground around here ran out of steam beside the garden:
Mole – dorsal
It has wonderfully soft velvety fur!
Flipping it over:
Mole – ventral
A closeup of its digging paws and gnawing teeth:
Mole – ventral paws – teeth
Those choppers seem overqualified for a diet of earthworms, but I suppose they know what they’re doing.
We left it in as-found condition, ready for recycling …
[Update: The consensus seems to be it’s a vole or shrew, not a mole. It’d be the biggest vole I’ve ever seen and “large shrew” seems oxymoronic, but the teeth are diagnostic. ]
Our CVS blood pressure meter (a relabeled Microlife unit) ran its pump for a few seconds this morning, gave up, and spat out Err 3, which translates into “Inflation of the cuff takes too long”. Not surprising, as the motor wasn’t running.
The AA alkaline cell quartet has plenty of mojo and no corrosion, but the motor doesn’t even turn over. The display is fine and the pressure release valve clicks, so it’s not completely dead.
This unit is sufficiently old to have the compelling advantage of transferring data through a USB (mini-B) connection, rather than a Bluetooth link through some sketchy Internet cloudy Android app, so it’s worth at least a look inside. Four screws and some internal snaps along the sides hold the case together; it’s a surprisingly easy teardown.
The business side of the PCB looks good:
CVS Blood Pressure Monitor – PCB
The various wires and solder joints for the “high current” parts look OK, although the wires likely don’t go all the way through the PCB:
CVS Blood Pressure Monitor – PCB detail
Q4 and Q5 look like they switch the compressor pump motor and pressure-release valve. D3 and D4 should tamp down the inductive energy, but they look like they’re in series with the outputs. Yes, the Valve wires are both black.
The motor has a foam vibration isolation wrap, which is a nice touch. Although you can’t see them well, all its wires & solder joints look like they’re in good shape:
CVS Blood Pressure Monitor – pump
The hose sticking out toward you plugs into the black right-angle fitting in the lower right corner of the picture. It’d help to have smaller fingers than mine, but I managed to get the hose off and on the fitting with only minor muttering.
Seeing nothing obviously wrong, I installed the same batteries, poked the switch to start a measurement, and the motor ran fine. Of course, the measurement failed because the cuff & pressure sensor weren’t connected.
Connect the hose, plug in the cuff & wrap it around my arm, poke the button, and everything works fine.
Reassemble everything and it still works fine.
I still think there’s a bad wire or solder joint in there somewhere, so this delightful “repair” can’t possibly last very long …