Ed Nisley's Blog: Shop notes, electronics, firmware, machinery, 3D printing, laser cuttery, and curiosities. Contents: 100% human thinking, 0% AI slop.
The cables with their tidy terminations make it a little neater, but all this stuff really needs a permanent home:
Stepper motor – first motion
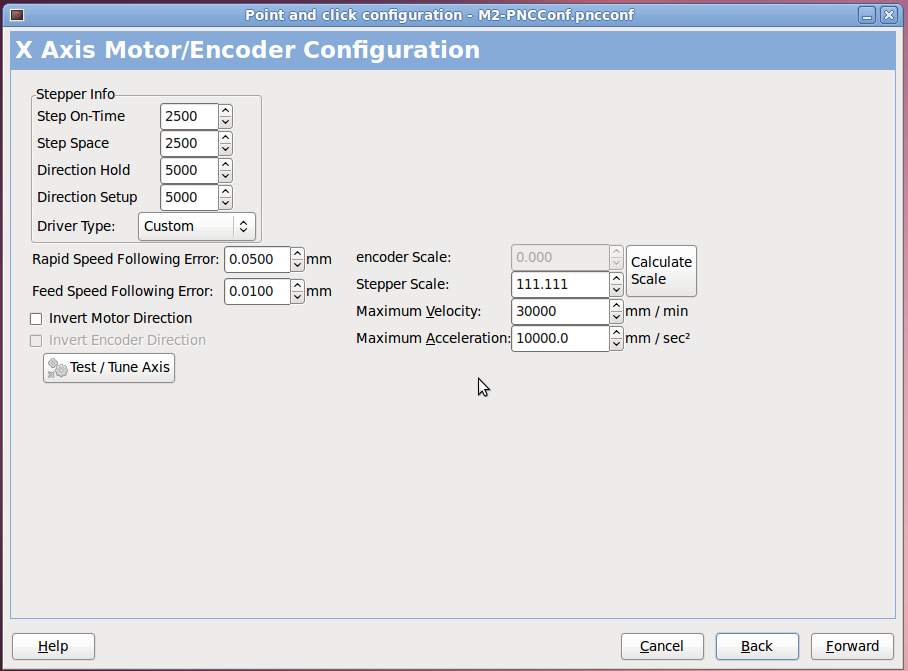
I used the LinuxCNC PNCConf utility to define a minimal system with little more than the X axis parameters filled in:
PNCConf – X Axis
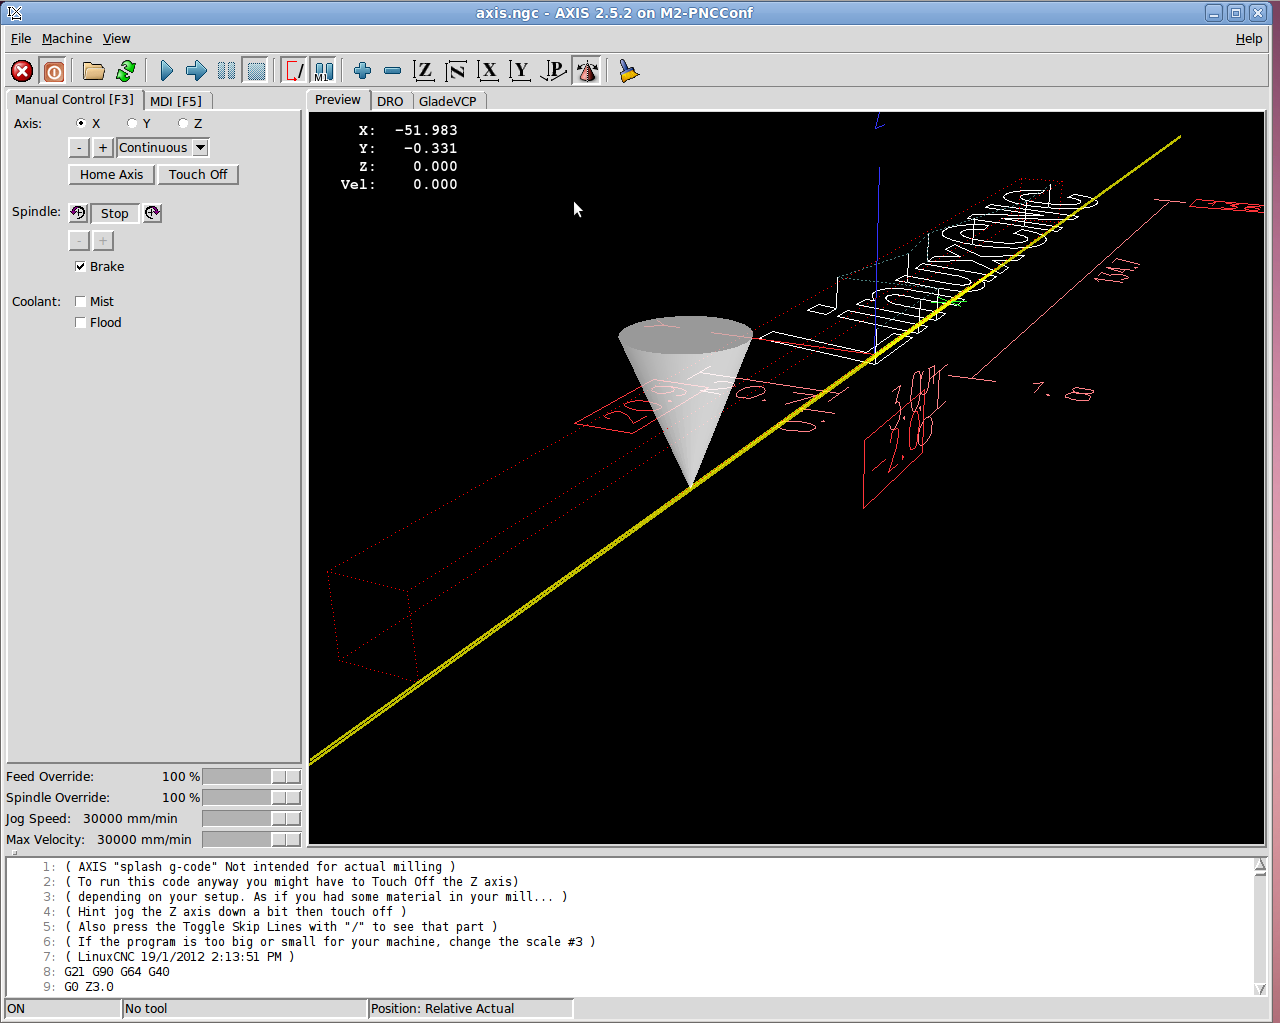
Then I could jog the stepper motor using the Axis UI:
7i76 – First Motion
And it worked!
Actually, it didn’t. The first motion instantly tripped a Following Error, so I bumped those values up a bit. Then I fiddled with accelerations and speeds and suchlike. Then I adjusted the Axis defaults to not be so nose-pickin’ slow. And then it Just Worked.
Not much to show, but at least I know the whole LinuxCNC to 5i25 to 7i76 to M542 to motor chain functions pretty much as it should, which is worth knowing. From here on out, it’s a matter of fine tuning…
Both the Mesa 7i76 and the M542 stepper driver boards use Phoenix-style pluggable screw terminals that simplify the connections: just strip the wires, jam them into the holes, and tighten the screw. That works great in an industrial situation where the equipment gets wired up once and stays that way forever, but I expect that I’ll be doing far too much twiddling… which means the stripped wire ends will fray and shed strands across the boards.
So, while wiring up a stepper motor, I tried soldering the wires to several different terminals I have lying around, just to see how they work.
The M542 stepper driver brick shows the assortment:
M542 Stepper Driver Wiring
On the far left, the four stepper wires end in right-angle PCB pins harvested from surplus connectors. This didn’t work nearly as well as I’d like, simply because the pins are entirely too bulky. I’m not sure quite how the bricks will be arranged, but I think a right-angle connection won’t work well at all.
The field power from the 24 VDC supply arrives on some (cheap) 18 AWG speaker zip cord, terminated in straight-line PCB pins. Those worked better, but they do stick out a goodly amount. Methinks the right thing to do with larger wire is just solder the strands together, clean the end, and not bother with pins. That’s not so good for strain relief (it concentrates at the end of the soldered strands), but, with some tubing added, maybe it’ll be Good Enough.
The 26 AWG input wires from the 7i76 terminate in turret pins originally intended for PCB terminations or test points, back in the day when you (well, I) could actually see such things; I have a bag of 1000 that I’ve been chewing away at for a while. I think these wires are simply too small for the screw terminals, so they really need a pin of some sort and I like the way the turret pins work. The heatstink tubing provides a bit of strain relief, which always comes in handy.
The two stray wires will eventually go to the “Enable” input. It turns out that these bricks defaults to Enabled with no input signal, so you cannot depend on a wiring fault disabling the motor: a broken Enable wire enables the drive output. This seems flat-out dumb, but I suppose there’s some planet on which it makes sense.
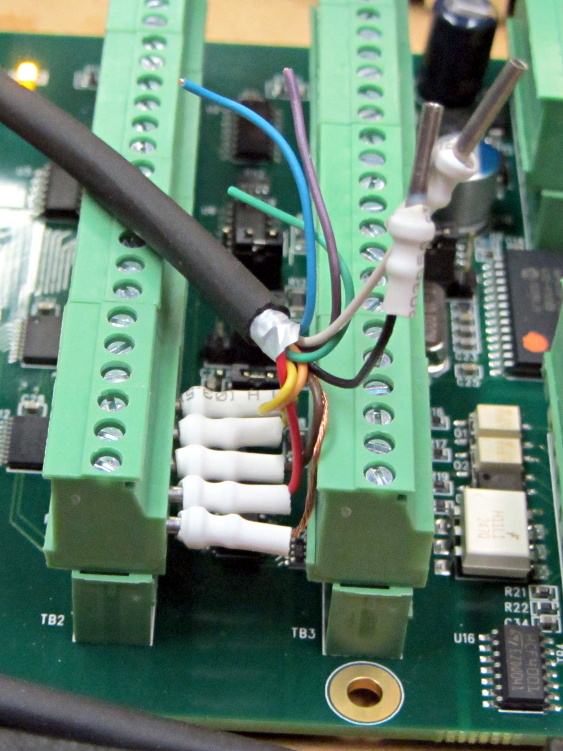
I snipped a bunch of 3/8 inch (call it 10 mm) lengths of tubing, but that turns out to be slightly too long for the 7i76 terminal layout:
Mesa 7i76 Wiring
So the next iteration must be a bit shorter.
Yes, you can get commercial crimp pin terminations; search eBay for crimp insulated terminal pins, some of which are curving around the planet even as I type. They won’t fit into the tight confines of the 7i76, but they should be better for the M542 bricks. The smallest size fits 22 through 16 AWG wires, so my tiny cable wires may need some steroids to bulk ’em up.
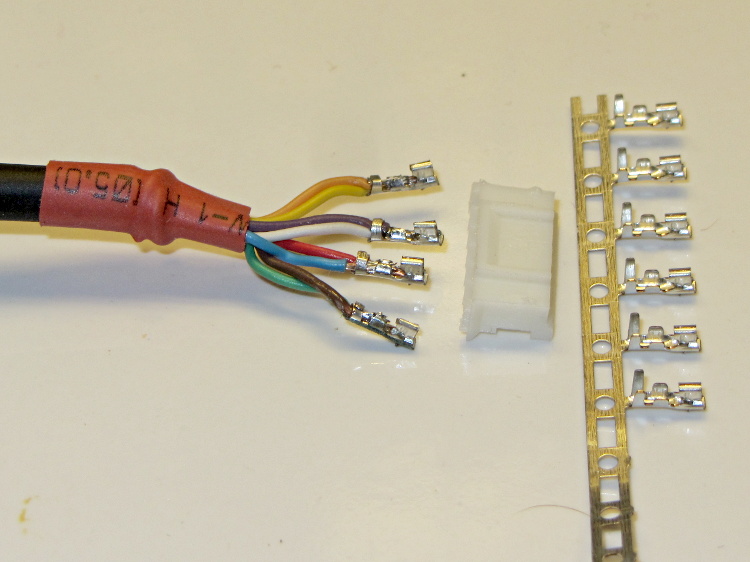
On the stepper motor end of the cable, I picked up a bunch of JST connectors and crimp pins. Unfortunately, the proper crimp tool runs into the hundreds of dollars, even from the usual eBay suppliers, and I really don’t have that much need for those pins. So I just soldered wires from the cable to the pins and mashed them down with needle nose pliers:
Stepper wiring – soldered JST pins
The alert reader will notice an egregious wire color coding faceplant. I made a corresponding blunder on the other end and nobody will ever know. Next time, maybe I’ll get it right.
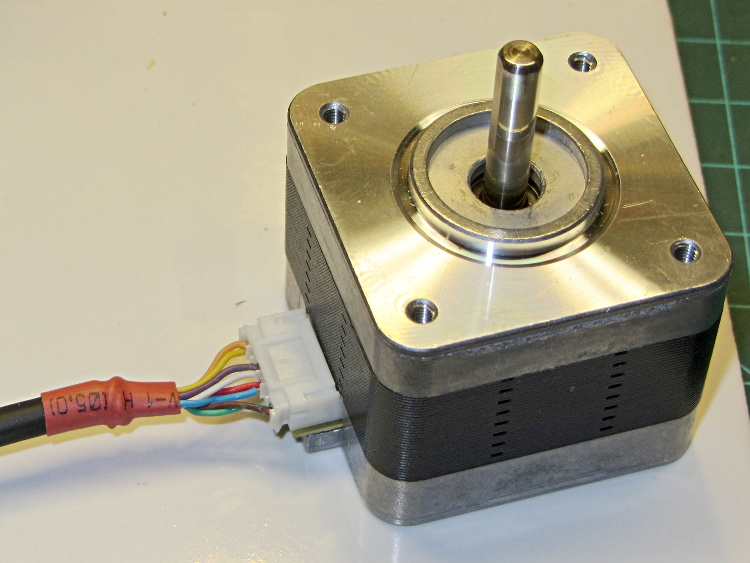
That makes for a nice connection at the motor:
Stepper wiring – connector in place
The thin black cable has nine 26 AWG conductors that I’m doubling up for the motors. In round numbers, 26 AWG stranded has about 120 mΩ/m resistance, so two in parallel work out to 60 mΩ/m. Assuming a meter of cable between the driver and the motor, a 1 A winding current will drop 120 mV along the way and dissipate 1/8 W, which seems defensible. It’s obviously Good Enough for signal wiring.
It is most definitely not good enough for, say, the heaters.
The motivation for using that cable: it’s thin and super-flexy, not the rigid cylinder you get with larger conductors. Plus, I have a huge supply of the stuff… it originally served as RS-232 cable, with molded connectors on each end of a 30 foot length, with four such cables assembled into a super-cable with nylon padding yarn laid inside a protective outer sheath. Must have cost a fortune to the original buyer; decades ago I got three or five of the assemblies and have been harvesting cable ever since.
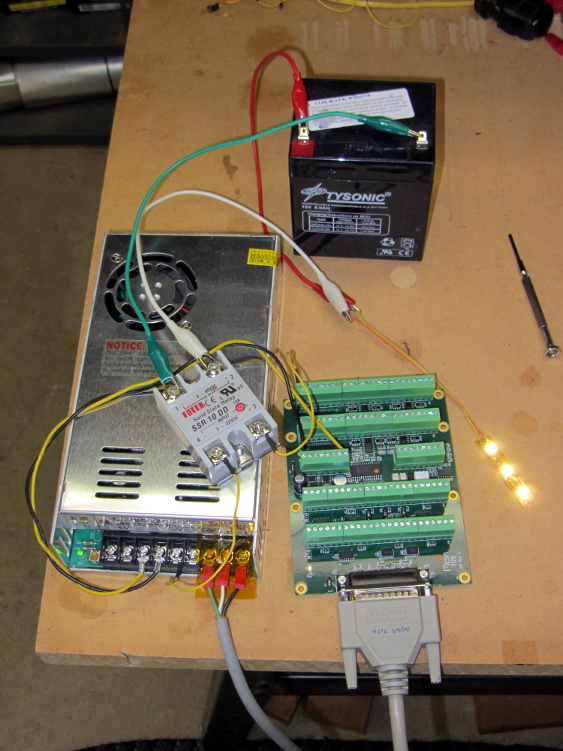
I intend to use solid-state relays to control things like extruder and platform heaters, so I wired a Fotek SSR-10 DD to the same output bit as the First Light test, with a random 12 V SLA battery providing power for the LED strip:
Mesa 7i76 with Fotek DC-DC SSR
Nothing groundbreaking, but it’s always nice to confirm these things.
Note that the SSR must have a DC output, not the more common AC output, to control DC power. In effect, a DC-DC SSR is just an up-armored power FET with an optically isolated gate terminal.
Dan reports that the Fotek SSRs have just about exactly the internal build quality you’d expect for a cheap product from halfway around the planet. Although the specs would have you believe they operate from a 5 VDC source, that may not be the case. The 7i76 output pins switch the +24 VDC field power to the SSR, so it’s firmly turned on.
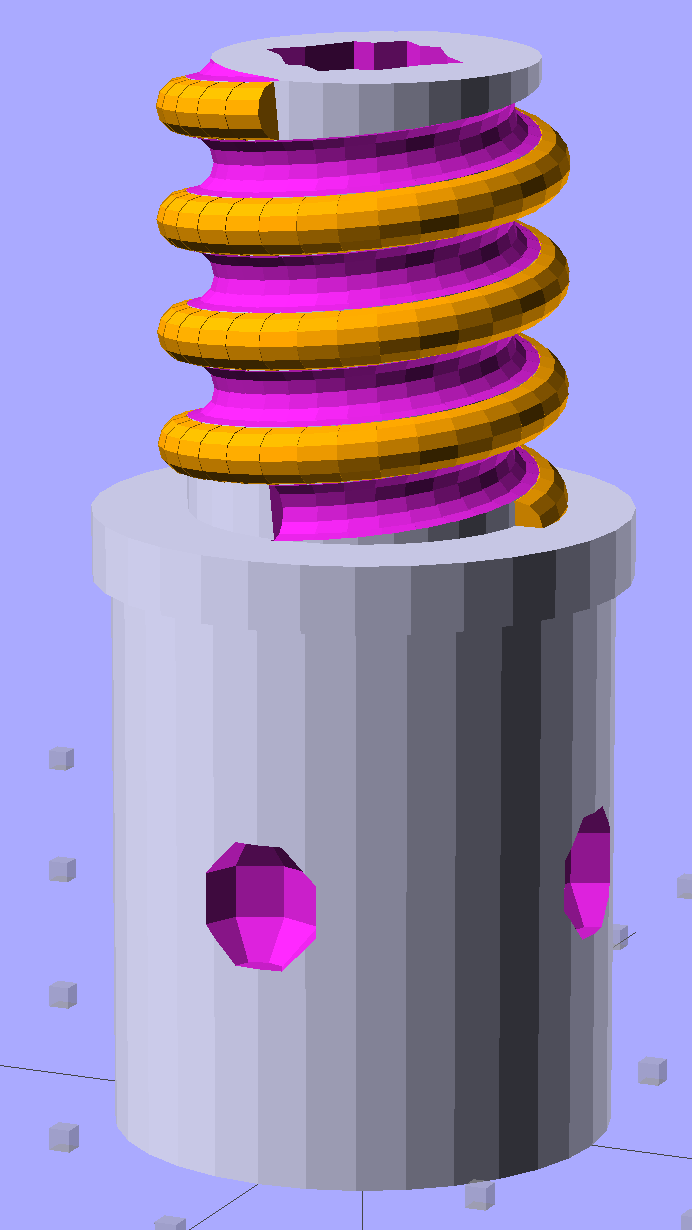
Although I don’t need another threaded plug, the most recent OpenSCAD version can handle a model including the thread dedendum:
Broom Handle Screw – full thread – solid model
This hyper-close view (as always, clicky for more dots) shows the problem: the region where the addendum and dedendum meet at the pitch cylinder consists of a bazillion tiny faces:
Broom Handle Screw – full thread – detail
The previous version simply couldn’t handle that many elements, but the new version has a parameter that I tweaked (to 100,000), allowing it to complete the rendering. Compiling to a solid model requires about 45 minutes, most of which probably involves those unprintably small facets.
The thread elements now taper slightly in the downhill direction, so that each quasi-cylinder nests cleanly inside the next to avoid the tiny slivers that stuck out of the joints in the previous model.
And the new Slic3r version (from GitHub) has better internal support for those indentations around the base, which means that AC vent plug might be build-able, too.
The OpenSCAD source code, with a few tweaks to nest the thread cylinders and properly locate the dedendum:
// Broom Handle Screw End Plug
// Ed Nisley KE4ZNU June 2013

//- Extrusion parameters must match reality!
//  Print with 2 shells and 3 solid layers

HoleWindage = 0.2;

Protrusion = 0.1;			// make holes end cleanly

//----------------------
// Dimensions

PostOD = 22.3;				// post inside metal handle
PostLength = 25.0;

FlangeOD = 24.0;			// stop flange
FlangeLength = 3.0;

PitchDia = 15.5;			// thread center diameter
ScrewLength = 20.0;

ThreadFormOD = 2.5;			// diameter of thread form
ThreadPitch = 5.0;

BoltOD = 7.0;				// clears 1/4-20 bolt
BoltSquare = 6.5;			// across flats
BoltHeadThick = 3.0;

RecessDia = 6.0;			// recesss to secure post in handle

OALength = PostLength + FlangeLength + ScrewLength;

$fn=8*4;					// default cylinder sides

echo("Pitch dia: ",PitchDia);
echo("Root dia: ",PitchDia - ThreadFormOD);
echo("Crest dia: ",PitchDia + ThreadFormOD);

Pi = 3.14159265358979;

//----------------------
// Useful routines

// Wrap cylindrical thread segments around larger plug cylinder

module CylinderThread(Pitch,Length,PitchDia,ThreadOD,PerTurn=32) {

CylFudge = 1.02;				// force overlap

    RotIncr = 1/PerTurn;
    PitchRad = PitchDia/2;

    Turns = Length/Pitch;
    NumCyls = Turns*PerTurn;

    ZStep = Pitch / PerTurn;

    HelixAngle = atan(Pitch/(Pi*PitchDia));
    CylLength = CylFudge * (Pi*(PitchDia + ThreadOD) / PerTurn) / cos(HelixAngle);

	for (i = [0:NumCyls-1]) {
		assign(Angle = 360*i/PerTurn)
			translate([PitchRad*cos(Angle),PitchRad*sin(Angle),i*ZStep])
				rotate([90+HelixAngle,0,Angle])
					cylinder(r1=ThreadOD/2,
							r2=ThreadOD/(2*CylFudge),
							h=CylLength,
							center=true,$fn=12);
	}
}

module PolyCyl(Dia,Height,ForceSides=0) {			// based on nophead's polyholes

  Sides = (ForceSides != 0) ? ForceSides : (ceil(Dia) + 2);

  FixDia = Dia / cos(180/Sides);

  cylinder(r=(FixDia + HoleWindage)/2,
           h=Height,
	   $fn=Sides);
}

module ShowPegGrid(Space = 10.0,Size = 1.0) {

  Range = floor(50 / Space);

	for (x=[-Range:Range])
	  for (y=[-Range:Range])
		translate([x*Space,y*Space,Size/2])
		  %cube(Size,center=true);

}

//-------------------
// Build it...

ShowPegGrid();

difference() {
    union() {
        cylinder(r=PostOD/2,h=PostLength);
        cylinder(r=PitchDia/2,h=OALength);
        translate([0,0,PostLength])
            cylinder(r=FlangeOD/2,h=FlangeLength);
        color("Orange")
        translate([0,0,(PostLength + FlangeLength)])
            CylinderThread(ThreadPitch,(ScrewLength - ThreadFormOD/2),PitchDia,ThreadFormOD);
    }

    translate([0,0,-Protrusion])
        PolyCyl(BoltOD,(OALength + 2*Protrusion),6);
    translate([0,0,(OALength - BoltHeadThick)])
        PolyCyl(BoltSquare,(BoltHeadThick + Protrusion),4);

    translate([0,0,(PostLength + FlangeLength + ThreadFormOD/2)])
		rotate(-90)
        CylinderThread(ThreadPitch,ScrewLength,PitchDia,ThreadFormOD);

	for (i = [0:90:270]) {
		rotate(i)
			translate([PostOD/2,0,PostLength/2])
				sphere(r=RecessDia/2,$fn=8);
	}
}
Rather than start with the stepper, I wired an LED and resistor between output bit 07 and Field Ground at the power supply:
Mesa 5i26-7i76 with LED
It’s worth noting that the terminals labeled GND on TB2 and TB3 are isolated from the Field GROUND terminal on TB1. When Mesa says “isolated power supply”, that’s exactly what they mean.
The digital output bits connect +24 VDC Field Power to the load, which should then connect to Field GROUND. I picked a good-looking 5 V panel LED from the pile, simply because it had wires soldered to it from a previous life, and put a 1 K resistor in series to drop the other 19 V.
Then you start up HAL, load the Mesa drivers, and twiddle the bit:
The thread runs with a 1 ms period, mostly because it’s convenient. The .read and .write pins transfer data from and to the 5i25 FPGA each time the thread runs; if you forget those, nothing happens.
Setting the output bit true activates the output bit, turns on the MOSFET driver, and connects the terminal to Field Power = 24 VDC. The 7i76 outputs do not sink current, they source it.
A journey of a thousand 3D printed objects starts with a single LED…
The watchdog timer ought to be connected to something more fragile and UI-related than the main thread, but I haven’t figured out how to do that yet.
First up: note that Mesa uses a capital I (“eye”) in the part numbers, a decision which they’ve surely had plenty of time to regret, as many common fonts exhibit nearly identical capital-I and digit-1 characters.
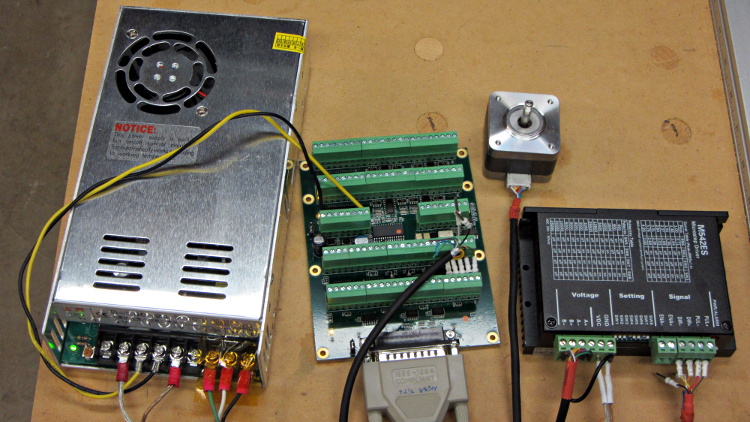
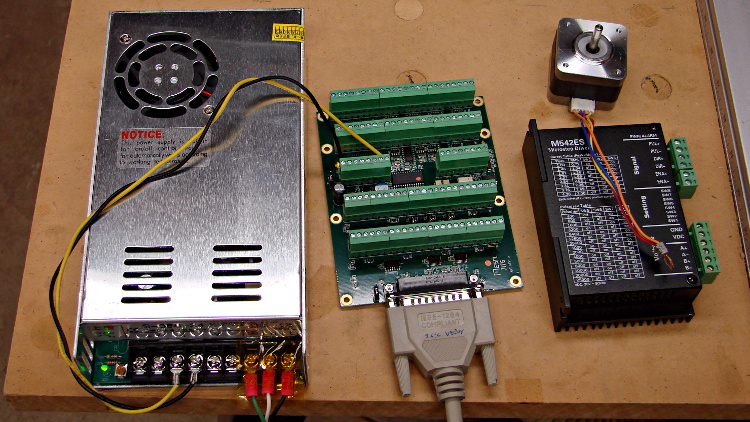
The 7i76 connects to the 5i25 in the PC through a Mesa-supplied IEEE-1284 printer cable. I cobbled up a 24 VDC power supply (which I’ll eventually be using for the M2 motors) to provide “field power” and let the firmware identify the daughtercard:
24 VDC power supply – Mesa 7i76 – stepper driver
The default jumper positions on both cards work fine.
The unconnected stepper driver brick and motor will serve as a simple demonstration after I’ve built the Eagle parts to represent the 5i25’s components. However, the first demo of any new hardware must be a blinking LED.
To see whether the cards work and are detected, load the hostmot2 drivers in halrun and dump all the information:
halrun
halcmd: loadrt hostmot2
halcmd: loadrt hm2_pci
halcmd: show all
Loaded HAL Components:
ID      Type  Name                                      PID   State
     5  RT    hm2_pci                                         ready
     3  User  halcmd5010                                 5010 ready
     4  RT    hostmot2                                        ready

Component Pins:
Owner   Type  Dir         Value  Name
     5  bit   OUT         FALSE  hm2_5i25.0.7i76.0.0.input-00
     5  bit   OUT         FALSE  hm2_5i25.0.7i76.0.0.input-00-not
     5  bit   OUT         FALSE  hm2_5i25.0.7i76.0.0.input-01
... snippage ...
     5  bit   OUT         FALSE  hm2_5i25.0.7i76.0.0.input-30
     5  bit   OUT         FALSE  hm2_5i25.0.7i76.0.0.input-30-not
     5  bit   OUT         FALSE  hm2_5i25.0.7i76.0.0.input-31
     5  bit   OUT         FALSE  hm2_5i25.0.7i76.0.0.input-31-not
     5  bit   IN          FALSE  hm2_5i25.0.7i76.0.0.output-00
     5  bit   IN          FALSE  hm2_5i25.0.7i76.0.0.output-01
... snippage ...
     5  bit   IN          FALSE  hm2_5i25.0.7i76.0.0.output-15
     5  bit   IN          FALSE  hm2_5i25.0.7i76.0.0.spindir
     5  bit   IN          FALSE  hm2_5i25.0.7i76.0.0.spinena
     5  float IN              0  hm2_5i25.0.7i76.0.0.spinout
     5  s32   OUT             0  hm2_5i25.0.encoder.00.count
     5  s32   OUT             0  hm2_5i25.0.encoder.00.count-latched
     5  bit   I/O         FALSE  hm2_5i25.0.encoder.00.index-enable
     5  bit   IN          FALSE  hm2_5i25.0.encoder.00.latch-enable
     5  bit   IN          FALSE  hm2_5i25.0.encoder.00.latch-polarity
     5  float OUT             0  hm2_5i25.0.encoder.00.position
     5  float OUT             0  hm2_5i25.0.encoder.00.position-latched
     5  s32   OUT             0  hm2_5i25.0.encoder.00.rawcounts
     5  s32   OUT             0  hm2_5i25.0.encoder.00.rawlatch
     5  bit   IN          FALSE  hm2_5i25.0.encoder.00.reset
     5  float OUT             0  hm2_5i25.0.encoder.00.velocity
     5  s32   OUT             0  hm2_5i25.0.encoder.01.count
... snippage ...
     5  float OUT             0  hm2_5i25.0.encoder.01.velocity
     5  bit   OUT         FALSE  hm2_5i25.0.gpio.000.in
     5  bit   OUT          TRUE  hm2_5i25.0.gpio.000.in_not
     5  bit   OUT         FALSE  hm2_5i25.0.gpio.001.in
... snippage ...
     5  bit   OUT          TRUE  hm2_5i25.0.gpio.032.in
     5  bit   OUT         FALSE  hm2_5i25.0.gpio.032.in_not
     5  bit   OUT          TRUE  hm2_5i25.0.gpio.033.in
     5  bit   OUT         FALSE  hm2_5i25.0.gpio.033.in_not
     5  bit   IN          FALSE  hm2_5i25.0.led.CR01
     5  bit   IN          FALSE  hm2_5i25.0.led.CR02
     5  u32   IN     0x00000000  hm2_5i25.0.sserial.channel
     5  u32   IN     0x00000000  hm2_5i25.0.sserial.parameter
     5  u32   IN     0x00000000  hm2_5i25.0.sserial.port
     5  u32   OUT    0x00000000  hm2_5i25.0.sserial.port-0.fault-count
     5  u32   OUT    0x00000000  hm2_5i25.0.sserial.port-0.port_state
     5  bit   IN           TRUE  hm2_5i25.0.sserial.port-0.run
     5  bit   IN          FALSE  hm2_5i25.0.sserial.read
     5  u32   OUT    0x00000000  hm2_5i25.0.sserial.state
     5  u32   IN     0x00000000  hm2_5i25.0.sserial.value
     5  bit   IN          FALSE  hm2_5i25.0.sserial.write
     5  bit   IN          FALSE  hm2_5i25.0.stepgen.00.control-type
     5  s32   OUT             0  hm2_5i25.0.stepgen.00.counts
     5  float OUT             0  hm2_5i25.0.stepgen.00.dbg_err_at_match
     5  float OUT             0  hm2_5i25.0.stepgen.00.dbg_ff_vel
     5  float OUT             0  hm2_5i25.0.stepgen.00.dbg_pos_minus_prev_
     5  float OUT             0  hm2_5i25.0.stepgen.00.dbg_s_to_match
     5  s32   OUT             0  hm2_5i25.0.stepgen.00.dbg_step_rate
     5  float OUT             0  hm2_5i25.0.stepgen.00.dbg_vel_error
     5  bit   IN          FALSE  hm2_5i25.0.stepgen.00.enable
     5  float IN              0  hm2_5i25.0.stepgen.00.position-cmd
     5  float OUT             0  hm2_5i25.0.stepgen.00.position-fb
     5  float IN              0  hm2_5i25.0.stepgen.00.velocity-cmd
     5  float OUT             0  hm2_5i25.0.stepgen.00.velocity-fb
     5  bit   IN          FALSE  hm2_5i25.0.stepgen.01.control-type
... snippage ...
     5  float OUT             0  hm2_5i25.0.stepgen.09.velocity-fb
     5  bit   I/O         FALSE  hm2_5i25.0.watchdog.has_bit

... snippage ...

Parameters:
Owner   Type  Dir         Value  Name
     5  bit   RW          FALSE  hm2_5i25.0.7i76.0.0.output-00-invert
     5  bit   RW          FALSE  hm2_5i25.0.7i76.0.0.output-01-invert
... snippage ...
     5  bit   RW          FALSE  hm2_5i25.0.7i76.0.0.output-15-invert
     5  u32   RO     0x100000A5  hm2_5i25.0.7i76.0.0.serial-number
     5  bit   RW          FALSE  hm2_5i25.0.7i76.0.0.spindir-invert
     5  bit   RW          FALSE  hm2_5i25.0.7i76.0.0.spinena-invert
     5  float RW            100  hm2_5i25.0.7i76.0.0.spinout-maxlim
     5  float RW              0  hm2_5i25.0.7i76.0.0.spinout-minlim
     5  float RW            100  hm2_5i25.0.7i76.0.0.spinout-scalemax
     5  u32   RO     0x00000000  hm2_5i25.0.7i76.0.0.status
     5  bit   RW          FALSE  hm2_5i25.0.encoder.00.counter-mode
     5  bit   RW           TRUE  hm2_5i25.0.encoder.00.filter
     5  bit   RW          FALSE  hm2_5i25.0.encoder.00.index-invert
     5  bit   RW          FALSE  hm2_5i25.0.encoder.00.index-mask
     5  bit   RW          FALSE  hm2_5i25.0.encoder.00.index-mask-invert
     5  float RW              1  hm2_5i25.0.encoder.00.scale
     5  float RW            0.5  hm2_5i25.0.encoder.00.vel-timeout
     5  bit   RW          FALSE  hm2_5i25.0.encoder.01.counter-mode
... snippage ...
     5  float RW            0.5  hm2_5i25.0.encoder.01.vel-timeout
     5  bit   RW          FALSE  hm2_5i25.0.gpio.000.invert_output
     5  bit   RW          FALSE  hm2_5i25.0.gpio.000.is_opendrain
     5  bit   RW          FALSE  hm2_5i25.0.gpio.001.invert_output
... snippage ...
     5  bit   RW          FALSE  hm2_5i25.0.gpio.030.invert_output
     5  bit   RW          FALSE  hm2_5i25.0.gpio.030.is_opendrain
     5  bit   RW          FALSE  hm2_5i25.0.gpio.030.is_output
     5  bit   RW          FALSE  hm2_5i25.0.io_error
     5  s32   RO              0  hm2_5i25.0.pet_watchdog.time
     5  s32   RW              0  hm2_5i25.0.pet_watchdog.tmax
     5  s32   RO              0  hm2_5i25.0.read.time
     5  s32   RW              0  hm2_5i25.0.read.tmax
     5  s32   RO              0  hm2_5i25.0.read_gpio.time
     5  s32   RW              0  hm2_5i25.0.read_gpio.tmax
     5  u32   RW     0x00000001  hm2_5i25.0.sserial.port-0.fault-dec
     5  u32   RW     0x0000000A  hm2_5i25.0.sserial.port-0.fault-inc
     5  u32   RW     0x000000C8  hm2_5i25.0.sserial.port-0.fault-lim
     5  u32   RW     0x00077FE2  hm2_5i25.0.stepgen.00.dirhold
     5  u32   RW     0x00077FE2  hm2_5i25.0.stepgen.00.dirsetup
     5  float RW              1  hm2_5i25.0.stepgen.00.maxaccel
     5  float RW              0  hm2_5i25.0.stepgen.00.maxvel
     5  float RW              1  hm2_5i25.0.stepgen.00.position-scale
     5  u32   RW     0x00000000  hm2_5i25.0.stepgen.00.step_type
     5  u32   RW     0x00077FE2  hm2_5i25.0.stepgen.00.steplen
     5  u32   RW     0x00077FE2  hm2_5i25.0.stepgen.00.stepspace
     5  u32   RW     0x00077FE2  hm2_5i25.0.stepgen.01.dirhold
... snippage ...
     5  u32   RW     0x00077FE2  hm2_5i25.0.stepgen.09.stepspace
     5  u32   RW     0x004C4B40  hm2_5i25.0.watchdog.timeout_ns
     5  s32   RO              0  hm2_5i25.0.write.time
     5  s32   RW              0  hm2_5i25.0.write.tmax
     5  s32   RO              0  hm2_5i25.0.write_gpio.time
     5  s32   RW              0  hm2_5i25.0.write_gpio.tmax

Parameter Aliases:
 Alias                                      Original Name

Exported Functions:
Owner   CodeAddr  Arg       FP   Users  Name
 00005  fc3d2582  f1b17000  NO       0   hm2_5i25.0.pet_watchdog
 00005  fc3c49dc  f1b17000  YES      0   hm2_5i25.0.read
 00005  fc3c4906  f1b17000  YES      0   hm2_5i25.0.read_gpio
 00005  fc3c4936  f1b17000  YES      0   hm2_5i25.0.write
 00005  fc3c48d6  f1b17000  YES      0   hm2_5i25.0.write_gpio

... snippage ...
Extract the 5i25 pin assignments from the kernel log file: dmesg | grep hm2
I am, perhaps, easily confused, but it took me a while to realize those pin assignments apply to the 5i25 back panel and on-card connectors, not the 7i76 daughter card’s screw terminals. Yeah, it says 5i25 right there in the dump, but …
The Fine 7i76 Manual gives the 7i76 pin connections, so they’re not even slightly hidden. [sigh]
I planned to use an old Dell Inspiron 531S AMD desktop for the LinuxCNC installation, but it turned out to have terrible interrupt latency, despite fiddling with all the available BIOS settings and video drivers. Mostly, it ran fine, but would occasionally burp up a millisecond-long latency spike for no apparent reason. So it’s now on the harvest / recycle heap.
A new-to-me off-lease Dell Optiplex 760 Core 2 Duo in the SDT (Small Desktop Tower) configuration has similar latency numbers:
Optiplex 760 latency – isolcpu 1
What’s important here is that the latency remains rock-solid stable at those numbers. Contrary to my experience with the D520 and D525 Atoms, isolating one CPU for the real-time tasks didn’t make any noticeable difference, but it’s running that way because the overall performance isn’t a problem.
Latency around 20 μs is near the upper limit for successful software step generation at any reasonable pace; the LinuxCNC description has more details. In round numbers, running the M2 at 500 mm/s needs a 40 kHz step rate in 1/16 microstep mode = a 25 μs period, which means 20 μs of jitter wouldn’t work well at all. Which is why I’m using Mesa FPGA card to get hardware step generation: it makes such problems Go Away.
The Optiplex arrived with Windows Vista Business preinstalled; it dates back to mid-2009. I used System Rescue CD to shrink the Windows partition, added a few more, then installed LinuxCNC direct from the CD image (based on Ubuntu 10.04 LTS) and Xubuntu 13.04. The latter serves as a general-purpose installation for times when I don’t need LinuxCNC, because 10.04 is pretty much obsolete for anything other than real-time control.
Digression 1: Yes, 10.04 LTS. TheRTAI project hasn’t released the patches that will slip the real-time kernel under the stock 3.x Linux kernel: LinuxCNC remains stuck at 10.04 LTS. Those changes have been coming Real Soon Now for quite a while; as with most Open Source projects, they could use more manpower and money. This isn’t a problem, as LinuxCNC is used for motion control, not a general-purpose operating system.
The SDT case has room for two PCI cards and one PCI-E video card, so I installed the dual-head video card that couldn’t handle the U2711 monitor’s dual-DVI connection (although I’m using only DVI Output 1) and a Mesa 5i25. The middle “card” is actually a tiny PCB connected to a ribbon cable that brings out a second serial port (remember serial ports?) and what could be either or both of a PS2 keyboard or mouse connection (remember PS/2?).
Optiplex 760 SDT – dual DVI – serial – 5i25
The back panel has a parallel printer port (which may come in handy for something) and a serial port, although you’re expected to have USB mice and keyboards these days. The front panel even has a floppy drive…
Digression 2: LinuxCNC does not require a parallel printer port; this seems to be a common misconception among folks who don’t actually know how it works. The Mesa 5i25 FPGA card with a 7i76 step-direction daughter board provides high-resolution timing for five axes, rotary encoder inputs, a bunch of buffered digital I/O bits, a watchdog timer, plus various other useful odds and ends, all behind handy screw terminals.
The Optiplex 760 has on-board VGA-class video that would also work fine, but the monitor I’m using has its VGA input connected to the box driving the Sherline mill and an unused DVI input. Having that dual-DVI monitor card lying around, I figured I could attach the same monitor to both systems and just poke the monitor’s input section button; I’ve found KVM switches unreliable in this application.
The usual setup preps the system for public-key SSH on a nonstandard port, sets up the NFS mounts, and tweaks this-and-that: it’s running just fine.
Digression 3: SSH kvetches when you swap server boxes at the same IP address, as well it should. If you’re foolish enough to have two separate Linux installs on the same box with the same IP, SSH reminds you every time you boot the other distro…