The Smell of Molten Projects in the Morning

Ed Nisley's Blog: Shop notes, electronics, firmware, machinery, 3D printing, laser cuttery, and curiosities. Contents: 100% human thinking, 0% AI slop.

Category: Machine Shop

Mechanical widgetry

  • LED Garage Light: FAIL

    LED Garage Light: FAIL

    A three-wing garage light Came With The House in the basement, where it served to light up the foot of the stairs. One of the 48 LEDs in one of the three LED panels began flickering brightly and, over the course of a few days, that panel went dark. The next time I turned on the basement lights, all three panels were dark.

    Removing the screw-in lamp base:

    LED Garage Light - overview
    LED Garage Light – overview

    A closer look inside:

    LED Garage Light - detail
    LED Garage Light – detail

    The middle of the PCB is darker than the perimeter, with the darkest area around the black inductor standing up near the green filter cap. A blackened lump on the solder side that may have once been an SMD resistor evidently served as a fuse.

    All three panels are in wired parallel, so the failed panel reduced the load on the supply, thus increasing the voltage on the remaining two panels enough to kill them off, too.

    Worth noting: the black wire goes to the positive side of the LED panel. You can just see the + mark near the two connectors on the left side.

    I wired each panel to a lashed-up bridge rectifier with a widowmaker extension cord from a variable transformer controlling the voltage, but none of them responded to the 150 VDC peaks: they’ve suffered Real Death.

    The electronics landed in the recycling box and the three heatsinks are now in the Big Box o’ Heatsinkery, where they will surely come in handy for something.

    The surprisingly readable 09/21 date code on the case says it’s just over four years old. Similar garage lights now run around ten bucks each and I wouldn’t expect them to last more than a couple of years.

  • Unbending Furnace Zone Drain Valve Knobs

    Unbending Furnace Zone Drain Valve Knobs

    For reasons long lost in our house’s history, two of the zone drain valves on the furnace apparently had something heavy fall on them from a great height:

    Furnace zone drain valve - bashed knob
    Furnace zone drain valve – bashed knob

    I was certain those knobs were made of brittle pot metal and would snap when I tried to un-bend them.

    My weight bench being next to the furnace, I had plenty of opportunities to contemplate conjuring a 3D printed knob similar to the dumbbell nuts, but with the undamaged central part of the metal knob engaging the valve stem to avoid thermoplastic shapes around hot metal.

    One can, of course, buy replacement knobs, but where’s the fun in that?

    Expecting to cut most of the knob away, I applied needle-nose pliers to the rim and, mirabile dictu, not only did it not immediately snap, I managed to un-bend it into a reasonable facsimile of its original shape.

    It wasn’t just beginner’s luck, because I did it again:

    Furnace zone drain valve - unbent knobs
    Furnace zone drain valve – unbent knobs

    Both of those knobs have obvious fractures and aren’t the prettiest things you’ll ever see, but they don’t get a lot of use. I can say, without fear of contradiction, they’re in fine shape.

    However, I’m certain those valves will need new washers if I ever turn those knobs …

  • MTD Snowblower Muffler Bolt Bracket: Redux

    MTD Snowblower Muffler Bolt Bracket: Redux

    Nearly eight years ago I replaced the OEM bracket locking the two long bolts on the MTD snowblower’s muffler to prevent them from loosening from vibration:

    Snowblower muffler installed
    Snowblower muffler installed

    Well, it happened again, with the top bolt working its way out, so those little crimps weren’t enough. As before, I watched it happen and saw the bolt fall sizzling into the snow.

    Verily it is written: When brute force isn’t working, you’re not using enough of it:

    MTD Snowblower muffler
    MTD Snowblower muffler

    I renewed the Never-Seez on both bolts and, for good measure, dabbed some on the third bolt securing the muffler bracket atop the engine block.

    That machine really vibrates!

  • Punched Cards: Paper Matters

    Punched Cards: Paper Matters

    Using different card colors makes it easy to find your program deck in the Comp Center’s output bins:

    Punched Cards - paper color vs smoke stains
    Punched Cards – paper color vs smoke stains

    The smoke stains on the bottom orange card came from the same LightBurn settings used with the purple (violet?) and blue (teal?) cards: 400 mm/s, 35% power, and assist air enabled.

    The conventional wisdom is that you *do not* use assist air while engraving, to avoid pushing the smoke / soot down onto the material, and I’ve generally followed that rule. Apparently evaporating holes in the other colors doesn’t generate much smoke and I had no reason to notice the air was enabled.

    The upper orange card differs from the lower one only in having the assist air turned off, so I have definitely learned my lesson!

    Readers of long memory will recall the dual-path assist air setup that pushes 2 l/m through the nozzle when the LightBurn layer has AIR disabled, specifically to keep smoke out of the nozzle and away from the lens; that gentle breeze doesn’t push smoke into the paper.

    FWIW, that’s why I run a set of test cards before I do anything fancy for the first time.

  • Crosman BB Bottle Cap

    Crosman BB Bottle Cap

    Mary made a frame weight to maintain tension on the fabric in the HQ Sixteen longarm:

    Longarm fabric frame weight
    Longarm fabric frame weight

    It’s a sturdy cloth tube filled with BBs, somewhat like a grossly overweight door snake (a.k.a. draft stopper).

    The bottle of 6000 copper-plated steel BBs arrived in an overwrap bag of the sort Amazon applies to all bottled products. This was a Good Thing, because the scrap of packing paper did nothing to cushion the bottle in an otherwise empty box. The bag contained most of the shattered cap and a few BBs, with escapees rattling around inside the box and surely a few left along the way.

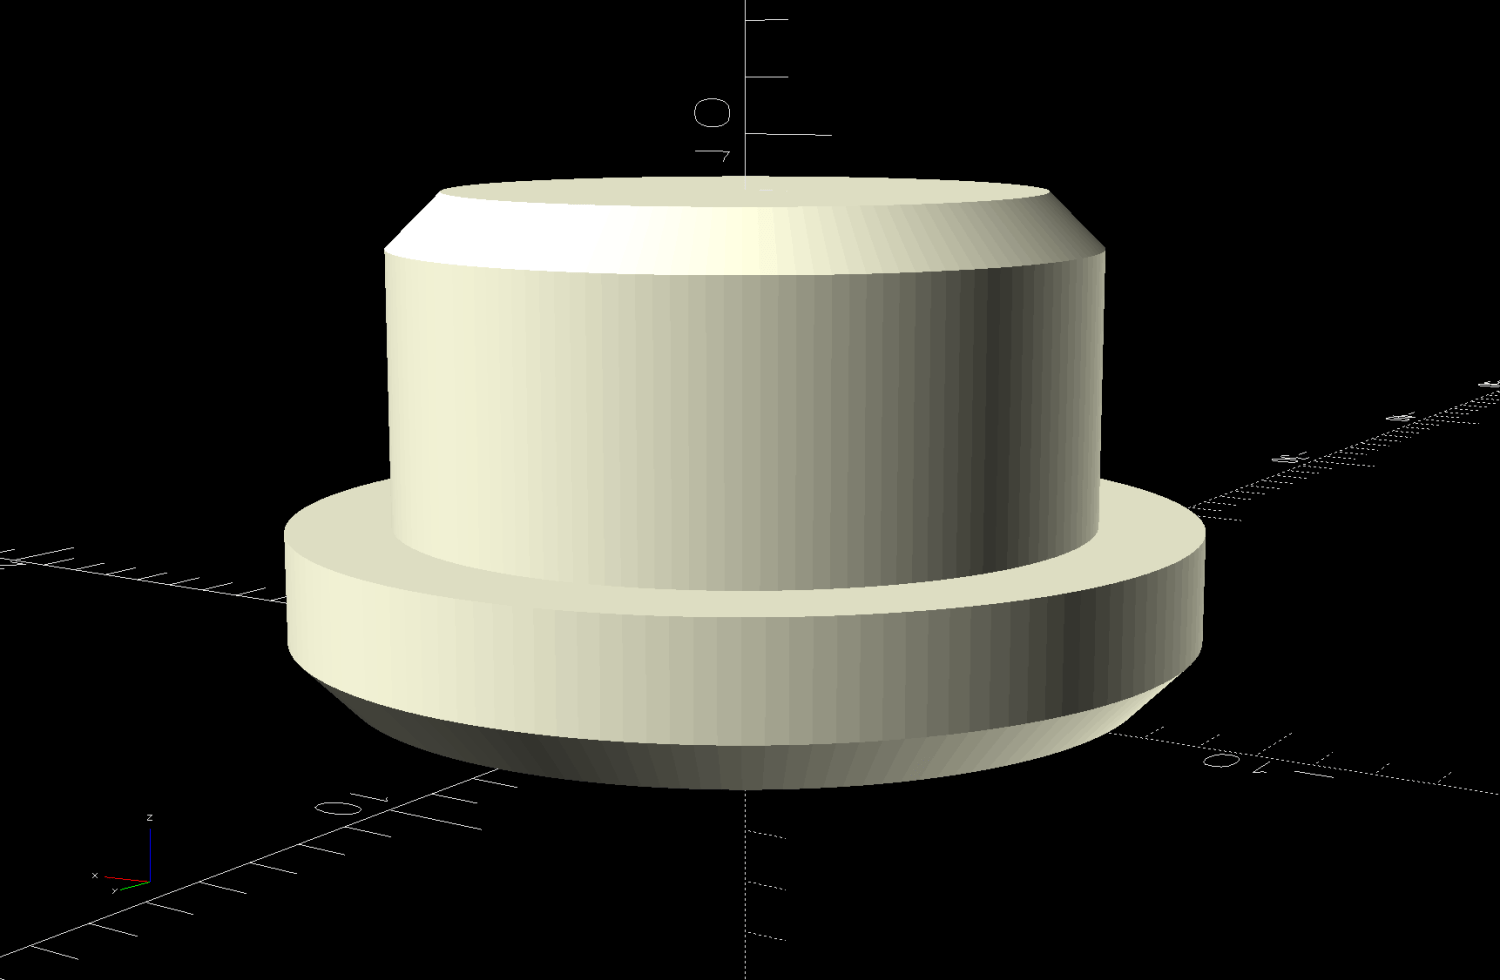
    So I conjured a replacement cap from TPU:

    Crosman BB bottle cap - solid model - build view
    Crosman BB bottle cap – solid model – build view

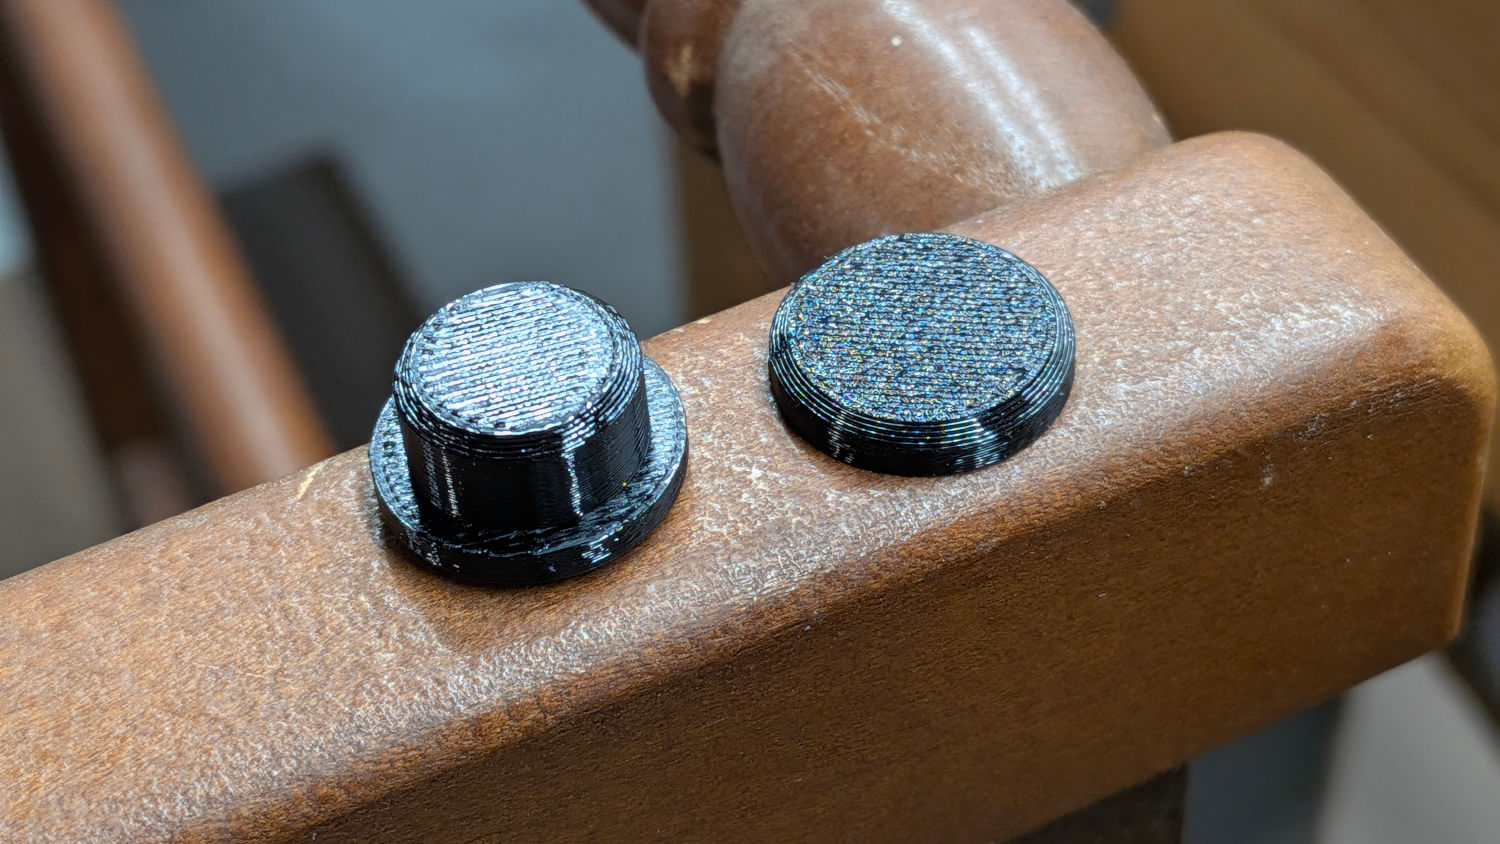
    It fits around the bottle neck and snaps onto the spout just like the original:

    Crosman BB bottle cap
    Crosman BB bottle cap

    Except this one is unbreakable.

    The strapless TPU cap was a quick test to verify the fiddly shoulder snapping onto the bottle snout:

    Crosman BB bottle cap - solid model - section view
    Crosman BB bottle cap – solid model – section view

    As it turned out, we poured all 6000 BBs (minus those few lost-in-transit strays) into the cloth tube, but the bottle will come in handy for something someday.

    The OpenSCAD source code as a GitHub Gist:

    // Crosman BB bottle cap
    // Ed Nisley – KE4ZNU
    // 2026-02-22
    include <BOSL2/std.scad>
    Layout = "Show"; // [Show,Build,Section]
    /* [Hidden] */
    ID = 0;
    OD = 1;
    LENGTH = 2;
    HoleWindage = 0.2;
    Protrusion = 0.1;
    NumSides = 6*3*4;
    $fn=NumSides;
    WallThick = 1.0;
    Heights = [1.2,2.0,13.0,WallThick]; // for easy tweaking
    Ring = [34.5,39,WallThick];
    Strap = [70.0,5.0,Ring[LENGTH]];
    CapOAL = sum(Heights);
    //—–
    // Conjure it with magic numbers
    module Cap() {
    tube(Heights[0],id=16.8,wall=WallThick+0.6/2,anchor=BOTTOM) position(TOP)
    tube(Heights[1],id=17.4,wall=WallThick,anchor=BOTTOM) position(TOP)
    tube(Heights[2],id1=17.4,id2=14.0,wall=WallThick,anchor=BOTTOM) position(TOP)
    cyl(Heights[3],d=14.0+2*WallThick,rounding2=WallThick/2,anchor=BOTTOM) position(BOTTOM)
    cuboid(Strap,anchor=BOTTOM+LEFT) position(BOTTOM+RIGHT)
    left(1.0)
    tube(Ring[LENGTH],id=Ring[ID],od=Ring[OD],anchor=BOTTOM+LEFT);
    }
    //—–
    // Build things
    if (Layout == "Show") {
    Cap();
    }
    if (Layout == "Section") {
    difference() {
    Cap();
    down(Protrusion)
    cuboid(2*Strap.x,anchor=BOTTOM+LEFT+FRONT);
    }
    }
    if (Layout == "Build") {
    back(Strap.x/2)
    zrot(90)
    up(CapOAL)
    yrot(180)
    Cap();
    }
  • HQ Sixteen: Fabric Rod Bearings

    HQ Sixteen: Fabric Rod Bearings

    The rods (a.k.a. tubes or poles) holding & guiding the quilt top / batting / backing fabric on Mary’s HQ Sixteen longarm quilting machine span the eleven feet of the table:

    HQ Sixteen - table overview
    HQ Sixteen – table overview

    The two end plates are 1/4 inch steel plate with four punched holes for the rods / tubes, which look remarkably like EMT. The machine is two decades old and Mary is (at least) the third owner, so it’s no surprise the rods long ago wore through the white powder-coat paint on the plates and, during the course of a long quilting project, now deposit black dust on the table.

    Black dust not being tolerable near a quilt-in-progress, Mary asked for an improvement.

    The tube OD is 28.7 mm (so it’s probably 1 inch EMT) and the plate hole ID is 31.2 mm (likely a scant 1-¼ inch punch), leaving barely a millimeter of clearance all around. I wanted to make a bearing from suitably slippery Delrin / acetal, but figured 3D printed PETG would suffice for at least while.

    The proper term is “bushing“, because it has no moving parts:

    Rod Bearing Sleeve - solid model - show view
    Rod Bearing Sleeve – solid model – show view

    On the right side, the bushing rim must fit between the sprockets and the plate:

    HQ Sixteen rod - right front
    HQ Sixteen rod – right front

    The spring-loaded pin holding the tube in place (visible on the inside bottom) sets the maximum length:

    HQ Sixteen rod - right outer
    HQ Sixteen rod – right outer

    The left side has none of that, so I made the bushings a little longer:

    HQ Sixteen rod - left inner
    HQ Sixteen rod – left inner

    The left-side bushings will need a better design should normal back-and-forth sliding push them out of place.

    A touch of silicone grease around the plate holes makes those bushings / bearings turn sooo smooth.

    The OpenSCAD source code as a GitHub Gist:

    // Bearing sleeve for HQ Sixteen table rods
    // Ed Nisley – KE4ZNU
    // 2026-02-20
    include <BOSL2/std.scad>
    Layout = "Show"; // [Show,Build]
    /* [Hidden] */
    ID = 0;
    OD = 1;
    LENGTH = 2;
    HoleWindage = 0.2;
    Protrusion = 0.1;
    NumSides = 8*3*2*4;
    $fn=NumSides;
    Rod = [25.0,28.7,100.0]; // very short rod
    Sleeve = [Rod[OD] + 0.3,31.2 – 0.2,9.0]; // LENGTH = overall
    Rim = [Sleeve[ID],Sleeve[OD] + 6.0,0.6];
    IdlerLength = 15.0;
    NumSlots = 2*4;
    Kerf = 1.0;
    Gap = 5.0;
    module Bearing(oal) {
    difference() {
    union() {
    tube(oal,id=Sleeve[ID],od=Sleeve[OD],anchor=BOTTOM);
    tube(Rim[LENGTH],id=Rim[ID],od=Rim[OD],anchor=BOTTOM);
    }
    for (a=[0:NumSlots-1])
    zrot(a*360/NumSlots)
    up(oal/4 + Rim[LENGTH])
    right(Sleeve[ID]/2)
    cuboid([Sleeve[OD],Kerf,oal],anchor=BOTTOM);
    }
    }
    //—–
    // Build things
    if (Layout == "Show") {
    color("Gray",0.5)
    xcyl(Rod[LENGTH],d=Rod[OD]);
    right(Rod[LENGTH]/3)
    yrot(90)
    Bearing(Sleeve[LENGTH]);
    left(Rod[LENGTH]/3)
    yrot(90)
    Bearing(IdlerLength);
    }
    if (Layout == "Build") {
    right(Rim[OD]/2 + Gap/2)
    Bearing(Sleeve[LENGTH]);
    left(Rim[OD]/2 + Gap/2)
    Bearing(IdlerLength);
    }
  • Punched Cards: Layered Apollo Eagle

    Punched Cards: Layered Apollo Eagle

    What with punching the Apollo 11 CSM source code into the cards, converting the mission’s eagle into a layered shape made some sense.

    The original Apollo 11 mission patch:

    Apollo 11 mission patch - rescaled
    Apollo 11 mission patch – rescaled

    After considerable faffing, a few of the fifteen layers look like this in GIMP:

    Apollo 11 Patch - eagle layers
    Apollo 11 Patch – eagle layers

    Each layer is a connected white region defining the cut perimeter, which will expose some part of the layer(s) below it in the stack. The small squares in the corners provide a bounding box to make all the layers snap to the same location.

    Then:

    • Select each layer’s shape + corner boxes with GIMP’s Color Select tool
    • Convert the selection to a path
    • Export paths as SVG files (all fifteen of them!)
    • Import SVGs into LightBurn & arrange neatly
    • Put outlines on a cut layer, corner squares on a tool layer
    • Burn each layer separately

    Testing the concept with packing paper looked surprisingly good:

    Apollo 11 Eagle - layer test piece
    Apollo 11 Eagle – layer test piece

    A few key layers on punched cards:

    Apollo 11 Eagle - card partial test piece
    Apollo 11 Eagle – card partial test piece

    The changes for each of those iterations required tweaking the original layer images to eliminate obvious-in-retrospect problems, recreating the SVG files, and importing into LightBurn. This is a relentlessly manual process.

    Then I ran a full-up test of all fifteen layers on cards punched with the Apollo source code.

    Cutting the head layers from face-down cards made them sufficiently white, although it’d be nice to have a different beak color and darker eyes :

    Apollo 11 Eagle patch - layer test - head
    Apollo 11 Eagle patch – layer test – head

    I must arrange the cards with text to put more holes in the wings, although too many will cause fragile feathers:

    Apollo 11 Eagle patch - layer test - wing
    Apollo 11 Eagle patch – layer test – wing

    The white tail should be also done with face-down cards, more holes, and the three-way joint between the cards shifted under the tail layers to its left:

    Apollo 11 Eagle patch - layer test - tail
    Apollo 11 Eagle patch – layer test – tail

    The feet and olive branch were a total faceplant, as successive layers did not register accurately enough to overlay the leaves:

    Apollo 11 Eagle patch - layer test - feet
    Apollo 11 Eagle patch – layer test – feet

    Not to mention those ug-u-lee claws.

    The wing layers need more rounding along their edges, perhaps with some thin cuts to emphasize the feathers.

    On the whole, though, I think it turned out well.

    Things to do:

    • Registration holes / pins up to the top layer
    • Remove speckles on all the layers
    • Arrange cards for more hole density where needed
    • Better glue application
    • Different card colors?