Ed Nisley's Blog: Shop notes, electronics, firmware, machinery, 3D printing, laser cuttery, and curiosities. Contents: 100% human thinking, 0% AI slop.
Unfortunately, reinforcing the USB Micro-B jack on the side of the LitUp LED Light Pad only delayed the inevitable: the light became erratic even without the slightest touch. The pad consists of three acrylic sheets glued together around the entire perimeter, so there’s no way to get access to the no-user-serviceable-parts within. Apparently, you’re supposed to just throw it out.
On the other paw, it’s already dead, so there’s nothing to lose:
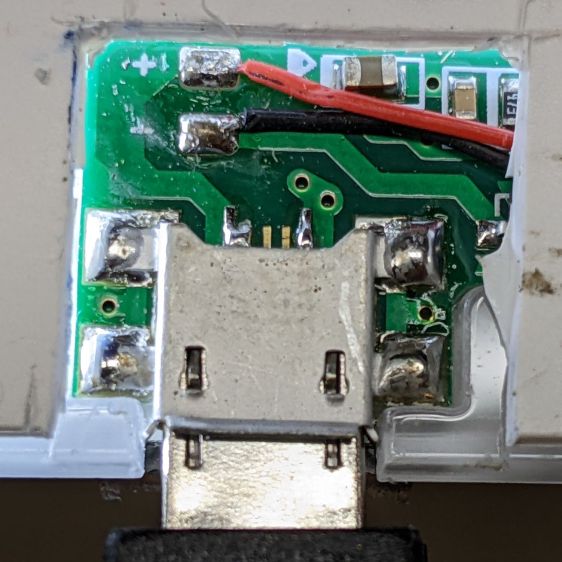
LitUp LED Light Pad – failed USB jack
A little deft razor knife work chopped through the rear sheet without doing any (more) damage to the PCB within. The LEDs can still be convinced to light, but the USB jack is definitely wrecked.
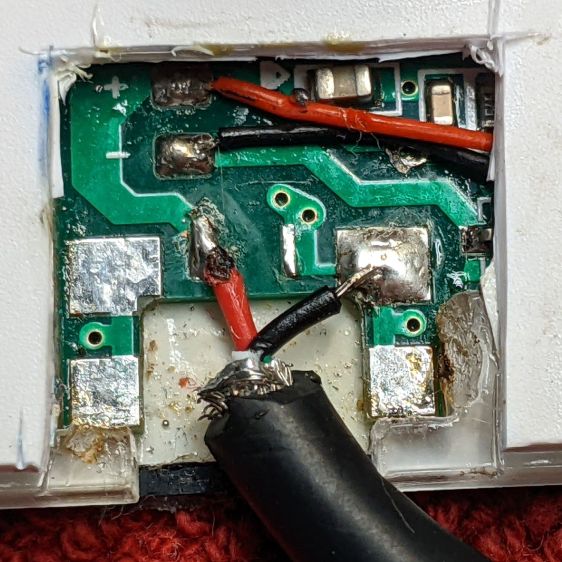
Applying some ChipQuik let me extract the jack without (too much) more damage. Rather than replace it, I just soldered a pigtail USB cable to the obvious PCB pads:
LitUp LED Light Pad – direct power wiring
If I’d noticed that little solder ball, I’d have removed it before filling the cavity with hot melt glue and squishing the cut-out piece of white acrylic in place.
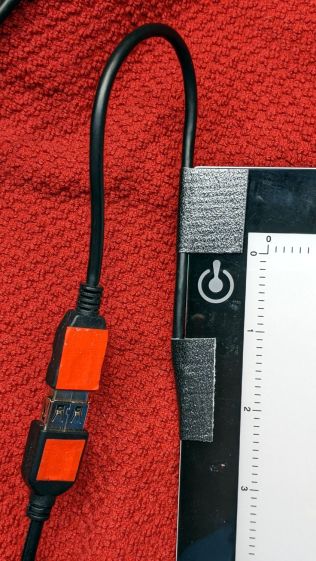
A little black duct tape should keep the wiring stable enough for the foreseeable future:
LitUp LED Light Pad – redirected cable
That was another (relatively) easy zero-dollar repair that should not be necessary.
In round numbers, the total capacity declined from 3.25 W·hr to 2.5 W·hr, which means a single battery can’t quite power the camera for the duration of our normal hour-long rides. I do not know what voltage trips the camera’s decision, but the batteries definitely shut down sooner.
So, based on their previous track record, I bought another quartet of Batmax batteries. Being that type of guy, I tested both the old (2020) and new (2022) sets:
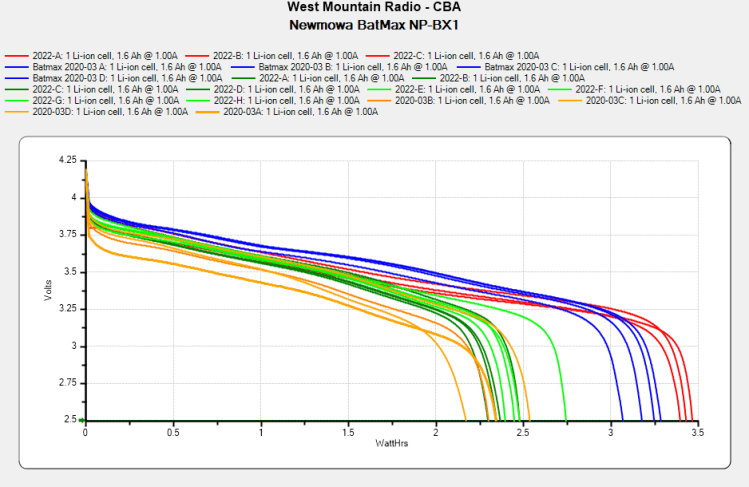
NP-BX1 – BatMax 2022 vs 2020 – used-new
The blue traces are the C/D batteries from the as-new tests back in early 2020, the green traces are C/D after two years of use, and the red traces are the “new” quartet after their first charge in the Official BatMax Charger.
It looks very much like BatMax is selling used batteries repackaged as new items, because they are indistinguishable from my used ones. They definitely are not the “Premium Grade A cells” touted in the description.
I returned them for a refund and sent the test results to BatMax; they sent “new replacements” even though I said I would not pay for any future shipments. The batteries had a slightly different wrapper, but the test results were still indistinguishable from used batteries. I offered to return the package and was told that would not be needed.
It seems three good batteries now cost about as much as four crap batteries, under the reasonable assumption chargers are essentially free.
Three batteries isn’t quite enough for my usual rotation and, for unknown reasons, one cannot buy only batteries, so in short order I will have two chargers and six batteries.
The consolidated test results:
NP-BX1 – Newmowa Batmax 2022 comparison
The color code:
Newmowa: red
BatMax 2020 new: blue
BatMax 2020 used: orange
BatMax 2022 new: green + lime
I stopped writing Amazon reviews after having a few detailed-writeups-with-graphs rejected for the usual unspecified reasons. As the Finn put it, “You wanna download, you know the access code already.”
At first we thought a mighty crunch in the morning meant the trash collection truck had dropped a garbage bin from a great height, but the sound of sirens and a myriad flashing lights revealed the true cause in our neighbor’s front yard:
NHR Crash – frontal view
The extent of the damage was more apparent from the road side:
The driver was walking around uninjured and the ambulance left quietly.
A day later, the trajectory became apparent:
NHR Crash – trajectory
The right side barely kissed the tree on the right, but the front wheel hooked the utility pole (that’s the new pole in the picture), snapped it off at ground level in addition to the usual break maybe ten feet up, and bounced a piece off the other tree:
NHR Crash – utility pole
I didn’t know you could shatter a cast aluminum alloy wheel, but the missing half of the outer face was lying amid the rather scrambled stone wall along driveway.
We’re reasonably sure we know the cause. Feel free to draw your own conclusions.
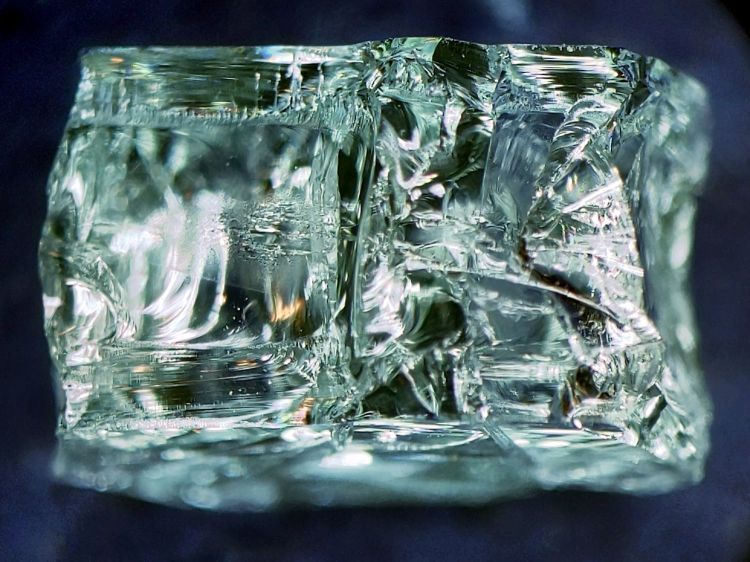
After the flatbed hauled away the car and everybody left, I harvested a few pounds of interesting debris from the lawn:
NHR Crash – tempered glass
It’s tempered glass from the driver-side windows, shattered into small chunks and barely hanging together in those sheets. Laminated windshield glass is entirely different stuff.
The smaller chunks glitter like jewels:
NHR Crash – tempered glass fragments
Obviously, the window had a bit of tint.
The smallest chunk, seen from its flat surface, shows the cuboid fragments:
NHR Crash – tempered glass fragment – front
A side view shows more complexity:
NHR Crash – tempered glass fragment – side
Tempering prevents a glass sheet from shattering into long knife-blade shards. Although the edges of the fragments are not keen, we are dealing with broken glass: they are sharp.
Broken tempered glass also sheds razor-edged flakes perfectly shaped to penetrate bike tires, although most roadside glass comes from ordinary beverage bottles. The tiniest flakes can make a mess of your eyes, so exercise at least some rudimentary shop safety practices.
Those slabs ought to be good for something, even if they fall apart at the slightest touch …
TIL: Muntin, which I’d always known was called a Mullion.
With that as preface, one of Mary’s quilting cronies lives in a very old house updated with vinyl windows sporting wood muntins arranged in a grille. The wood strips forming the grille end in plastic clips that snap into the sash, thereby holding the grill in place to make the window look more-or-less historically correct, while not being a dead loss as far as winter heating goes.
Time passed, sun-drenched plastic became brittle, and eventually enough clips broke that the grilles fell out. An afternoon quilting bee produced a question about the possibility of making a 3D printed clip, as the original manufacturer is either defunct or no longer offers that particular style of clip as a replacement part.
Well, I can do that:
Window Muntin Clips
The original is (obviously) the transparent injection-molded part in the upper left. The other two come hot off the M2’s platform, with the one on the right showing the support material under the sash pin.
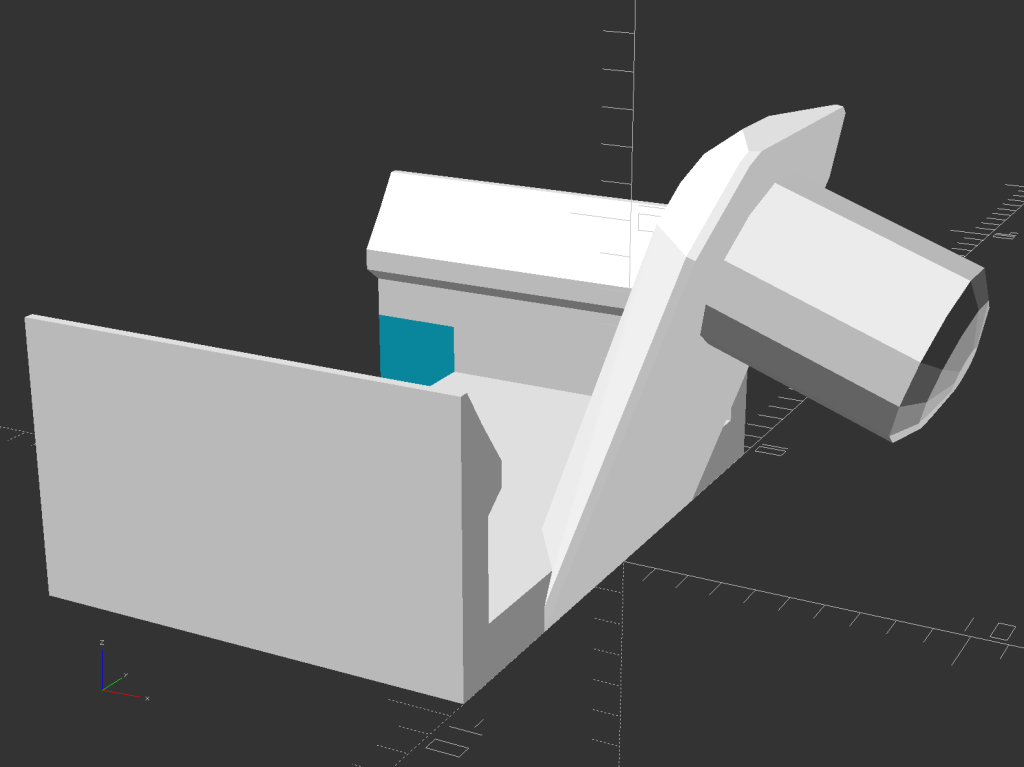
The solid model looks about like you’d expect:
Window Muntin Clip – solid model
There is obviously no way to build it without support material, so I painted the bottom facet of the sash pin with a PrusaSlicer support enforcer:
Window Muntin Clip – PrusaSlicer
The pin comes out slightly elongated top-to-bottom, but it’s still within the tolerances of the original part and ought to pop right into the sash. We’ll know how well it works shortly after the next quilting bee.
The doodle with useful measurements amid some ideas that did not work out:
This file contains hidden or bidirectional Unicode text that may be interpreted or compiled differently than what appears below. To review, open the file in an editor that reveals hidden Unicode characters.
Learn more about bidirectional Unicode characters
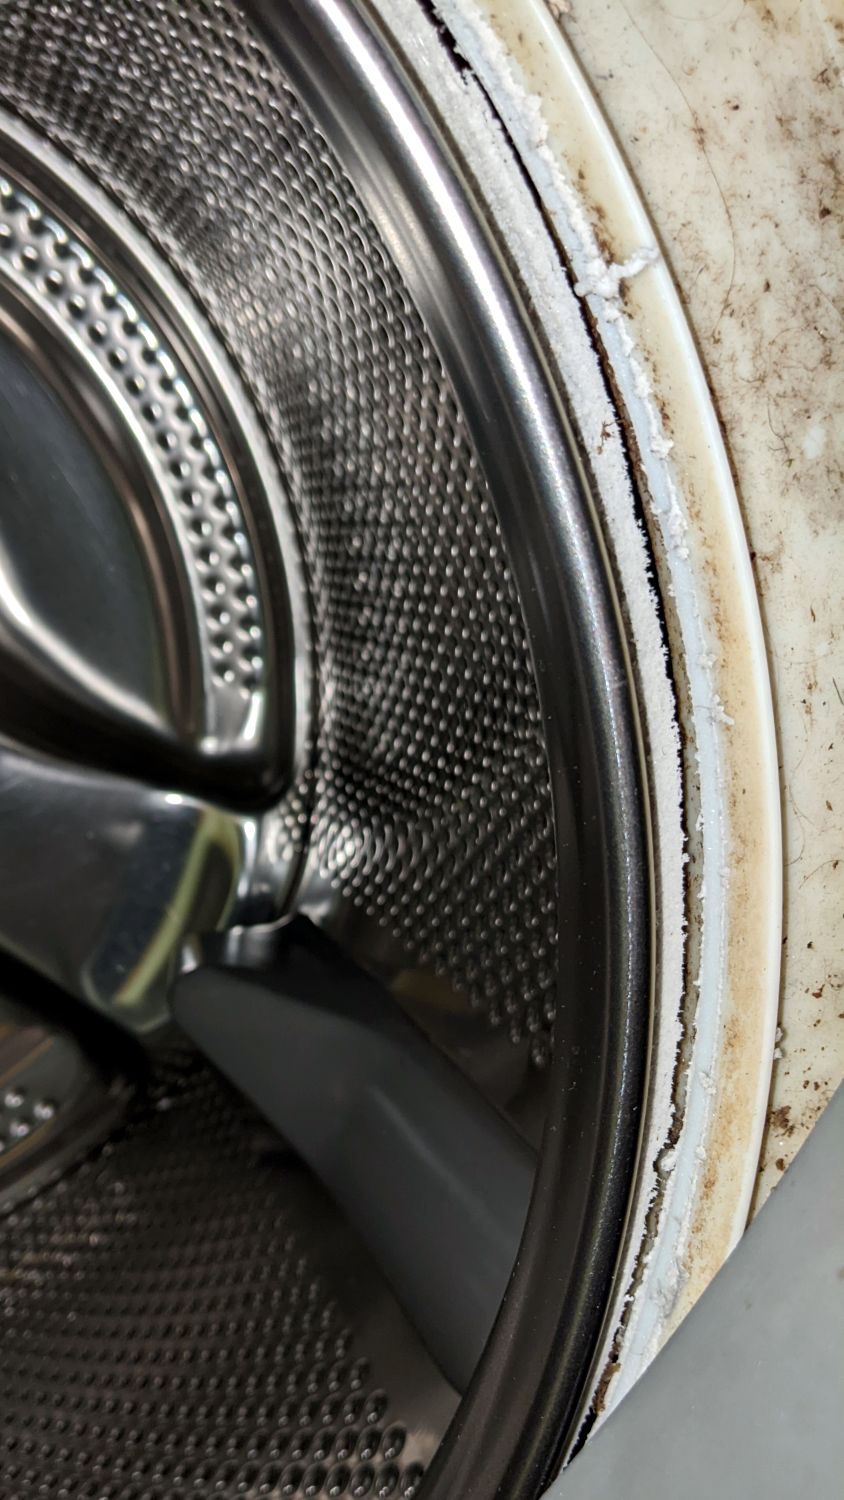
After eighteen years and one basket / tub replacement, our venerable Kenmore HE3 clothes washer has reached End of Life:
Kenmore washer – eroded tub A
Kenmore washer – eroded tub B
Kenmore washer – eroded tub C
I had looked in there (between the door gasket and the tub) to find any foreign objects making the horrible noise and again, perhaps a week later, when I replaced the shock absorbers, after which the corroded spider in the back finally broke enough to let the basket flop around continuously during the spin cycle and erode the tub rim.
In round numbers, we heard the first sign of trouble three weeks ago: a very loud, but only occasional, KLONK due to protrusions on the side of the basket or the fractured part of the spider on its back hitting indentations in the tub. The KLONK remained intermittent during half a dozen loads, until it became pretty much continuous.
We installed the washer in early 2004, replaced the tub and basket in 2010, and it’s now 2022: the first spider failed after six years and its replacement lasted twelve. After nearly two decades, the tub and basket are no longer available from the usual appliance part sources, so (even if I wanted to) I cannot repair the washer.
Another washer, also a front-loader, also highly rated, will arrive shortly. For the first time ever, we bought an Extended Service Plan good for five years. The alert reader will note the difference between the first failure and the length of the plan, but reviews of similar new machines suggest having Lemon Replacement coverage. In this situation, I am willing to pay for the talismanic effect of coverage that may never pay off, if that makes any sense.
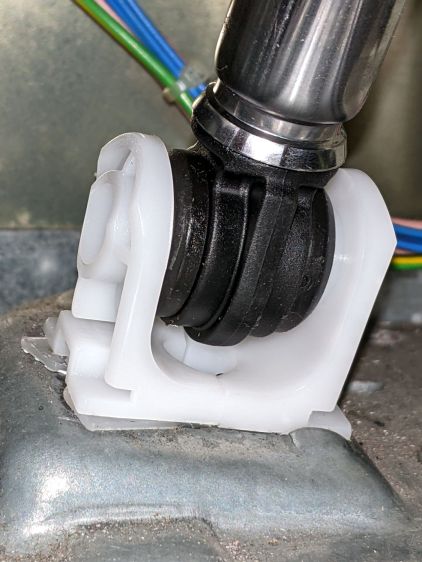
As part of diagnosing a Terrible Sound inside our two decade old washer, I replaced the OEM shock absorber struts with cheap knockoffs. Although it didn’t solve the problem (spoiler: another tub spider bites the dust), the experience may come in handy elsewhere.
The left rear (as seen from the front) shock stood in a pile of rust on the baseplate that came from a drip in the water feed nozzle to the detergent / bleach / whatever dispenser drawer. The affected parts are no longer available and I have never had any luck finding a replacement O-ring of the proper size, so I just pulled the nozzle out, ran a small bead of acrylic sealant around the O-ring, and squished it back in place:
Kenmore washer – dispenser nozzle seal
It’s the Y connection between the two black hoses, held in place on the dispenser by a relentless little clip. Release the two hose clamps, remove the hoses, pull it out, apply sealant, squish, reinstall in reverse order.
As for the shocks, don a pair of work gloves and turn the upper mount (on the tub) counterclockwise as you look along the shock. The tub has molded-in latches that make turning it the wrong way difficult, but not impossible.
With the shock loose, you can now try to turn the lower mounts counterclockwise as you look along the shock, but I had to deploy the BFW in very cramped quarters to get enough traction. This will likely wreck the little latches holding the mount in place, but you were going to replace it anyway.
The new left-rear latch snapped firmly into place:
Kenmore washer shock – left rear
Yes, that’s after I cleaned off as much of the rust as made sense.
The remaining three latches did not snap firmly into place, so I made shims to soak up the slop:
Kenmore washer shock – shim laser cut
They slip around the central pillar with clearance for the latches, although the thicker shim didn’t leave much engagement:
Kenmore washer shock – shim installed
They ranged from 0.8 mm down to 0.2, based entirely on feel, and I used PETG, LDPE, and polypropylene clamshell of the right thickness.
The left front got the thickest:
Kenmore washer shock – left front
Right front thinnest:
Kenmore washer shock – right front
And right rear in the middle:
Kenmore washer shock – right rear
The shims aren’t precisely lined up with the feet, because I couldn’t make that work out, but they definitely prevented the mounts from shaking in their boots during the spin cycle.
You will inevitably want to take the mounts off the shocks, which will prove surprisingly difficult. The two halves are identical, with triangular latches that snap together with no provision for release:
Kenmore washer shock – foot internals
Brute force applied with a small screwdriver may suffice, but don’t be surprised if strong words are required.
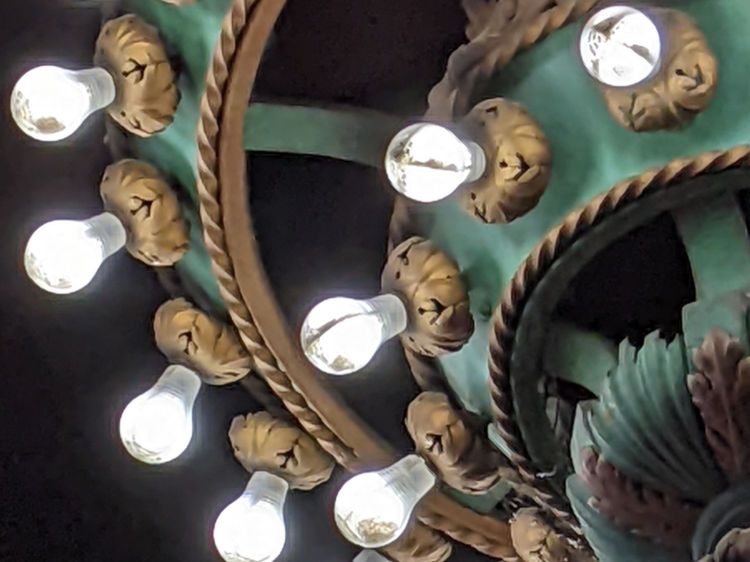
A rare trip to the Poughkeepsie Railroad Station provided an opportunity to check out the LED bulbs in the chandeliers:
The 108 bulbs had only one deader (lower left in chandelier C).
I have no way of knowing if they’re the same bulbs from six years ago, but the accumulation of bugs / dust / crud inside the (what I would expect to be) sealed envelopes suggests they’ve been hanging there for quite a while:
Pok RR Station – Chandelier B – detail
The dark cruciform patches might come from failed LED chip strings, although the bulbs all had the same eyeballometric brightness. The patches all seem to have a hard lower edge, so we may be seeing shadows from dust accumulating atop the chips on the PCB.