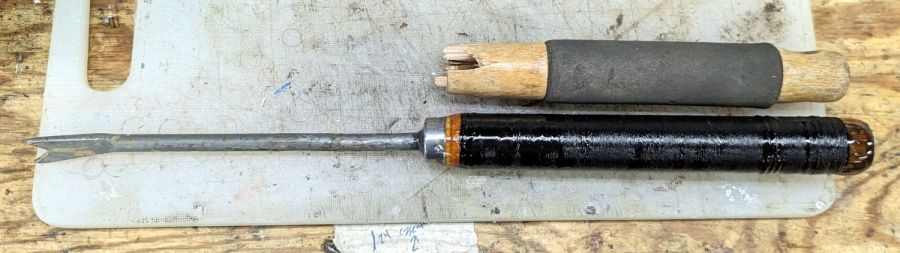
The Smell of Molten Projects in the Morning

Ed Nisley's Blog: Shop notes, electronics, firmware, machinery, 3D printing, laser cuttery, and curiosities. Contents: 100% human thinking, 0% AI slop.

Category: Home Ec

Things around the home & hearth

  • Patio Chair Foot Adapters

    Patio Chair Foot Adapters

    Some years ago we acquired a free quartet of aluminum-frame patio chairs in need of new straps and feet. Eventually enough straps broke to force me to re-strap the things and I finally got around to replacing the badly worn OEM feet:

    Patio Chair Foot Adapter - OEM feet
    Patio Chair Foot Adapter – OEM feet

    The small drilled holes let me yoink most them out with sheet-metal screw attached to a slide hammer, then apply the Designated Prydriver to the most recalcitrant / broken ones.

    Some feet had worn enough to expose the aluminum tubes, but most had at least a thin layer of plastic:

    Patio Chair Foot Adapter - OEM foot erosion
    Patio Chair Foot Adapter – OEM foot erosion

    Obviously, I should have stripped and repainted the frames (if that’s possible, as they’re probably powder-coated), but a man’s gotta know his limitations and this job needed to get done.

    One might think patio furniture replacement feet are cheap & readily available, but no amount of keyword engineering produced search results with any degree of assured fit, so I conjured adapters for screw-in feet from the vasty digital deep:

    Patio Chair Foot Adapters - solid models
    Patio Chair Foot Adapters – solid models

    This was a long-awaited opportunity to explore the BOSL2 library and it worked wonderfully well. Each adapter is whittled from a huge hex nut with threads that perfectly fit the M8×1.25 stud, which stands vertically through the middle of the (slightly oval) bottom surface parallel to the floor.

    The front tubes have a 5° angle with respect to the vertical:

    Patio Chair Foot Adapter - front
    Patio Chair Foot Adapter – front

    And the rear tubes are 15° off:

    Patio Chair Foot Adapter - rear
    Patio Chair Foot Adapter – rear

    Each adapter has an orientation notch pointing toward the front of the front leg and the rear of the rear leg:

    Patio Chair Foot Adapter - orientation notch
    Patio Chair Foot Adapter – orientation notch

    I expected to apply adhesive on the inside and outside of the adapters, but they tapped firmly into place inside the legs and the studs screwed firmly into them, so we’ll see how they survive in actual use. I expect the studs to rust after a while, but that might not be the most awful thing ever to happen.

    The OpenSCAD source code as a GitHub Gist:

    // Patio chair foot adapter
    // Ed Nisley – KE4ZNU – 2023-06
    include <BOSL2/std.scad>
    include <BOSL2/threading.scad>
    LegAngles = [5,15];
    /* [Hidden] */
    ThreadThick = 0.25;
    ThreadWidth = 0.40;
    HoleWindage = 0.2;
    Protrusion = 0.1; // make holes end cleanly
    function IntegerMultiple(Size,Unit) = Unit * ceil(Size / Unit);
    ID = 0;
    OD = 1;
    LENGTH = 2;
    inch = 25.4;
    //———————-
    // Dimensions
    LegTube = [18.8 – HoleWindage,22.5,0];
    Stud = [8.0,1.25,10.0]; // M8x1.25 foot stud
    FlangeBase = 3.0;
    //———————–
    for (i=[0:len(LegAngles)-1]) {
    ang = LegAngles[i];
    FlangeIncr = LegTube[OD]*tan(ang);
    Flange = [Stud[0],LegTube[OD],FlangeBase + FlangeIncr];
    translate([i*1.5*Flange[OD],0,0])
    difference() {
    translate([0,0,0*-FlangeIncr/2])
    threaded_nut(2*Flange[OD],Stud[0],1.5*Stud[2],Stud[1],
    anchor=BOTTOM,bevel=false,$slop=0.2);
    rotate([0,ang,0]) {
    translate([0,0,FlangeBase + FlangeIncr/2])
    tube(4*Stud[2],2*Flange[OD],LegTube[ID]/2,
    anchor=BOTTOM);
    tube(4*Stud[2],2*Flange[OD],Flange[OD]/2,
    anchor=CENTER);
    }
    cube([Flange[OD],ThreadWidth,2*ThreadThick],anchor=BOTTOM+RIGHT);
    }
    }

  • Chipmunk Refuge

    Chipmunk Refuge

    Chipmunks zip into drain pipes when they detect even a slight threat:

    Chipmunk peering from drainpipe
    Chipmunk peering from drainpipe

    When I installed the drain pipes for the gutters & retaining wall along the driveway, I added a grate plug to keep critters from setting up housekeeping in what must look like an extensive cave network, although later experience showed I must clean debris out of the plug more frequently than I expected:

    Driveway drain - fountain
    Driveway drain – fountain

    I didn’t glue the PVC pipes together, because I knew they’d need adjusting, so it was no surprise when the last section of pipe shifted enough to open a small gap, probably because my lawnmowing passes always proceed from right to left over the pipe:

    Chipmunk Refuge - shifted drain pipe
    Chipmunk Refuge – shifted drain pipe

    The front yard chipmunk immediately claimed the pipe and zipped into the opening whenever we met on my way to the mailbox.

    When I reconnected the pipe, the chipmunk knew something had gone wrong and started some exploratory excavation in about the right spot to find the missing tunnel entrance:

    Chipmunk Refuge - missing gap
    Chipmunk Refuge – missing gap

    Not being one to rebuff the humble, I decided to make the world better:

    Chipmunk Refuge - site overview
    Chipmunk Refuge – site overview

    It’s a short section of PVC pipe with a wood plug in the far end to keep what I grandly call “our lawn” from filling it up. I bandsawed a disk from a scrap of inch-thick lumber that used to be a door and introduced it to Ms Belt Sander often enough to make it a snug push fit in the pipe.

    Some decoration seemed in order:

    Chipmunk Refuge - decorated end plug
    Chipmunk Refuge – decorated end plug

    Which gives the place a nice, homey look:

    Chipmunk Refuge - installed
    Chipmunk Refuge – installed

    Now, we’ll see whether the critters enjoy it as much as I did.

  • Raccoons In the Night

    Raccoons In the Night

    The only reason we haven’t seen a standing raccoon is because we’re not awake when it happens:

    Raccoons vs wheelbarrow - 2023-06-09
    Raccoons vs wheelbarrow – 2023-06-09

    The glowing dot over on the far right is a third raccoon!

    They are athletic critters:

    Raccoons in wheelbarrow - 2023-06-09
    Raccoons in wheelbarrow – 2023-06-09

    Mary puts garden clippings in the wheelbarrow before hauling them over the hill to our organic dumping ground. Something must smell pretty good in there:

    Raccoons around wheelbarrow - 2023-06-09
    Raccoons around wheelbarrow – 2023-06-09

    The wire mesh over the new plantings in the garden seems to be holding them at bay, but it must come off before it snares the growing plants. We hope whatever is in the fertilizer will have worn off by then!

  • Danger Zone Earrings: GITD Set

    Danger Zone Earrings: GITD Set

    Embiggening the SCP symbols used on the yellow vinyl-on-acrylic version improves their proportions:

    SCP Earrings - GITD vs vinyl PSA
    SCP Earrings – GITD vs vinyl PSA

    The black-on-white look come from vinyl PS atop GITD tape atop some transparent red acrylic, which looks a whole lot better in its natural environment:

    SCP Earrings - GITD in action
    SCP Earrings – GITD in action

    Making those ten samples requires 15 minutes of laser time (mostly kiss-cutting the patterns at maybe 5 mm/s) and another 25 minutes of weeding and primping. I’m not convinced this is an economically feasible activity, but I really like the results.

    Nah, I’m still not getting my ears punched.

  • Seedling Starter Pot Bottoms

    Seedling Starter Pot Bottoms

    One of Mary’s gardening compadres teaches a kid’s class which involves starting seedlings in “pots” made from the cardboard tubes found in paper towels and toilet paper. Cutting four slits in the bottom of the tube and folding the flaps inward puts a bottom on the pot, but what’s the fun in that?

    Draw a 42 mm circle, set the layer to cut corrugated cardboard, turn the circle into suitable arrays, flatten some boxes from the heap, and Fire the Laser:

    Seedling starter pot bottoms
    Seedling starter pot bottoms

    Collect the fallen disks from the chip tray and jam one in place as a serving suggestion, where it fits like it was custom-made:

    TP roll seedling starter pot bottom
    TP roll seedling starter pot bottom

    You’d still want to fold some flaps over the disk to keep it in place, but now your pot has a real bottom.

    I have no idea if 42 mm is a Galactic Constant, but it worked for the pile of tubes we had on hand.

    That was easy …

  • Punching the Exercise Ticket

    Punching the Exercise Ticket

    An unfortunate confluence of weather, schedule, and enthusiasm led to mowing all the yard in one session:

    Mowing pattern - 2023-05-27
    Mowing pattern – 2023-05-27

    I managed to remember to pause the tracker during a break in the middle, so it’s really just shy of three wall-clock hours from start to finish. It’s amazing how much work you (well, I) can get out of 100 mg of caffeine.

    Despite what you see here, the path on what’s euphemistically called “our lawn” show a much more organized solution to the problem of covering our property with non-overlapping foot-and-a-half stripes. As with my leaf-shredding track, I neither venture into the road nor mow the neighboring yards.

    Bonus: slept like a stone that night …

  • Engraved Popsicle Sticks

    Engraved Popsicle Sticks

    Having found a handful of popsicle sticks on my desk, I had to finish this up:

    Popsicle stick markers - engraving
    Popsicle stick markers – engraving

    The fixture has the same layout as the craft stick version, sized to fit the smaller sticks. They’re a bit thicker than the chipboard sheet, but match up well enough for the purpose.

    Even though the sticks don’t have much room for cutout letters, I had to try it anyway:

    Popsicle stick markers - finished
    Popsicle stick markers – finished

    Aligning the template to the fixture uses LightBurn’s Print-and-Cut tool, which seems easier than nailing the fixture to the laser platform.

    I suppose if they ever make actual popsicles with wood handles, they can tell who gets which one.

    For whatever it’s worth, the larger craft stick markers in the garden remain in good shape.