The Smell of Molten Projects in the Morning

Ed Nisley's Blog: Shop notes, electronics, firmware, machinery, 3D printing, laser cuttery, and curiosities. Contents: 100% human thinking, 0% AI slop.

Category: Electronics Workbench

Electrical & Electronic gadgets

  • Victoreen 710-104 Ionization Chamber: Circuit Fixture

    The general idea is to put the electrometer circuitry directly atop the Victoreen 710-104 ionization chamber, so as to minimize the distance from the center collector electrode to the electrometer input. After a few false starts, this looked promising:

    Victoreen 710-104 Ionization Chamber Fittings - Show layout
    Victoreen 710-104 Ionization Chamber Fittings – Show layout

    The hexagonal circuit board fits the can so nicely that I’ll run with it, despite the over-the-top twee factor. Because it’s so hard to freehand a hex, I printed the green object as a tracing template, despite having the Slic3r preview show the parts just barely fitting on the M2 platform:

    Victoreen 710-104 Ionization Chamber Fittings - Build layout
    Victoreen 710-104 Ionization Chamber Fittings – Build layout

    Fortunately, my configuration hand is strong:

    Victoreen 710-104 Fittings - on M2 platform
    Victoreen 710-104 Fittings – on M2 platform

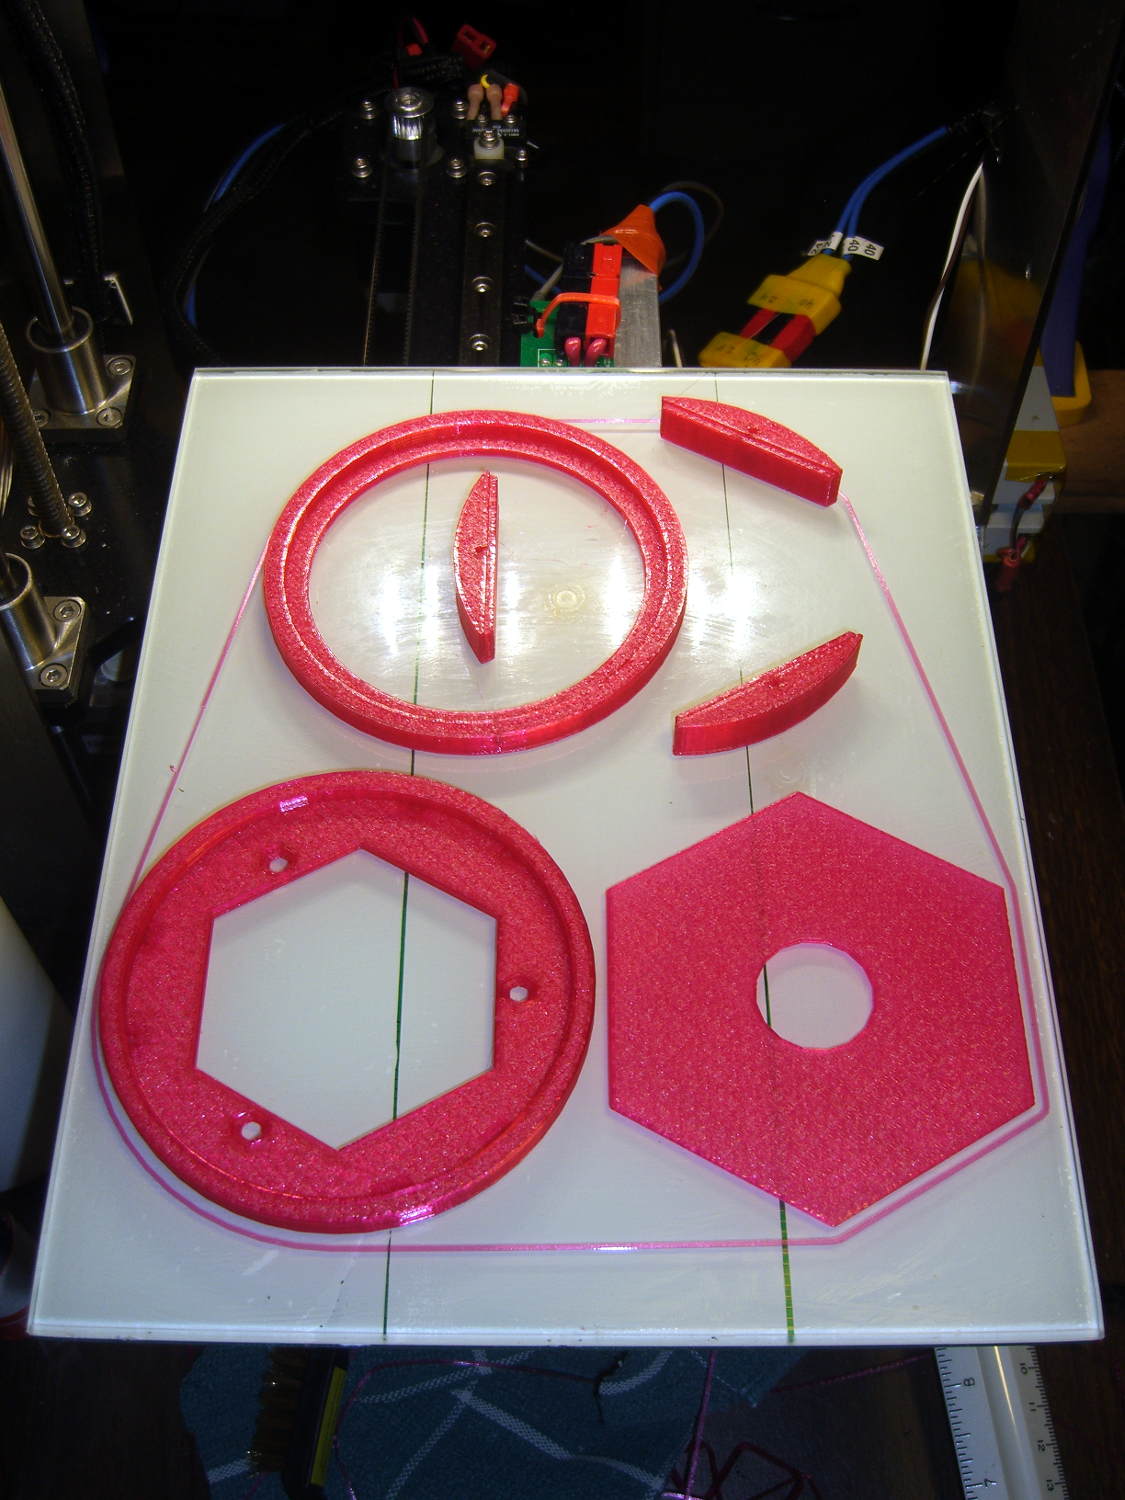
    The skirt measures 0.25±0.05 around the entire perimeter, with a slight positive bias (platform too low) along the left side and a corresponding negative bias on the right. Both sides look just fine to me.

    A pair of alignment pegs hold each board support in place while gluing:

    Victoreen 710-104 Fittings - clamping
    Victoreen 710-104 Fittings – clamping

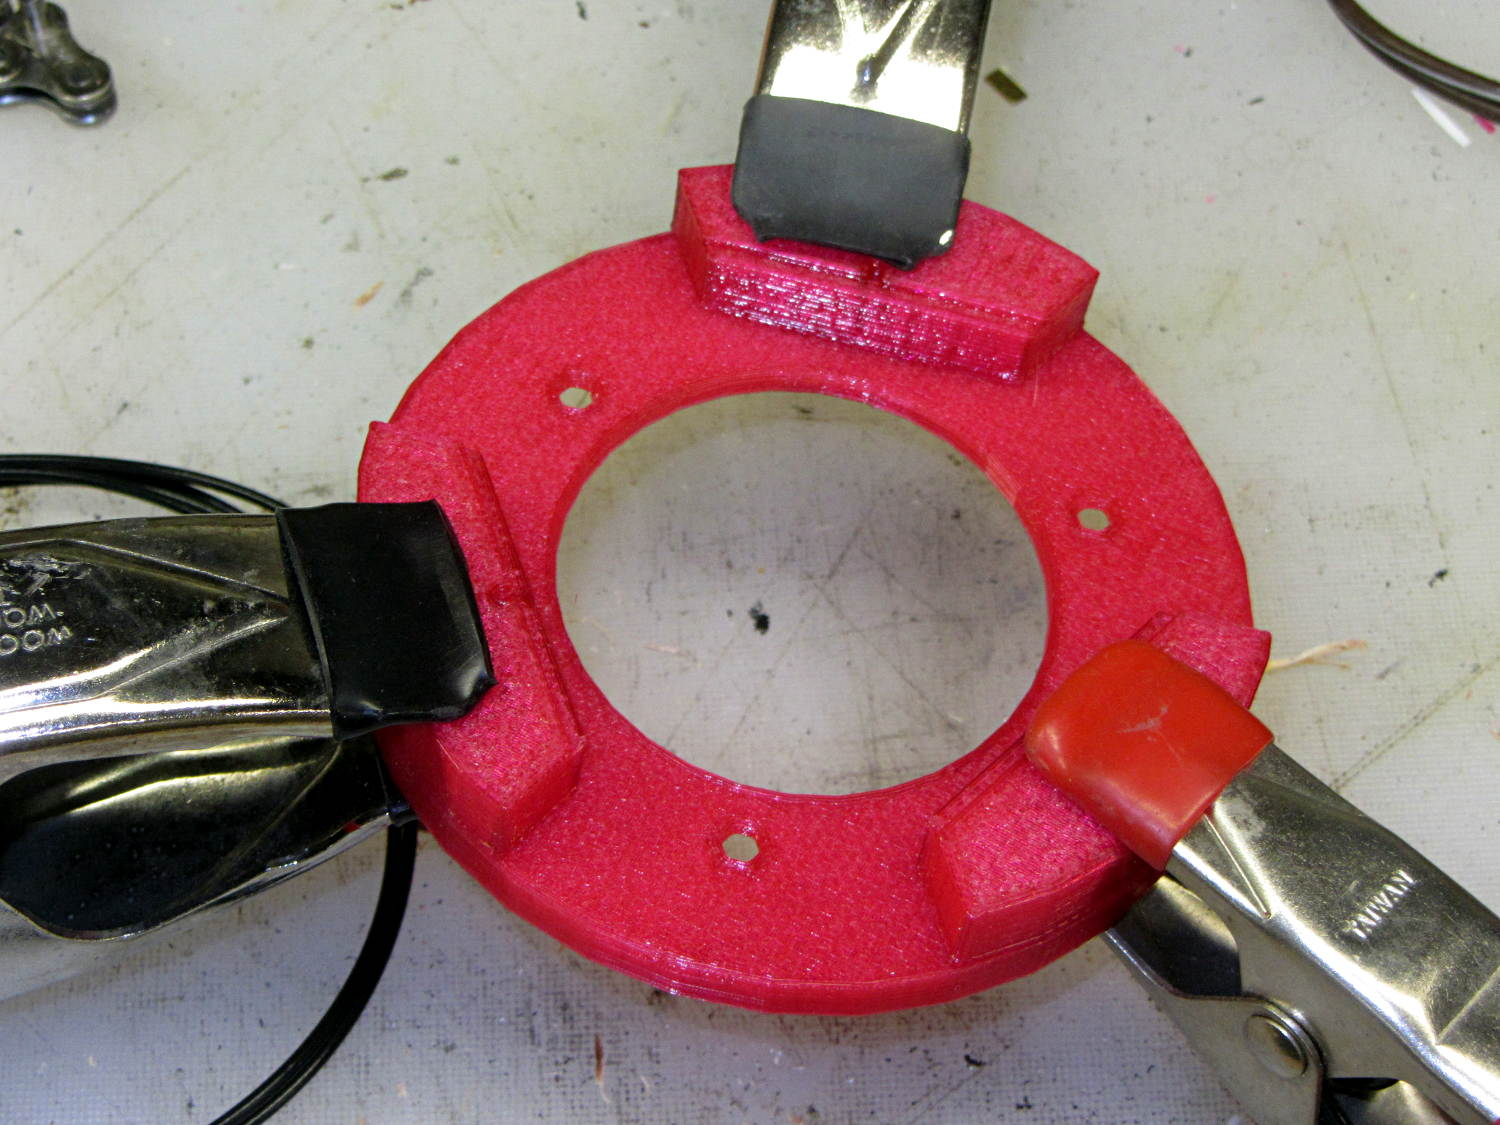
    Next time around, I’ll glue the supports with the circuit board template laid in place to ensure the edges have the proper orientation, but they came out surprisingly close just by matching the outer perimeters. Of course, I probably bandsawed / belt sanded the carefully traced hex just slightly off-kilter.

    The outer perimeter has 48 sides. Making it a multiple of three means each board support has the same pattern of sides and all will be interchangeable. Making it a multiple of four means each quadrant has the same pattern of sides and the ring looks pleasingly symmetrical. The factor-of-three is most important: you want interchangeable supports. Trust me on this.

    The bottom ring keeps the solder dimple that seals the can base off the desk, but I also stuck a quartet of rubber feet on the can for better traction.

    Here’s what it looks like with the two A23 12 V bias batteries in their holders, affixed to the can with foam tape:

    Victoreen 710-104 Fittings - assembled
    Victoreen 710-104 Fittings – assembled

    The OpenSCAD source code includes a few more tweaks:

    // Victoreen 710-104 Ionization Chamber Fittings
    // Ed Nisley KE4ZNU July 2015
    
    Layout = "Show";
    					// Show - assembled parts
    					// Build - print them out!
    					// CanCap - PCB insulator for 6-32 mounting studs
    					// CanBase - surrounding foot for ionization chamber
    					// CanLid - generic surround for either end of chamber
    					// PCB - template for cutting PCB sheet
    					// PCBBase - holder for PCB atop CanCap
    
    BuildTemplate = false;			// true to build PCB template along with everything else
    
    //- Extrusion parameters must match reality!
    //  Print with 2 shells and 3 solid layers
    
    ThreadThick = 0.25;
    ThreadWidth = 0.40;
    
    HoleWindage = 0.2;
    
    Protrusion = 0.1;			// make holes end cleanly
    
    AlignPinOD = 1.75;			// assembly alignment pins = filament dia
    
    inch = 25.4;
    
    function IntegerMultiple(Size,Unit) = Unit * ceil(Size / Unit);
    
    //- Screw sizes
    
    Tap4_40 = 0.089 * inch;
    Clear4_40 = 0.110 * inch;
    Head4_40 = 0.211 * inch;
    Head4_40Thick = 0.065 * inch;
    Nut4_40Dia = 0.228 * inch;
    Nut4_40Thick = 0.086 * inch;
    Washer4_40OD = 0.270 * inch;
    Washer4_40ID = 0.123 * inch;
    
    
    //----------------------
    // Dimensions
    
    OD = 0;											// name the subscripts
    LENGTH = 1;
    
    Chamber = [91.0 + HoleWindage,38];				// Victoreen ionization chamber dimensions
    
    Stud = [										// stud welded to ionization chamber lid
    	[6.5,IntegerMultiple(0.8,ThreadThick)],		// flat head -- generous clearance
    	[4.0,9.5],									// 6-32 screw -- ditto
    ];
    NumStuds = 3;
    StudSides = 6;									// for hole around stud
    
    BCD = 2.75 * inch;								// mounting stud bolt circle diameter
    
    PlateThick = 3.0;								// layer atop and below chamber ends
    RimHeight = 4.0;								// extending up along chamber perimeter
    WallHeight = RimHeight + PlateThick;
    WallThick = 5.0;								// thick enough to be sturdy & printable
    CapSides = 8*6;									// must be multiple of 4 & 3 to make symmetries work out right
    
    PCBFlatsOD = 85.0 + 2*ThreadWidth;				// hex dia across flats + clearance
    PCBThick = 1.1;
    PCB = [PCBFlatsOD / cos(30),PCBThick - ThreadThick];		// OD = tip-to-tip dia
    
    echo(str("Actual PCB across flats: ",PCBFlatsOD - 2*ThreadWidth));
    echo(str(" ... tip-to-tip dia: ",(PCBFlatsOD - 2*ThreadWidth)/cos(30)));
    echo(str(" ... thickness: ",PCBThick));
    
    HolderHeight = 11.0 + PCB[LENGTH];				// thick enough for PCB to clear studs
    HolderShelf = 2.0;								// shelf under PCB edge
    
    echo(str("PCB holder height: ",HolderHeight));
    echo(str(" ... across flats: ",PCBFlatsOD));
    
    //----------------------
    // Useful routines
    
    module PolyCyl(Dia,Height,ForceSides=0) {			// based on nophead's polyholes
    
      Sides = (ForceSides != 0) ? ForceSides : (ceil(Dia) + 2);
    
      FixDia = Dia / cos(180/Sides);
    
      cylinder(r=(FixDia + HoleWindage)/2,
               h=Height,
    	   $fn=Sides);
    }
    
    //- Locating pin hole with glue recess
    //  Default length is two pin diameters on each side of the split
    
    module LocatingPin(Dia=AlignPinOD,Len=0.0) {
    	
    	PinLen = (Len != 0.0) ? Len : (4*Dia);
    	
    	translate([0,0,-ThreadThick])
    		PolyCyl((Dia + 2*ThreadWidth),2*ThreadThick,4);
    
    	translate([0,0,-2*ThreadThick])
    		PolyCyl((Dia + 1*ThreadWidth),4*ThreadThick,4);
    		
    	translate([0,0,-Len/2])
    		PolyCyl(Dia,Len,4);
    
    }
    
    module ShowPegGrid(Space = 10.0,Size = 1.0) {
    
      RangeX = floor(100 / Space);
      RangeY = floor(125 / Space);
      
    	for (x=[-RangeX:RangeX])
    	  for (y=[-RangeY:RangeY])
    		translate([x*Space,y*Space,Size/2])
    		  %cube(Size,center=true);
    }
    
    //-----
    
    module CanLid() {
    	
    	difference() {
    		cylinder(d=Chamber[OD] + 2*WallThick,h=WallHeight,$fn=CapSides);
    		translate([0,0,PlateThick])
    			PolyCyl(Chamber[OD],Chamber[1],CapSides);
    	}
    	
    }
    
    module CanCap() {
    
    	difference() {
    		CanLid();
    		
    		translate([0,0,-Protrusion])											// central cutout
    //			cylinder(d=(BCD - 2*5.0),h=Chamber[LENGTH],$fn=CapSides);
    			rotate(180/6)
    				cylinder(d=BCD,h=Chamber[LENGTH],$fn=6);
    			
    		for (i=[0:(NumStuds - 1)])												// stud clearance holes
    			rotate(i*360/NumStuds)
    				translate([BCD/2,0,0])
    					rotate(180/StudSides) {
    						translate([0,0,(PlateThick - (Stud[0][LENGTH] + 2*ThreadThick))])
    							PolyCyl(Stud[0][OD],2*Stud[0][LENGTH],StudSides);
    						translate([0,0,-Protrusion])
    							PolyCyl(Stud[1][OD],2*Stud[1][LENGTH],StudSides);
    					}
    					
    		for (i=[0:(NumStuds - 1)], j=[-1,1])									// PCB holder alignment pins
    			rotate(i*360/NumStuds + j*15 + 60)
    				translate([Chamber[OD]/2,0,0])
    					rotate(180/4)
    						LocatingPin(Len=2*PlateThick - 2*ThreadThick);
    	}
    
    }
    
    module CanBase() {
    	
    	difference() {
    		CanLid();
    		translate([0,0,-Protrusion])
    			PolyCyl(Chamber[OD] - 2*5.0,Chamber[1],CapSides);
    	}
    }
    
    module PCBTemplate() {
    	
    	difference() {
    		cylinder(d=((PCBFlatsOD - 2*ThreadWidth)/cos(30)),h=max(PCB[LENGTH],3.0),$fn=6);		// actual PCB size, overly thick
    		translate([0,0,-Protrusion])
    			cylinder(d=10,h=10*PCB[LENGTH],$fn=12);
    	}
    }
    
    module PCBBase() {
    
    	difference() {
    		cylinder(d=Chamber[OD] + 2*WallThick,h=HolderHeight,$fn=CapSides);
    		
    		rotate(30) {
    			translate([0,0,-Protrusion])										// central hex
    				cylinder(d=(PCBFlatsOD - 2*HolderShelf)/cos(30),h=2*HolderHeight,$fn=6);	
    				
    			translate([0,0,HolderHeight - PCB[LENGTH]])							// hex PCB recess
    				cylinder(d=PCB[OD],h=HolderHeight,$fn=6);
    				
    			for (i=[0:NumStuds - 1])											// PCB retaining screws
    				rotate(i*120 + 30)
    					translate([(PCBFlatsOD/2 + Clear4_40/2 + ThreadWidth),0,-Protrusion])
    						rotate(180/6)
    							PolyCyl(Tap4_40,2*HolderHeight,6);
    							
    			for (i=[0:(NumStuds - 1)], j=[-1,1])								// PCB holder alignment pins
    				rotate(i*360/NumStuds + j*15 + 30)
    					translate([Chamber[OD]/2,0,0])
    						rotate(180/4)
    							LocatingPin(Len=PlateThick);
    		}
    		
    		for (i=[0:NumStuds - 1])												// segment isolation
    			rotate(i*120 - 30)
    				translate([0,0,-Protrusion]) {
    					linear_extrude(height=2*HolderHeight)
    						polygon([[0,0],[Chamber[OD],0],[Chamber[OD]*cos(60),Chamber[OD]*sin(60)]]);
    				}
    	}
    	
    
    }
    
    
    //----------------------
    // Build it
    
    ShowPegGrid();
    
    if (Layout == "CanLid") {
    	CanLid();
    }
    
    if (Layout == "CanCap") {
    	CanCap();
    }
    
    if (Layout == "CanBase") {
    	CanBase();
    }
    
    if (Layout == "PCBBase") {
    	PCBBase();
    }
    
    if (Layout == "PCB") {
    	PCBTemplate();
    }
    
    if (Layout == "Show") {
    	CanBase();
    	color("Orange",0.5)
    		translate([0,0,PlateThick + Protrusion])
    			cylinder(d=Chamber[OD],h=Chamber[LENGTH],$fn=CapSides);
    	translate([0,0,(2*PlateThick + Chamber[LENGTH] + 2*Protrusion)])
    		rotate([180,0,0])
    			CanCap();
    	translate([0,0,(2*PlateThick + Chamber[LENGTH] + 5.0)])
    		PCBBase();
    	color("Green",0.5)
    		translate([0,0,(2*PlateThick + Chamber[LENGTH] + 7.0 + HolderHeight)])
    			rotate(30)
    				PCBTemplate();
    }
    
    if (Layout == "Build") {
    	
    	if (BuildTemplate) {
    		translate([-0.50*Chamber[OD],-0.60*Chamber[OD],0])
    			CanCap();
    			
    		translate([0.55*Chamber[OD],-0.60*Chamber[OD],0])
    			rotate(30)
    				PCBTemplate();
    	}
    	else {
    		translate([-0.25*Chamber[OD],-0.60*Chamber[OD],0])
    			CanCap();
    	}
    		
    	translate([-0.25*Chamber[OD],0.60*Chamber[OD],0])
    		CanBase();
    	translate([0.25*Chamber[OD],0.60*Chamber[OD],0])
    		PCBBase();
    }
    
  • Victoreen 710-104 Ionization Chamber: Mounting Dimensions

    Mounting a circuit board atop the Victoreen 710-104 ionization chamber requires figuring out the location of those 6-32 studs:

    Victoreen 710-104 Ionization Chamber - oblique
    Victoreen 710-104 Ionization Chamber – oblique

    Given that it dates back to the early Cold War days, the bolt circle dimensions are all hard inch:

    Victoreen 710-104 Ionization Chamber - mounting dimensions
    Victoreen 710-104 Ionization Chamber – mounting dimensions

    I embossed the studs into a pad of Geek Scratch Paper, eyeballed the stud-to-stud spacing from a cheap ruler, back-calculated the BCD, rounded it from 2.742 to the obvious 2.75, then fed that into the first BCD calculator that appeared in the obvious search.

    The can is just over 3.5 inch OD and stands 1.5 inch tall.

    The can will run at +24 V in relation to the rest of the circuitry, so the studs must be insulated from the PCB’s copper pours. That, most likely, will require some 3D printed doodads.

    The circuitry must live inside a grounded metallic can that excludes random electric fields. Somewhere in the pile, I have a few sheets of Mu-metal that, while grossly overqualified for the task (even without heat treatment), should solder up nicely…

  • CNC Workshop 2015: Arduino Survival Guide, Workshop Edition

    MOSFET RDS Tester - Arduino
    MOSFET RDS Tester – Arduino

    Armed with bags of electronic parts and boxes of meters, I’ll be helping folks at the CNC Workshop understand the electrical limitations of the Arduino microcontrollers they’re building into projects.

    The presentation in PDF form:

    Arduino Survival Guide – Workshop Edition – CNC Workshop 2015

    We’ll wing it with the source code, because nothing’s more than a few lines long…

  • Victoreen 710-104 Ionization Chamber

    Using radiation to generate random numbers reminded me of some Victoreen 710-104 ionization chambers that have been in the pile basically forever:

    Victoreen 710-104 Ionization Chamber
    Victoreen 710-104 Ionization Chamber

    The central contact seems to be double-insulated from the chamber with glass (?) seals in a soldered-in-place assembly:

    Victoreen 710-104 Ionization Chamber - terminal detail
    Victoreen 710-104 Ionization Chamber – terminal detail

    That might be rosin left over from soldering, but you’d think they would have rinsed it off to reduce the leakage. Some cleaning will be in order.

    A picture in The Fine Manual for the CD-V-710 Model 5 Radiation Survey Meter showed that the circuit board used point-to-point wiring, with the range switch soldered directly to that bent metal contact:

    Victoreen CD-V-710 Model 5 Manual - Page 10 - circuit layout
    Victoreen CD-V-710 Model 5 Manual – Page 10 – circuit layout

    Another page gave some useful values and a simplified schematic:

    Victoreen CD-V-710 Model 5 Manual - Page 5
    Victoreen CD-V-710 Model 5 Manual – Page 5

    Never fear, the manual also has the full schematic; they don’t write manuals like that any more.

    The chamber bias voltage was +22.5, from one carbon-zinc battery available back in the 1950s. You can still get 22.5 V batteries at about ten bucks a pop, but 24 V from a pair of cheap & readily available 12 V A23 alkaline batteries should be close enough. There’s no current drain, so the batteries should last their entire shelf life.

    The “HI-MEG” resistor represents a trio of glass-body resistors selected by the range switch:

    • R5 = 100 GΩ → 0.5 R/h
    • R6 = 10 GΩ→ 5 R/h
    • R7 = 1 GΩ→ 50 R/h

    As the saying goes, if you must select R7 in an actual emergency, you should sit down, put your head between your legs, and kiss your ass goodbye.

    The steel-wall chamber responds only to gamma radiation, with a nominal current of 5 pA at 0.5 R/h. However, given an op amp like the LMC6081 with 10 fA bias current, maybe building an electrometer-style amplifier that can respond to background gamma radiation or maybe secondary gamma rays from cosmic ray air showers would be feasible; I haven’t done anything like that in a while and even a faceplant would be interesting.

    Alas, radium-226 and its progeny, including radon-222 decay through alpha and beta emission that’s specifically excluded by the can.

    This is not a new idea, by any means, as shown by some extensive discussion and well-done circuitry. Any amplifier that works with the Victoreen can will certainly work with a homebrew ionization chamber.

  • 125 mm OD White LED Ring Current vs. Voltage

    I picked up a pair of 125 mm OD white LED rings for the hand magnifier project from the usual eBay source, which arrived with the expected level of build quality:

    LED Ring - SMD soldering
    LED Ring – SMD soldering

    But, hey, all the LEDs lit up more-or-less uniformly.

    With 20 mA in each of 13 parallel strings of 3 white LEDs, the ring should draw 260 mA. It’s nominally a 12 V device sorta-kinda intended for automotive “angel eye” use, where the actual battery charging voltage runs around 14 V. The 180 Ω ballast resistors seem to be sized with that in mind:

    LED Ring - SMD soldering
    LED Ring – SMD soldering

    The reciprocal of that 45.5 mA/V slope is 220 V/mA = 220 Ω, which is close enough to the actual (we presume from their marking) 180 Ω resistors for comfort.

    Driving it at 14 V to get 250 mA dissipates 3.5 W and makes it pleasantly warm.

    For use with a magnifying lens, I think it deserves a brightness control. Perhaps hacking a bigger trimpot with a knob onto a cheap & tiny boost converter will suffice.

  • Caig DeoxIT Bottle Holder

    Having found my lifetime supply of DeoxIT slouched against something that didn’t appreciate a thin coating of red oil:

    Caig DeoxIT bottle holder
    Caig DeoxIT bottle holder

    The solid model consists of two squashed cylinders atop a slab:

    DeoxIT Bottle Holder
    DeoxIT Bottle Holder

    Applying the resize() operator to both cylinders separately, before the difference() operation, maintains a uniform (and grossly overqualified) 5 mm wall thickness, which you wouldn’t get by squashing them after the difference().

    The 2.5 mm slab gets nice, rounded corners from a hull() shrinkwrapping a quartet of squat cylinders; Slic3r applies Hilbert Curve infill to the top & bottom surfaces to produce a nice pattern. I admit to being easily pleased.

    The OpenSCAD source code took about ten minutes to write and two hours to print:

    // CAIG DeoxIT Bottle Holder
    // Ed Nisley KE4ZNU - June 2015
    
    //- Extrusion parameters - must match reality!
    
    ThreadThick = 0.25;
    ThreadWidth = 0.40;
    
    function IntegerMultiple(Size,Unit) = Unit * ceil(Size / Unit);
    
    Protrusion = 0.1;
    
    HoleWindage = 0.2;
    
    //------
    // Dimensions
    
    BottleOD = [40,21,30];			// actual dia, holder depth
    
    Clearance = [1.0,1.0,0.0];				// around bottle
    
    WallThick = 5.0;
    
    PlateThick = IntegerMultiple(2.5,ThreadThick);
    PlateRound = 5.0;
    
    NumSides = 8*4;
    
    //- Build it
    
    union() {
    	hull() {
    		for (i=[-1,1], j=[-1,1]) {
    			translate([i*(BottleOD[0] - PlateRound),j*(BottleOD[0] - PlateRound),0])
    				cylinder(r=PlateRound,h=PlateThick,$fn=NumSides);
    		}
    	}
    	difference() {
    		resize(BottleOD + 2*Clearance + [2*WallThick,2*WallThick,WallThick])
    			cylinder(d=BottleOD[0],h=1,$fn=NumSides);
    		translate([0,0,WallThick])
    			resize(BottleOD + 2*Clearance + [0,0,WallThick])
    				cylinder(d=BottleOD,h=1,$fn=NumSides);
    	}
    }
    

    I loves me my 3D printer…

  • Random LED Dots: Startup Lamp Test

    I should mention the lamp test in case it comes in useful later on…

    	digitalWrite(PIN_HEARTBEAT,LOW);	// turn off while panel blinks
    	
    	analogWrite(PIN_DIMMING,LEDS_ON);	// enable LED array
    
    	for (byte i=0; i<NUMROWS; i++) {
    		for (byte j=0; j<NUMCOLS; j++) {
    			LEDs[i].ColR = LEDs[i].ColG = LEDs[i].ColB = 0x80 >> j;
    			for (byte k=0; k<NUMROWS; k++) {
    				UpdateLEDs(k);
    				delay(25);
    				if (GeigerTicked) {
    					GeigerTicked = false;
    					TogglePin(PIN_HEARTBEAT);
    				}
    			}
    		LEDs[i].ColR = LEDs[i].ColG = LEDs[i].ColB = 0;
    		}
    	}
    	UpdateLEDs(NUMROWS-1);			// clear the last LED
    

    Updating / multiplexing all the rows inside the inner loop with a 25 ms pause produces distinct flashes and demonstrates that each LED operates separately from all the others:

    Lamp Test
    Lamp Test

    The lamp test ends with all the LEDs turned off, but having the array gradually fill with light looked odd.

    After some tinkering, I added the GeigerTicked conditional to handshake with the Geiger pulse interrupt handler, thus producing a nice random time at the end of the loop. Feed that mostly random time into the hash function, use the hash as the random number seed, then set all the LEDs using random(2) function calls:

    	randomSeed(jenkins_one_at_a_time_hash((char *)GeigerTime,4));
    	
    	for (byte Row=0; Row<NUMROWS; Row++) {
    		for (byte Col=0; Col<NUMCOLS; Col++) {		// Col runs backwards, but we don't care
    			LEDs[Row].ColR |= random(2) << Col;
    			LEDs[Row].ColG |= random(2) << Col;
    			LEDs[Row].ColB |= random(2) << Col;
    		}
    		UpdateLEDs(Row);
    	}
    	
    	GeigerTicks = 0;				// reset counter
    	GeigerTicked = false;			// resume capture
    

    Which produced a more-or-less random fill that looked better:

    Random Preload - bright
    Random Preload – bright

    Underexposed to reduce the burnout (after a few Geiger events):

    Random Preload - dim
    Random Preload – dim

    There should be about eight of each color and, hey, it’s close enough.

    After the preload, it ticks along like it should…