
This wonderful texture lives at the top of Cochran Hill Road, where I spotted it on a recent walk. That tiny hole on the right trunk suggests more trouble than meets the human eye…
It’s now a background for the portrait monitor.
The Smell of Molten Projects in the Morning
Ed Nisley's Blog: Shop notes, electronics, firmware, machinery, 3D printing, laser cuttery, and curiosities. Contents: 100% human thinking, 0% AI slop.
This wonderful texture lives at the top of Cochran Hill Road, where I spotted it on a recent walk. That tiny hole on the right trunk suggests more trouble than meets the human eye…
It’s now a background for the portrait monitor.
Those 3D printed dishwasher rack protectors solved the problem on the bottom of the pins, but the tops also had some rust. I dosed the pins with Evapo-Rust to stabilize the corrosion:

After that picture, the pins soaked for a while, got a rinse & blotting, then sat for a while to dry. I can’t say that’s in complete accordance with the directions, but it’s close to the spirit of the thing.
Meanwhile, the MEK / xylene / acetone I added to the bottle of stiffened ReRACK repair coating had softened it up pretty well. They recommend several coats at half-hour intervals, of which this was the first:

I probably should have chewed off the corrosion bulging the OEM coating, but, given the number of pins that needed chewing, that started looking like a major project. Let’s face it, I can always touch things up if the pins continue rotting out.
The next morning, the rack was back in service:
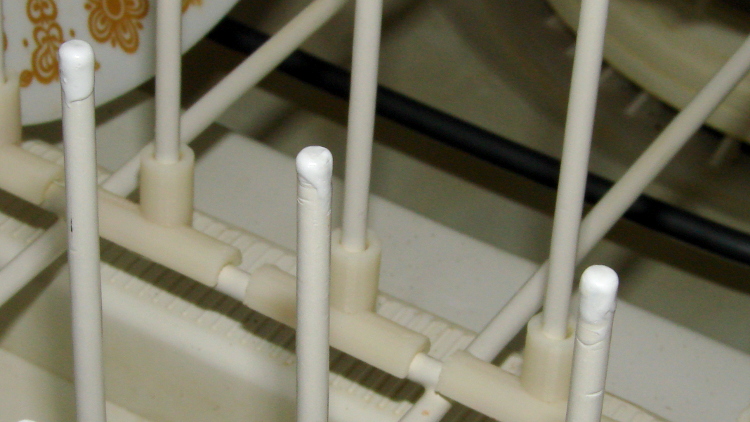
One advantage of a big blob atop each pin: the printed rack protectors might not wriggle off quite so easily.
I should have done this a long time ago:
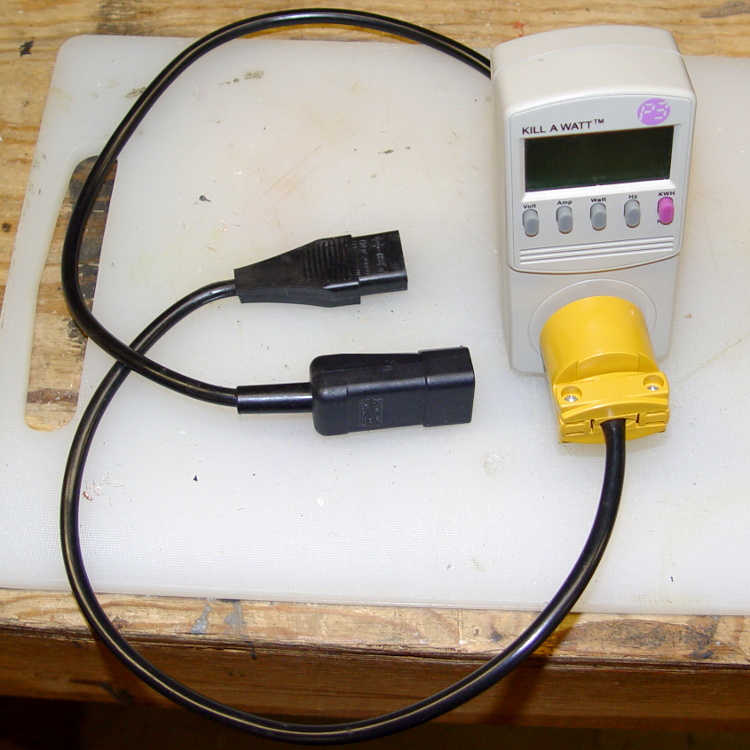
It makes measuring PC power consumption much easier!
I picked up some cheap AC plugs and sockets, cut a short IEC extender cable in half, and wired ’em up. If the IEC extender link breaks again, search amazon.com for something like “computer power cord extension” and rummage around.
IEC color code hint: brown = hot, blue = neutral (unless they cheat).
US NEMA 5 plug / socket hint: the blade marked W is neutral. More expensive hardware will have dark brass = hot, light brass = neutral, but don’t bet your life on it.
According to the sticker inside, I’ve been using my RayTek IR Thermometer since 2000. At some point in the last dozen or so year, Fluke Borged RayTek, which means yellow plastic instead of gray.
The pushbutton switch behind the trigger has recently gone from intermittent to nonfunctional, but everything else still works fine: some simple surgery should suffice…
The handle has a flip-down cover, for the battery compartment and °C/°F switch, that pivots on molded hinges. The cover’s hinge pins are rectangular with a slight bevel and the case sockets have a notch that will just clear a properly aligned pin. Given this hint, you’ll get the cover off much faster than I did:
Remove the obvious screw and press the latches while prying the two halves apart. A small screwdriver helps persuade the latches to release their death grip:

The parts heap didn’t have any suitable through-hole pushbutton switches, but I managed to solder an SMD switch in place; the original switch is parked atop the IC for reference. Yes, the white button is slightly taller than the original black one, but it doesn’t matter:

Then it’s just a matter of tucking everything in place:

There. That was easy.
This may not be a LibreOffice problem, but that’s where it shows up: the font selection dialog won’t display fonts with nonstandard Style names. There is, of course, no documentation anywhere (that I can find, anyway) on what Style names are permitted, so you discover this only when a font style that’s properly installed and accessible by other programs (like, say, Inkscape or Scribus) doesn’t render properly and doesn’t appear in the list.
In Xubuntu 12.10, LibreOffice 3.6.2.2 can’t handle the American Typewriter font style called Medium, which is what I’ve been using for the return address field on my (very few, these days) mail envelopes. Over the years, various versions of OpenOffice and LibreOffice have alternately accepted and rejected the Medium style, so this isn’t exactly a regression. It is, however, Yet Another Annoyance.
The solution, hinted at in that thread, involves using FontForge to rename the offending Style to, say, Regular, then saving the font. It’s actually the Weight property, hidden in Element → Font Info → PS Names tab. In this case, I changed the word “Medium” in the Fontname, Name for Humans, and Weight fields to “Regular”, which also updates the values in the TTF Names tab.
I save the modified font files in ~/.local/share/fonts using TrueType format, just to be sure I don’t confuse them with the original Postscript version in /usr/share/fonts/custom, delete the original, and then run fc-cache -v -f to update the caches. This surely isn’t the cleanest way to make it happen and almost certainly isn’t allowed by the Adobe EULA I agreed to, back when I actually bought the fonts, but so it goes.
And then It Just Works…

I bought an off-lease Optiplex 780 in the Small Form Factor (SFF) version to replace my ancient Pentium D; it’s also available in Small Desktop Tower (SDT) and Ultra-SFF variations. The SFF box has two PCI slots and one PCI-E slot, which let me install a half-height dual-output video card, with results described yesterday. I innocently believed the PCI-E slot would have enough clearance for the video card, what with these things being standardized and all.
Turns out that the heatsink collided with a flange on the hard drive carrier, with about 5 mm of overlap. Fortunately, the bracket is plastic and I have no qualms about chopping up the hardware. A few minutes of Quality Shop Time removed a section of the offending flange and gave the video card just enough clearance:

The heatsink reflects in the shiny surface of the carrier, with the scar from the missing flange just above that. The small dark-gray disk on the far left is a grommet holding a pin that supports the drive; it installs through the larger circular opening and snaps leftward.
You must install the video card and then snap the drive carrier into place. The heatsink protrudes above the flange, with the left side just barely clearing that grommet.
It used to be that using two monitors with two separate X sessions in Linux actually worked. Then they improved things so it stopped working out of the box, but you could force it to work with a bit of effort. Further improvements made the workarounds more difficult. Now, with Xubuntu 12.10, it seems impossible.
This. Is. Not. Progress.
Experimenting will require considerable restarting of the X server, which nowadays requires, by default, rebooting the box. In the Bad Old Days, you could hit Ctrl-Alt-Backspace to restart the X server (and, en passant, blow away all unsaved data in your session). My suggestions about re-enabling it no longer work and, worse, the suggestions there about:
Right-Alt + Sysreq + KDontZapdo not work, either. I’m no longer surprised by any of this.
Fortunately, as suggested at the same spot, this works:
~/.xprofilesetxkbmap -option terminate:ctrl_alt_bkspchmod u+x .xprofileBut it’s per-user, so it works only while you’re logged in, which means you can’t restart X from the login screen. This is marginally OK.
So. We begin.
This box (an off-lease Dell Optiplex 780, Core 2 Duo E8400 3.0 GHz) now has a Jaton GeForce GT430 nVidia video card with two DVI outputs.
In order to get decent performance, you must use the nVidia proprietary driver. Installing the nvidia-current package pulls in, as of this writing, 304. The nVidia driver now ignores the rotate option and the randrrotation option in xorg.conf. Adding the {Rotation=Left} meta-option to the portrait monitor or enabling Xinerama kills xrandr.
Not having xrandr used to not be fatal, but now OpenSCAD (among others) requires xrandr to be both present and active. Any solution that doesn’t allow xrandr isn’t feasible.
Despite notes suggesting that nVidia’s TwinView kills xrandr, it doesn’t (perversely, Xinerama should allow it and doesn’t; perhaps I misunderstand what’s going on). Add another line to .xprofile:
xrandr --output DVI-I-3 --rotate left
You discover which output to use by parsing the output of xrandr without any parameters:
$ xrandr
Screen 0: minimum 8 x 8, current 2650 x 1680, maximum 16384 x 16384
DVI-I-0 disconnected (normal left inverted right x axis y axis)
DVI-I-1 disconnected (normal left inverted right x axis y axis)
DVI-I-2 connected 1600x1200+0+0 (normal left inverted right x axis y axis) 367mm x 275mm
   1600x1200      60.0*+
   1280x1024      75.0     60.0
   1152x864       75.0
   1024x768       75.0     60.0
   800x600        75.0     60.3
   640x480        75.0     59.9
DVI-I-3 connected 1050x1680+1600+0 left (normal left inverted right x axis y axis) 434mm x 270mm
   1680x1050      59.9*+
   1280x1024      75.0     60.0
   1152x864       75.0
   1024x768       75.0     60.0
   800x600        75.0     60.3
   640x480        75.0     59.9
HDMI-0 disconnected (normal left inverted right x axis y axis)
Why DVI-I-0 and DVI-I-1 are disconnected is not explained. There is an HDMI jack that I’m not using, so that one does make sense. The output shows the portrait monitor on DVI-I-3 as rotated.
This is a single X session, so the two monitors show sections of a larger workspace. The cursor moves freely across the junction, it doesn’t vanish below the landscape montitor, and windows maximize properly to fill the single monitor they start in.
This is not what I want, because I cannot independently flip the workspaces on the two monitors. It’s possible to force one of the windows on the portrait monitor to “always on top”, but that means I have only one program accessible on that monitor, which isn’t usually the case.
This. Is. Not. Progress.
But it seems to be as good as it gets these days…
