Ed Nisley's Blog: Shop notes, electronics, firmware, machinery, 3D printing, laser cuttery, and curiosities. Contents: 100% human thinking, 0% AI slop.
The user community asked for toned-down buttons, in place of my rather garish color scheme. A bit of twiddling with the Hue parameter produced these buttons:
Kenmore 158 UI – Pastel Buttons
Which look pretty good in context:
Kenmore 158 UI – Pastel buttons
The Bash script, which includes Unicode characters that may confuse your browser:
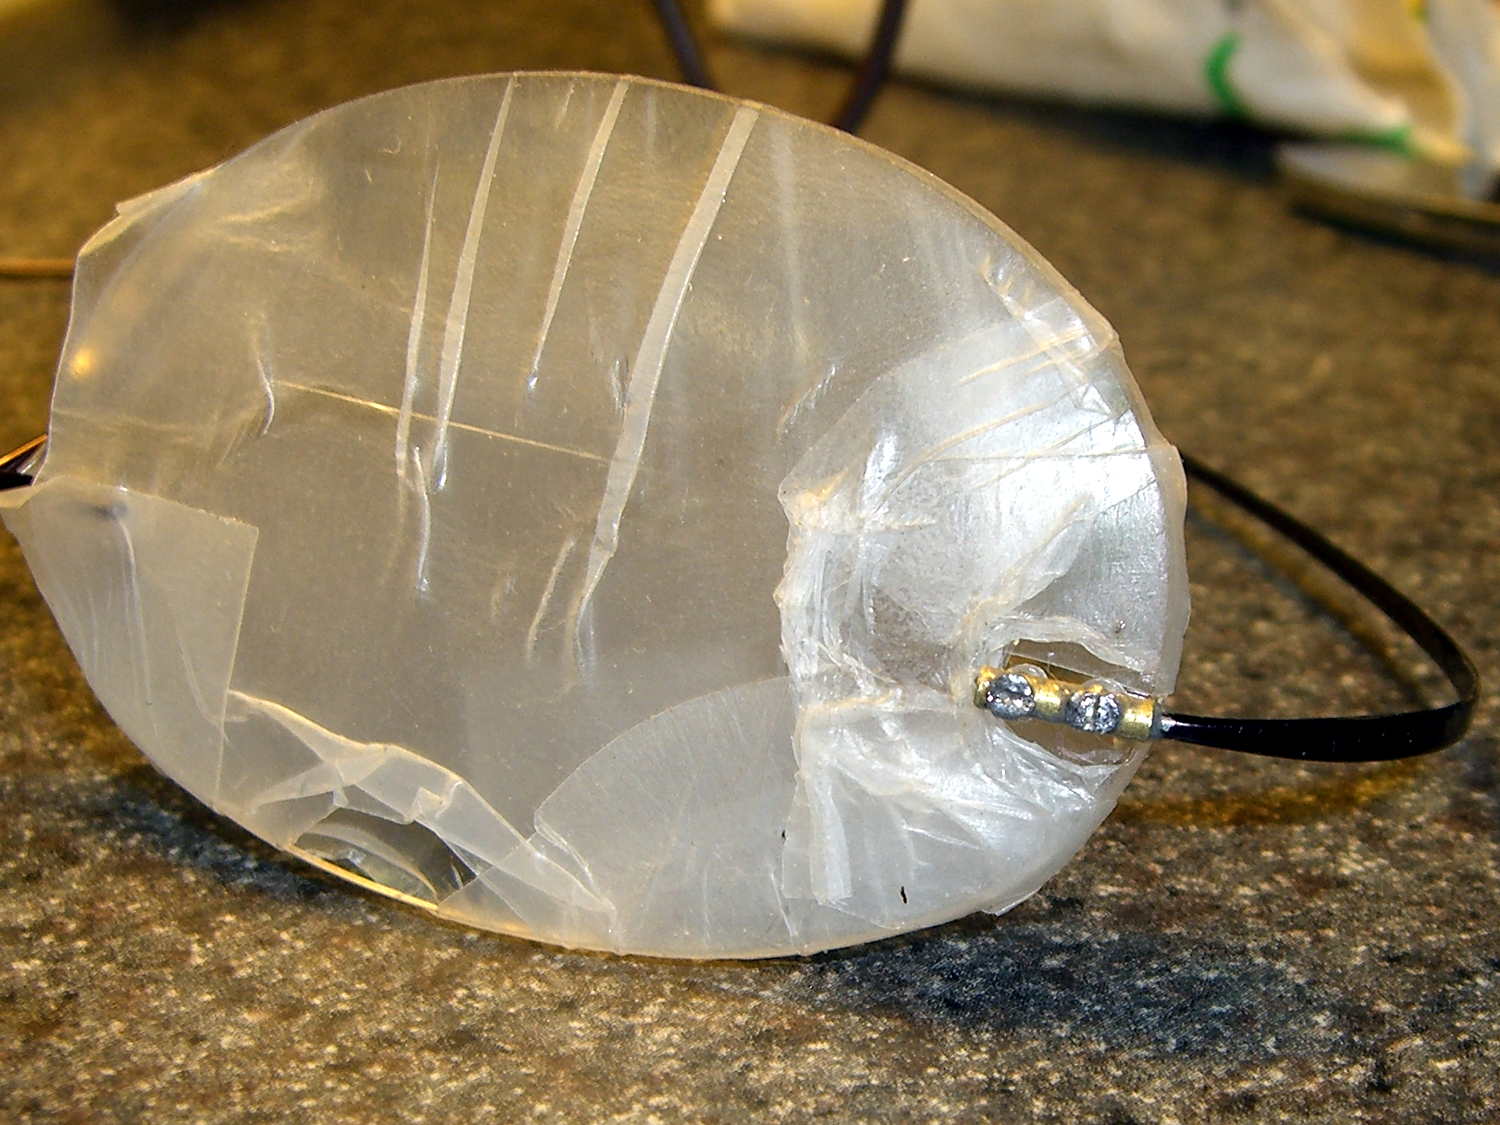
As we expected, the remaining temple of Mary’s Silhouette glasses broke, a bit over a year from the previous repair, and this repair proceeded along the same lines as the previous fix.
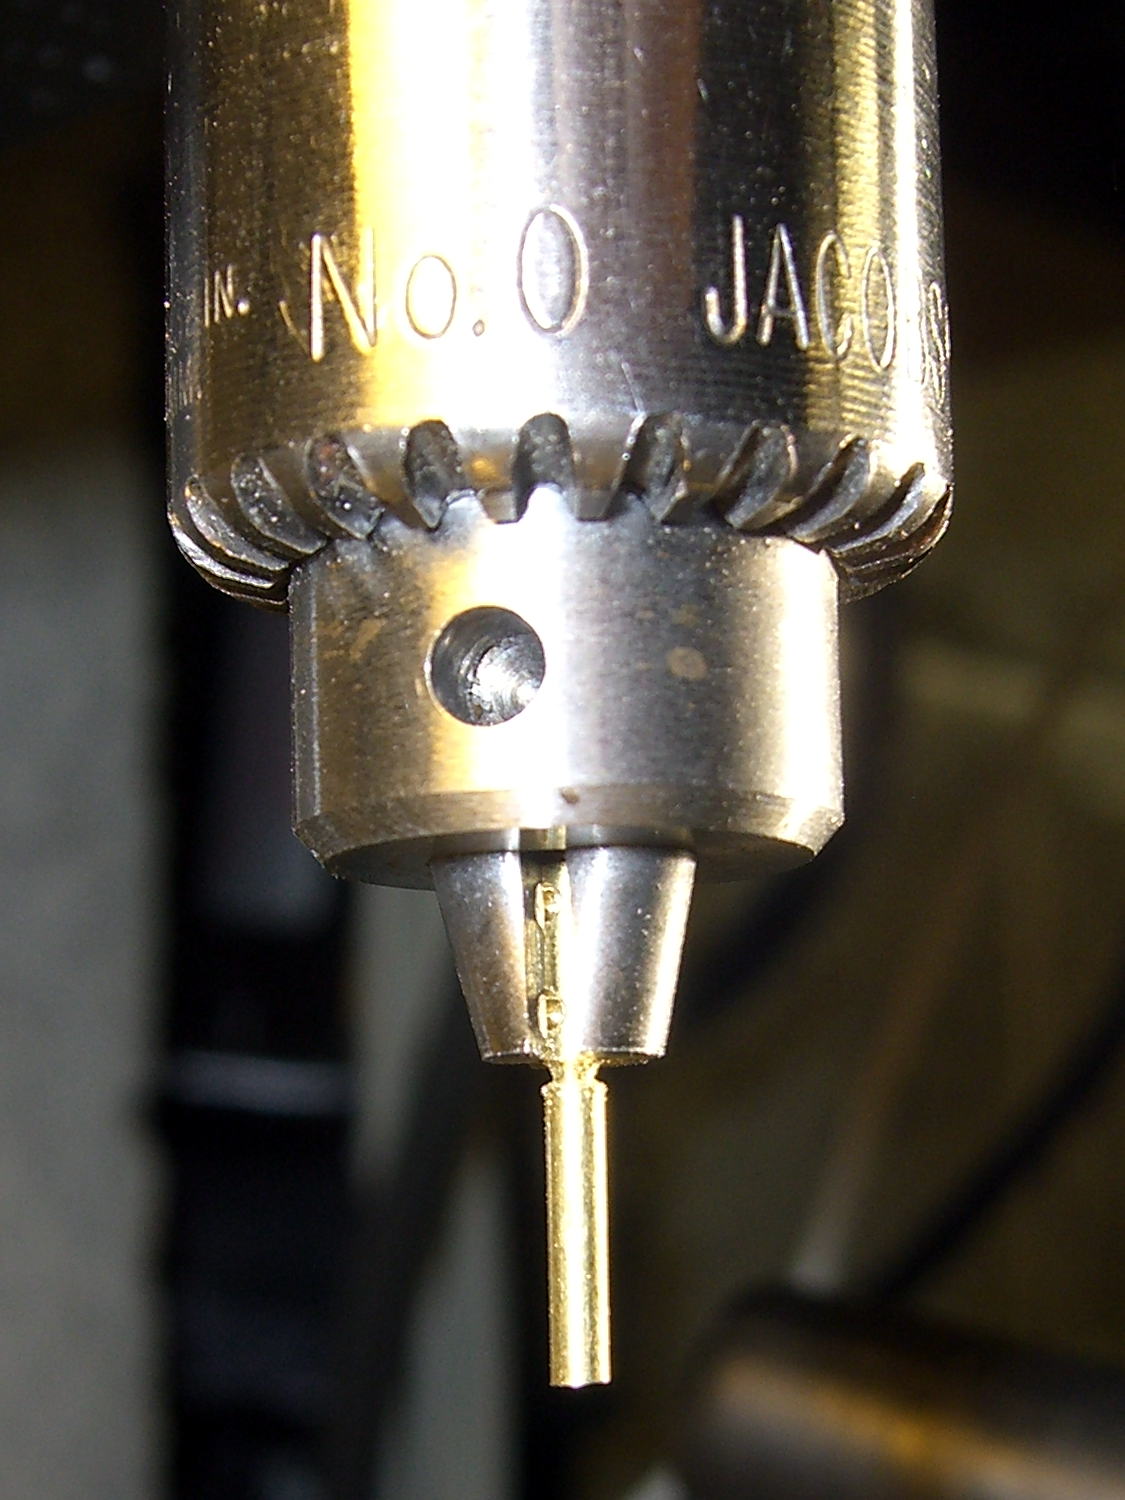
I don’t recall having to do quite this much filing to make the screws fit, but they don’t call ’em “needle files” for nothin’:
Silhouette temple repair – filing screw holes
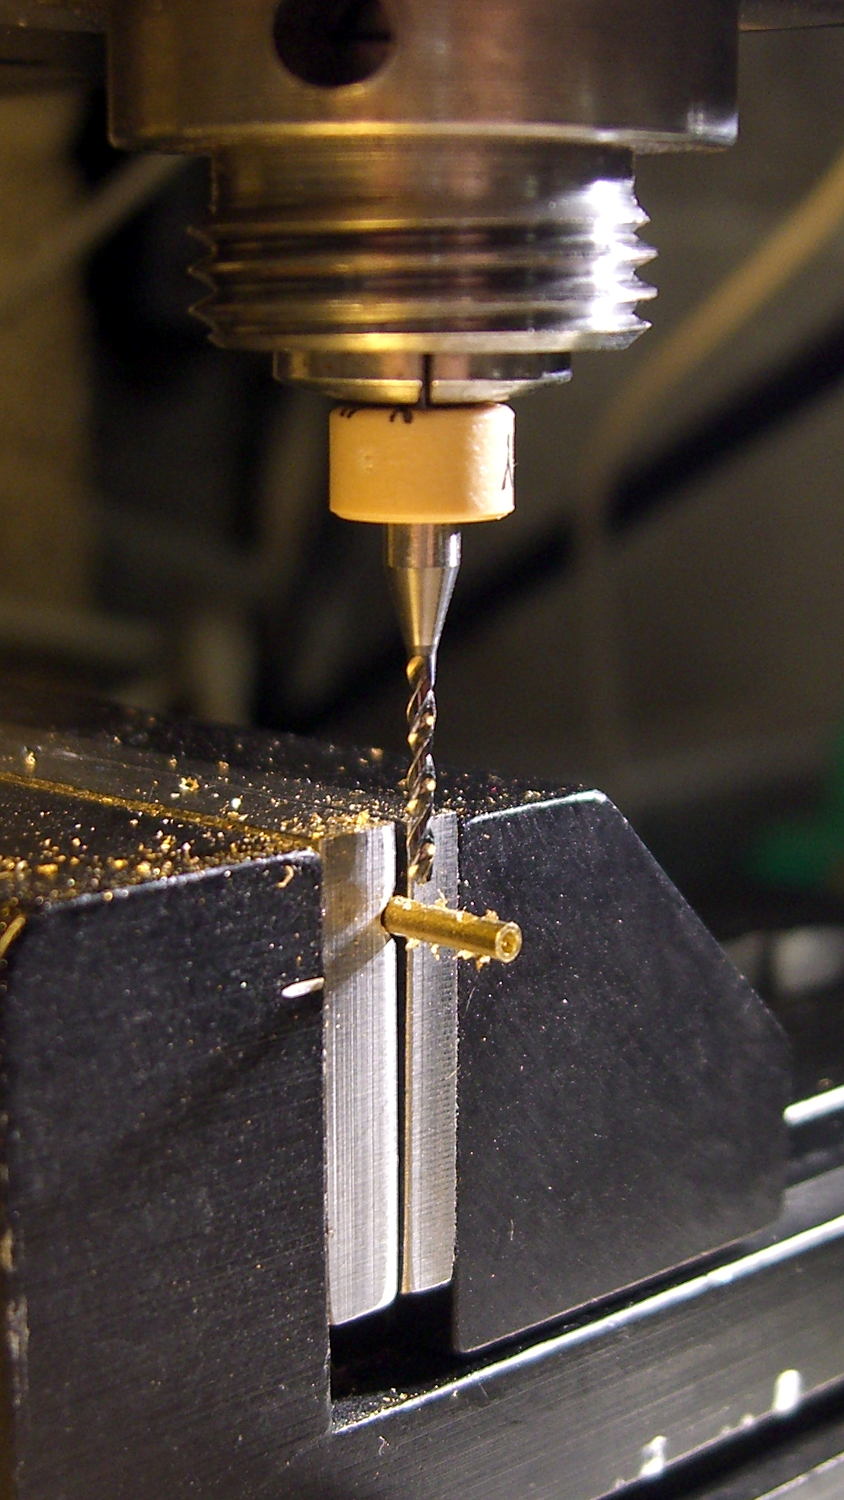
Trim the tube to the proper length by chucking it in the Sherline, rotating the spindle by hand, and filing a notch just below the jaws:
Silhouette temple repair – trimming tube
Then file the end flat, countersink it just a bit, and ream out the hole to fit the broken end of the earpiece. This one didn’t quite fit the tubing, but we’re talking a few mils of tolerance on a bent piece of titanium. Rough up the end of the earpiece, degrease everything, and a few dabs of epoxy suffice for another Steampunk repair:
Silhouette temple repair – finished
The original fix continues to hold, but … this can’t go on.
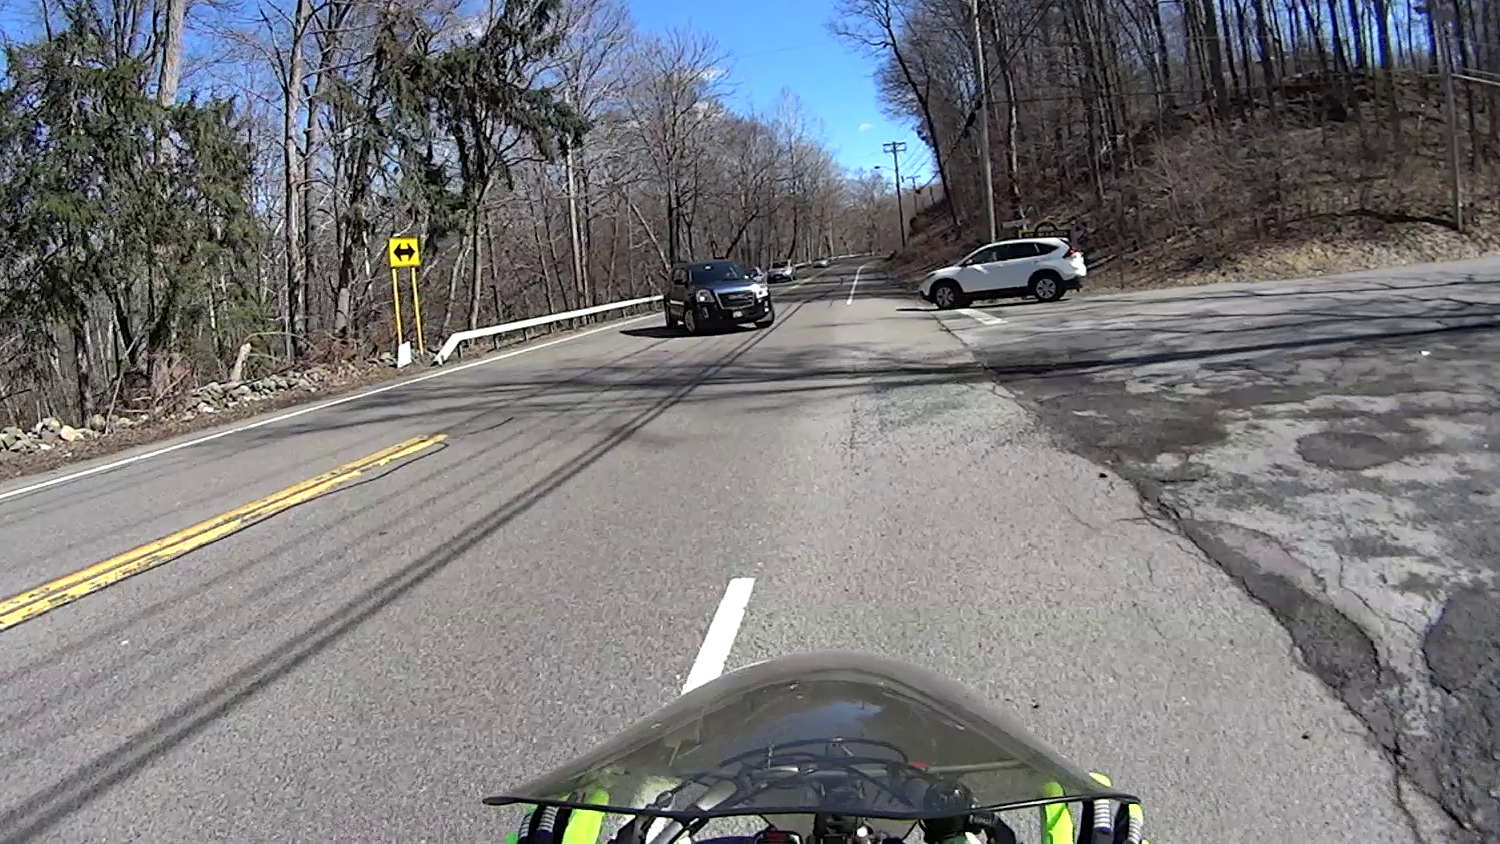
It’s the start of a new riding season and we’re returning from a concert at Vassar. I’m cranking 20+ mph, pushed by a gusty tailwind.
T minus 7 seconds:
Cedar Valley Rd – Left Cross – T-7
The white car approaches the intersection a bit faster than usual, which leads me to expect a New York State Rolling Stop-and-Go right turn directly in front of me.
T minus 5 seconds:
Cedar Valley Rd – Left Cross – T-5
The white car slows enough that I now expect a stop with the front end well onto the shoulder. A quick check in the mirror shows no traffic behind me: I can take the lane if needed. This intersection always has a large gravel patch spanning the shoulder, so I must move closer to the fog line anyway.
T minus 2 seconds:
Cedar Valley Rd – Left Cross – T-2
The white car comes to a full stop, not too far onto the shoulder, and my fingers come off the brakes. I gotta work on that fingers-up position, though.
… Whoops, a classic left cross from the black SUV!
T minus 1 second:
Cedar Valley Rd – Left Cross – T-1
I’m now braking hard, barely to the left of the gravel patch.
T zero:
Cedar Valley Rd – Left Cross – T-0
Well, that was close.
Somewhat to my surprise, the white car hasn’t crept any further onto the shoulder.
The SUV driver gives me a cheery wave, as if to thank me for not scratching the doors. I never make hand gestures, but I did tell him he does nice work.
It is, apparently, easy to mis-judge a bike’s speed, although driver-ed courses used to recommend that you err on the side of not trying to beat an oncoming vehicle. Perhaps that recommendation has become inoperative?
The corresponding maneuver by a car passing you is known as a right hook.
Memo to Self: Always look at the license plate to give the camera a straight-on picture.
I’d originally secured the rear fender to the steel strap connecting the chainstays on Mary’s Tour Easy with a cable tie: small, simple, light weight, reliable. Unfortunately, that put the end of the fender just slightly lower than the strap and, I fear, sprayed water all over the strap, where it worked its way through a paint flaw and rusted the steel under the paint. A simple metal clip would chew its way through the pain[t] on the strap, so, seeing as how we’re living in the future…
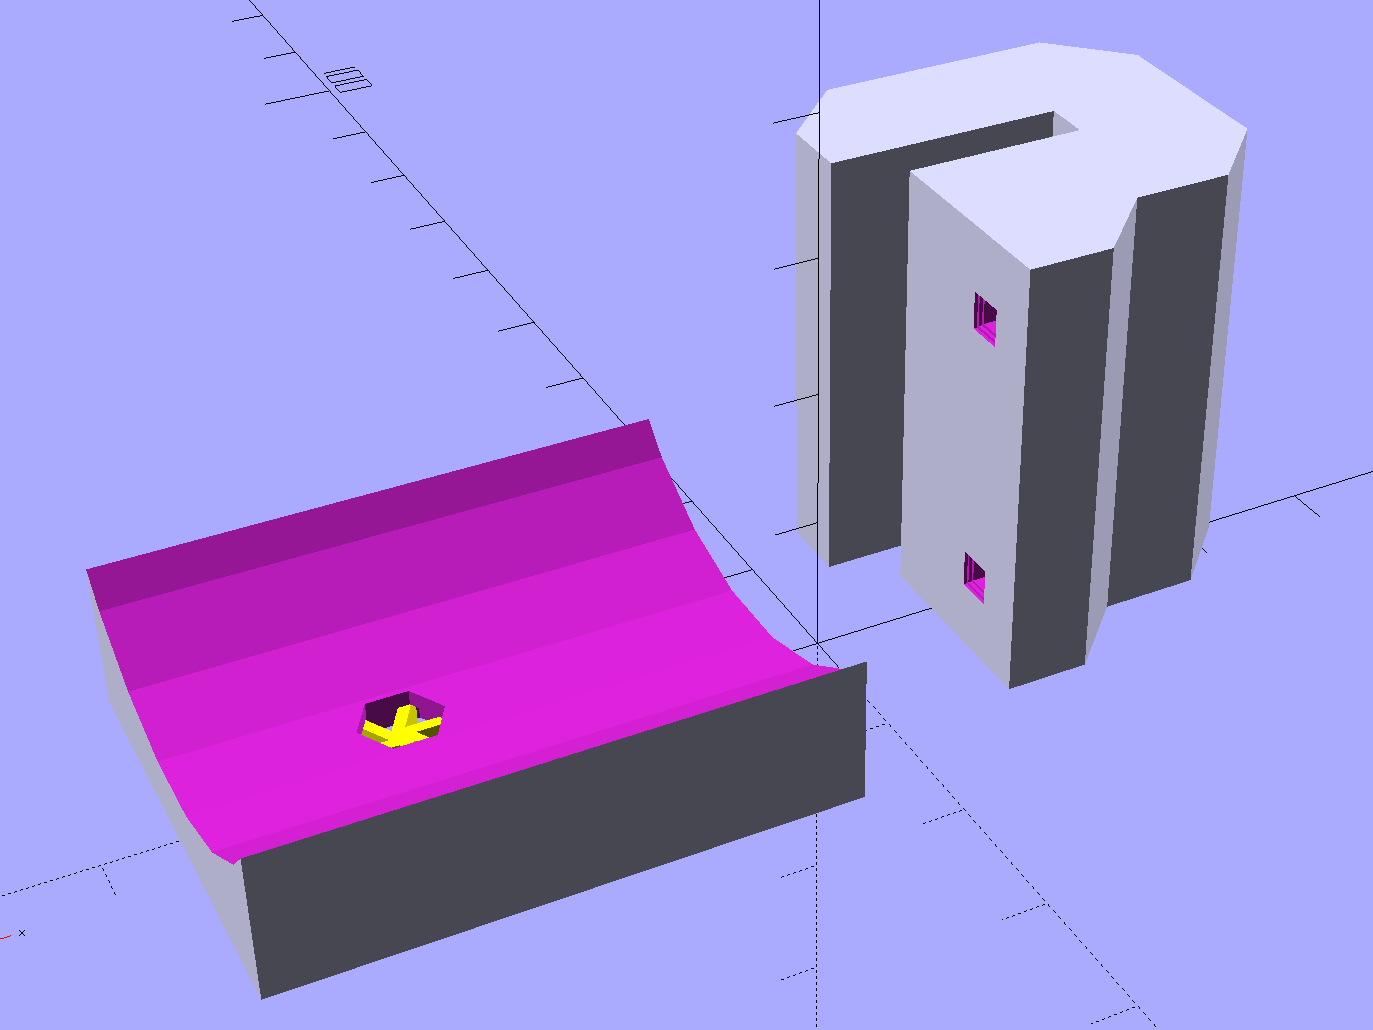
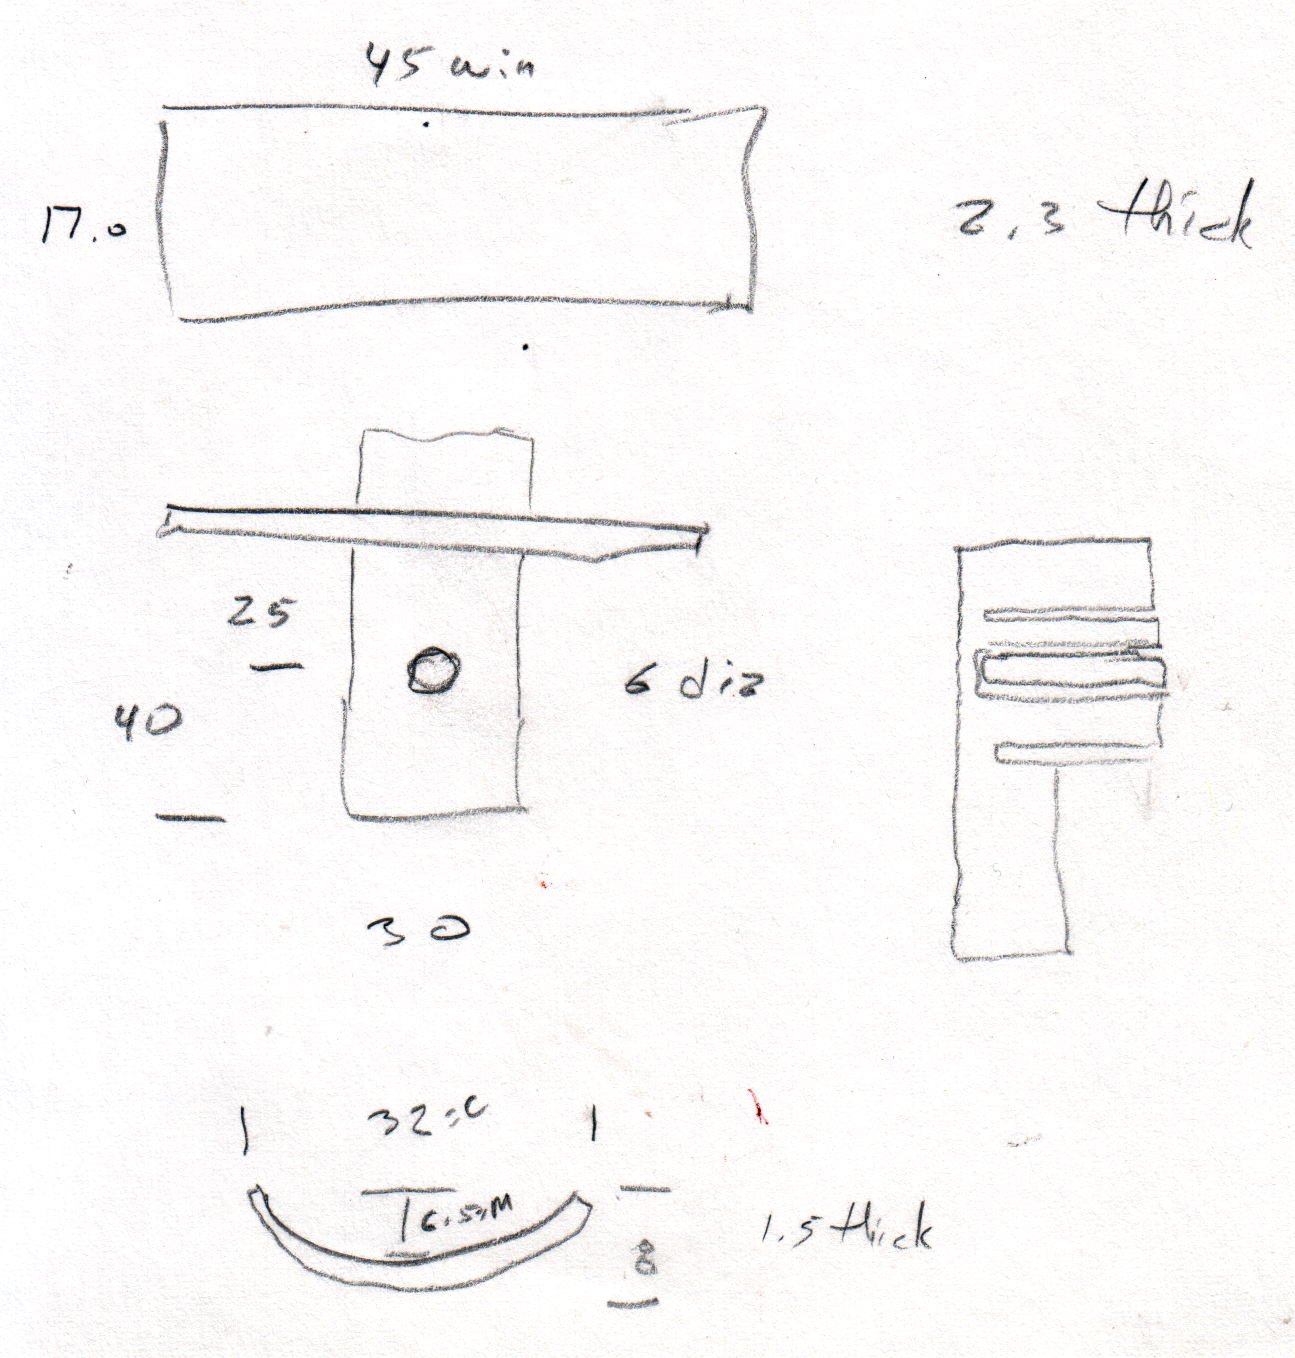
The C-shaped block on the top grips the steel cross-strap, the trough fits the fender’s curve, the little spider supports the inside of the nut recess, and a pair of alignment pin holes (one visible) help during gluing:
Tour Easy Rear Fender Bracket – solid model – show
Although it’s tempting to 3D print both parts as a single unit, laying them out like this aligns the threads for best strength in each piece:
Tour Easy Rear Fender Bracket – solid model – build
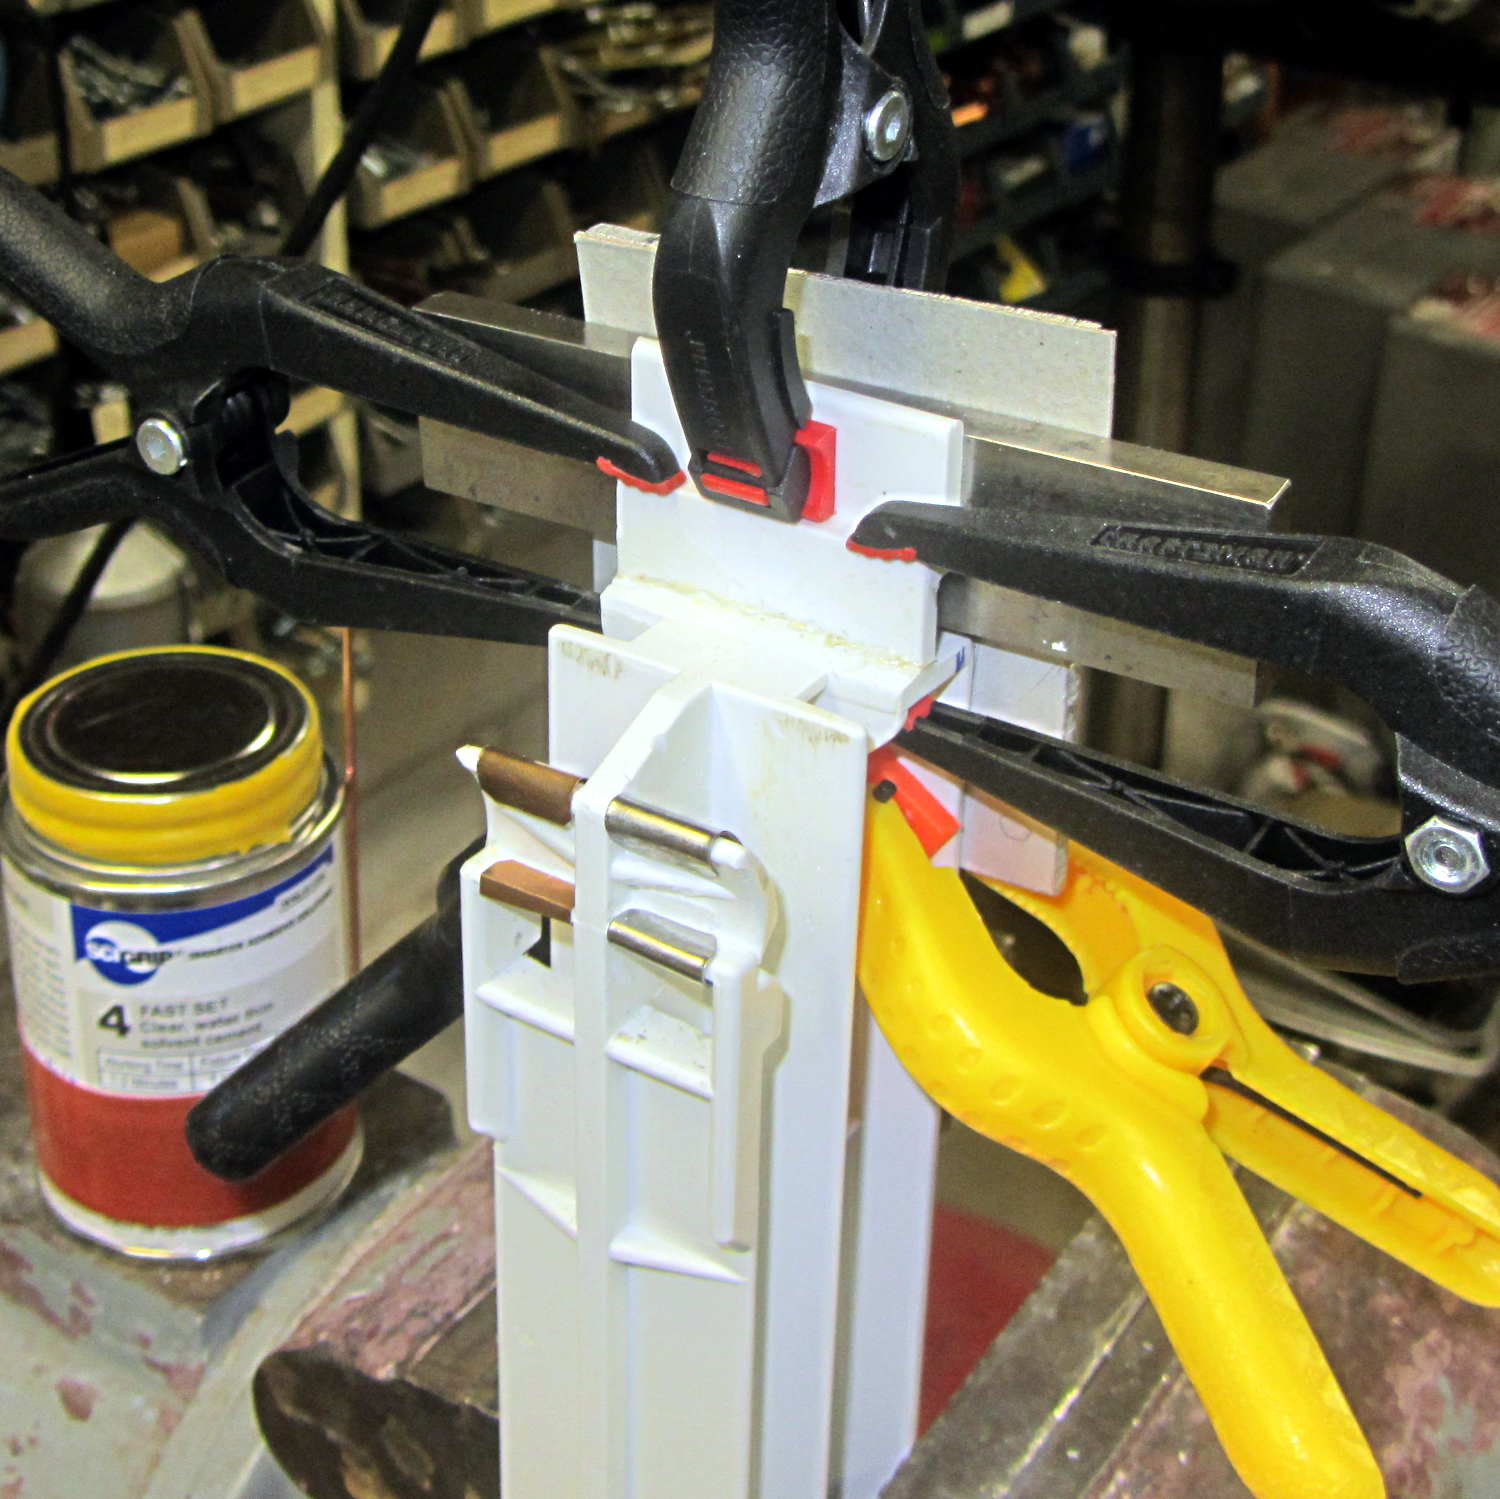
Pressing the bracket on the glass slab (flat side up, nubblies on the bottom) with the clamps in place finished the job. The slightly crushed support spider from the nut recess sits in the foreground:
Tour Easy rear fender bracket – gluing
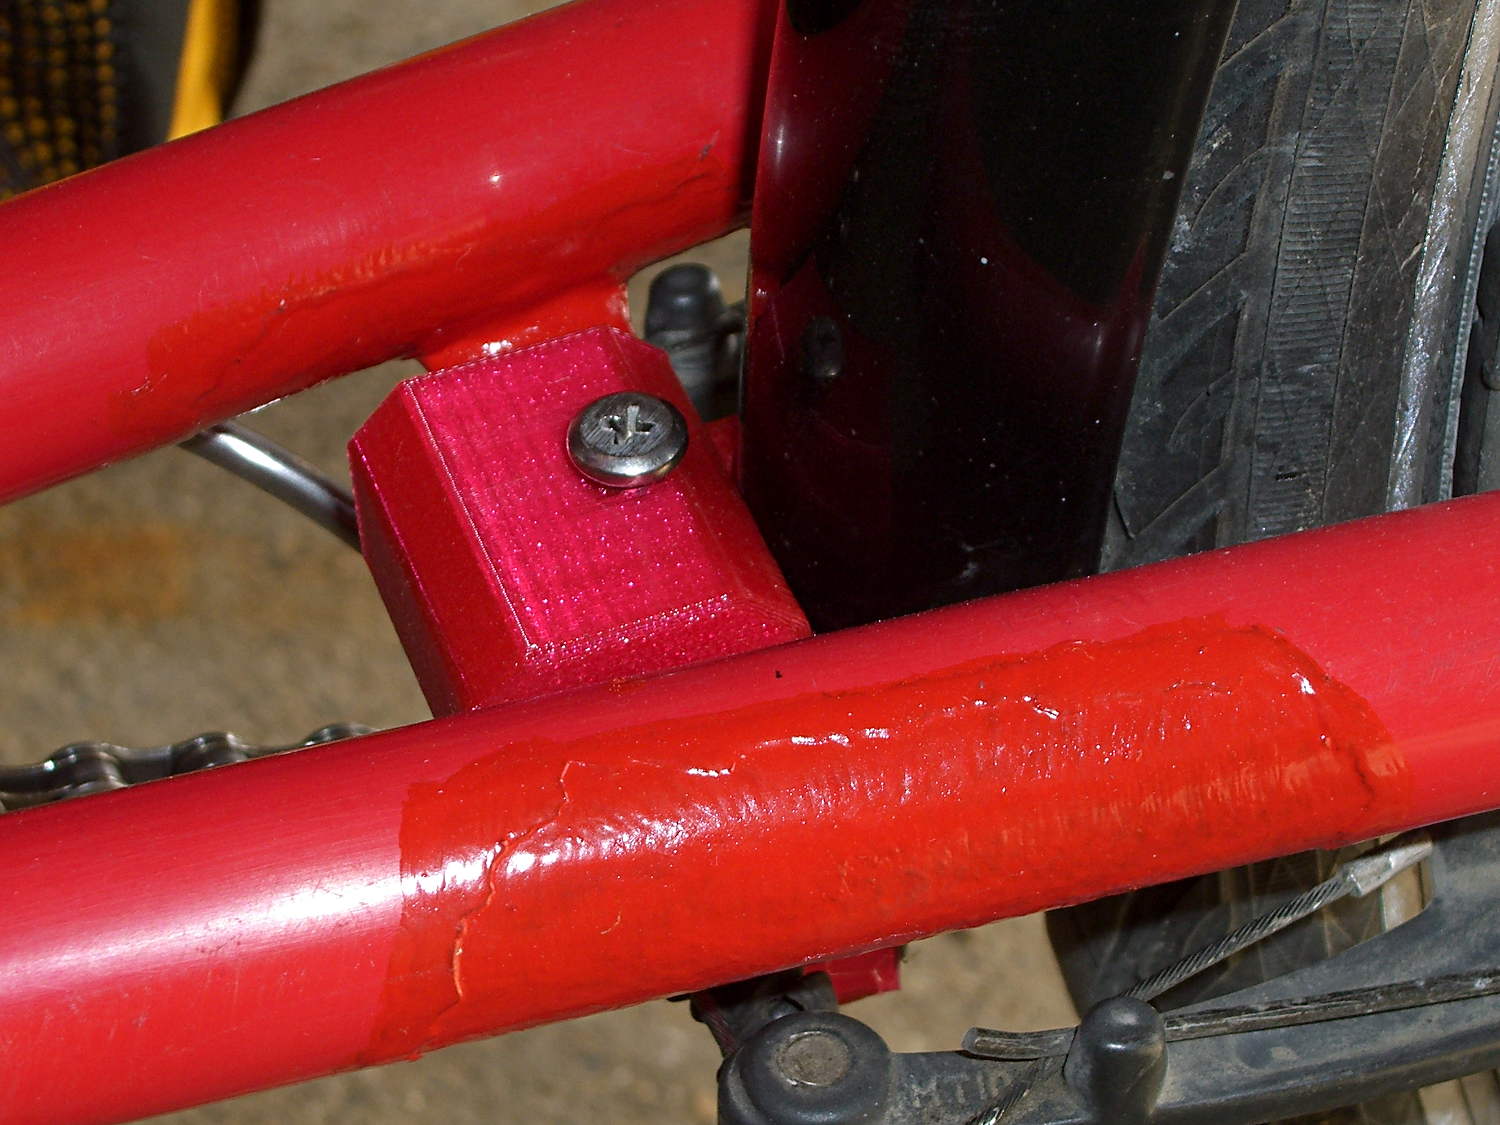
Magenta PETG matches the red Tour Easy paint surprisingly well:
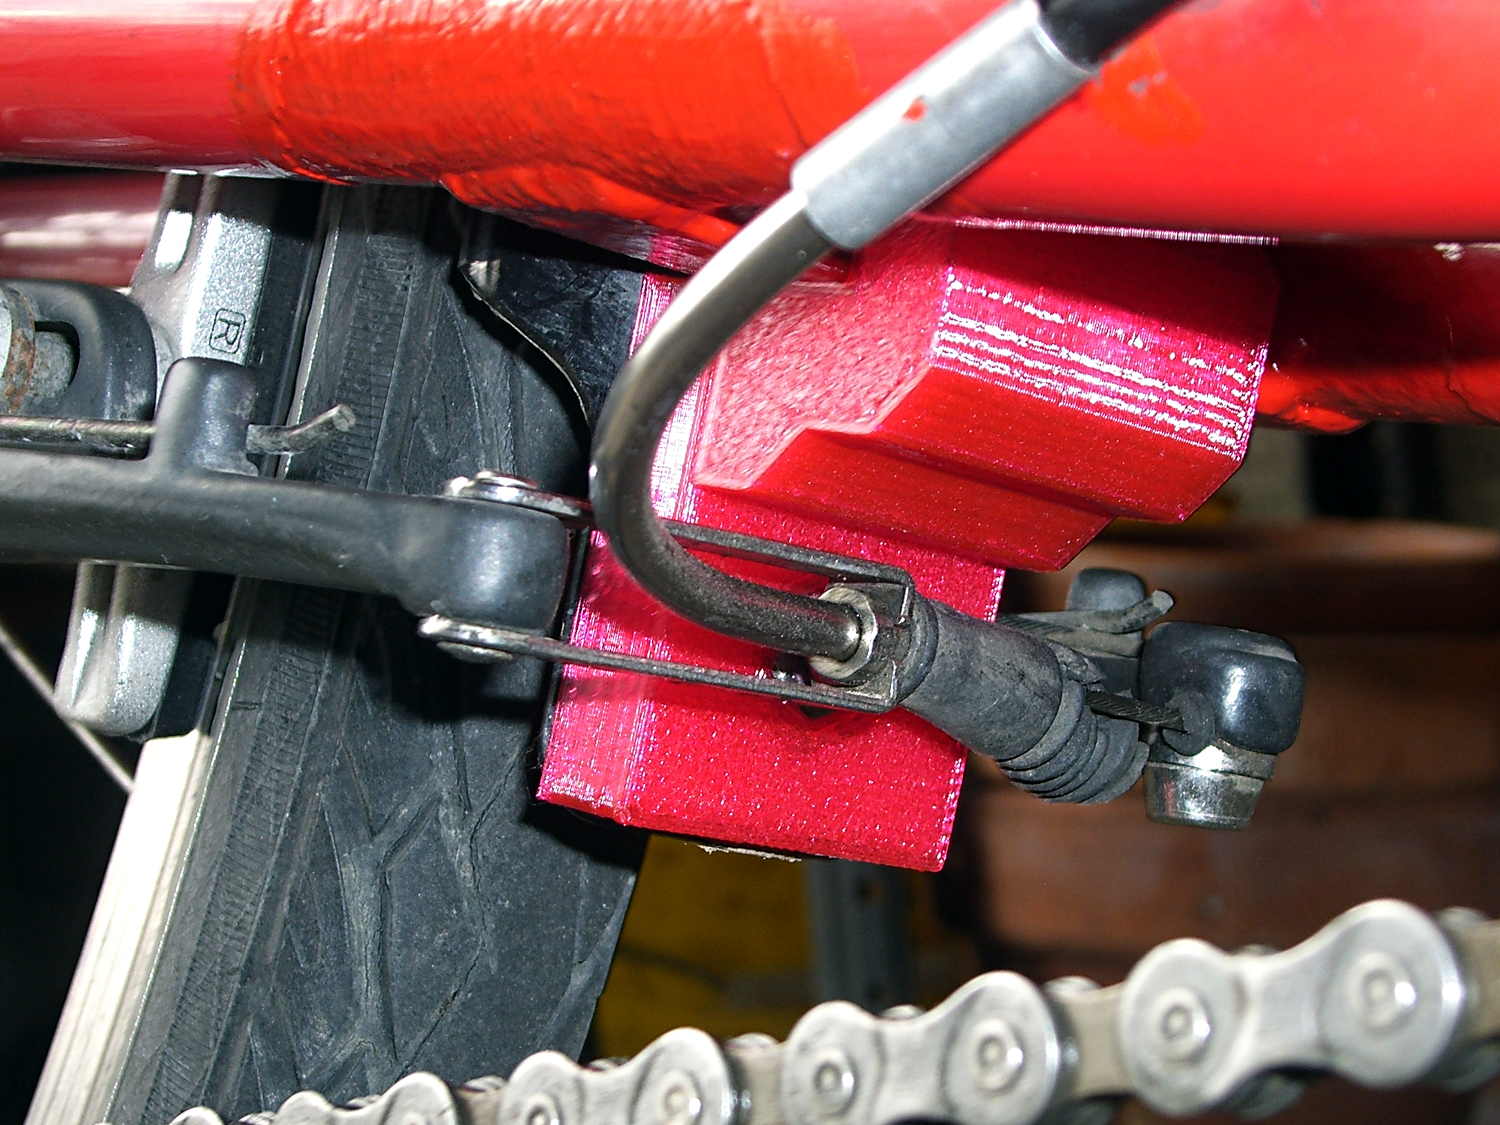
Tour Easy – rear fender bracket – installed – top
From below, you can see why the top block can’t extend all the way to the bottom of the fender mount:
Tour Easy rear fender bracket – installed
That rubber boot needs replacing in the worst possible way, but I didn’t have anything suitable on hand and wouldn’t dismount that cable even if I had; cables never go back on properly.
Alas, because the brakes weren’t mounted when I did the measurements, I had to build one to find out why a long block wouldn’t work:
Tour Easy rear fender bracket – long back
The screw atop the block (on the left in that picture) presses a small plastic slug against the steel strap, in the hopes it won’t chew through the paint quite as rapidly. The screws & nuts are stainless, so at least they’ll survive for a while.
The curve in the trough comes from the chord equation applied to these crude measurements:
Tour Easy Rear Fender Bracket – measurement doodle
Fortunately, it’s tucked into a spot where nobody ever looks…
While replacing the well-worn sprocket / chain / chainrings on Mary’s bike, I finally got around to repairing some damaged paint tucked in an inconvenient spot…
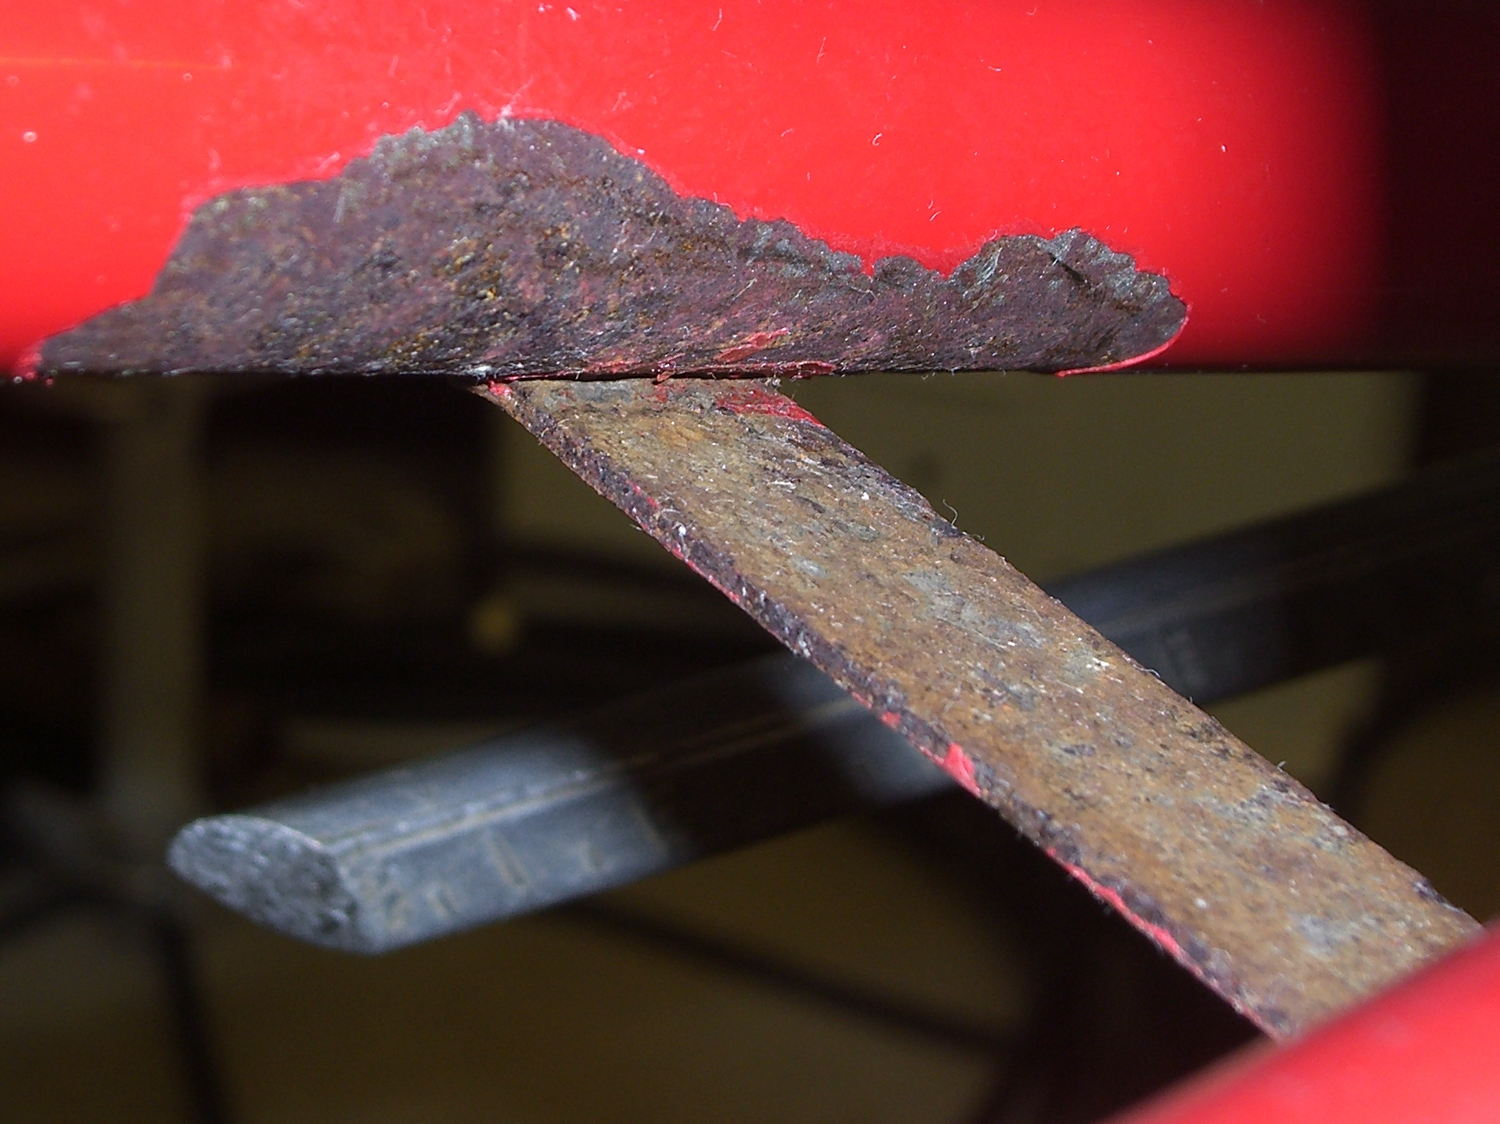
Over the years, a flaw in the paint underneath the strap connecting the chainstays on Mary’s Tour Easy let in enough moisture to dislodge the paint over a considerable area. I chipped off the loose paint and used Evapo-Rust to convert the oxide to phosphate; there’s not much damage to the steel parts, despite what it may look like in the pictures.
A top view from the right rear, minus the wheel & fender, looking toward the left chainstay:
Tour Easy – rusted chainstay strap
Two epoxy fillets in the concave sections where the strap meets the chainstays should eliminate problems in those sections forever more:
Tour Easy – chainstay strap – epoxy fillet
Some rusty-metal primer and a few coats of red paint conceal most of the ugliness:
Tour Easy – rear fender bracket – installed – top
It’ll never be mistaken for showroom quality, but our bikes are tools, not art objects.
The obviously 3D printed red block in the middle of the strap holds the fender in place, about which more tomorrow…
Well, another year, another deep-cleaning session, another break in the strut holding up the drawers in the Whirlpool refrigerator:
Whirlpool refrigerator drawer strut – clamped
This time, there’s a fixture positioning the tab in the proper orientation while the solvent evaporates. The two bottom clamps hold an aluminum plate against the top (far side) of the strut, with the top-center clamp holding the tab against a steel block shimmed with cardboard to get the correct angle. The other two clamps squash the tab against the joint, which is well-soaked with IPS 4 adhesive.
I replaced the right-side guide plate, originally made from phosphor bronze strip, with some thicker steel strip. The bronze strip collapsed into the worn section of the plastic bump that appeared in the previous post:
Refrigerator strut – worn retainers
I’ve written bigger caution messages on the top of the strut in red letters, but we think it’s getting on time for a whole new refrigerator…
Make sure you’re running an ad blocker and perhaps a script killer, feed “Larval Engineer received a Pilot InstaBoost” into your favorite search engine, along these lines:
The first (few) hits should be the various ways my original post from late last year appears on wordpress.com, but the rest (particularly from Google) will be spam blogs and scraper sites that ripped my text, ran it past a thesaurus (euphemistically known as article spinning), larded the result with keywords, and reposted the shattered remains. If you click on the links, you’ll have the experience of reading text where short sequences of words make sense, but the overall corpus leaves you shaking your head in disbelief.
Even though Google allegedly doesn’t reward such sites, they make up the bulk of its list. DuckDuckGo does a slightly better job of suppressing them and Bing kills nearly all of the junk, which suggests that Google operates with a powerful incentive to not notice problems in sites serving (its?) advertisements.
There’s obviously no point in getting annoyed with any of the participants…
FWIW, that particular post seems to have drawn the attention of scammers due to the presence of a trademarked brand name with good search-ability. Other posts have been more fortunate in escaping their attention, despite my glowing prose…